Visual Basic and OOP
| I l @ ve RuBoard |
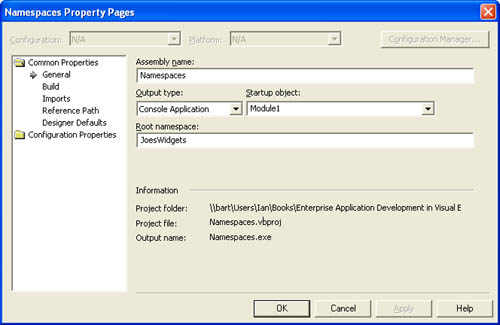
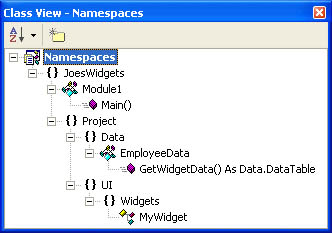
| Rather than bore you again by extolling the virtues of OOP, we'll be brief. This section is all about how to use OOP features to improve your applications. We'll start by looking at how you can use namespaces to improve your project organization and make your class hierarchy easier to work with. Then we'll look at how to spice up your projects with inheritance and look at singletons ”something every advanced developer should know about. Making the Most of NamespacesNamespaces are really about taming the unruly set of classes and methods that littered programming projects and libraries of the past. Visual Basic was no stranger to this problem, but other languages and platforms suffered from clutter as well. Namespaces help address this problem by providing a framework for structuring your program elements into logical hierarchical groupings. Caution Namespaces can be dangerous. Developers who tend to overdo things might create a massive hierarchy with more namespaces than classes. (Yes, we've seen this, and no, it isn't pretty.) Keep it under control, and keep it logical. Namespaces are not just a new feature of Visual Basic .NET ”they lie at the heart of the CLR. It is through namespaces that most type references are resolved by the CLR. In Visual Basic .NET, namespaces are used both implicitly and explicitly. When you create a new Visual Basic project, a namespace is automatically created that defaults to the name of the project. You can change this default name using the project's property page by entering a different name for the root namespace (as shown in Figure 2-1). You can explicitly create additional child namespaces in your projects using the Namespace statement. Figure 2-1. The Visual Basic General Project Settings panel. Organizing Your ApplicationsNamespaces are all about organization. They're designed to produce a logical hierarchical structure for applications. From an organizational perspective, namespaces should start very general and become more specific as you ascend the hierarchy. In this way, you can create a logical organization that provides guidance to other developers on how to use your objects. Let's look at an example. Let's say we've created a Visual Basic console application project using the name JoesWidgets as the default namespace. In the module1.vb file (which is created by default), we add the following code: ModuleModule1 SubMain() EndSub EndModule NamespaceProject NamespaceUI NamespaceWidgets PublicClassMyWidget ... EndClass EndNamespace EndNamespace EndNamespace You can see how we've defined a namespace hierarchy for the MyWidget class. A fully qualified name for MyWidget would look like this: JoesWidgets.Project.UI.Widgets.MyWidget Looks familiar, right? The entire .NET Framework is based on namespaces. Notice how the namespace is designed to become more specific as you move from left to right. You should always follow this design pattern. It will make your namespace hierarchy much easier to comprehend ( especially for those who are unfamiliar with it). All types in the .NET Framework are grouped in this way. This allows the creation of classes that have the same name but are contained in different namespaces. An example is the Control class inside the System.Windows.Forms namespace. System.Windows.Forms.Control is a completely different class from the System.Web.UI.Control class in the System.Web.UI namespace. Note The name of the assembly does not have to correspond to any of the contained namespaces. It can be a good practice to establish some relationship, but the CLR really doesn't care what your assemblies are called. All of your namespaces do not have to be in the same code file, let alone the same project. If we add another file to our project and add the following code, the new code will just add itself to the namespace structure. NamespaceProject NamespaceData ModuleEmployeeData FunctionGetWidgetData()AsDataTable EndFunction EndModule EndNamespace EndNamespace You can see the results in Class View (as shown in Figure 2-2). The Class View window displays your project's namespace hierarchy. This view can be very useful for discovering types that have been put into the wrong namespace or for getting a general overview of how your types are organized. Figure 2-2. The Class View of our sample project. Namespace TipsGenerally , it's good namespace practice to group functionally related classes inside the same namespace. Microsoft's own base class libraries are good examples of this. For example, many of the classes relevant to Visual Basic programmers are inside the Microsoft.VisualBasic namespace, and all of the data access classes are inside the System.Data namespace (and get more specific with the OleDb and SqlClient namepaces). The nesting of namespaces is allowed to any arbitrary depth (be practical, though) and can be spread across source code files and assemblies. The .NET Framework does this all the time. Many common namespaces exist in different assemblies, yet they all combine to form the System namespace hierarchy. For example, the complete System namespace is spread across mscorlib.dll and System.dll, but System.Data is contained in System.Data.dll. Remember that namespaces help create logical groupings and are not generally affected by physical separation. Note If you cause a namespace conflict by creating a class in two projects that share the same namespace, you'll definitely run into problems. The ability to spread namespaces across assemblies can be as much a hindrance as a help unless you keep the design of your namespace hierarchy under strict control. You can access members of any given namespace in three ways:
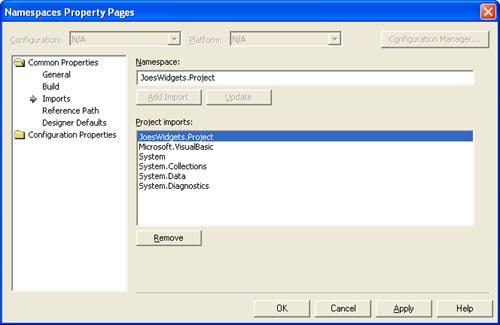
Figure 2-3. Adding Imports at the project level. As you can see, namespaces are quite powerful, and Visual Basic .NET gives you a number of options for implementing them. Use them well, and use them wisely. Inheritance: The Wily Beast of OOPInheritance is a tricky subject. By all accounts, inheritance is a good thing, but developers don't always use it in the way it was intended. Inheritance just for the sake of inheritance is a really bad idea. The most common reason for using inheritance is code reuse. But other, valid reasons include standardization ( predefining critical subclass structures), extending behaviors of existing classes, and encapsulation. Inheritance: The Rules of the RoadThere are two forms of inheritance in Visual Basic .NET: interface inheritance and implementation inheritance. Interface inheritance is what interfaces do. Implementation inheritance is supported only by classes. The CLR has very specific rules governing inheritance. It allows multiple interface inheritance but only single implementation inheritance. This means that classes can inherit only from a single base class while interfaces can inherit from many interfaces. Note When a class supports an interface, we say that it "implements" that interface. This is quite literally true because adding an interface to a class requires that the class provide an implementation for the interface's members. The following rules apply specifically to class inheritance:
The following rules apply to specifically to interfaces:
Inheritance: No Substitute for Good DesignA recurring theme throughout this book is design, design, design. Logical errors are the outgrowth of poor design decisions. Don't fool yourself into thinking that inheritance will solve all of your design problems. In fact, preventing inheritance can sometimes be necessary or even desirable. After you write code and build classes, the next developer that comes along will make certain decisions about your code based on what it allows her to do. If your class allows inheritance, it would not be unreasonable to assume that it was designed with that purpose in mind. You should always design with an eye to preventing unintended uses of your code. If you build a class that should never be inherited from, you prevent inheritance. This will prevent confusion and force other developers ”and yourself ”to use your objects as they were intended. Apply this logic to all aspects of your classes and interfaces. A good design should make the right coding decisions easy (or at least not optional). Inheritance NuancesInheritance is a surprisingly rich topic with many subtle aspects. Here we'll attempt to cover some of the more important issues or features that you need to be aware of in order to make effective use of inheritance within your applications. Controlling inheritanceWhen you define a class, you have three ways to control its inheritance properties:
Allowing inheritance is the simplest option and requires no further action on your part. All classes support and allow inheritance by default. If you decide that it is safe and advantageous to allow inheritance of your class, by all means allow it. On the other hand, you might have a class that you do not want others to inherit from. You might have a utility class that should never be used as a base class. Or you might have a class that you aren't sure anyone would want to inherit from. In these situations and others, it's smart to prevent inheritance of your class simply to avoid confusion. Realistically, if a class was not designed with inheritance in mind, you probably shouldn't allow other classes to derive from it. In these cases, you should use the NotInheritable class qualifier, as in the following example: 'Ican'tinheritfromthisclass! PublicNotInheritableClassMyFinalClass ... EndClass If, on the other hand, you define a class that should be used only as a base class (that is, you should not be able to create an instance of it), you can use the MustInherit class qualifier. In this way, a client that wants an object of this type must first create a derived class that inherits from your base class. The following example shows MustInherit at work and shows how you can use both MustInherit and NotInheritable in an inheritance hierarchy: 'Ican'tcreateaninstanceofthisclass! PublicMustInheritClassMyBaseClass ... EndClass 'Icancreateaninstanceofthisclassandsubclassit! PublicClassMySubClass InheritsMyBaseClass ... EndClass 'Icancreateaninstanceofthisclass,butIcan'tsubclassit! PublicNotInheritableClassMyOtherClass InheritsMyBaseClass ... EndClass Polymorphism and inheritancePolymorphism in implementation inheritance is essentially the ability to redefine the functionality of methods inherited from a base class. When we do this, we typically refer to it as "overriding" the base class method. There are three scenarios for polymorphism:
The simplest scenario might look like this: PublicClassMyBaseClass PublicOverridableSubHelloWorld() Console.WriteLine("HelloWorld") EndSub EndClass PublicClassMyNewClass InheritsMyBaseClass PublicOverridesSubHelloWorld() Console.WriteLine("HellonewWorld!") EndSub EndClass In this situation, we defined a base class with an Overridable member HelloWorld . It is up to the derived class to determine whether it is appropriate to override that method, but it is allowed. MustOverride indicates that a method is not implemented in the base class and must be implemented in a derived class in order for that class to be creatable. If you mark a method or property with MustOverride , you must also mark your class as MustInherit . This is because you are defining a method without an implementation, and that logically prevents the containing class from being instantiated. After all, you cannot create a class instance if you lack an implementation. The following example illustrates this: PublicMustInheritClassMyBaseClass PublicMustOverrideSubHelloWorld() EndClass PublicClassMyNewClass InheritsMyBaseClass PublicOverridesSubHelloWorld() Console.WriteLine("HellonewWorld!") EndSub EndClass Last but not least, there's the Shadows keyword. Shadowing is probably one of the most confusing features of Visual Basic .NET. When you override a method, you typically provide another method with the same name and signature. This substitutes the base class method implementation with one you have defined. There is a caveat. The base class must have marked that method as MustOverride or Overridable ” otherwise , you cannot override that method. Shadows lets you not only overload a base method but hide it as well, regardless of how that method was originally defined. One side-effect of Shadows is that because it is based on the method name, it hides all base-class overloads of that method. This defeats the purposes of polymorphism. One consequence of using Shadows is that if you use it on a method in a derived class, you run into strange behavior if you obtain a reference to the base class and call the method. The shadowed method will not be called in this instance, thus preventing you from changing the behavior of the base class ”a major feature of polymorphism. Check out the following example: ClassClassBase PublicSubMyMethod() Console.WriteLine("BaseClass.WillBeShadowed") EndSub PublicSubMyMethod(ByValiAsInteger) Console.WriteLine("BaseClass.WillBeShadowed(Integer)") EndSub EndClass ClassClassDerived InheritsClassBase PublicShadowsSubMyMethod(ByValiAsInteger) Console.WriteLine("BaseClass.WillBeShadowed(Integer)") EndSub EndClass In the above code, the ClassDerived class's MyMethod will hide both of the ClassBase class's MyMethod procedures. If I also cast a reference to the ClassDerived object to a ClassBase type, the derived type's implementation of MyMethod will be completely inaccessible. In general, you should avoid shadowing unless it is absolutely necessary. Shadowing complicates the inheritance hierarchy and makes code use and maintenance more challenging. The need to use Shadows is often due to a failure in the design process, necessitating what is in essence a bandage over a bad design. Me , MyBase , and MyClassVisual Basic .NET provides three keywords to help you navigate the reference complexities of OOP. The MyBase keyword refers to the base class object of a current instance of a class. It is mainly used to access base class members that are overridden or shadowed in a derived class. Probably the most common use is for calling MyBase.New to call a base class constructor from a derived class constructor. Note MyBase has some limitations. The biggest limitation is that if your base class contains methods defined with MustOverride , those methods will not have any implementation and therefore cannot be called. The Me keyword always refers to the current instance of a class. (It is the same thing as the this pointer in C#.) Probably the most common use of the Me keyword is to pass an instance of a class as a parameter to another function. The MyClass keyword is an object variable that refers to the current instance of a class. MyClass is similar in behavior to the Me keyword, but all method calls on MyClass are treated as if the methods are NotOverridable . In other words, MyClass allows access to the immediate members of a class, regardless of whether a method has been overridden by a derived class. The following example clearly illustrates how these keywords work: ClassBaseClass PublicOverridableSubMyMethod() Console.WriteLine("CallingBaseClass.MyMethod") EndSub PublicSubUseMe() Me.MyMethod() EndSub PublicSubUseMyClass() MyClass.MyMethod() EndSub EndClass ClassDerivedClass InheritsBaseClass PublicOverridesSubMyMethod() Console.WriteLine("CallingDerivedClass.MyMethod") EndSub PublicSubUseMyBase() MyBase.MyMethod() EndSub EndClass ClassTestClass SharedSubStart() DimTestObjAsDerivedClass=NewDerivedClass() TestObj.UseMe() TestObj.UseMyClass() TestObj.MyMethod() TestObj.UseMyBase() EndSub EndClass Calling the Start method of TestClass will produce the following program output: CallingDerivedClass.MyMethod CallingBaseClass.MyMethod CallingDerivedClass.MyMethod CallingBaseClass.MyMethod If you use MyClass or MyBase to refer to the method MyMethod , BaseClass . MyMethod will always be called even if it is overridden in a derived class. This implies that the overuse of the MyBase and MyClass keywords can severely limit the flexibility of inheritance and negate the benefits of Overridable methods. You should use MyBase or MyClass only if you want to force the call to the base class method or the method as it is visible in the current class. Me is key to inheritance, and there is no reason you should not use it. Me allows derived classes to override methods and allows an overridden method to be invoked even if it is called from the base class. EncapsulationEncapsulation is defined as the ability to contain and control the access to a group of associated items. Classes are a common way to encapsulate data and implementation logic in OOP languages. Without encapsulation, you would need to declare separate procedures and variables to store and manage information, and it would be difficult to work with more than one object at a time. Encapsulation lets you use the data and procedures in an object as a single unit and allows you to work with multiple objects at the same time without confusion because each object is represented by a separate instance of a class. Encapsulation also allows you to control how the data and procedures are used. You can use access modifiers, such as Private or Protected , to prevent outside procedures from executing methods or reading and modifying data in properties and fields. Internal details of a class should be declared as Private to prevent them from being used outside your class; this technique is called data hiding . A basic rule of encapsulation is that class data should be modified or retrieved only through Property procedures or methods. Hiding the implementation details of your classes prevents them from being used in undesired ways and lets you modify such items later without risk of compatibility problems. Shared MembersThe Shared keyword indicates that one or more declared class elements are shared across all instances of a class. Shared elements are not associated with a specific instance of a class or structure, but exist on their own and are created only once, regardless of how many classes containing shared members are created. The Shared keyword can be used with
Accessing shared members is easy. You can access shared members by qualifying them with the class or structure name or with the variable name of a specific instance of the class or structure. The following example demonstrates how shared members can work: ImportsSystem.Text ImportsMicrosoft.VisualBasic PublicClassApplicationLog PrivateSharedm_logAsNewStringBuilder() PublicSharedSubLogMessage(msgAsString) m_log.AppendFormat("{0}{1}",msg,vbCrLf) EndSub PublicSharedReadOnlyPropertyLog()AsString Get Returnm_log.ToString() EndGet EndProperty EndClass PublicModuleModule1 PublicSubMain() ApplicationLog.LogMessage("Thisisatest") ApplicationLog.LogMessage("ofclass'sharedmembers.") Console.Write(ApplicationLog.Log) EndSub EndModule Notice that we don't need to create an instance of the ApplicationLog class. But that only applies to this example. You can create a class that has both shared and instance members if you need to ”it's up to you. Note Whenever you see a shared variable in a class in this book, you'll notice that it is marked private. This is intentional because public shared variables are dangerous, especially in a multithreaded application. By using properties or methods as indirect ways to manipulate shared variables, you can introduce code to make your shared members thread-safe. We'll cover this and other synchronization-related issues in Chapter 3. One thing the previous example does not do is demonstrate the shared nature of the Shared members. To help clarify this, take a look at the following example, which uses a shared variable to track the number of class instances created: PublicClassEmployee PrivateSharedm_countAsInteger=0 PublicSubNew() MyBase.New() m_count+=1 EndSub PublicSharedReadonlyPropertyEmployeeCount()AsInteger Get Returnm_count EndGet EndProperty EndClass PublicModuleModule1 PublicSubMain() DimempasEmployee Console.WriteLine("EmployeeCount={0}",Employee.EmployeeCount) emp=NewEmployee() Console.WriteLine("EmployeeCount={0}",Employee.EmployeeCount) emp=NewEmployee() Console.WriteLine("EmployeeCount={0}",Employee.EmployeeCount) emp=NewEmployee() Console.WriteLine("EmployeeCount={0}",Employee.EmployeeCount) EndSub EndModule If you run this program, you'll see the following output: EmployeeCount=0 EmployeeCount=1 EmployeeCount=2 EmployeeCount=3 The employee count will continue to grow as long as your application continues to call New Employee() (or until an integer overflow error occurs). It is important to note that you'll get the same result each time you run your application. The m_count variable is reinitialized every time the application is started. Also, the m_count variable is shared only within your application's process. If you launch two instances of the application simultaneously , you'll get precisely the same result in each.
Object ConstructionObject construction is all about creating instances of your classes. You cannot create an instance of a class without first calling the class's constructor. The purpose of the constructor is to initialize the class into a known state. Developers often take the opportunity to perform some additional work in the constructor, which can lead to some interesting issues. The biggest problem with doing too much in a constructor is that it will pose some challenging error-handling issues. A constructor will always return an object reference, regardless of whether the method succeeds. If you have to do something like opening a file handle in your constructor, what do you do if the file doesn't exist? Worse, what if the constructor causes an exception? Yes, you can always handle the exception in the code that calls the constructor. But the problem is that it's already too late. The class has been created and allocated on the heap and is partially initialized . If the class had allocated expensive resources before the exception was thrown, the class will not go away until the next garbage collection. You won't be able to do anything because you won't have a reference to the object, yet it will still exist. There are two basic approaches to creating an instance of a class. The first is the most obvious: using a public constructor. In this case, you should not do anything that might cause an exception unless you handle the exception in the constructor itself. The second option is more subtle but can be very useful: using a protected or private constructor and a public shared Create method. You use the shared member to perform your system checks and validate the parameters before you call the New operator. Consider the following example: PublicClassClass1 PublicSubNew(filePathasString) 'Ifanexceptionisthrownandnothandledhere,you 'openyourselfuptoalotoftrouble. EndSub EndClass PublicClassClass2 PrivateSubNew() EndSub PublicSharedFunctionCreate()AsClass2 'Performyourvalidationlogichere. 'Youcanalsothrowexceptionsifyoulike. 'Createtheobjectonlyiftheparametersarevalid IfValidParamsThen ReturnNewClass2() Else ReturnNothing EndIf EndFunction EndClass The definition of Class1 is perfectly fine as long as it can handle invalid construction parameters or it doesn't care. If your class is sensitive to the validity of the construction parameters (bad parameters can result in an unhandled exception), you might want to try static construction. In this case, you can do all of your parameter validation before the object is ever created. This gives you a lot of flexibility without requiring a lot of overhead. Note There are whole schools of thought on which approach is ultimately better. We prefer a more pragmatic approach. If a solution makes sense for a single class, great. A one- size -fits-all approach to object construction is a bad idea. Don't take this section as an endorsement of one approach over the other. We just want to make you aware of the options. SingletonsSingletons are an important part of many applications. Put simply, a singleton is a class for which only one instance can be allowed to exist per application. This is important when you need to have a single resource shared across your entire application. Imagine a situation in which you want to implement custom logging or auditing in an application. To make the task manageable, you'll want a central authority to handle all of the tasks related to logging and auditing. If you were to create multiple instances of a logging class, you would need to implement a great deal of redundant code throughout your application (for creating, initializing, and disposing). In addition, you want to avoid potential problems with data integrity if, for example, two or more instances might attempt to write to a file at the same time. Who will win? Using a singleton in these cases will make most of the problems go away and will centralize all of the functionality into one place. There are four requirements for creating a true singleton in an application:
Here's a very basic implementation of a singleton in Visual Basic .NET. Note the behavior of the GetClass function. PublicNotInheritableClassMySingleton PrivateSharedm_MySingletonAsMySingleton PrivateSubNew() MyBase.New() EndSub 'TheSharedmethodthatalwaysreturnsaninstanceofMySingleton PublicSharedFunctionGetClass()AsMySingleton 'Notewecreatethisifitdoesn'texistbutitisonlydoneonce Ifm_MySingletonIsNothingThen m_MySingleton=NewMySingleton() EndIf Returnm_MySingleton EndFunction EndClass It is possible to implement singleton behavior without implementing all of the previously stated requirements, but the implementation shown here prevents any other use of the MySingleton class. An alternative implementation would not be a "true" singleton because it could be used in a manner not consistent with being a singleton (to create multiple instances or derive classes that could create multiple instances). This is a key concept in projects that involve multiple developers: design your classes and your interface for how they should be used. Never give developers a choice. If a class should not be inherited from, mark it NotInheritable . If you intend a class to be used as a singleton, implement it as a true singleton. This prevents inappropriate use of the class. A design that is not explicit in its implementation is open to misuse or abuse. Whole categories of bugs in systems are the direct result of permissive designs. Don't make the same mistake. |
| I l @ ve RuBoard |
EAN: 2147483647
Pages: 103