| The previous sections of this chapter enabled you to understand how the Active Directory works with Windows Server 2003 (and in a similar manner, to the AD that comes with Windows 2000). Now that you understand the principles behind the Active Directory, you can choose whether to install it. This section gives you an example of how to install the Active Directory on a Windows Server 2003 operating system. The example here is based on the Enterprise edition, but it should be the same or similar for all other Windows 2003 servers (other than the Web edition). To install the Active Directory on Windows Server 2003, follow these steps: -
In Figure 31.14 you can see the first window that the Configure Your Server Wizard pops up after the installation is finished and you have logged on using the Administrator account. Figure 31.14. In Windows Server 2003 you can select one or more roles that the computer will be used for in the network.  Tip If the current server is using DHCP to obtain an IP address, you should change this to a static address before continuing. The Active Directory computer is also a domain controller, and this requires a static address. If you do not assign a static address, you will be prompted to do so later in the Active Directory installation process. | -
When you click on the Add or Remove a Role button, the next window lists preliminary steps you should perform before continuing to select a role (see Figure 31.15). For example, if you will use a modem or another peripheral device, they should be installed. Because this computer will host the Active Directory, and provide AD services to clients on a network, you need to be sure that you have one or more network cards installed. Figure 31.15. These steps should be performed before you select a role for your Windows Server 2003 computer.  At this point you will need to have a connection to the Internet and have the Windows 2003 CD availableor know the network path that holds the Windows 2003 setup files. This is necessary because some roles, such as the Domain Name System (DNS) or the Active Directory will require copying additional files to your computer. -
When you click the Next button, the wizard makes sure that you are connected to a local network or the Internet. If this is the case, the next window the wizard displays is the one shown in Figure 31.16. Figure 31.16. This wizard page enables you to install the Active Directory. 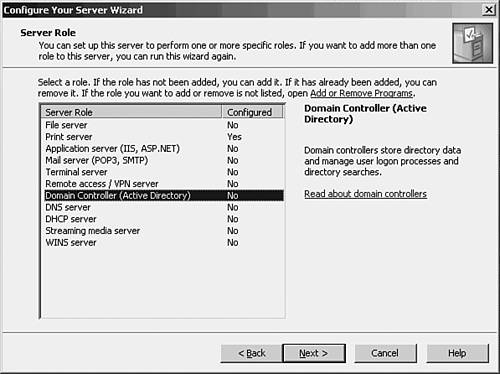 The Active Directory must be installed on a Domain Controller. In both Windows 2000 and Windows Server 2003, all domain controllers within a domain are equals, more or less. The distinction between Primary Domain Controllers (PDCs) and Backup Domain Controllers (BDCs) has been removed. There are still some details about which domain controller in a domain controls the global catalog, for example, but these are outside the scope of this chapter. Note In Figure 31.16 you can see that there are other roles your computer can be used for. For example, the computer can be used as a DHCP server (see Chapter 29). You can execute this wizard more than once to add roles to the computer. This chapter concentrates on the Active Directory (and the Domain Name System server) required for the Active Directory. You can also use another computer on your network as the DNS server, if you wanthowever, the DNS server you use must support dynamic updates. In a large network, you will probably need more than one DNS server (and on the Internet two are required if you have a registered domain name), and Active Directory computers can still use these other servers for DNS. Yet, in a small network, using a single server to host both DNS and the Active Directory is a good idea, because it gives you a single computer you can use to manage both services. | -
After you select Domain Controller (Active Directory) from the selections displayed in Figure 31.16, click the Next button and the next wizard window will show you a summary of what you have selected. Click Next to continue. -
The Welcome to the Active Directory Installation Wizard appears. Click Next and the wizard displays information such as earlier versions of Windows (Windows 95 and Windows NT 4.0 with service pack 3 or earlier). Those earlier computers will not be able to log on to the Windows Server 2003 version of the Active Directory. Click Next to continue. Note You can, however, install an Active Directory client software application on Windows 95. For Windows NT 4.0, you need to install Service Pack 4. | -
In Figure 31.17 the next dialog box presented by the wizard is shown. Here you need to make a selection based on your current AD setup. You can choose to create a domain controller for a new domain, or install the AD on a domain controller in a domain that already has the Active Directory installed on another computer. For purposes of this example, a new domain controller will be used. Figure 31.17. Select to install a new domain controller for a new domain, or to install the Active Directory in a domain that already has the Active Directory installed on another server. 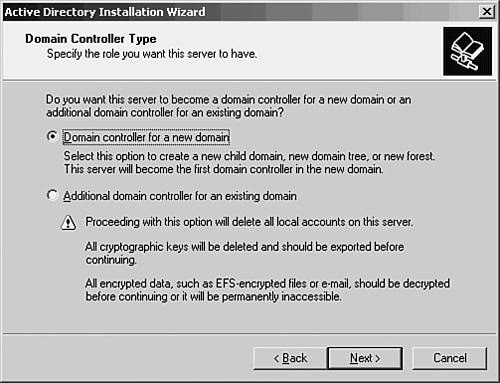 -
Likewise, the next wizard dialog box asks whether this will be a new domain in a new forest. A forest is simply a collection of domain trees that can interact with each other. In Figure 31.18 you can see that it is also possible to create a child domain within an existing domain. For example, you can create a domain called art.by.ono under the domain by.ono . Figure 31.18. You can create a new domain in a new forest, a child domain, or a domain tree in an existing forest. 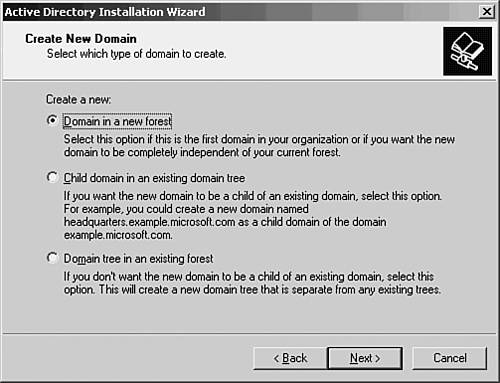 -
The third selection in Figure 31.18 enables you to create another domain in an existing forest of AD trees. If you are setting up your first domain and your first instance of the Active Directory, select the first radio button and click Next. Otherwise, you will have already done this and should be cognizant of what the other two choices mean! -
The next wizard (see Figure 31.19) dialog box asks you to enter the fully qualified domain name for the domain (that is, include the .com, .net, or other qualifier). After entering the domain name, click the Next button. Figure 31.19. Here you should enter the fully qualified domain name.  -
The next wizard screen enables you to enter a NetBIOS name that can be used by older Windows operating systems to access the directory. It is suggested that you use something similar to the domain name you entered in Figure 31.19. For example, the domain in Figure 31.19 was zira.com. The suggested NetBIOS name is ZIRA. You can change this NetBIOS name or take the default. Click Next to continue. -
Next the wizard asks you where the database files for the Active Directory should be stored (see Figure 31.20). It is suggested that you put these files on a disk other than the one that holds the operating system. This increases performance, because both the operating system and the Active Directory, in a larger network, will probably be accessed frequently. By placing the files on a separate disk, you can improve performance. Figure 31.20. Specify the location that will be used on your server to store the Active Directory data files. 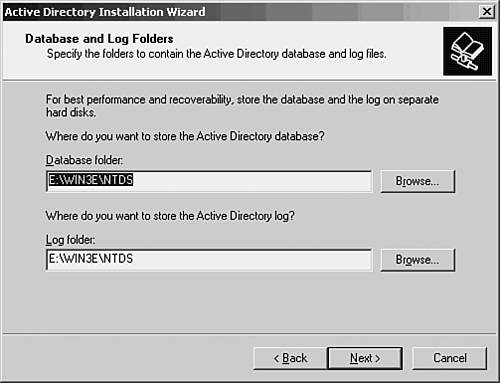 If you don't want to use the default disk drive or directories that the wizard suggests, use the Browse buttons for both the Database folder and the Log folder to change them to a location more suitable for your system. -
The next wizard dialog box asks you to specify a location for the SYSVOL directory. This directory (or folder) contains public information that is replicated to all domain controllers in the domain. This is the situation when you create more than one domain controller, which is a good idea for the fault tolerance it provides. Again, you can take the default or use the Browse button to select a location that best fits your environment. Click Next after making your choice. -
The Domain Name System server had not been installed on this computer, and Windows Server 2003 cannot find a domain controller that can resolve the name you have chosen for your domain. It is at this point that you can choose to create a DNS server on the same computer used by the Active Directory. If you want, you can fix the problemis the DNS server for your network offline for some reason? Or you can choose to configure a DNS server after the Active Directory installation. For the purposes of this example, the default action (create the DNS server on the same server) is used. -
You must now select what kind of permissions you will use on the server. If you are operating a mixed-mode network, which contains Windows operating systems that were marketed before Windows 2000, then select the first radio button (Permissions Compatible with pre-Windows 2000 Server Operating Systems). Note also that this radio button should be used if your Windows Server 2003 system participates in a mixed-mode network that also has domain controllers prior to Windows 2000. For example, if you still have a mixed-mode Windows 2000 network that contains Windows NT 4.0 networks, select this option. The second radio button on this Wizard dialog box lets you enable permissions to the Active Directory for just Windows 2000/2003 clients. If you've upgraded your network to these servers (and in the case of Windows 2000, the Professional Edition), then make this selection. This will provide a more secure network than one using earlier clients or servers. -
Finally, the wizard asks you to enter a password that can be used if you find a need to restart the server in Directory Services Restore Mode. This is not the same password used for the Administrator account on the computer. It is used only when you need to restore the Active Directory in case of a problem. -
The Summary dialog box enables you to view the selections you have made before proceeding to create the Active Directory. Read these carefully to ensure that you are about to install the AD using selections compatible with your network. You can make changes using the Back button. When you are satisfied with your selections, click the Next button. An information dialog box will let you know that the Active Directory is being configured on your server. It will take a few minutes if you are installing on a high-end server, or longer if you are using a server based on the minimum requirements for Windows Server 2003. -
The last Wizard dialog box lets you know that the Active Directory installation has finished. Click the Finish button. You will then have to restart the server to continue. When the system reboots, you can view the log file of what has been changed. See the location for this log file described earlier in this chapter. If you chose to install the DNS server on the same server as the Active Directory, you will see a Manage the DNS Server selection on the Manage Your Server window that appears after the reboot. For instructions on how to manage a DNS server, see Chapter 29. Because DHCP is used to provide IP addressing configuration information to clients on your network, it is important that you understand the implications of setting the scope of IP addresses that the DHCP server can allocate. Inside a private intranet (or on a SOHO cable/DSL router), be sure to assign addresses for this scope that do not interfere with another DHCP range of addresses, such as those provided by your ISP. If you already have a range of IP addresses that are valid on the Internet, you should probably still use a private address range within your intranet to add a bit of security to your network. The Manage Your Server window reappears after you have completed the installation of the Windows 2003 Active Directory. You can continue to add roles to the server, such as Manage Users and Computers in Active Directory. However, the management functions listed here can also be found in the Administrative Tools folder. You can go ahead and choose to continue setting up your server using this window, or use the Administrative Tools later. If you want, you can now create additional roles for this server, or you can use other servers to set up other roles. Your decision should depend on what role you choose, and the capacity of the servers you will use. In a small to moderate- sized network, you might be able to use a single server to perform the roles you select. However, in an Enterprise network, you should carefully plan to install many servers to use for separate roles in your network. Indeed, if you use multiple subnets, you will have to consider how network traffic affects your network, and probably use servers on each subnet that are set up to perform specific roles. |