ISDN Overview
| In the late 1960s, telephone companies began the long process of upgrading their analog trunks and switches to digital networks that allow for clearer signals, compressible data, better trunk utilization, features such as caller ID and three-way calling, higher bandwidth using a single connection to a service provider, and the elimination of amplifiers in the network. ISDN was originally used as a means to move the digital network into the household, to enable a single line to provide two standard phone lines, as well as digital services for data. The great thing about this is that ISDN can use the existing copper wire, enabling telephone providers to add an immediate service that translated into more revenue and improved their existing service. Later, ISDN became popular for businesses to handle video conferencing, point-of-sale transactions, data transfers, and to connect small to medium- sized businesses, as well as households, to the Internet. Most ISDN problems occur in certain areas and can be isolated and resolved easily with a good fundamental knowledge of ISDN. The next sections look at the following common issues:
Dial-On-Demand RoutingDial-on-demand routing ( DDR ) is used to allow more than one Cisco ISDN router to dial an ISDN dial-up connection on an as-needed basis. DDR is designed to be used in low-volume and periodic network connections, using either a Public Switched Telephone Network (PSTN) or ISDN line. If an access list is configured and a packet that meets the requirements of interesting (sendable) traffic is received on an interface on the inside network, the following steps take place:
To configure Dial-on-Demand Routing (DDR) to dial a connection when there is interesting traffic to send, you use the following steps:
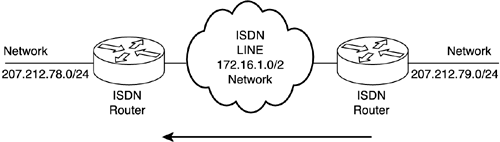
The following section explains this configuration process in more detail. Configuring Static RoutesTo forward traffic across an ISDN link, you should configure static routes on each of the ISDN routers. If you are using a dynamic routing protocol, there will always be data to send and the ISDN link will never drop. A dynamic routing protocol sort of defeats the purpose of dialing the destination network only when data exists to send. Therefore, all participating ISDN routers should have a static route that defines all the known routes to other networks. You first need to define the destination network, which is 207.212.78.0 (as shown in Figure 12.1), with the following command: Seans804 (config)# ip route 207.212.78.0 255.255.255.0 172.16.1.1 Figure 12.1. The two network subnets of the network. In between is the ISDN link with its own network and subnet. You can also define which interface can be used to get to 207.212.78.0, which is the BRI0 interface, using the following command: Seans804 (config)#ip route 207.212.78.0 255.255.255.0 bri0 Using Dialer Lists to Specify Interesting TrafficAfter setting the route tables in each router, you need to configure the router to determine what brings up the ISDN line. An administrator using the dialer-list global configuration command defines interesting packets. The following are the commands to turn on all IP traffic: Sean804(config)# dialer-list 1 protocol ip permit Sean804(config)# int bri0 Sean804(config-if)# dialer-group 1 The dialer-group command sets the access list on the BRI interface. Extended access lists can be used with the dialer-list command to define interesting traffic to include only certain applications. There are three other commands that you should use when configuring your BRI interface:
The dialer load-threshold command instructs the BRI interface when to bring up the second B channel. You must specify how much of a load must exist on the first B channel before the second is used. This option ranges from 1 to 255, where 255 indicates that the second BRI channel should be brought up when the first is at 100 percent. You must also indicate whether this number is based on the load coming in, going out, or both (either) on this interface. The dialer idle-timeout command is used to specify the number of seconds to wait before disconnecting a call if no data is sent. The default is 120 seconds. The following is an example of using the dialer load-threshold , dialer idle-timeout , and ppp multilink commands: Seans804(config-if)# dialer load-threshold 200 either Seans804(config-if)# dialer idle-timeout 200 Seans804(config-if)# ppp multilink The multilink ppp (Multilink Point-to-Point Protocol, or MP) command allows load balancing between the two B channels in a BRI. Multilink PPP is not vendor-specific and it provides packet fragmentation and reassembly, sequencing, and load calculating. Cisco's MP is based on RFC 1990. To verify the PPP multilink configuration, use the show ppp multilink command. |
EAN: 2147483647
Pages: 213