| Several controls in VB.NET can be used to manage lists of information. These controls include the ListBox , ComboBox , DomainUpDown , CheckedListBox , and ListView . These controls display lists and allow the user to select items from the lists. Each list control shares the concept of an Items property that represents the collection of items in the control's list. This property is a collection that has its own properties (for example, Count ) and methods (for example, Add , AddRange , Clear , Remove , and RemoveAt ). Domain UpDown The DomainUpDown control is a scrollable control that displays a string value from a list. The user can also enter text in the control if the ReadOnly property is set to False , but the text entered must match an item in the collection. Interesting properties of the DomainUpDown include the following: -
SelectedIndex indicates the index of the item in the list that is selected. If nothing is selected, the value is -1. -
Text represents the text that is displayed in the control next to the up/down buttons . Using The DomainUpDown  | The following program, found in Contacts , uses a DomainUpDown control to select a value for data entry from a finite set of possibilities. See Figure 8-17. | Figure 8-17. Using the DomainUpDown control. 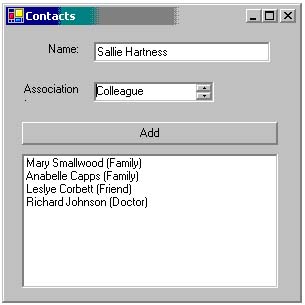 The form contains two labels, one textbox, one DomainUpDown control, one listbox, and one button. Properties for this form are highlighted in Table 8-8. Table 8-8. Property Values for the Contacts Form | Control Type | Name | Text | | Label | lblName | Name: | | Textbox | txtName | (blank) | | Label | lblAssociation | Association: | | DomainUpDown | domAssociation | (blank) | | Button | btnAdd | Add | | ListBox | lstContacts | (blank) | | Form | ContactsForm | Contacts | Code to initialize the DomainUpDown control has been placed in the form's Load event handler. The AddRange method is used to add an array containing a set of values to the control's list. The Add method could have been used to add the values one at a time. Private Sub ContactsForm_Load(ByVal sender As _ System.Object, ByVal e As System.EventArgs) _ Handles MyBase.Load Dim assocTypes() As String = _ {"Colleague", "Friend", "Family", "Doctor", _ "Dentist"} domAssociation.Items.AddRange(assocTypes) End Sub The Click event handler for the Add button references the Text property of the DomainUpDown control to retrieve the selected value. Private Sub btnAdd_Click(ByVal sender As System.Object, _ ByVal e As System.EventArgs) Handles btnAdd.Click Dim s As String s = txtName.Text & " (" & domAssociation.Text & ")" lstContacts.Items.Add(s) txtName.Text = "" domAssociation.Text = "" End Sub CheckedListBox The CheckedListBox control lists items that are selected by checking the check box next to the item(s) desired. It has the four properties that represent the checked item(s) in the control: The CheckedListBox also has other interesting properties, including: -
CheckOnClick indicates whether the check box is toggled when the item is selected. -
Sorted indicates whether items in the control are sorted. -
MultiColumn indicates whether the control supports multiple columns . Typically, items in the list are checked or unchecked via user action, but they may also be programmatically manipulated using SetItemChecked . | | We will examine the behavior of the CheckedListBox control in the example TravelChoices . This program maintains a list of vacation destinations. It allows the user to select any number of vacation requirements from a list, and then uses that list to find suitable destinations. Only those destinations that match at least 50% of your criteria will be shown. See Figure 8-18. | Figure 8-18. Using the CheckedListBox control. 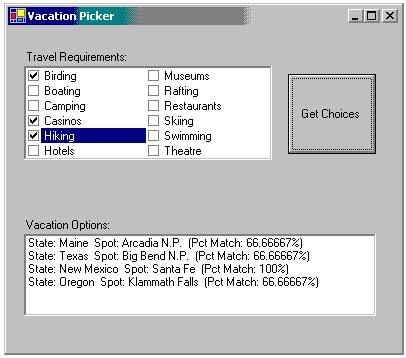 Table 8-9 summarizes the important properties that were specified for this application. Table 8-9. Property Values for the TravelChoice Form | Control Type | Name | Properties | | Label | lblRequirements | Text: Vacation Requirements: | | CheckedListBox | chkRequirements | CheckOnClick: True MultiColumn: True Sorted: True | | Button | btnGetChoices | Text: Get Choices | | Label | lblOptions | Text: Vacation Options: | | ListBox | lstOptions | | | Form | TravelChoicesForm | Text: Vacation Picker | This application required the development of a supporting class. VacationSpot manages a destination, the state that it is in, and a list of features available at that destination. It also features the method GetMatchPercentage that accepts a list of requirements and determines the percentage of those that are matched by features at the destination. Code for VacationSpot follows : Public Class VacationSpot Public ReadOnly Description As String Public ReadOnly State As String Private m_features As New ArrayList() Public Sub New(ByVal description As String, ByVal _ state As String, ByVal ParamArray features() As String) Me.Description = description Me.State = state Dim s As String For Each s In features m_features.Add(s) Next End Sub Public Function GetMatchPercentage(ByVal _ desiredfeatures As ArrayList) As Single Dim numMatches As Integer Dim o As Object ' Look for each feature For Each o In desiredFeatures If m_features.Contains(o) Then numMatches += 1 Next If desiredfeatures.Count > 0 Then Return numMatches / desiredfeatures.Count Else Return 1 End If End Function End Class Step 1: Initializing the ArrayList Before we begin coding the form, we must establish our list of vacation spots. We will use an ArrayList to hold an array of VacationSpot objects. We will initialize the array in the constructor, Public Class TravelChoiceForm Inherits System.Windows.Forms.Form Dim choices As New ArrayList() Public Sub New() MyBase.New() InitializeComponent() choices.Add(_ New VacationSpot("Arcadia N.P.", "Maine", _ "Birding", "Hiking", "Camping", "Boating")) choices.Add(_ New VacationSpot("Manhattan", "New York", _ "Hotels", "Restaurants", "Theatre", "Museums")) .. . choices.Add(_ New VacationSpot("Big Bend N.P.", "Texas", _ "Birding", "Hiking", "Camping")) End Sub ... End Class Step 2: Adding Items to the CheckedListBox Control Items may be added to the CheckedListBox control (and almost any other list control) at design time or run time. To add them programmatically, you must use the Add or AddRange method of the Items collection. chkRequirements.Items.Add("Camping") ... Dim cityStyle As String() = _ {"Hotels", "Restaurants", "Museums"} chkRequirements.Items.AddRange(cityStyle) In this application, we added the items at design time. To do this, we choose the Items property from the Property Window and launched the String Collection Editor in order to enter the strings that initialize the items in the list. Figure 8-19 shows the editor and the values for Items that we entered at design time. Figure 8-19. The String Collection Editor. 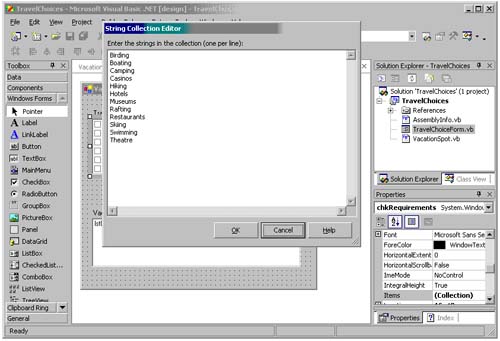 Step 3: Accessing Items in the Control You can use the Contains method of either the Items or CheckedItems property to determine whether a specific string is found in the control: If chkRequirements.CheckedItems.Contains("Camping") Then ' do something End If You can also access the individual elements in the Items collection by specifying the index of the desired item. To determine if the item is checked, you must call GetItemChecked . For index = 0 To chkRequirements.Items.Count - 1 If chkRequirements.GetItemChecked(i) Then MessageBox.Show(_ chkRequirements.Items(index).ToString()) End If Next You can access the individual elements in the CheckedItems collection by specifying the index of the desired item: For index = 0 To chkRequirements.CheckedItems.Count - 1 MessageBox.Show(_ chkRequirements.CheckedItems(index).ToString()) Next You can also access the individual elements selected by using the CheckedIndices collection: Dim n As Integer For index = 0 To chkRequirements.CheckedIndices.Count - 1 n = chkRequirements.CheckedIndices(index) MessageBox.Show(chkRequirements.Items(n).ToString()) Next In our TravelChoices example, maintain our list of vacation spots in the array choices . It is initialized in the form's Load event handler. The Click event handler for btnGetChoices builds an array containing the strings from the checked items and calls the GetMatchPercentage method in VacationSpot . Public Class TravelChoiceForm Inherits System.Windows.Forms.Form ... Private Sub btnGetChoices_Click(ByVal sender As _ System.Object, ByVal e As System.EventArgs) _ Handles btnGetChoices.Click lstOptions.Items.Clear() Dim requirements As New ArrayList() Dim i As Integer For i = 0 To chkRequirements.CheckedItems.Count - 1 requirements.Add(_ chkRequirements.Items(i).ToString()) Next Dim o As Object For Each o In choices Dim oneOption As VacationSpot Dim pctmatch As Single oneOption = CType(o, VacationSpot) pctmatch = _ oneOption.GetMatchPercentage(requirements) If pctmatch >= 0.5 Then Dim s As String s = "State: " & oneOption.State & " Spot: " _ & oneOption.Description & " (Pct Match: " & _ pctmatch * 100 & "%)" lstOptions.Items.Add(s) End If Next End Sub End Class ListView The ListView control is a more flexible version of the ListBox control. It contains items, and optionally subitems, and can display its list in four different ways according to the style specified in the View property: -
LargeIcons specifies that the items appear as large icons with labels underneath them. -
SmallIcons specifies that the items appear as small icons with labels underneath them. -
List specifies that the items appear as small icons with a label to the right. Items are arranged in columns with no column headers. -
Details specifies that each item in the list appears on a separate line. Subitem information is arranged in columns and displayed beside the item. The user can resize each column at runtime. The ListView control can be associated with one or more ImageList controls using the LargeImageList and SmallImageList properties to indicate the icons when icons they are displayed. Other properties include: -
Sorting indicates how items in the control are sorted. -
MultiSelect indicates whether the control supports multiple selection. -
Columns provides access to the collection of columns. -
GridLines indicates whether gridlines are drawn in the control. -
FocusedItem indicates the item with focus. -
FullRowSelect indicates whether clicking an item selects the item or the whole row. | | The following example, found in the project HotelAdmin3 , uses a ListView control to display the list of hotels. See Figure 8-20. | Figure 8-20. Using the ListView control. 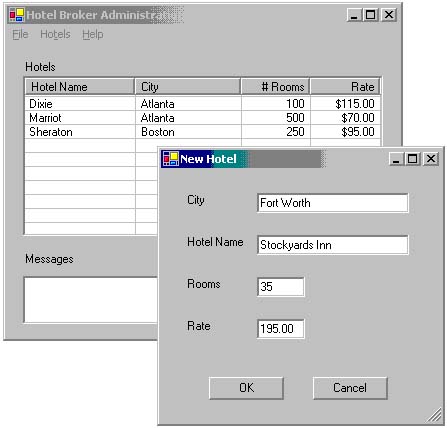 Step 1: Adding the ListView Control We began by replacing the listbox with a ListView control named lvHotels . Then we set its View property to Details . Finally, we added columns to the ListView control at design time by selecting the Columns property in the Properties window. The ColumnHeader Collection Editor (see Figure 8-21) provides an easy-to-use graphical way to add columns when they are known at design time. (Note: It is easy to adjust the column width using the mouse by dragging and resizing the columns after they are initially added.) Figure 8-21. The ColumnHeader Collection Editor. 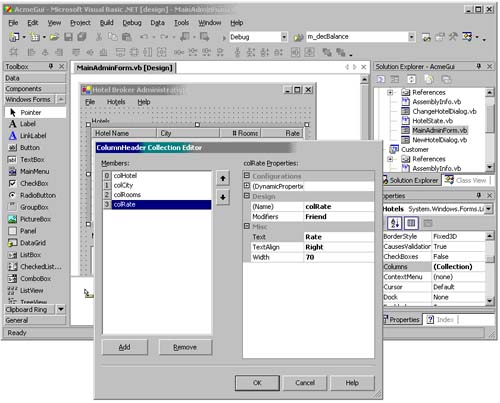 If the columns aren't known at design time, you can also programmatically add columns. You must specify the column heading, width (in pixels) and text alignment using the Columns.Add method. lvHotels.Columns.Add(_ "Hotel", 60, HorizontalAlignment.Left) ... lvHotels.Columns.Add(_ "Rate", 60, HorizontalAlignment.Right) Our example does not associate an image with the items in the ListView , so we leave the properties for LargeImageList and SmallImageList as "(none)". Step 2: Adding Items to the Control The items that are added to the ListView control are similar to items added to the ListBox control. They are shown when the ListView displays icons or a list. However, the ListView items may have subitems , which represent additional data displayed when the style indicates details are shown. To add an item, you will use the Items.Add method, specifying the following: -
The item text -
Optionally, an index from the associated ImageLists -
Optionally, the subitems associated with the item In HotelAdmin3 , we replace the code that was used to populate the listbox with the following code: Private Sub ShowHotelList(ByRef array As ArrayList) lvHotels.Items.Clear() If array Is Nothing Then Return End If Dim hotel As HotelListItem For Each hotel In array Dim li As New ListViewItem() Dim city As String = hotel.City.Trim() Dim name As String = hotel.HotelName.Trim() Dim rooms As String = hotel.NumberRooms.ToString() Dim rate As String = _ String.Format("{0:c}", hotel.Rate) li.ImageIndex = -1 ' No icon image li.Text = name ' The hotel name is the item li.SubItems.Add(city) ' City, # rooms & rate are li.SubItems.Add(rooms) ' subitems li.SubItems.Add(rate) lvHotels.Items.Add(li) Next End Sub Step 3: Accessing the Selected Item We used the FocusedItem property to determine which hotel is selected for use with editing and deleting hotels. We have replaced the member variable currHotel that existed in HotelAdmin2 with the function GetHotelSelection that can be called anytime the currently selected hotel must be known. Private Function GetHotelSelection() As HotelListItem Dim currHotel As New HotelListItem() currHotel.HotelName = "" currHotel.City = "" currHotel.NumberRooms = 0 currHotel.Rate = 0 Dim li As ListViewItem li = lvHotels.FocusedItem() If Not (li Is Nothing) Then currHotel.HotelName = li.Text() currHotel.City = li.SubItems(1).Text currHotel.NumberRooms = _ Convert.ToInt32(li.SubItems(2).Text) Dim s As String = li.SubItems(3).Text currHotel.Rate = _ Convert.ToDecimal(s.Substring(1, s.Length() - 1)) End If Return currHotel End Function Private Sub mnuEdit_Click(ByVal sender As Object, ByVal _ e As System.EventArgs) Handles mnuEdit.Click Dim currHotel As HotelListItem = GetHotelSelection() .. . End Sub Private Sub mnuDelete_Click(ByVal sender As Object, ByVal _ e As System.EventArgs) Handles mnuDelete.Click Dim currHotel As HotelListItem = GetHotelSelection() .. . End Sub Private Sub mnuContext_Popup(ByVal sender As Object, _ ByVal e As System.EventArgs) Handles mnuContext.Popup Dim currHotel As HotelListItem = GetHotelSelection() .. . End Sub Private Sub mnuHotels_Popup(ByVal sender As Object, ByVal _ e As System.EventArgs) Handles mnuHotels.Popup Dim currHotel As HotelListItem = GetHotelSelection() .. . End Sub At this point, HotelAdmin3 is functional and is quite a bit more elegant than our original solution.  | 