Easy Microsoft Office Access 2003
Authors: Oap]Hara S.
Published year: 2003
Pages: 90-92/174
Buy this book on amazon.com >>

Adding a Field to a Form

graphics/05inf30.jpg

graphics/one_icon.jpg

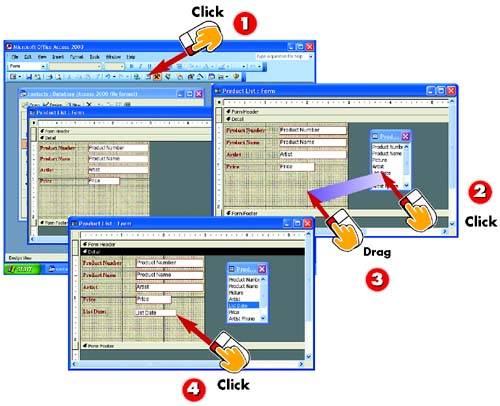
After you open the form to which you want to add a field in Design view, click the Field List button on the Standard toolbar in the main Access window.

graphics/two_icon.jpg

A list of fields in the current table appears. Click the field you want to add to select it.

graphics/three_icon.jpg

Drag the field to the location on the form where you want it to be placed.

graphics/four_icon.jpg

Access adds a label and text box for the new field. (You may have to make some adjustments to the field's size and placement.) Click the Save button to save the form design.

INTRODUCTION

When you create a form with a wizard, you select which fields are included. If needed, however, you can add more fields to the form later. You can even add fields from other tables.

TIP

Resizing Sections

You may need to resize the Detail section of the form to make room for the new field. To do so, place the mouse pointer on the section's border and drag it to resize.

TIP

Using Menu Commands

If you prefer, you can open the View menu and choose the Field List command to display the list of fields in the current table. To close the list, click its Close button.


Changing the Tab Order

graphics/05inf31.jpg

graphics/one_icon.jpg

After you've opened the form whose Tab order you want to change in Design view, open the View menu and choose Tab Order to open the Tab Order dialog box.

graphics/two_icon.jpg

The Tab Order dialog box displays the form's Tab order. Click a field whose place in the Tab order you want to change to select it.

graphics/three_icon.jpg

Click the selected field and drag it to its new spot in the order.

graphics/four_icon.jpg

Repeat steps 2 and 3 until the fields are arranged in the order you want. When you're finished, click OK .

INTRODUCTION

When you press the Tab key on your keyboard while entering data into a form, Access moves the insertion point to the next field in the database table. You might, however, prefer to enter information in a different order. In that case, you can change the form's Tab order. When you change a form's Tab order, you won't notice a change to the form's layout, but you will notice a change when you use the form to enter data.

TIP

Selecting Multiple Fields ?

If you keep selecting multiple fields instead of dragging the field, it's because you haven't released the mouse button after clicking. Remember to click once to select, release the mouse button, and then click and drag the field to the new location.


Viewing and Formatting Form Controls

graphics/05inf32.jpg

graphics/one_icon.jpg

After you've opened the desired form in Design view, double-click the form control you want to modify.

graphics/two_icon.jpg

A control-specific dialog box opens. Click the Format tab if it is not selected already.

graphics/three_icon.jpg

The Format tab contains the various formatting options. Click the scroll arrows to scroll through the list.

INTRODUCTION

You have a great many options in terms of how a form appears and works. For example, you can change the form's background color , hide a field, set a specific size (width and height) for the form, change the font, and much more. In this task, you'll take a look at some of the various options. For information on using these options to further customize your form, experiment or consult Access's online help.

graphics/05inf33.jpg

graphics/four_icon.jpg

Click in a text field. In some cases, such as with the Border Style option, a down arrow appears on the right side of the field; click it to display a list of formatting options.

graphics/five_icon.jpg

Click the dialog box's Data tab to view the various Data options. (Some of these options are the same as the field properties for a field in a table.)

graphics/six_icon.jpg

Click the Other tab to view additional options that you can change, such as the field name .

TIP

Options Vary

The options available in the dialog box vary depending on what type of control you selected in step 1 (a label or a text box), as well as on the type of field the control is associated with.

TIP

Displaying All Options

To display all the available options in one list, click the All tab in the dialog box.

TIP

Building Events

You can use the dialog box shown in this task to build an event (that is, an action) that will occur after certain actions take place, such as clicking, exiting, or pressing a certain key. This topic is beyond the scope of this book, however.

Easy Microsoft Office Access 2003
Authors: Oap]Hara S.
Published year: 2003
Pages: 90-92/174
Buy this book on amazon.com >>