| 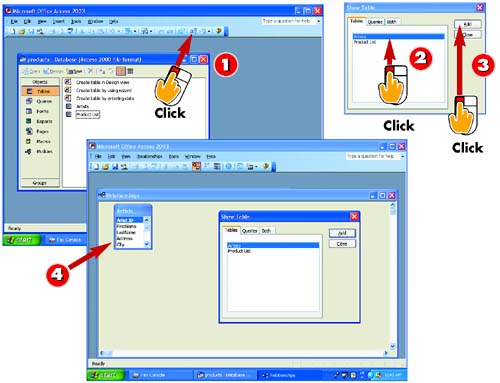 -
 | With the database for which you want to establish relationships displayed onscreen, click the Relationships button on the Standard toolbar in the main Access window. | -
 | The Show Table dialog box opens with the Tables tab displayed. Click the first table for which you want to establish a relationship to select it. | -
 | Click the Add button. | -
 | A window representing the table you added (here, Artists ) is displayed onscreen. To link another table to the one displayed, click it in the Show Table dialog box. | INTRODUCTION It's much easier to manage a database when you work with several tables rather than one huge file. For example, suppose that you sell products and use Access to track orders, product lists, inventory, and clients . If you stored all that information in one database table, the table would be difficult to work with. If, though, you create tables for each specific task or action and then set up relationships, you'd be able to work with data more easily. For example, you could link the Orders table to the Product table to pull product information. You could also link the Client Information table to the Orders table so that you could access client information as part of the order. To create these types of links, you set up relationships between tables. | 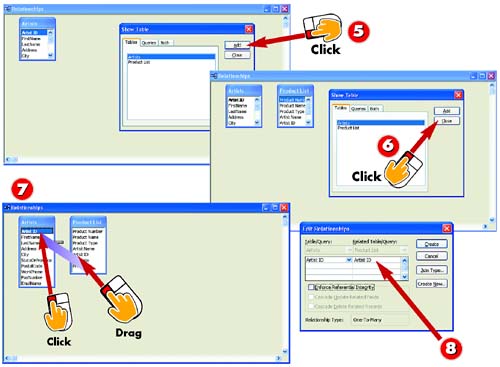 -
 | Click the Add button. | -
 | A window representing the second table you added (here, Product List ) is displayed onscreen. Click the Close button in the Show Tables dialog box to close it. | -
 | In the first table window, click the field you want to use to establish a relationship (here, Artist ID ) and drag it to its matching field in the second table window. | -
 | The Edit Relationships dialog box opens; in it, you can set options on how the relationship you've established will work. Make sure that the correct fields are listed as the linked fields. | TIP Sharing Fields To set up relationships between tables, the tables must share one field in common. Usually this is some type of unique ID field. The field does not have to have the same name but must contain the same data type and data. | TIP Resizing the Table Window If necessary, resize the table windows to better view all the fields each one contains. To do so, put the pointer on the border of the field list and drag. | TIP Removing a Table If you add a table to the Relationships window by mistake, you can remove it from the window by right-clicking the table window and choosing Hide Table from the shortcut menu that appears. | 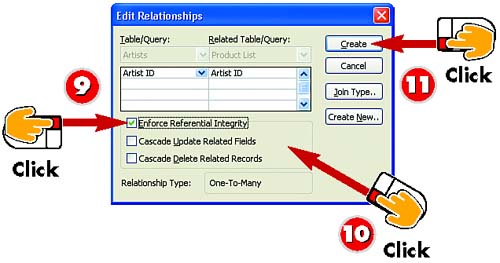 -
 | If you want to enforce referential integrity, click the Enforce Referential Integrity check box to select it. | -
 | The Cascade Update Related Fields and Cascade Delete Related Records check boxes become available; if desired, mark one or both check boxes. | -
 | Click the Create button. | TIP Understanding Referential Integrity When you turn on referential integrity, Access keeps the related tables in sync. That means if you mark the Cascade Update Related Fields check box and make a change to the related field in one database table, the change will also be made in the related database table. Likewise, if you mark the Cascade Deleted Related Records check box and delete a record in one table, any associated records in the related table are deleted as well. | 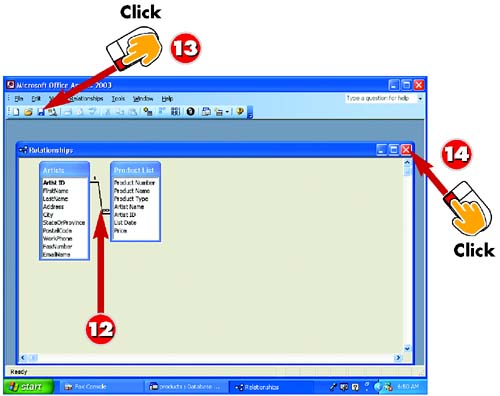 -
 | Access establishes the relationship. A line links the two related fields in the Relationships window. (If you enabled referential integrity, the line indicates this with a chain link symbol.) | -
 | Click the Save button to save the relationship. | -
 | Click the Close button in the Relationships window to close it. | TIP Using Multiple Tables You aren't limited to setting relationships between just two tables. For complex databases, you might have several relationships among your tables. For instance, your Client table might be linked to your Orders table by client ID, and your Orders table might be linked to your Product table by product ID. | TIP Using the Table Wizard When you set up a table using the Table Wizard, you are prompted to assign any relationships among tables; doing so has the same effect as assigning relationships by following the steps in this task. | |