IDSIPS Tuning
IDS/IPS Tuning
The most time-consuming and, in my opinion, biggest reason why IDS/IPS deployments fail or fail to live up to expectations is the time and effort required in tuning an IDS/IPS. Regardless of whether you implement an anomaly detection or misuse detection system, it is going to require significant long- term effort to configure the IDS/IPS to minimize the occurrence of false positives and negatives .
The need for tuning is simple: without it, the sensor is going to generate alerts for all traffic that matches a given criteria, regardless of whether the traffic is indeed something that should generate an alert. For example, by default, Cisco generates alerts for traffic that uses RFC1918 addresses. Because many networks are designed using the RFC1918 address space, if the sensor is monitoring internal network segments, this is a false positive that should be tuned accordingly . False positives are a lot like the boy who cried wolf. Given enough false positives, even the most diligent of IT personnel will begin to ignore the sensor.
There are six steps to tuning your sensors:
-
Identify where you are going to locate the sensor. You need to identify where you are going to be placing the sensor because monitoring different network segments and modules will require a different amount of tuning, and tuning of different traffic.
-
Apply an initial configuration. You want to configure the sensor with the initial basic configuration that monitors and alarms on all traffic. From this starting point, you will work backward to tune the sensor accordingly.
-
Monitor the sensor during the tuning period. During this time, you need to monitor the sensor as you begin the tuning process to ensure that the amount of false alarms is decreasing . One thing not to underestimate is the amount of time that this step will require. Depending on your environment and the number of sensors, the initial tuning period could easily take a week or more.
-
Analyze the alarms, tune out false positives, and implement signature customization during the tuning period. This is the most tedious part of the tuning period because it requires extensive legwork. You have to analyze every alarm that is generated by the sensor to determine whether the alarm is a false positive or not. It is difficult to tell you whether a given alarm is a false positive because each network is unique, both in traffic and in what traffic is permitted by security policies. To assist you in this, you can verify the meaning of the alarm by checking it against a known database of alarm meanings. For example, Cisco maintains a Network Security Database (NSDB) on all of its sensors that can be accessed at the web GUI by following the URL /protected/nsdb/html/all_sigs_index.html; for example, if your IDS was named sensor, you would enter https ://sensor/protected/nsdb/html/all_sigs_index.html . Snort rules can be checked against an online database at http://www.snort.org/snort-db/sid.html?sid=1317.
-
When you are tuning the alarms, make sure you do not assume that the proper response is to prevent the sensor from generating the alarm. For example, if the sensor is generating alarms due to NETBIOS traffic, verify whether NETBIOS is indeed needed on the system in question. If it isn t, disable it on that system instead of tuning the alarm out. You also need to be as granular as possible when tuning alarms. For example, rather than removing a signature or rule because of legitimate systems engaging in that traffic, configure the sensor not to generate an alarm only when the traffic is from those legitimate systems, but continue to alarm for all other systems.
-
Implement response actions (if required). Only once you have tuned out false positives can you implement response actions such as e- mails , pages, TCP resets, shunning, or IP logging.
-
Update the sensor with new signatures. Because the sensor is only as effective as the signatures it contains, you should make sure you regularly update the signature or rule database. When you do this, you will need to take a day or two to tune the new signatures accordingly.
Tuning PureSecure Sensors
PureSecure runs Snort as the underlying IDS mechanism. As a result, PureSecure can be largely tuned using the underlying Snort methodologies through the PureSecure console interface.
Adding or Removing Rulesets
The first thing to tune on your sensor are the rulesets that are going to be used, as specified in the snort.conf file. The rulesets can be edited by performing the following steps:
-
Log into your PureSecure console and click Configure.
-
In the PureSecure Configuration Menu, click Network IDS Rules in the Network Intrusion Detection section.
-
At the Sensor Details screen, click the sensor you want to modify.
-
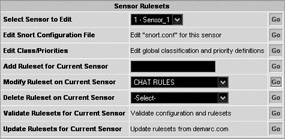
In the Sensor Rulesets section, click the Go button on the line Edit Snort Configuration File, as shown here:

-
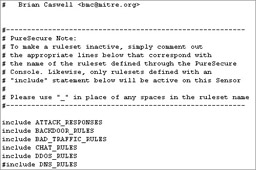
Scroll down to the ruleset section and include/exclude the appropriate rulesets by using # to ignore an entry or removing # to implement an entry, as shown next . For example, if I wanted to use the DNS_RULES ruleset, I would remove # from the line. When you are finished editing the configuration file, select Update and click Go.
Editing Rules
Editing the rules on PureSecure sensors follows the Snort syntax and rule format. The syntax and format can be found at http://www.snort.org/docs/snort_manual/ under the How to Write Snort Rules and Keep Your Sanity section. You can access the rules-editing feature by returning to the Sensor Ruleset screen, as previously detailed, and selecting the ruleset you want to modify and then clicking Go, as shown next.
| |
A more efficient way of maintaining your signature files is to use variables to define the various source and destination addresses. If you do not do this when a given address changes, you might need to update multiple signature files. It is much easier to use variables in the signatures and update these variables in a single location. The variables are stored in the snort.conf file on the sensor.
| |
Tuning Cisco IDS Sensors
Tuning the Cisco IDS sensor is a little bit more complex than tuning and customizing PureSecure (or other Snort-based IDSs) because Cisco signatures are based on a proprietary format. You have a number of different ways to reduce the amount of false positives on your sensor, including the following:
-
Defining internal networks
-
Disabling signatures
-
Signature filtering
-
Customizing prebuilt signatures
-
Writing custom signatures
Defining Internal Networks
Because Cisco assumes that the internal network is more trusted, one method of reducing false positives is to define the internal network, which can then be used for filters to reduce the signatures processed for the internal network. You can define the internal network by connecting to the IDS Device Manager and navigating to the Configuration Sensing Engine Alarm Channel Configuration System Variables screen. Check the box that you want to assign to the variable IN and click Edit. At the next screen, enter the network or networks you want to define and then click OK. When you are finished, commit the changes by saving the configuration using the Save Changes button on the activity bar.
Disabling Signatures
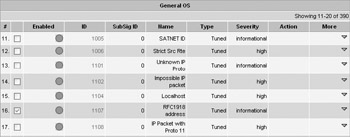
Some signatures you are not going to want to have the IDS process and use. The most efficient way of addressing this is to disable these signatures on the sensor. You can do this using the IDS Device Manager by accessing the Configuration Sensing Engine Virtual Sensor Configuration Signature Configuration Mode screen and navigating through the signature groups to locate the signature you want to disable. For example, if you wanted to disable the RFC1918 addresses signature, you would navigate to the OS General OS screen and check the box next to the signature, as shown next. Then you would click Disable. Disabled signatures will have a white circle in the Enabled column, whereas enabled signatures have a blue circle.
Signature Filtering
Signature filtering is used to allow the sensor to analyze the data while preventing it from generating an alarm (with the exception of inclusive filters). You can perform filtering based on the source address, destination address, or signature. You can do this using the IDS Device Manager by navigating to the Configuration Sensing Engine Alarm Channel Configuration Event Filters screen and clicking Add. At the Adding screen, enter the following information:
| Sigid | The signature ID. |
| SubSig | The subsignature ID. |
| Exception | This check box defines whether it is an exclusion filter (unchecked) or an inclusion filter (checked). |
| SrcAddrs | The source IP address to filter. |
| DestAddrs | The destination IP address to filter. |
For example, let s assume you have a DHCP server you want to filter alarms for because it is a legitimate DHCP server, but you want to generate alarms for all other DHCP servers that may attempt to provide IP addresses to clients on the network.
You would enter a Sigid of 4605 (the DHCP offer signature) and a SrcAddrs value of the legitimate DHCP server and then click Apply to Sensor. When you are finished, commit the changes to make them permanent.
Customizing Prebuilt Signatures
Although it is not possible to customize Cisco signatures to the same degree of granularity as you can Snort rules, you can still undertake a number of tasks to tune and customize the prebuilt signatures on the sensor.
You can customize any signature by accessing the Configuration Sensing Engine Virtual Sensor Configuration Signature Configuration Mode screen and navigating the signature groups to locate the signature you want to edit. For example, let s say you want to customize the HTTP authorization failure signature (signature ID 6256). Once you have located the signature in question, check the box next to the signature and click Edit.
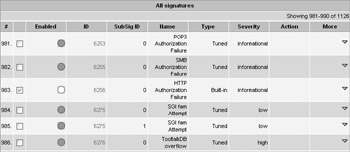
Let s assume you want to change the severity from informational to high, and you want to change the minimum number of matches (minhits) to 2. Edit the appropriate fields and click OK when you re finished, as shown next. In the case of this signature, because it is disabled by default, you will also need to enable it as previously described.
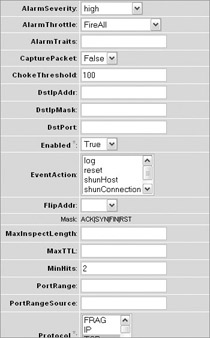
| Note | Each signature contains unique fields and values that you can customize, so if you follow these procedures with a different signature, you may see different options. |
Writing Custom Signatures
Custom signatures are particularly valuable in situations where you have unique traffic in your environment that you want to be able to monitor. The IDS sensor has a wizard to help you build custom signatures. Let s assume you want to create a new signature that generates an alarm any time someone goes to an online forum. The following steps detail the process:
-
Navigate to the Configuration Sensing Engine screen and click Signature Wizard. At the introduction screen, click Start the Wizard.
-
At the Signature Type screen, select the appropriate signature type. In this case, select Web Server Signature. When you are finished, click Next.
-
At the Signature Identification screen, enter a valid signature ID and signature name . When you re finished, click Next.
-
At the Web Server Service Ports screen, enter the ports on which you want to be looking for web traffic. I recommend leaving the default values and clicking Next.
-
At the Web Server Buffer Overflow Checks screen, enter the appropriate values and click Next. If you do not want to perform these checks (for instance, for the signature in this example), click Next.
-
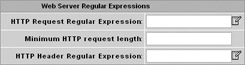
At the Web Server Regular Expressions screen, edit the HTTP Header URI Regular Expression section to contain [/\\][Ff][Oo][Rr][Uu][Mm], as shown next. This will cause the signature to look for \forum in the HTTP header information, which will allow it to trigger on any online forums that use \forum in their URL. When you are finished, click Next.
-
At the Alert Response Actions screen, select the appropriate alert level, what action to take (if any), and whether to include the packet in the alert. When you are finished, click Next.
-
At the Alert Behavior screen, click Next to accept the default alert behavior or click Advanced to edit the alert behavior. You can always tune the alert behavior later by customizing the signature, as described previously.
-
At the Ready to Create the New Signature screen, click Create.
-
The last step is to click OK to close the wizard and save the changes to cause the sensor to start using the new signature.
EAN: N/A
Pages: 125