Landscape Rendering
The landscape in XNA Shooter is just a simple 3D model with just one 1024x1024 texture. However, landscape rendering is not an easy topic. You will spend a whole chapter in the next part of this book just to render the landscape and the tracks for the upcoming racing game.
But I did not want to spend so much time for this simple shoot-’em-up game just for the landscape rendering in the background with which you don’t even interact in the game. So instead of implementing a landscape engine to render many thousands of polygons, put tile-able textures on these polygons and maybe even implement alpha blending between the different ground texture types. I just took the easy road and used a finished 3D model for the whole landscape. It is just enough to fit on one screen and it does not allow you to scroll to the left or right, but that is not required for this game; you just move up.
The mission is about 60 of these landscape parts long and you simply put them on top of each other, always showing just the current one and the next. It does not fit together perfectly because the lighting on the borders is hard to fix (texture has to fit, normal map has to fit, 3D model normals have to fit), but it is good enough for our purpose.
In this section I want to show you the necessary steps to create such a background model because I’m not the only one who uses this easy technique to get something on the screen quickly (for example, one game modification of Rocket Commander called Canyon Commander uses a similar technique to show 3D canyons).
Base Texture and Normal Map
Before you start with any 3D data or height-map for the background landscape, you should have an idea of what is displayed in the background. My idea was just to have desert sand in the middle and rocks at the sides, which form a little canyon. I quickly grabbed two textures that would fit and threw them together into the BackgroundRock.dds texture (see Figure 11-8). To be honest I did not really think of the sand part at first and I thought just having a rock texture was sufficient, but it looked boring and was too repetitive.
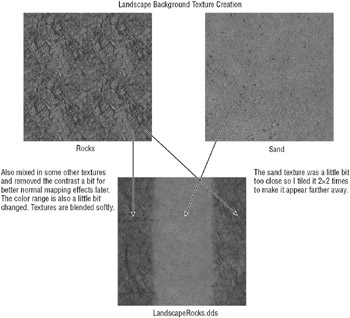
Figure 11-8
The normal map is mixed together in a similar way, but for these two textures I did not have a normal map at first. I used the Nvidia Photoshop plugins to generate normal maps from the two base textures. You have to play around a little bit with the values until it looks good and sometimes you have to repaint the base texture to fix wrong places. The diffuse textures that are used here have no information about the height or normals in it, so the only thing this normal map generator plugin can do is to convert the image to a grayscale format and generate normals from this fake height map.
Sometimes it looks ok, other times it is just plain wrong to generate normals this way. It would be much better if these textures were created by an artist who also provides normal maps or at least height maps with them, but you will not always have this luxury. Sometimes just the diffuse texture exists and if you take a photo with your camera height and normal map, data is not recorded either. Again, try to keep things simple here. You create more complex landscape textures and normal maps in the next chapter for the more complex racing game. Figure 11-9 shows the normal maps mixed together. You will notice that the normals for the rocks use a stronger normal map than for the sand, and that is good because you want to have the rocks appear curvier than the sand on the ground. But even the sand has some variations in it (added on top of the relatively plain sand texture) to get a little bit better lighting from the normal mapping shader used in the game.
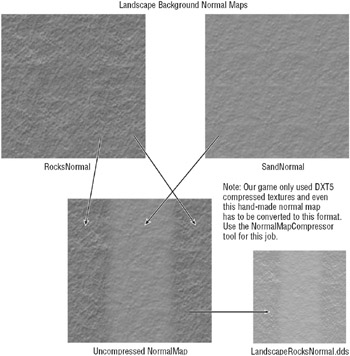
Figure 11-9
Height Map
With the diffuse and normal texture in place you can now display the landscape background on a simple polygon, but it would not look very convincing or even appear to be 3D this way. You need some real height for the cliffs and the canyon in the middle. To create this canyon I used 3D Studio Max (but you can use whatever 3D content creation tool you feel comfortable with or ask someone who knows how to use these tools if you don’t want to create 3D models yourself) and I created a simple plane object on the xy ground (z pointing up) with 64x64 intersection points forming 63*63*2 = 7938 polygons. I used 63 because each polygon needs a start and end position and multiplied by two because each landscape quad is formed from two triangles (see Figure 11-10).
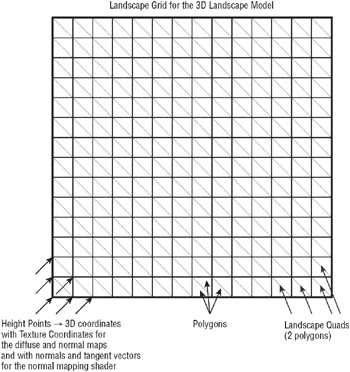
Figure 11-10
To give each height point another z value than the default 0.0 you could drag them up or down in your 3D modeling program, but I’m not skilled or patient enough to create a landscape this way. A much easier approach is to use a height texture and then displace all height points of your plane according to this height map. Height maps are also often used for geological landscape maps, so it is not very hard to find some cool looking height maps on the Internet, even from other planets.
Luckily for us 3D Studio Max has a simple modifier called Displace, which does just what you need (not easy to find, but once you know where it is, it becomes very useful). From here you can add your newly created height map (I painted it myself; not spectacular, but it works) to the 3D model (see Figure 11-11).
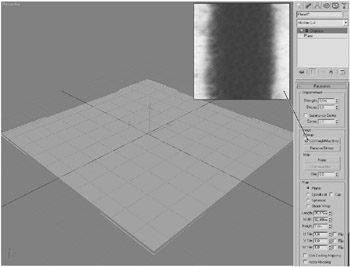
Figure 11-11
Nothing happens now; you might ask why that is. Well, Max has many settings and it is not always easy to find out which one is responsible for what. Just play around with the settings until something changes. In this case you need to adjust the Strength setting at the top. Set it to something between 30 and 40 to see a result like the one shown in Figure 11-12.
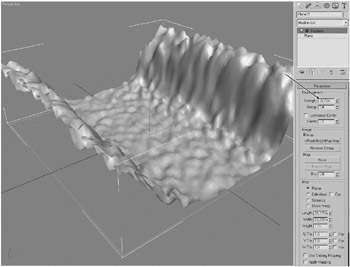
Figure 11-12
The final action you have to do in 3D Studio Max is to assign the diffuse and normal textures to a new normal mapping shader material. Then you can assign this material to your 3D model (see Figure 11-13) and export it. It is now ready to be used in your game.
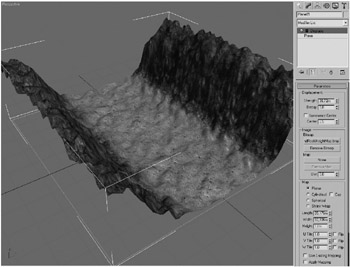
Figure 11-13
This landscape is now rendered from the top in the game and you will only see the valley and the inner borders of the cliffs. The landscape rendering was tested with support of 16:9 widescreen resolutions, which means on 4:3 resolutions some parts of it might not always be visible. All the action happens in the middle anyway. After you add the 3D buildings and plans in the game everything is up and ready for some shoot-’em-up action.
Check out the unit test in the Mission class to see how this landscape model is rendered in the game. For just taking a look at the 3D model you can also use the unit test in the Model class, which shows all used models in the game.
Adding Objects
The landscape looks nice (at least better than a simple xy plane), but it is still kind of empty. To make it a little bit more exciting the buildings and plants you saw earlier are added to it. Check out the TestRenderLandscapeBackground unit test at the end of the Mission class, which just calls RenderLandscapeBackground of the Mission class. This method takes the current level position as a parameter and always shows only the current and the next landscape part to ensure you always have 3D models in front of you even when you move up. The player will not notice this because the current landscape part is replaced with the next if you move up enough and a new landscape part is generated at the top until you are done with the level.
The more interesting code is the object generation, which takes the array of loaded models and randomly adds new objects to the visible landscape object list. Plants are randomly placed and rotated, but buildings only appear on the left and right side and they are only rotated in 90 degree steps to fit better together.
// From the GenerateLandscapeSegment method: List<MatrixAndNumber> ret = new List<MatrixAndNumber>(); int numOfNewObjects = RandomHelper.GetRandomInt( MaxNumberOfObjectsGeneratedEachSegment); if (numOfNewObjects < 8) numOfNewObjects = 8; for (int num = 0; num < numOfNewObjects; num++) { int type = 1+RandomHelper.GetRandomInt(NumOfLandscapeModels-1); // Create buildings only left and right if (type <= 5) { int rotSimple = RandomHelper.GetRandomInt(4); float rot = rotSimple == 0 ? 0 : rotSimple == 1 ? MathHelper.PiOver2 : rotSimple == 1 ? MathHelper.Pi : MathHelper.PiOver2 * 3; bool side = RandomHelper.GetRandomInt(2) == 0; float yPos = segmentNumber * SegmentLength + 0.94f * RandomHelper.GetRandomFloat(-SegmentLength / 2, SegmentLength / 2); Vector3 pos = new Vector3(side ? -18 : +18, yPos, -16); // Add very little height to each object to avoid same height // if buildings collide into each other. pos += new Vector3(0, 0, 0.001f * num); ret.Add(new MatrixAndNumber( Matrix.CreateScale(LandscapeModelSize[type]) * Matrix.CreateRotationZ(rot) * Matrix.CreateTranslation(pos), type)); } // if else { ret.Add(new MatrixAndNumber( Matrix.CreateScale(LandscapeModelSize[type]) * Matrix.CreateRotationZ( RandomHelper.GetRandomFloat(0, MathHelper.Pi * 2)) * Matrix.CreateTranslation(new Vector3( RandomHelper.GetRandomFloat(-20, +20), segmentNumber * SegmentLength + RandomHelper.GetRandomFloat( -SegmentLength / 2, SegmentLength / 2), -15)), type)); } // else } // for The ret list is then returned to the caller, which saves it to the requested landscape part. The full GenerateLandscapeSegment code also adds all enemy units, checks for colliding landscape objects, and prevents objects from being too close to each other.
If you execute the TestRenderLandscapeBackground unit test you should see the landscape and the ground objects like in Figure 11-14. Note that the shadow map generation is not discussed in this chapter; please read the last part of this book for more information about shadow mapping techniques. You can also just check out the ShadowMappingShader class if you are interested now.
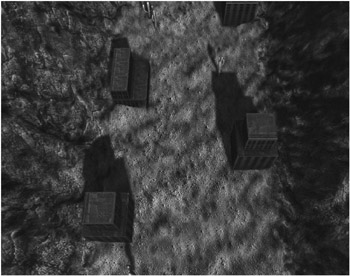
Figure 11-14
EAN: 2147483647
Pages: 138