Chapter 12. Network Programming
| CONTENTS |
- 12.1 Sockets
- 12.2 Datagram Sockets
- 12.3 Simple Serialized Object Protocols
- 12.4 Remote Method Invocation
- 12.5 Scaleable I/O with NIO
The network is the soul of Java. Most of what is new and exciting about Java centers around the potential for new kinds of dynamic, networked applications. In this chapter, we'll start our discussion of the java.net package, which contains the fundamental classes for communications and working with networked resources. Then we'll talk about the java.rmi package, which provides Java's powerful, high-level, remote method invocation facilities. Finally, we'll complete our discussion of the java.nio package, which is highly efficient for implementing large servers.
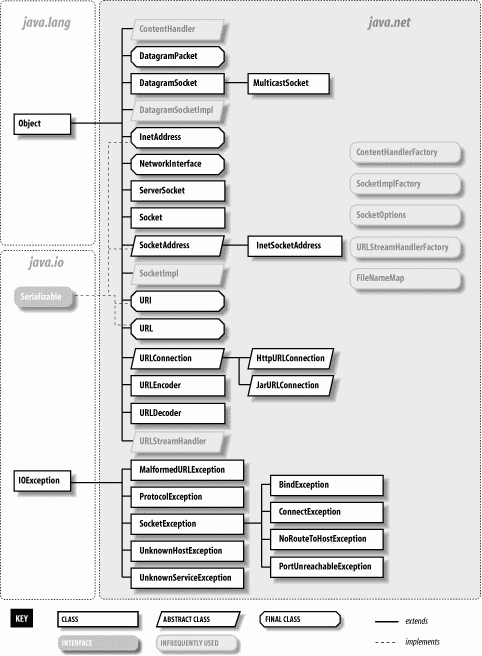
The classes of java.net fall into two categories: the Sockets API and tools for working with uniform resource locators (URLs). Figure 12-1 shows the java.net package.
Figure 12-1. The java.net package
Java's Sockets API provides access to the standard network protocols used for communications between hosts on the Internet. Sockets are the mechanism underlying all other kinds of portable networked communications. Sockets are your lowest-level tool you can use sockets for any kind of communications between client and server or peer applications on the Net, but you have to implement your own application-level protocols for handling and interpreting the data. Higher-level networking tools, such as remote method invocation and other distributed object systems, are implemented on top of sockets.
Java remote method invocation (RMI) is a powerful tool that leverages Java object serialization, allowing you to transparently work with objects on remote machines as if they were local. With RMI, it is easy to write distributed applications in which clients and servers work with each other's data as full-fledged Java objects rather than raw streams or packets of data.
In this chapter, we'll provide some simple and practical examples of Java network programming at both levels, using sockets and RMI. In Chapter 13, we'll look at the other half of the java.net package, which lets clients work with web services via URLs. Chapter 14 covers the Servlets API, which allows you to write application components for web servers.
12.1 Sockets
Sockets are a low-level programming interface for networked communications. They send streams of data between applications that may or may not be on the same host. Sockets originated in BSD Unix and are, in other languages, hairy and complicated things with lots of small parts that can break off and choke little children. The reason for this is that most socket APIs can be used with almost any kind of underlying network protocol. Since the protocols that transport data across the network can have radically different features, the socket interface can be quite complex.[1]
The java.net package supports a simplified, object-oriented interface to sockets that makes network communications considerably easier. If you have done network programming using sockets in C or another structured language, you should be pleasantly surprised at how simple things can be when objects encapsulate the gory details. If this is the first time you've come across sockets, you'll find that talking to another application over the network can be as simple as reading a file or getting user input from a terminal. Most forms of I/O in Java, including most network I/O, use the stream classes described in Chapter 11. Streams provide a unified I/O interface so that reading or writing across the Internet is similar to reading or writing on the local system.
Java provides sockets to support three distinct classes of underlying protocols: Sockets, DatagramSockets, and MulticastSockets. In this first section, we look at Java's basic Socket class, which uses a connection-oriented protocol. A connection-oriented protocol provides the equivalent of a telephone conversation; after establishing a connection, two applications can send streams of data back and forth the connection stays in place even when no one is talking. The protocol ensures that no data is lost and that whatever you send always arrives in the order that you sent it. In the next section, we look at the DatagramSocket class, which uses a connectionless protocol. A connectionless protocol is more like the postal service. Applications can send short messages to each other, but no end-to-end connection is set up in advance, and no attempt is made to keep the messages in order. It is not even guaranteed that the messages will arrive at all. A MulticastSocket is a variation of a DatagramSocket that perform multicasting sending data to multiple recipients simultaneously. Working with multicast sockets is very much like working with datagram sockets. Because multicasting is not widely supported across the Internet at this time, we do not cover it here.
Again, in theory, just about any protocol family can be used underneath the socket layer: Novell's IPX, Apple's AppleTalk, etc. But in practice, there's only one protocol family people care about on the Internet, and only one protocol family that Java supports: the Internet Protocol (IP). The Socket class speaks TCP, the connection-oriented flavor of IP, and the DatagramSocket class speaks UDP, the connectionless kind. These protocols are generally available on any system connected to the Internet.
12.1.1 Clients and Servers
When writing network applications, it's common to talk about clients and servers. The distinction is increasingly vague, but the side that initiates the conversation is usually considered the client. The side that accepts the request is usually the server. In the case where there are two peer applications using sockets to talk, the distinction is less important, but for simplicity we'll use this definition.
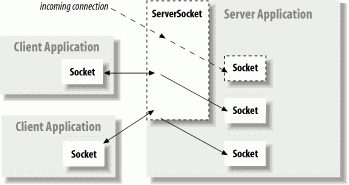
For our purposes, the most important difference between a client and a server is that a client can create a socket to initiate a conversation with a server application at any time, while a server must be prepared to listen for incoming conversations in advance. The java.net.Socket class represents one side of an individual socket connection on both the client and server. In addition, the server uses the java.net.ServerSocketclass to listen for new connections from clients. In most cases, an application acting as a server creates a ServerSocket object and waits, blocked in a call to its accept() method, until a connection arrives. When it does, the accept() method creates a Socket object the server uses to communicate with the client. A server may carry on conversations with multiple clients at once; in this case there is still only a single ServerSocket but the server has multiple Socket objects one associated with each client, as shown in Figure 12-2.
Figure 12-2. Clients and servers, Sockets and ServerSockets
A client needs two pieces of information to locate and connect to a server on the Internet: a hostname (used to find the host's network address) and a port number. The port number is an identifier that differentiates between multiple clients or servers on the same host. A server application listens on a prearranged port while waiting for connections. Clients select the port number assigned to the service they want to access. If you think of the host computers as hotels and the applications as guests, then the ports are like the guests' room numbers. For one person to call another, he or she must know the other party's hotel name and room number.
12.1.1.1 Clients
A client application opens a connection to a server by constructing a Socket that specifies the hostname and port number of the desired server:
try { Socket sock = new Socket("wupost.wustl.edu", 25); } catch ( UnknownHostException e ) { System.out.println("Can't find host."); } catch ( IOException e ) { System.out.println("Error connecting to host."); } This code fragment attempts to connect a Socket to port 25 (the SMTP mail service) of the host wupost.wustl.edu. The client handles the possibility that the hostname can't be resolved (UnknownHostException) and that it might not be able to connect to it (IOException). The constructor also works with a string containing the host's IP address:
Socket sock = new Socket("22.66.89.167", 25); Once a connection is made, input and output streams can be retrieved with the Socket getInputStream() and getOutputStream() methods. The following (rather arbitrary) code sends and receives some data with the streams:
try { Socket server = new Socket("foo.bar.com", 1234); InputStream in = server.getInputStream( ); OutputStream out = server.getOutputStream( ); // write a byte out.write(42); // write a newline or carriage return delimited string PrintWriter pout = new PrintWriter( out, true ); pout.println("Hello!"); // read a byte byte back = (byte)in.read( ); // read a newline or carriage return delimited string BufferedReader bin = new BufferedReader( new InputStreamReader( in ) ); String response = bin.readLine( ); // send a serialized Java object ObjectOutputStream oout = new ObjectOutputStream( out ); oout.writeObject( new java.util.Date( ) ); oout.flush( ); server.close( ); } catch (IOException e ) { ... } In this exchange, the client first creates a Socket for communicating with the server. The Socket constructor specifies the server's hostname (foo.bar.com) and a prearranged port number (1234). Once the connection is established, the client writes a single byte to the server using the OutputStream`s write() method. It then wraps a PrintWriter around the OutputStream in order to send a string of text more easily. Next, it performs the complementary operations: reading a byte from the server using InputStream's read() and then creating a BufferedReader from which to get a full string of text. Finally, we do something really funky and send a serialized Java object to the server, using an ObjectOutputStream. (We'll talk in depth about sending serialized objects later in this chapter.) The client then terminates the connection with the close() method. All these operations have the potential to generate IOExceptions; the catch clause is where our application would deal with these.
12.1.1.2 Servers
After a connection is established, a server application uses the same kind of Socket object for its side of the communications. However, to accept a connection from a client, it must first create a ServerSocket, bound to the correct port. Let's recreate the previous conversation from the server's point of view:
// Meanwhile, on foo.bar.com... try { ServerSocket listener = new ServerSocket( 1234 ); while ( !finished ) { Socket client = listener.accept( ); // wait for connection InputStream in = client.getInputStream( ); OutputStream out = client.getOutputStream( ); // read a byte byte someByte = (byte)in.read( ); // read a newline or carriage-return-delimited string BufferedReader bin = new BufferedReader( new InputStreamReader( in ) ); String someString = bin.readLine( ); // write a byte out.write(43); // say goodbye PrintWriter pout = new PrintWriter( out, true ); pout.println("Goodbye!"); // read a serialized Java object ObjectInputStream oin = new ObjectInputStream( in ); Date date = (Date)oin.readObject( ); client.close( ); } listener.close( ); } catch (IOException e ) { ... } catch (ClassNotFoundException e2 ) { ... } First, our server creates a ServerSocket attached to port 1234. On some systems, there are rules about what ports an application can use. Port numbers below 1024 are usually reserved for system processes and standard, well-known services, so we pick a port number outside of this range. The ServerSocket is created only once; thereafter we can accept as many connections as arrive.
Next we enter a loop, waiting for the accept() method of the ServerSocket to return an active Socket connection from a client. When a connection has been established, we perform the server side of our dialog, then close the connection and return to the top of the loop to wait for another connection. Finally, when the server application wants to stop listening for connections altogether, it calls the close() method of the ServerSocket.
This server is single-threaded; it handles one connection at a time, not calling accept() to listen for a new connection until it's finished with the current connection. A more realistic server would have a loop that accepts connections concurrently and passes them off to their own threads for processing. There is a lot to be said about implementing multithreaded servers. Later in this chapter we'll create a tiny web server that starts a new thread for each connection and also a slightly more complex web server that uses the NIO package to handle many connections with a small number of threads.
12.1.1.3 Sockets and security
The previous examples presuppose that the client has permission to connect to the server and that the server is allowed to listen on the specified socket. If you're writing a general, standalone application this is normally the case. However, applets and other untrusted applications run under the auspices of a security policy that can impose arbitrary restrictions on what hosts they may or may not talk to, and whether or not they can listen for connections.
The security policy imposed on applets by the SDK appletviewer and most browsers allow untrusted applets to open socket connections only to the host that served them. That is, they can talk back only to the server from which their class files were retrieved. Untrusted applets are not allowed to open server sockets themselves. Now, this doesn't mean that an untrusted applet can't cooperate with its server to communicate with anyone, anywhere. The applet's server could run a proxy that lets the applet communicate indirectly with anyone it likes. What this security policy prevents is malicious applets poking around inside corporate firewalls, making connections to trusted services. It places the burden of security on the originating server, and not the client machine. Restricting access to the originating server limits the usefulness of "Trojan" applications that do annoying things from the client side. (You probably won't let your proxy mail-bomb people, because you'll be blamed.)
While fully trusted code and applications that are run without any security policy can perform any kind of activities, the default security policy that comes with Java 1.2 and later disallows most network access. So, if you are going to run your application under the default security manager (using the -Djava.security.manager option on the command line or by manually installing the security manager within your application), you must modify the policy file to grant the appropriate permissions to your code. (See Section 3.3 in Chapter 3.) The following policy file fragment sets the socket permissions to allow connections to or from any host, on any nonprivileged port:
grant { permission java.net.SocketPermission "*:1024-", "listen,accept,connect"; }; When starting the Java interpreter, you can install the security manager and use this file (call it mysecurity.policy):
java -Djava.security.manager -Djava.security.policy=mysecurity.policy MyApplication
12.1.2 The DateAtHost Client
Many networked workstations run a time service that dispenses their local clock time on a well-known port. This was a precursor of NTP, the more general Network Time Protocol. In the next example, DateAtHost, we'll make a specialized subclass of java.util.Date that fetches the time from a remote host instead of initializing itself from the local clock. (See Chapter 10 for a complete discussion of the Date class.)
DateAtHost connects to the time service (port 37) and reads four bytes representing the time on the remote host. These four bytes have a peculiar specification which we'll decode to get the time. Here's the code:
//file: DateAtHost.java import java.net.Socket; import java.io.*; public class DateAtHost extends java.util.Date { static int timePort = 37; // seconds from start of 20th century to Jan 1, 1970 00:00 GMT static final long offset = 2208988800L; public DateAtHost( String host ) throws IOException { this( host, timePort ); } public DateAtHost( String host, int port ) throws IOException { Socket server = new Socket( host, port ); DataInputStream din = new DataInputStream( server.getInputStream( ) ); int time = din.readInt( ); server.close( ); setTime( (((1L << 32) + time) - offset) * 1000 ); } } That's all there is to it. It's not very long, even with a few frills. We have supplied two possible constructors for DateAtHost. Normally we'd expect to use the first, which simply takes the name of the remote host as an argument. The second constructor specifies the hostname and the port number of the remote time service. (If the time service were running on a nonstandard port, we would use the second constructor to specify the alternate port number.) This second constructor does the work of making the connection and setting the time. The first constructor simply invokes the second (using the this() construct) with the default port as an argument. Supplying simplified constructors that invoke their siblings with default arguments is a common and useful technique; that is the only reason we've shown it here.
The second constructor opens a socket to the specified port on the remote host. It creates a DataInputStream to wrap the input stream and then reads a four-byte integer using the readInt() method. It's no coincidence that the bytes are in the right order. Java's DataInputStream and DataOutputStream classes work with the bytes of integer types in network byte order (most significant to least significant). The time protocol (and other standard network protocols that deal with binary data) also uses the network byte order, so we don't need to call any conversion routines. Explicit data conversions would probably be necessary if we were using a nonstandard protocol, especially when talking to a non-Java client or server. In that case we'd have to read byte by byte and do some rearranging to get our four-byte value. After reading the data, we're finished with the socket, so we close it, terminating the connection to the server. Finally, the constructor initializes the rest of the object by calling Date's setTime() method with the calculated time value.
The four bytes of the time value are interpreted as an integer representing the number of seconds since the beginning of the 20th century. DateAtHost converts this to Java's variant of the absolute time (milliseconds since January 1, 1970, a date that should be familiar to Unix users). The conversion first creates a long value, which is the unsigned equivalent of the integer time. It subtracts an offset to make the time relative to the epoch (January 1, 1970) rather than the century, and multiplies by 1000 to convert to milliseconds. It then uses the converted time to initialize itself.
The DateAtHost class can work with a time retrieved from a remote host almost as easily as Date is used with the time on the local host. The only additional overhead is that we have to deal with the possible IOException that can be thrown by the DateAtHost constructor:
try { Date d = new DateAtHost( "sura.net" ); System.out.println( "The time over there is: " + d ); } catch ( IOException e ) { ... } This example fetches the time at the host sura.net and prints its value.
12.1.3 The TinyHttpd Server
Have you ever wanted to write your very own web server? Well, you're in luck. In this section, we're going to build TinyHttpd, a minimal but functional HTTP daemon. TinyHttpd listens on a specified port and services simple HTTP GET requests. They look something like this:
GET /path/filename [ optional stuff ]
Your web browser sends one or more of these requests for each document it retrieves from a web server. Upon reading a request, our server attempts to open the specified file and send its contents. If that document contains references to images or other items to be displayed inline, the browser follows up with additional GET requests. For best performance TinyHttpd services each request in its own thread. Therefore, TinyHttpd can service several requests concurrently.
This example works, but it's a bit oversimplified. Remember that file pathnames are still somewhat architecture-dependent in Java. This example should work, as is, on most systems, but could require some enhancement to work everywhere. It's possible to write slightly more elaborate code that uses the environmental information provided by Java to tailor itself to the local system. (Chapter 11 gives some hints about how.)
|
Now, without further ado, here's TinyHttpd:
//file: TinyHttpd.java import java.net.*; import java.io.*; import java.util.regex.*; public class TinyHttpd { public static void main( String argv[] ) throws IOException { ServerSocket ss = new ServerSocket( Integer.parseInt(argv[0]) ); while ( true ) new Thread( new TinyHttpdConnection( ss.accept() ) ).start( ); } } class TinyHttpdConnection implements Runnable { Socket client; TinyHttpdConnection ( Socket client ) throws SocketException { this.client = client; } public void run( ) { try { BufferedReader in = new BufferedReader( new InputStreamReader(client.getInputStream( ), "8859_1" ) ); OutputStream out = client.getOutputStream( ); PrintWriter pout = new PrintWriter( new OutputStreamWriter(out, "8859_1"), true ); String request = in.readLine( ); System.out.println( "Request: "+request); Matcher get = Pattern.compile("GET /?(\\S*).*").matcher( request ); if ( get.matches( ) ) { request = get.group(1); if ( request.endsWith("/") || request.equals("") ) request = request + "index.html"; try { FileInputStream fis = new FileInputStream ( request ); byte [] data = new byte [ 64*1024 ]; for(int read; (read = fis.read( data )) > -1; ) out.write( data, 0, read ); out.flush( ); } catch ( FileNotFoundException e ) { pout.println( "404 Object Not Found" ); } } else pout.println( "400 Bad Request" ); client.close( ); } catch ( IOException e ) { System.out.println( "I/O error " + e ); } } } Compile TinyHttpd and place it in your classpath, as described in Chapter 3. Go to a directory with some interesting documents and start the daemon, specifying an unused port number as an argument. For example:
% java TinyHttpd 1234
You should now be able to use your web browser to retrieve files from your host. You'll have to specify the port number you chose in the URL. For example, if your hostname is foo.bar.com, and you started the server as shown, you could reference a file as in:
http://foo.bar.com:1234/welcome.htm
Or if you're running both the server and your web browser on the same machine:
http://localhost:1234/welcome.html
TinyHttpd looks for files relative to its current directory, so the pathnames you provide should be relative to that location. Retrieved some files? (Did you notice that when you retrieved an HTML file, your web browser automatically generated more requests for items like images that were contained within it?) Let's take a closer look.
The TinyHttpd application has two classes. The public TinyHttpd class contains the main() method of our standalone application. It begins by creating a ServerSocket, attached to the specified port. It then loops, waiting for client connections and creating instances of the second class, a TinyHttpdConnection, to service each request. The while loop waits for the ServerSocket accept() method to return a new Socket for each client connection. The Socket is passed as an argument to construct the TinyHttpdConnection thread that handles it.
TinyHttpdConnection is a Runnable object. For each connection we start a thread, which lives long enough to handle the single client connection and then dies. The body of TinyHttpdConnection's run() method is where all the magic happens. First, we fetch an OutputStream for talking back to our client. The second line reads the GET request from the InputStream into the variable request. This request is a single newline-terminated String that looks like the GET request we described earlier. For this we use a BufferedInputStream wrapped around an InputStreamReader. (We'll say more about the InputStreamReader in a moment.)
We then parse the contents of request to extract a filename. Here we are using the Regular Expression API (see Chapter 9 for a full discussion of regular expressions and the Regular Expression API). The pattern simply looks for the "GET " followed by an optional slash and then any string of non-whitespace characters. We add the ".*" at the end to cause the pattern to match the whole input, so that we can use the Matcher match() method to test if the whole request made sense to us or not. The part that matches the filename is in a capture group: "(\\S*)". This allows us to retrieve that text with the Matcher group() method. Finally, we check to see if the requested filename looks like a directory name (i.e., ends in a slash) or is empty. In these cases, we append the familiar default filename index.html as a convenience.
Once we have the filename, we try to open the specified file and send its contents using a large byte array. Here we loop, reading a buffer at a time and writing to the client via the OutputStream. If we can't parse the request or the file doesn't exist, we use the PrintStream to send a textual message. Then we return an appropriate HTTP error message. Finally, we close the socket and return from run(), removing our Thread.
12.1.3.1 Do French web servers speak French?
In TinyHttpd, we explicitly created the InputStreamReader for our BufferedRead and the OutputStreamWriter for our PrintWriter. We do this so that we can specify the character encoding to use when converting to and from the byte representation of the HTTP protocol messages. (Note that we're not talking about the body of the file to be sent that is simply a stream of raw bytes to us; rather we're talking here about the GET and response messages.) If we didn't specify, we'd get the default character encoding for the local system. For many purposes that may be correct, but in this case we are speaking of a well-defined international protocol, and we should be specific. The RFC for HTTP specifies that web clients and servers should use the ISO8859-1 character encoding. We specify this encoding explicitly when we construct the InputStreamReader and OutputStreamWriter. Now as it turns out, ISO8859-1 is just plain ASCII and conversion to and from Unicode should always leave ASCII values unchanged, so again we would probably not be in any trouble if we did not specify an encoding. But it's important to think about these things at least once and now you have.
12.1.3.2 Taming the daemon
An important problem with TinyHttpd is that there are no restrictions on the files it serves. With a little trickery, the daemon would happily send any file in your filesystem to the client. It would be nice if we could enforce the restriction that TinyHttpd serve only files that are in the current working directory or a subdirectory, as it normally does. An easy way to do this is to activate the Java Security Manager. Normally, a security manager is used to prevent Java code downloaded over the Net from doing anything suspicious. However, we can press the security manager into service to restrict file access in our application as well.
You can use a policy like the simple one that we provided in the previous section Section 12.1.1.3; it allows the server to accept connections on a specified range of sockets. Fortuitously, the default file-access security policy does just what we want: it allows an application access to files in its current working directory and subdirectories. So simply installing the security manager provides exactly the kind of file protection that we wanted in this case. (It would be easy to add additional permissions if you wish to extend the server's range to other well-defined areas.)
With the security manager in place, the daemon cannot access anything outside the current directory and its subdirectories. If it tries to, the security manager throws an exception and prevents access to the file. In that case, we should have TinyHttpd catch the SecurityException and return a proper message to the web browser. Add the following catch clause after the FileNotFoundException's catch clause.
... } catch ( Security Exception e ) { pout.println("403 Forbidden"); } 12.1.3.3 Room for improvement
TinyHttpd still has quite a bit of room for improvement. Technically it implements only an obsolete subset of the HTTP protocol (Version 0.9) in which the server expects only the GET request and returns just the content. All modern servers speak either HTTP 1.0 or 1.1, which allows for additional metadata in both the HTTP request and response and requires certain data (like version number, content length, etc.). HTTP 1.1 also allows multiple requests to be sent over one socket connection.
And of course real web servers can do all sorts of other things. For example, you might consider adding a few lines of code to read directories and generate linked HTML listings as most web servers do. Have fun with this example, and you can learn quite a bit!
12.1.4 Socket Options
As we've said, the Java sockets API is a somewhat simplified interface to the general socket mechanisms. In other environments, where all the gory details of the network are visible to you, a lot of complex and sometimes esoteric options can be set on sockets to govern the behavior of the underlying protocols. Java gives us access to a few important ones. We'll refer to them by their standard (C language) names so that you can recognize them in other networking books.
12.1.4.1 SO_TIMEOUT
The SO_TIMEOUT option sets a timer on all I/O methods of a socket that block so that you don't have to wait forever if they don't return. This works for operations such as accept() on server sockets and read() or write() on all sockets. If the timer expires before the operation would complete, an InterruptedIOException is thrown. You can catch the exception and continue to use the socket normally if it is appropriate, or you can take the opportunity to bail out of the operation. Multi-threaded, blocking servers such as TinyHttpd can use this sort of technique for their "shutdown" logic:
serverSocket.setSoTimeout( 2000 ); // 2 seconds while ( !shutdown ) { try { Socket client = serverSocket.accept( ); handleClient( client ); } catch ( InterruptedIOException e ) { // ignore the exception } // exit } You set the timer by calling the setSoTimeout() method of the Socket class with the timeout period, in milliseconds, as an int argument. This works for regular Sockets, ServerSockets (TCP), and DatagramSockets (UDP), discussed in the next section. To find the current timeout value, call getSoTimeout().
This feature is a workaround for the fact that stream-oriented I/O operations in Java are "blocking," and there is no way to test, or poll, them for activity. Later in this chapter we'll complete our discussion of the NIO package, which provides full nonblocking I/O for all types of operations, including sockets.
12.1.4.2 TCP_NODELAY
This option turns off a feature of TCP called Nagle's algorithm, which tries to prevent certain interactive applications from flooding the network with very tiny packets. You can turn this feature off if you have a fast network, and you want all packets sent as soon as possible. The Socket setTcpNoDelay() method takes a boolean argument specifying whether the delay is on or off. To find out whether the TCP_NODELAY option is enabled, call getTcpNoDelay(), which returns a boolean.
12.1.4.3 SO_LINGER
This option controls what happens to any unsent data when you perform a close() on an active socket connection. Normally the system blocks on the close and tries to deliver any network buffered data and close the connection gracefully. The setSoLinger() method of the Socket class takes two arguments: a boolean that enables or disables the option and an int that sets the time to wait (the linger value), in seconds. If you set the linger value to 0, any unsent data is discarded, and the TCP connection is aborted (terminated with a reset). To find the current linger value, call getSoLinger().
12.1.4.4 TCP_KEEPALIVE
This option can be enabled with the setKeepAlive() method. It triggers a feature of TCP that polls the other side every two hours if there is no other activity. Normally, when there is no data flowing on a TCP connection, no packets are sent. This can make it difficult to tell whether the other side is simply being quiet or has disappeared. If one side of the connection closes properly, this is detected. But if the other side simply disappears, we don't know unless and until we try to talk to it. For this reason, servers often use TCP_KEEPALIVE to detect lost client connections (where they might otherwise only respond to requests, rather than initiate them). Keepalive is not part of the TCP specification; it's an add-on that's not guaranteed to be implemented everywhere. If you have the option, the best way to detect lost clients is to implement the polling as part of your own protocol.
12.1.4.5 Half close
In TCP, it is technically possible to close one direction of a stream but not the other. In other words, you can shut down sending but not receiving, or vice versa. A few protocols use this to indicate the end of a client request by closing the client side of the stream, allowing the end of stream to be detected by the server. You can shut down either half of a socket connection with shutdownOutput() or shutdownInput() .
12.1.5 Proxies and Firewalls
Many networks are behind firewalls, which prevent applications from opening direct socket connections to the outside network. Instead, they provide a service called SOCKS (named for sockets) that serves as a proxy server for socket connections, giving the administrators more control over what connections are allowed. Alternatively, firewalls can choose to proxy only HTTP level requests at a higher level using an HTTP proxy. Java has built-in support for both SOCKS and HTTP proxies. All you have to do is set some system properties in your application (in an applet, this should be already taken care of for you, because you wouldn't have authority to set those properties). Here's a list of the properties that configure Java to use a socket proxy server:
- socksproxyHost
-
The SOCKS proxy server name
- socksproxyPort
-
The SOCKS proxy port number
It's similar for an HTTP proxy:
- http.proxySet
-
A boolean (true or false) indicating whether to use the proxy
- http.proxyHost
-
The proxy server name
- http.proxyPort
-
The proxy port number
You can set these properties on the command line using the Java interpreter's -D option or by calling the System.setProperty() method. The following command runs MyProgram using the HTTP proxy server at foo.bar.com on port 1234:
% java -Dhttp.proxySet=true -Dhttp.proxyServer=foo.bar.com -Dhttp.proxyPort=1234 MyProgram
If the firewall does not allow any outside socket connections, your applet or application may still be able to communicate with the outside world by using HTTP to send and receive data in this way. See Chapter 13 for an example of how to perform an HTTP POST operation to send data.
12.2 Datagram Sockets
TinyHttpd used a Socket to create a connection to the client using the TCP protocol. In that example, TCP itself took care of data integrity; we didn't have to worry about data arriving out of order or incorrect. Now we take a walk on the wild side, building an applet that uses a java.net.DatagramSocket, which uses the UDP protocol. A datagram is sort of like a letter sent via the postal service: it's a discrete chunk of data transmitted in one packet. Unlike the previous example, where we could get a convenient OutputStream from our Socket and write the data as if writing to a file, with a DatagramSocket we have to work one datagram at a time. (Of course, the TCP protocol was taking our OutputStream and slicing the data into packets, but we didn't have to worry about those details.)
UDP doesn't guarantee that the data is received. If the data packets are received, they may not arrive in the order in which we sent them; it's even possible for duplicate datagrams to arrive (under rare circumstances). Using UDP is something like cutting the pages out of the encyclopedia, putting them into separate envelopes, and mailing them to your friend. If your friend wants to read the encyclopedia, it's his or her job to put the pages in order. If some pages get lost in the mail, your friend has to send you a letter asking for replacements.
Obviously, you wouldn't use UDP to send a huge amount of data without error correction. But it's significantly more efficient than TCP, particularly if you don't care about the order in which messages arrive, or whether 100% of their arrival is guaranteed. For example, in a simple periodic database lookup, the client can send a query; the server's response itself constitutes an acknowledgment. If the response doesn't arrive within a certain time, the client can send another query. It shouldn't be hard for the client to match responses to its original queries. Some important applications that use UDP are the Domain Name System (DNS) and Sun's Network File System (NFS).
12.2.1 The HeartBeat Applet
In this section, we build a simple applet, HeartBeat, that sends a datagram to its server each time it's started and stopped. We also build a simple standalone server application, Pulse, that receives these datagrams and prints them. By tracking the output, you can have a crude measure of who is currently looking at your web page at any given time (assuming that firewalls do not block the UDP packets). This is an ideal application for UDP: we don't want the overhead of a TCP socket, and if the datagrams get lost, it's no big deal.
First, the HeartBeat applet:
//file: HeartBeat.java import java.net.*; import java.io.*; public class HeartBeat extends java.applet.Applet { String myHost; int myPort; public void init( ) { myHost = getCodeBase( ).getHost( ); myPort = Integer.parseInt( getParameter("myPort") ); } private void sendMessage( String message ) { try { byte [] data = message.getBytes( ); InetAddress addr = InetAddress.getByName( myHost ); DatagramPacket pack = new DatagramPacket(data, data.length, addr, myPort ); DatagramSocket ds = new DatagramSocket( ); ds.send( pack ); ds.close( ); } catch ( IOException e ) { System.out.println( e ); // Error creating socket } } public void start( ) { sendMessage("Arrived"); } public void stop( ) { sendMessage("Departed"); } } Compile the applet and include it in an HTML document with an <APPLET> tag:
<APPLET height=10 width=10 code=HeartBeat> <PARAM name="myPort" value="1234"> </APPLET>
Make sure to place the compiled HeartBeat.class file in the same directory as the HTML document. If you're not familiar with embedding applets in HTML documents, consult Chapter 22.
The myPort parameter should specify the port number on which our server application listens for data.
Next, the server-side application, Pulse:
//file: Pulse.java import java.net.*; import java.io.*; public class Pulse { public static void main( String [] argv ) throws IOException { DatagramSocket s = new DatagramSocket( Integer.parseInt(argv[0]) ); while ( true ) { DatagramPacket packet = new DatagramPacket(new byte [1024], 1024); s.receive( packet ); String message = new String( packet.getData( ) ); System.out.println( "Heartbeat from: " + packet.getAddress( ).getHostName( ) + " - " + message ); } } } Compile Pulse and run it on your web server, specifying a port number as an argument:
% java Pulse 1234
The port number should be the same as the one you used in the myPort parameter of the <APPLET> tag for HeartBeat.
Now, pull up the web page in your browser. You won't see anything interesting there (a better application might do something visual as well), but you should get a blip from the Pulse application. Leave the page and return to it a few times. Each time the applet is started or stopped, it sends a message, and Pulse reports it:
Heartbeat from: foo.bar.com - Arrived Heartbeat from: foo.bar.com - Departed Heartbeat from: foo.bar.com - Arrived Heartbeat from: foo.bar.com - Departed ...
Cool, eh? Just remember the datagrams are not guaranteed to arrive (although it's highly unlikely you'll ever see them fail on a normal network), and it's possible that you could miss an arrival or a departure. Now let's look at the code.
12.2.1.1 The HeartBeat applet code
HeartBeat overrides the init() , start(), and stop() methods of the Applet class and implements one private method of its own, sendMessage(), which sends a datagram. (Again, we haven't covered applets yet, so if you want more details you'll have to refer to Chapter 22.) HeartBeat begins its life in init(), where it determines the destination for its messages. It uses the Applet getCodeBase() and getHost() methods to find the name of its originating host and fetches the correct port number from the myPort parameter of the <APPLET> tag. After init() has finished, the start() and stop() methods are called whenever the applet is started or stopped. These methods merely call sendMessage() with the appropriate message.
sendMessage() is responsible for sending a String message to the server as a datagram. It takes the text as an argument, constructs a datagram packet containing the message, and then sends the datagram. All the datagram information is packed into a java.net.DatagramPacket object, including the destination and port number. The DatagramPacket is like an addressed envelope, stuffed with our bytes. After the DatagramPacket is created, sendMessage() simply has to open a DatagramSocket and send it.
The first five lines of sendMessage() build the DatagramPacket:
try { byte [] data = message.getBytes( ); InetAddress addr = InetAddress.getByName( myHost ); DatagramPacket pack = new DatagramPacket(data, data.length, addr, myPort ); First, the contents of message are placed into an array of bytes called data. Next a java.net.InetAddress object is created from the name myHost. An InetAddress holds the network address information for a host in a special format. We get an InetAddress object for our host using the static getByName() method of the InetAddress class. (We can't construct an InetAddress object directly.) Finally, we call the DatagramPacket constructor with four arguments: the byte array containing our data, the length of the data, the destination address object, and the port number.
The remaining lines construct a default client DatagramSocket and call its send() method to transmit the DatagramPacket. After sending the datagram, we close the socket:
DatagramSocket ds = new DatagramSocket( ); ds.send( pack ); ds.close( );
Two operations throw a type of IOException: the InetAddress.getByName() lookup and the DatagramSocket send() method. InetAddress.getByName() can throw an UnknownHostException, which is a type of IOException that indicates the hostname can't be resolved. If send() throws an IOException, it implies a serious client-side problem in talking to the network. We need to catch these exceptions; our catch block simply prints a message telling us that something went wrong. If we get one of these exceptions, we can assume the datagram never arrived. However, we can't assume the inverse: even if we don't get an exception, we still don't know that the host is actually accessible or that the data actually arrived; with a DatagramSocket, we never find out from the API.
12.2.1.2 The Pulse server code
The Pulse server corresponds to the HeartBeat applet. First, it creates a DatagramSocket to listen on our prearranged port. This time, we specify a port number in the constructor; we get the port number from the command line as a string (argv[0]) and convert it to an integer with Integer.parseInt(). Note the difference between this call to the constructor and the call in HeartBeat. In the server, we need to listen for incoming datagrams on a prearranged port, so we need to specify the port when creating the DatagramSocket. The client just sends datagrams, so we don't have to specify the port in advance; we build the port number into the DatagramPacket itself.
Second, Pulse creates an empty DatagramPacket of a fixed size to receive an incoming datagram. This alternative constructor for DatagramPacket takes a byte array and a length as arguments. As much data as possible is stored in the byte array when it's received. (A practical limit on the size of a UDP datagram that can be sent over the Internet is 8K, although they can be larger for local network use theoretically up to 64K.) Finally, Pulse calls the DatagramSocket's receive() method to wait for a packet to arrive. When a packet arrives, its contents are printed by turning them to a string using the default system encoding.
As you can see, DatagramSockets are slightly more tedious than regular Sockets. With datagrams, it's harder to spackle over the messiness of the socket interface. The Java API rather slavishly follows the Unix interface, and that doesn't help. It's easy to imagine conveniences that would make all this simpler; perhaps we'll have them in a future release.
12.3 Simple Serialized Object Protocols
Earlier in this chapter, we showed a hypothetical conversation in which a client and server exchanged some primitive data and a serialized Java object. Passing an object between two programs may not have seemed like a big deal at the time, but in the context of Java as a portable bytecode language, it has profound implications. In this section, we show how a protocol can be built using serialized Java objects.
Before we move on, it's worth considering network protocols. Most programmers would consider working with sockets to be "low-level" and unfriendly. Even though Java makes sockets much easier to use than many other languages, sockets still provide only an unstructured flow of bytes between their endpoints. If you want to do serious communications using sockets, the first thing you have to do is come up with a protocol that defines the data you'll be sending and receiving. The most complex part of that protocol usually involves how to marshal (package) your data for transfer over the Net and unpack it on the other side.
As we've seen, Java's DataInputStream and DataOuputStream classes solve this problem for simple data types. We can read and write numbers, Strings, and Java primitives in a standard format that can be understood on any other Java platform. But to do real work, we need to be able to put simple types together into larger structures. Java object serialization solves this problem elegantly, by allowing us to send our data just as we use it, as the state of Java objects. Serialization can even pack up entire graphs of interconnected objects and put them back together at a later time, in another Java VM.
12.3.1 A Simple Object-Based Server
In the following example, a client sends a serialized object to the server, and the server responds in kind. The object sent by the client represents a request and the object returned by the server represents the response. The conversation ends when the client closes the connection. It's hard to imagine a simpler protocol. All the hairy details are taken care of by object serialization, which allows us to work with standard Java objects as we are used to.
To start, we define a class Request to serve as a base class for the various kinds of requests we make to the server. Using a common base class is a convenient way to identify the object as a type of request. In a real application, we might also use it to hold basic information such as client names and passwords, timestamps, serial numbers, etc. In our example, Request can be an empty class that exists so others can extend it:
//file: Request.java public class Request implements java.io.Serializable {} Request implements Serializable, so all its subclasses are serializable by default. Next we create some specific kinds of Requests. The first, DateRequest, is also a trivial class. We use it to ask the server to send us a java.util.Date object as a response:
//file: DateRequest.java public class DateRequest extends Request {} Next, we create a generic WorkRequest object. The client sends a WorkRequest to get the server to perform some computation for it. The server calls the WorkRequest object's execute() method and returns the resulting object as a response:
//file: WorkRequest.java public abstract class WorkRequest extends Request { public abstract Object execute( ); } For our application, we subclass WorkRequest to create MyCalculation, which adds code that performs a specific calculation; in this case, we just square a number:
//file: MyCalculation.java public class MyCalculation extends WorkRequest { int n; public MyCalculation( int n ) { this.n = n; } public Object execute( ) { return new Integer( n * n ); } } As far as data content is concerned, MyCalculation really doesn't do much; it only transports an integer value for us. But keep in mind that a request object could hold lots of data, including references to many other objects in complex structures such as arrays or linked lists. The only requirement is that all the objects to be sent must be serializable or must be able to be discarded by marking them as transient (see Section 11.3 in Chapter 11). An important thing to note here is that MyCalculation also contains behavior the execute() operation. While Java object serialization sends only the data content of a class, in our discussion of RMI below we'll see how Java's ability to dynamically download bytecode for classes can make both the data content and behavior portable over the network.
Now that we have our protocol, we need the server. The following Server class looks a lot like the TinyHttpd server we developed earlier in this chapter:
//file: Server.java import java.net.*; import java.io.*; public class Server { public static void main( String argv[] ) throws IOException { ServerSocket ss = new ServerSocket( Integer.parseInt(argv[0]) ); while ( true ) new ServerConnection( ss.accept( ) ).start( ); } } // end of class Server class ServerConnection extends Thread { Socket client; ServerConnection ( Socket client ) throws SocketException { this.client = client; } public void run( ) { try { ObjectInputStream in = new ObjectInputStream( client.getInputStream( ) ); ObjectOutputStream out = new ObjectOutputStream( client.getOutputStream( ) ); while ( true ) { out.writeObject( processRequest( in.readObject( ) ) ); out.flush( ); } } catch ( EOFException e3 ) { // Normal EOF try { client.close( ); } catch ( IOException e ) { } } catch ( IOException e ) { System.out.println( "I/O error " + e ); // I/O error } catch ( ClassNotFoundException e2 ) { System.out.println( e2 ); // unknown type of request object } } private Object processRequest( Object request ) { if ( request instanceof DateRequest ) return new java.util.Date( ); else if ( request instanceof WorkRequest ) return ((WorkRequest)request).execute( ); else return null; } } The Server handles each request in a separate thread. For each connection, the run() method creates an ObjectInputStream and an ObjectOutputStream, which the server uses to receive the request and send the response. The processRequest() method decides what the request means and comes up with the response. To figure out what kind of request we have, we use the instanceof operator to look at the object's type.
Finally, we get to our Client, which is even simpler:
//file: Client.java import java.net.*; import java.io.*; public class Client { public static void main( String argv[] ) { try { Socket server = new Socket( argv[0], Integer.parseInt(argv[1]) ); ObjectOutputStream out = new ObjectOutputStream( server.getOutputStream( ) ); ObjectInputStream in = new ObjectInputStream( server.getInputStream( ) ); out.writeObject( new DateRequest( ) ); out.flush( ); System.out.println( in.readObject( ) ); out.writeObject( new MyCalculation( 2 ) ); out.flush( ); System.out.println( in.readObject( ) ); server.close( ); } catch ( IOException e ) { System.out.println( "I/O error " + e ); // I/O error } catch ( ClassNotFoundException e2 ) { System.out.println( e2 ); // unknown type of response object } } } Just like the server, Client creates the pair of object streams. It sends a DateRequest and prints the response; it then sends a MyCalculation object and prints the response. Finally, it closes the connection. On both the client and the server, we call the flush() method after each call to writeObject(). This method forces the system to send any buffered data; it's important because it ensures that the other side sees the entire request before we wait for a response. When the client closes the connection, our server catches the EOFException that is thrown and ends the session. Alternatively, our client could write a special object, perhaps null, to end the session; the server could watch for this item in its main loop.
The order in which we construct the object streams is important. We create the output streams first because the constructor of an ObjectInputStream tries to read a header from the stream to make sure that the InputStream really is an object stream. If we tried to create both of our input streams first, we would deadlock waiting for the other side to write the headers.
Finally, we run the example, giving it a port number as an argument:
% java Server 1234
Then we run the Client, telling it the server's hostname and port number:
% java Client flatland 1234
The result should look something like this:
Sun Mar 3 14:25:25 PDT 2002 4
All right, the result isn't that impressive, but it's easy to imagine more substantial applications. Imagine that you need to perform some complex computation on many large datasets. Using serialized objects makes maintenance of the data objects natural and sending them over the wire trivial. There is no need to deal with byte-level protocols at all.
12.3.1.1 Limitations
There is one catch in this scenario: both the client and server need access to the necessary classes. That is, all the Request classes including MyCalculation, which is really the property of the Client have to be in the classpath on both the client and the server machines. As we hinted earlier, in the next section we'll see that it's possible to send the Java bytecode along with serialized objects to allow completely new kinds of objects to be transported over the network dynamically. We could create this solution on our own, adding to the earlier example using a network class loader to load the classes for us. But we don't have to: Java's RMI facility handles that for us. The ability to send both serialized data and class definitions over the network is not always needed but it makes Java a powerful tool for developing advanced distributed applications.
12.4 Remote Method Invocation
The most fundamental means of interobject communication in Java is method invocation. Mechanisms such as the Java event model are built on simple method invocations between objects in the same virtual machine. Therefore, when we want to communicate between virtual machines on different hosts, it's natural to want a mechanism with similar capabilities and semantics. Java's Remote Method Invocation (RMI) mechanism does just that. It lets us get a reference to an object on a remote host and use it as if it were in our own virtual machine. RMI lets us invoke methods on remote objects, passing real Java objects as arguments and getting real Java objects as returned values.
Remote invocation is nothing new. For many years C programmers have used remote procedure calls (RPC) to execute a C function on a remote host and return the results. The primary difference between RPC and RMI is that RPC, being an offshoot of the C language, is primarily concerned with data structures. It's relatively easy to pack up data and ship it around, but for Java, that's not enough. In Java we don't just work with data structures; we work with objects that contain both data and methods for operating on the data. Not only do we have to be able to ship the state of an object (the data) over the wire, but the recipient has to be able to interact with the object (use its methods) after receiving it. With Java RMI, you can work with network services in an object-oriented fashion, using real, extensible types.
It should be no surprise that RMI uses object serialization, which allows us to send graphs of objects (objects and all the connected objects that they reference). When necessary, RMI can also use dynamic class loading and the security manager to transport Java classes safely. So, in addition to making remote method calls almost as easy to use as local calls, RMI also makes it possible to ship both data and behavior (code) around the Net.
12.4.1 Remote and Nonremote Objects
Before an object can be used remotely through RMI, it must be serializable. But that's not sufficient. Remote objects in RMI are real distributed objects. As the name suggests, a remote object can be an object on a different machine, or it can be an object on the local host. The term remote means that the object is used through a special kind of object interface that can be passed over the network. Like normal Java objects, remote objects are passed by reference. Regardless of where the reference is used, the method invocation occurs at the original object, which still lives on its original host. If a remote host returns a reference to one of its remote objects to you, you can call the object's methods; the actual method invocations happen on the remote host, where the object resides.
Nonremote objects are simpler; they're just normal serializable objects. (You can pass these over the network as we did in the previous section Section 12.3.1.) The catch is that when you pass a nonremote object over the network, it is simply copied, so references to the object on one host are not the same as those on the remote host. Nonremote objects are passed by copy (as opposed to by reference). This may be acceptable for many kinds of data-oriented objects in your application, such as the client requests and server responses in our previous example.
12.4.1.1 Stubs and skeletons
No, we're not talking about a gruesome horror movie. Stubs and skeletons are used in the implementation of remote objects. When you invoke a method on a remote object (which could be on a different host), you are actually calling some local code that serves as a proxy for that object. This is the stub. (It is called a stub because it is something like a truncated placeholder for the object.) The skeleton is another proxy that lives with the real object on its original host. It receives remote method invocations from the stub and passes them to the object.
After you create stubs and skeletons you never have to work with them directly; they are hidden from you (in the closet, so to speak). Stubs and skeletons for your remote objects are created by running the rmic (RMI compiler) utility. After compiling your Java source files normally, you run rmic on the remote object classes as a second pass. It's easy; we'll show you how in the following examples.
12.4.1.2 Remote interfaces
Remote objects are objects that implement a special remote interface that specifies which of the object's methods can be invoked remotely. The remote interface must be explicitly created, and it must extend the java.rmi.Remote interface. Your remote object then implements its remote interface, as does the stub object that is automatically generated for it. In the rest of your code, you should then refer to the remote object as an instance of the remote interface not as an instance of its actual class. Because both the real object and stub implement the remote interface, they are equivalent as far as we are concerned (for method invocation); locally, we never have to worry about whether we have a reference to a stub or to an actual object. This "type equivalence" means that we can use normal language features such as casting, with remote objects. Of course public fields (variables) of the remote object are not accessible through an interface, so you must make accessor methods if you want to manipulate the remote object's fields.
All methods in the remote interface must declare that they can throw the exception java.rmi.RemoteException. This exception (or one of its subclasses) is thrown when any kind of networking error happens, for example, a server crash, a network failure, or a request for an unavailable object.
Here's a simple example of the remote interface that defines the behavior of RemoteObject; we give it two methods that can be invoked remotely, both of which return some kind of Widget object:
import java.rmi.*; public interface RemoteObject extends Remote { public Widget doSomething( ) throws RemoteException; public Widget doSomethingElse( ) throws RemoteException; } 12.4.1.3 The UnicastRemoteObject class
The actual implementation of a remote object (not the interface we discussed previously) usually extends java.rmi.server.UnicastRemoteObject. This is the RMI equivalent to the familiar Object class. When a subclass of UnicastRemoteObject is constructed, the RMI runtime system automatically "exports" it to start listening for network connections from remote interfaces (stubs) for the object. Like java.lang.Object, this superclass also provides implementations of equals(), hashcode(), and toString() that make sense for a remote object.
Here's a remote object class that implements the RemoteObject interface; we haven't shown implementations for the two methods or the constructor:
public class MyRemoteObject implements RemoteObject extends java.rmi.UnicastRemoteObject { public RemoteObjectImpl( ) throws RemoteException {...} public Widget doSomething( ) throws RemoteException {...} public Widget doSomethingElse( ) throws RemoteException {...} // other non-public methods ... } This class can have as many additional methods as it needs; presumably, most of them will be private, but that isn't strictly necessary. We have to supply a constructor explicitly, even if the constructor does nothing, because the constructor (like any method) can throw a RemoteException; we therefore can't use the default constructor.
What if we can't or don't want to make our remote object implementation a subclass of UnicastRemoteObject? Suppose, for example, that it has to be a subclass of BankAccount or some other special base type for our system. Well, we can simply take over the job of exporting the object ourselves, using the static method exportObject() of UnicastRemoteObject. The exportObject() method takes as an argument a Remote interface and accomplishes what the UnicastRemoteObject constructor normally does for us. It returns as a value the remote object's client stub. However, you will normally not do anything with this directly. In the next section, we'll discuss how to get stubs to your client through the RMI registry (a lookup service).
Normally, exported objects listen on individual ephemeral (randomly assigned) port numbers by default. (This is implementation-dependent.) You can control the port number allocation explicitly by exporting your objects using another form of UnicastRemoteObject.exportObject(), which takes both a Remote interface and a port number as arguments.
Finally, the name UnicastRemoteObject begs the question, "What other kinds of remote objects are there?" Right now, none. It's possible that Sun will develop remote objects using other protocols or multicast techniques in the future.
12.4.1.4 The RMI registry
The registry is the RMI phone book. You use the registry to look up a reference to a registered remote object on another host. We've already described how remote references can be passed back and forth by remote method calls. But the registry is needed to bootstrap the process: the client needs some way of looking up some initial object.
The registry is implemented by a class called Naming and an application called rmiregistry. This application must be running on the local host before you start a Java program that uses the registry. You can then create instances of remote objects and bind them to particular names in the registry. (Remote objects that bind themselves to the registry sometimes provide a main() method for this purpose.) A registry name can be anything you choose; it takes the form of a slash-separated path. When a client object wants to find your object, it constructs a special URL with the rmi: protocol, the hostname, and the object name. On the client, the RMI Naming class then talks to the registry and returns the remote object reference.
So, which objects need to register themselves with the registry? Well, initially this can be any object the client has no other way of finding. But a call to a remote method can return another remote object without using the registry. Likewise, a call to a remote method can have another remote object as its argument, without requiring the registry. So you could design your system such that only one object registers itself and then serves as a factory for any other remote objects you need. In other words, it wouldn't be hard to build a simple object request "bouncer" (we won't say "broker") that returns references to all the remote objects your application uses. Depending on how you structure your application, this may happen naturally anyway.
The RMI registry is just one implementation of a lookup mechanism for remote objects. It is not very sophisticated, and lookups tend to be slow. It is not intended to be a general-purpose directory service but simply to bootstrap RMI communications. More generally, the Java Naming and Directory service (JNDI) can be used as a frontend to other name services that can provide this service. It is used with RMI as part of the Enterprise Java Beans APIs. The factory registry that we mentioned is also extremely flexible and useful.
12.4.2 An RMI Example
The first example using RMI is a duplication of the simple serialized object protocol from the previous section. We make a remote RMI object called MyServer on which we can invoke methods to get a Date object or execute a WorkRequest object. First, we define our Remote interface:
//file: ServerRemote.java import java.rmi.*; import java.util.*; public interface ServerRemote extends Remote { Date getDate( ) throws RemoteException; Object execute( WorkRequest work ) throws RemoteException; } The ServerRemote interface extends the java.rmi.Remote interface, which identifies objects that implement it as remote objects. We supply two methods that take the place of our old protocol: getDate() and execute().
Next, we implement this interface in a class called MyServer that defines the bodies of these methods. (Note that a more common convention for naming the implementation of remote interfaces is to append Impl to the class name. Using that convention MyServer would instead be named something like ServerImpl.)
//file: MyServer.java import java.rmi.*; import java.util.*; public class MyServer extends java.rmi.server.UnicastRemoteObject implements ServerRemote { public MyServer( ) throws RemoteException { } // implement the ServerRemote interface public Date getDate( ) throws RemoteException { return new Date( ); } public Object execute( WorkRequest work ) throws RemoteException { return work.execute( ); } public static void main(String args[]) { try { ServerRemote server = new MyServer( ); Naming.rebind("NiftyServer", server); } catch (java.io.IOException e) { // problem registering server } } } MyServer extends java.rmi.UnicastRemoteObject, so when we create an instance of MyServer, it is automatically exported and starts listening to the network. We start by providing a constructor, which must throw RemoteException, accommodating errors that might occur in exporting an instance. Next, MyServer implements the methods of the remote interface ServerRemote. These methods are straightforward.
The last method in this class is main(). This method lets the object set itself up as a server. main() creates an instance of the MyServer object and then calls the static method Naming.rebind() to place the object in the registry. The arguments to rebind() include the name of the remote object in the registry (NiftyServer) which clients use to look up the object and a reference to the server object itself. We could have called bind() instead, but rebind() is less prone to problems: if there's already a NiftyServer registered, rebind() replaces it.
We wouldn't need the main() method or this Naming business if we weren't expecting clients to use the registry to find the server. That is, we could omit main() and still use this object as a remote object. We would be limited to passing the object in method invocations or returning it from method invocations but that could be part of a factory registry, as we discussed before.
Now we need our client:
//file: MyClient.java import java.rmi.*; import java.util.*; public class MyClient { public static void main(String [] args) throws RemoteException { new MyClient( args[0] ); } public MyClient(String host) { try { ServerRemote server = (ServerRemote) Naming.lookup("rmi://"+host+"/NiftyServer"); System.out.println( server.getDate( ) ); System.out.println( server.execute( new MyCalculation(2) ) ); } catch (java.io.IOException e) { // I/O Error or bad URL } catch (NotBoundException e) { // NiftyServer isn't registered } } } When we run MyClient, we pass it the hostname of the server on which the registry is running. The main() method creates an instance of the MyClient object, passing the hostname from the command line as an argument to the constructor.
The constructor for MyClient uses the hostname to construct a URL for the object. The URL looks something like this: rmi://hostname/NiftyServer. (Remember, NiftyServer is the name under which we registered our ServerRemote.) We pass the URL to the static Naming.lookup() method. If all goes well, we get back a reference to a ServerRemote (the remote interface). The registry has no idea what kind of object it will return; lookup() therefore returns an Object, which we must cast to ServerRemote.
Compile all the code. Then run rmic to make the stub and skeleton files for MyServer:
% rmic MyServer
Let's run the code. For the first pass, we assume you have all the class files, including the stubs and skeletons generated by rmic, available in the classpath on both the client and server machines. (You can run this example on a single host to test it if you want.) Make sure your classpath is correct, start the registry, and then start the server:
% rmiregistry & (on Windows: start rmiregistry ) % java MyServer
In each case, make sure the registry application has the classpath including your server classes so that it can load the stub class. (Be warned: we're going to tell you to do the opposite later as part of setting up the dynamic class loading!)
Finally, on the client machine, run MyClient, passing the hostname of the server:
% java MyClient myhost
The client should print the date and the number 4, which the server graciously calculated. Hooray! With just a few lines of code, you have created a powerful client/server application.
12.4.2.1 Dynamic class loading
Before running the example, we told you to distribute all the class files to both the client and server machines. However, RMI was designed to ship classes, in addition to data, around the network; you shouldn't have to distribute all the classes in advance. Let's go a step further and have RMI load classes for us, as needed. This involves several steps.
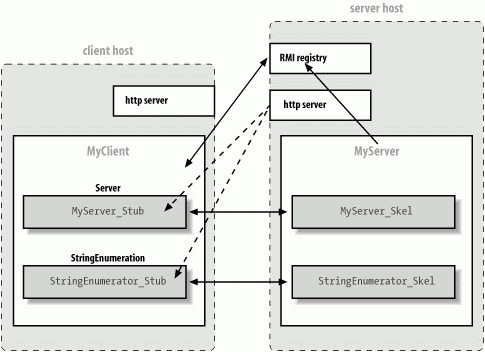
First, we need to tell RMI where to find any other classes it needs. We can use the system property java.rmi.server.codebase to specify a URL on a web server (or FTP server) when we run our client or server. This URL specifies the location of a JAR file or a base directory where RMI begins its search for classes. When RMI sends a serialized object (i.e., an object's data) to some client, it also sends this URL. If the recipient needs the class file in addition to the data, it fetches the file at the specified URL. In addition to stub classes, other classes referenced by remote objects in the application can be loaded dynamically. Therefore, we don't have to distribute many class files to the client; we can let the client download them as necessary. In Figure 12-3, we see an example as MyClient is going to the registry to get a reference to the ServerRemote object. Then MyClient dynamically downloads the stub class for MyServer from a web server running on the server object's host.
Figure 12-3. RMI applications and dynamic class loading
We can now split our class files between the server and client machines. For example, we could withhold the MyCalculation class from the server since it really belongs to the client. Instead, we can make the MyCalculation class available via a web server on some machine (probably our client's) and specify the URL when we run MyClient:
% java -Djava.rmi.server.codebase='http://myserver/foo/' ... Note that the trailing slash in the codebase URL is important: it says that the location is a base directory that contains the class files. In this case, we would expect that MyCalculation would be accessible at the URL http://myserver/foo/MyCalculation.class.
Next we have to set up security. Since we are loading class files over the network and executing their methods, we must have a security manager in place to restrict the kinds of things those classes may do, at least in the case where they are not coming from a trusted code source. RMI will not load any classes dynamically unless a security manager is installed. One easy way to meet this condition is to install the RMISecurityManager as the system security manager for your application. It is an example security manager that works with the default system policy and imposes some basic restrictions on what downloaded classes can do. To install the RMISecurityManager, simply add the following line to the beginning of the main() method of both the client and server applications (yes, we'll be sending code both ways in the next section):
main( ) { System.setSecurityManager( new RMISecurityManager( ) ); ... The RMISecurityManager works with the system security policy file to enforce restrictions. So you have to provide a policy file that allows the client and server to do basic operations like make network connections. Unfortunately allowing all the operations needed to load classes dynamically requires listing a lot of permission information and we don't want to get into that here. So we're going to resort to suggesting that for this example you simply grant the code all permissions. Here is an example policy file call it mysecurity.policy:
grant { permission java.security.AllPermission ; }; (It's exceedingly lame, not to mention risky, to install a security manager and then tell it to enforce no real security, but we're more interested in looking at the networking code at the moment.)
So, to run our MyServer application we would run a command like this:
% java -Djava.rmi.server.codebase='http://myserver/foo/' -Djava.security.policy=mysecurity.policy MyServer
Finally, there is one last magic incantation required to enable dynamic class loading. As of the current implementation, the rmiregistry must be run without the classes that are to be loaded being in its classpath. If the classes are in the classpath of rmiregistry, it does not annotate the serialized objects with the URLs of their class files, and no classes are dynamically loaded. This limitation is really annoying; all we can say is to heed the warning for now.
If you meet these conditions, you should be able to get the client started with only the MyClient class and the ServerRemote remote interface. All the other classes are loaded dynamically from a remote location.
12.4.2.2 Passing remote object references
So far, we haven't done anything that we couldn't have done with the simple object protocol. We used only one remote object, MyServer, and we got its reference from the RMI registry. Now we extend our example to pass some remote references between the client and server, allowing additional remote calls in both directions. We'll add two methods to our remote ServerRemote interface:
public interface ServerRemote extends Remote { ... StringIterator getList( ) throws RemoteException; void asyncExecute( WorkRequest work, WorkListener listener ) throws RemoteException; } getList() retrieves a new kind of object from the server: a StringIterator. The StringIterator is a simple list of strings, with some methods for accessing the strings in order. We make it a remote object, so that implementations of StringIterator stay on the server.
Next we spice up our work request feature by adding an asyncExecute() method. asyncExecute() lets us hand off a WorkRequest object as before, but it does the calculation on its own time. The return type for asyncExecute() is void because it doesn't actually return a value; we get the result later. Along with the request, our client passes a reference to a WorkListener object that is to be notified when the WorkRequest is done. We'll have our client implement WorkListener itself.
Because this is to be a remote object, our interface must extend Remote, and its methods must throw RemoteExceptions:
//file: StringIterator.java import java.rmi.*; public interface StringIterator extends Remote { public boolean hasNext( ) throws RemoteException; public String next( ) throws RemoteException; } Next, we provide a simple implementation of StringIterator, called MyStringIterator:
//file: MyStringIterator.java import java.rmi.*; public class MyStringIterator extends java.rmi.server.UnicastRemoteObject implements StringIterator { String [] list; int index = 0; public MyStringIterator( String [] list ) throws RemoteException { this.list = list; } public boolean hasNext( ) throws RemoteException { return index < list.length; } public String next( ) throws RemoteException { return list[index++]; } } MyStringIterator extends UnicastRemoteObject. Its methods are simple: it can give you the next string in the list, and it can tell you if there are any strings you haven't seen yet.
Next, we define the WorkListener remote interface. This is the interface that defines how an object should listen for a completed WorkRequest. It has one method, workCompleted(), which the server executing a WorkRequest calls when the job is done:
//file: WorkListener.java import java.rmi.*; public interface WorkListener extends Remote { public void workCompleted(WorkRequest request, Object result ) throws RemoteException; } Next, let's add the new features to MyServer. We need to add implementations of the getList() and asyncExecute() methods, which we just added to the ServerRemote interface:
public class MyServer extends java.rmi.server.UnicastRemoteObject implements ServerRemote { ... public StringIterator getList( ) throws RemoteException { return new MyStringIterator( new String [] { "Foo", "Bar", "Gee" } ); } public void asyncExecute( WorkRequest request , WorkListener listener ) throws java.rmi.RemoteException { // should really do this in another thread Object result = request.execute( ); listener.workCompleted( request, result ); } } getList() just returns a StringIterator with some stuff in it. asyncExecute() calls a WorkRequest's execute() method and notifies the listener when it's done.
Note that our implementation of asyncExecute() is a little cheesy. If we were forming a more complex calculation we would want to start a thread to do the calculation and return immediately from asyncExecute(), so the client won't block. The thread would call workCompleted() at a later time, when the computation was done. In this simple example, it would probably take longer to start the thread than to perform the calculation.
We have to modify MyClient to implement the remote WorkListener interface. This turns MyClient into a remote object, so we must make it a UnicastRemoteObject. We also add the workCompleted() method the WorkListener interface requires.
public class MyClient extends java.rmi.server.UnicastRemoteObject implements WorkListener { ... public void workCompleted( WorkRequest request, Object result) throws RemoteException { System.out.println("Async work result = " + result); } } Finally, we want MyClient to exercise the new features. Add these lines after the calls to getDate() and execute():
// MyClient constructor ... StringIterator se = server.getList( ); while ( se.hasNext( ) ) System.out.println( se.next( ) ); server.asyncExecute( new MyCalculation(100), this );
We use getList() to get the iterator from the server, then loop, printing the strings. We also call asyncExecute() to perform another calculation; this time, we square the number 100. The second argument to asyncExecute() is the WorkListener to notify when the data is ready; we pass a reference to ourselves (this).
Now all we have to do is compile everything and run rmic to make the stubs for all our remote objects:
% rmic MyClient MyServer MyStringIterator
Restart the RMI registry and MyServer on your server, and run the client somewhere. You should get the following:
Sun Mar 3 23:57:19 PDT 2002 4 Foo Bar Gee Async work result = 10000
If you are experimenting with dynamic class loading, you should be able to have the client download all the server's auxiliary classes (the stubs and the StringIterator) from a web server. And, conversely, you should be able to have the MyServer download the Client stub and WorkRequest related classes when it needs them.
We hope that this introduction has given you a feel for the tremendous power that RMI offers through object serialization and dynamic class loading. Java is one of the first programming languages to offer this kind of powerful framework for distributed applications.
12.4.3 RMI Object Activation
One of the newer features of RMI is the ability to create remote objects that are persistent. They can save their state for arbitrary periods of inactivity and be reactivated when a request from a client arrives. This is an important feature for large systems with remote objects that must remain accessible across long periods of time. RMI activation effectively allows a remote object to be stored away in a database, for example and automatically reincarnated when it is needed. RMI activation is not particularly easy to use and would not have benefited us in any of our simple examples; we won't delve into it here. Much of the functionality of activatable objects can be achieved by using factories of shorter-lived objects that know how to retrieve some state from a database (or other location). The primary users of RMI activation may be systems such as Enterprise JavaBeans, which need a generalized mechanism to save remotely accessible objects and revive them at later times.
12.4.4 RMI and CORBA
Java supports an important alternative to RMI, called CORBA (Common Object Request Broker Architecture). We won't say much about CORBA here, but you should know that it exists. CORBA is a distributed object standard developed by the Object Management Group (OMG), of which Sun Microsystems is one of the founding members. Its major advantage is that it works across languages: a Java program can use CORBA to talk to objects written in other languages, like C or C++. This is may be a considerable advantage if you want to build a Java frontend for an older program that you can't afford to reimplement. CORBA also provides other services similar to those in the Java Enterprise APIs. CORBA's major disadvantages are that it's complex, inelegant, and somewhat arcane.
Sun and OMG have been making efforts to bridge RMI and CORBA. There is an implementation of RMI that can use IIOP (the Internet Inter-Object Protocol) to allow some RMI-to-CORBA interoperability. However, CORBA currently does not have many of the semantics necessary to support true RMI-style distributed objects. So this solution is somewhat limited at this writing.
12.5 Scaleable I/O with NIO
We'll now wrap up the discussion of the NIO package we began in Chapter 10 by talking about nonblocking and selectable network communications. All our server examples in this chapter have used a thread-bound pattern (one thread per I/O operation). In Java this is very natural because of the ease with which we can create threads. It's also very efficient, within limits. Problems arise when you try to build very large scale servers using this style of client handling. While on a large machine it's certainly possible to have hundreds or even thousands of threads (especially if they're mostly idle, waiting for I/O), this is a resource-hungry solution. Every thread you start in Java consumes memory for its internal stack, and the performance of managing this number of threads is highly system-dependent.
An alternative approach is to take a lesson from the old, dark days before threading was available and to use nonblocking I/O operations to manage a lot of communications from a single thread. Better yet, our server will use a configurable pool of threads, taking advantage of machines with many processors.
At the heart of this process is the concept of selectable I/O. It's not good enough to simply have nonblocking I/O operations if you have no way to efficiently poll for work to be done. The NIO package provides for efficient polling using selectable channels. A selectable channel allows for the registration of a special kind of listener called a selector that can check the readiness of the channel for operations such as reading and writing or accepting or creating network connections.
The selector and the selection process are not typical Java listeners of the kind we'll see elsewhere in this book, but instead rather slavishly follow the conventions of C language systems. This is mainly for performance reasons; since this API is primarily intended for high-volume servers it is bound very tightly to the traditional, underlying operating system facilities with less regard for ease of use. This, combined with the other details of using the NIO package, mean that this section is somewhat dense and the server we create here is one of the longer and more complex examples in the book. Don't be discouraged if you are a bit put off by this section. You can use the general techniques earlier in this chapter for most applications and reserve this knowledge for creating services that handle very high volumes of simultaneous client requests.
12.5.1 Selectable Channels
A selectable channel implements the SelectableChannel interface, which specifies that the channel can be set to a nonblocking mode and that it provides support for the select process that makes efficient polling possible. In Java 1.4, the primary selectable channels are those for working with the network: SocketChannel , ServerSocketChannel, and DatagramChannel. The only other selectable channel is the Pipe (which can be used in an analogous way for intra-VM communication).
At the heart of the process is the Selector object, which knows about a particular set of selectable channels and provides a select() method for determining their readiness for I/O operations. Conceptually the process is simple; you register one or more channels with a selector and then poll it, asking it to tell you which set of channels is ready to go. In actuality, there are a few additional pieces involved.
First, the Selector does not work directly with channels but instead operates on SelectionKey objects. A SelectionKey object is created implicitly when the channel is registered with the Selector. It encapsulates the selectable channel as well as information about what types of operations (e.g., read, write) we are interested in waiting for. That information is held in the SelectionKey in a set of flags called the interest set , which can be changed by the application at any time. SelectionKeys are also used to return the results of a select operation. Each call to select() returns the set of SelectionKeys that are ready for some type of I/O. Each key also has a set of flags called the ready set that indicates which operation of interest is actually ready (possibly more than one). For example, a SelectionKey interest set might indicate that we want to know when its channel is ready for reading or writing. After a select operation, if that key is in the set returned by the selector, we know that it is ready for one or more of those operations, and we can check the key's ready set to see which.
Before we go on we should say that although we have been saying that channels are registered with selectors, the API is (confusingly) the other way around. Selectors are actually registered with the channels they manage, but it's better to mentally spackle over this and think of them the other way around.
12.5.2 Using Select
A Selector object is created using the Selector.open() method (Selector uses a factory pattern).
Selector selector = Selector.open( );
To register one or more channels with the selector, set them to nonblocking mode:
SelectableChannel channelA = // ... channelA.configureBlocking( false );
Now register the channels:
int interestOps = SelectionKey.OP_READ | SelectionKey.OP_WRITE; SelectionKey key = channelA.register( selector, interestOps );
When we register the channel we have an opportunity to set the initial interest operations (or "interest ops"). These are defined by constant fields in the SelectionKey class:
OP_READ | Ready to read |
OP_WRITE | Ready to write |
OP_CONNECT | Client socket connection ready |
OP_ACCEPT | Server socket connection ready |
These fields are bit flags; you can OR them together as in the above example to express interest in more than one type of operation.
The result of the register() method is a SelectionKey object. We can use the key to change the interest ops at any time with the SelectionKey interestOps() method or to deregister the channel from the Selector with the key's cancel() method.
This same key is also returned as the result of selection operations when its channel is ready. When the SelectionKey is returned, its ready set holds flags for the operations that do not block if called. We can retrieve the value of the flags with the readySet() method. There are also convenience methods to test for each operation in the ready set : isReadable(), isWritable(), isConnectable() and isAcceptable().
Depending on how you structure your application, it may not be necessary to save the SelectionKey at registration time. In our example, we let the Selector keep track of the keys for us, simply using them when they are ready. In fact, we go even further and put the SelectionKey to work by asking it to hold a reference for us! The SelectionKey attach() method is a convenience that can attach an arbitrary object to the key for use by our application. We'll show you how this can be useful in a bit.
Once one or more channels are registered with the Selector we can perform a select operation using one of its select() methods.
int readyCount = selector.select( );
Without arguments, the method blocks until at least one channel is ready for some operation or until the Selector's wakeup() method is called. Alternately you can use the form of select() that takes a timeout (in milliseconds) to wait for a ready channel before returning. There is also selectNow(), which always returns immediately. Each of these returns the count of the number of ready channels.
You can use the blocking select() and wakeup() somewhat like wait() and notify(). The wakeup is necessary because once a selection is started, it will not see any changes to its key's interest ops until the next invocation. The Selector is also heavily synchronized; for example, calls to register new channels block until the select is finished. So often it's much easier to simply use select with a short timeout and a loop, like this:
while ( selector.select( 50 ) == 0 );
Next we can get the set of ready channels from the Selector with the selectedKeys() method and iterate through them, doing whatever our application dictates:
Set readySet = selector.selectedKeys( ); for( Iterator it = readySet.iterator(); it.hasNext( ); ) { SelectionKey key = (SelectionKey)it.next( ); it.remove( ); // remove the key from the ready set // use the key } The ready set is returned to us as a java.util.Set, which we walk through with an Iterator (see Section 10.4 in Chapter 10). One important thing to note is that we've used the Iterator's remove() method to remove the key from the ready set. The select() methods add keys only to the ready set or add flags to keys already in the set; they never remove them. So we must clear the keys when we handle them. You can get the full set of keys a Selector is managing with the keys() method, but you should not attempt to remove keys from that set; use the cancel() method on individual keys instead. Or you can close the entire Selector with its close() method, de-registering all its keys.
12.5.3 LargerHttpd
Now let's put this information to use. In this section we create the big brother of TinyHttpd (our minimalist web server) called LargerHttpd. The LargerHttpd server is a nonblocking web server that uses SocketChannels and a pool of threads to service requests. In this example, a single thread executes a main loop that accepts new connections and checks the readiness of existing client connections for reading or writing. Whenever a client needs attention, it places the job in a queue where a thread from our thread pool waits to service it. As we said, this example is a bit longer than we would like, but is really the minimum necessary to show a realistic usage of the APIs. Here we go:
import java.io.*; import java.util.*; import java.net.*; import java.nio.*; import java.nio.channels.*; import java.nio.charset.*; import java.util.regex.*; public class LargerHttpd { Selector clientSelector; ClientQueue readyClients = new ClientQueue( ); public void run( int port, int threads ) throws IOException { clientSelector = Selector.open( ); ServerSocketChannel ssc = ServerSocketChannel.open( ); ssc.configureBlocking(false); InetSocketAddress sa = new InetSocketAddress( InetAddress.getLocalHost( ), port ); ssc.socket( ).bind( sa ); ssc.register( clientSelector, SelectionKey.OP_ACCEPT ); for(int i=0; i<threads; i++) // create thread pool new Thread() { public void run( ) { while (true) try { handleClient( ); } catch (IOException e) { } } }.start( ); while ( true ) try { // main select loop while ( clientSelector.select(50) == 0 ); Set readySet = clientSelector.selectedKeys( ); for( Iterator it = readySet.iterator(); it.hasNext( ); ) { SelectionKey key = (SelectionKey)it.next( ); it.remove( ); if ( key.isAcceptable( ) ) acceptClient( ssc ); else { key.interestOps( 0 ); readyClients.add( key ); } } } catch ( IOException e ) { System.out.println(e); } } void acceptClient( ServerSocketChannel ssc ) throws IOException { SocketChannel clientSocket = ssc.accept( ); clientSocket.configureBlocking(false); SelectionKey key = clientSocket.register( clientSelector, SelectionKey.OP_READ ); HttpdConnection client = new HttpdConnection( clientSocket ); key.attach( client ); } void handleClient( ) throws IOException { SelectionKey key = (SelectionKey)readyClients.next( ); HttpdConnection client = (HttpdConnection)key.attachment( ); if ( key.isReadable( ) ) client.read( key ); else client.write( key ); } public static void main( String argv[] ) throws IOException { new LargerHttpd( ).run( Integer.parseInt(argv[0]) ); } } class HttpdConnection { static Charset charset = Charset.forName("8859_1"); static Pattern httpGetPattern = Pattern.compile("(?s)GET /?(\\S*).*"); SocketChannel clientSocket; ByteBuffer buff = ByteBuffer.allocateDirect( 64*1024 ); String request; String response; FileChannel file; int filePosition; HttpdConnection ( SocketChannel clientSocket ) { this.clientSocket = clientSocket; } void read( SelectionKey key ) throws IOException { if ( request == null && (clientSocket.read( buff ) == -1 || buff.get( buff.position( )-1 ) == '\n' ) ) processRequest( key ); else key.interestOps( SelectionKey.OP_READ ); } void processRequest( SelectionKey key ) { buff.flip( ); request = charset.decode( buff ).toString( ); Matcher get = httpGetPattern.matcher( request ); if ( get.matches( ) ) { request = get.group(1); if ( request.endsWith("/") || request.equals("") ) request = request + "index.html"; //System.out.println( "Request: "+request); try { file = new FileInputStream ( request ).getChannel( ); } catch ( FileNotFoundException e ) { response = "404 Object Not Found"; } } else response = "400 Bad Request" ; if ( response != null ) { buff.clear( ); charset.newEncoder( ).encode( CharBuffer.wrap( response ), buff, true ); buff.flip( ); } key.interestOps( SelectionKey.OP_WRITE ); } void write( SelectionKey key ) throws IOException { if ( response != null ) { clientSocket.write( buff ); if ( buff.remaining( ) == 0 ) response = null; } else if ( file != null ) { int remaining = (int)file.size( )-filePosition; int got = file.transferTo( filePosition, remaining, clientSocket ); if ( got == -1 || remaining <= 0 ) { file.close( ); file = null; } else filePosition += got; } if ( response == null && file == null ) { clientSocket.close( ); key.cancel( ); } else key.interestOps( SelectionKey.OP_WRITE ); } } class ClientQueue extends ArrayList { synchronized void add( SelectionKey key ) { super.add(key); notify( ); } synchronized SelectionKey next( ) { while ( isEmpty( ) ) try { wait( ); } catch ( InterruptedException e ) { } return (SelectionKey)remove(0); } } From a bird's eye view, the structure of LargerHttpd is the same as TinyHttpd. There is the main class, LargerHttpd, which accepts connections, and a connection class, HttpdConnection, which encapsulates a socket and handles the conversation with the client. However this time, instead of each connection object being a Runnable serviced in its own thread, its functionality is broken into two primary methods called read() and write(). The job of our LargerHttpd is to accept new client socket connections, wrap them in an instance of HttpdConnection, and then watch the client's status with a Selector. Whenever we detect that a client is ready for some operation, we place its key into a queue (for which we've created the class ClientQueue). A set of threads waits in the queue, pulling out the keys and calling read() or write() on the corresponding client, based on which operation is ready.
The HttpConnection object encapsulates the state of the conversation with the client. Since its interface is rather coarse, it must keep track of whether it is waiting to read more input, when it's time to generate a response, and when to write output. The HttpdConnection also manages the interest set of its key, so that it can effectively schedule itself to be woken up when it's ready for reading or for writing. The association between the HttpdConnection and the key is made using the key's attach() and attachment() methods. LargerHttpd's acceptClient() method does several things. First, it accepts the new socket connection. Next, it configures and registers it with the selector with an initial interest set for reading. Finally it creates the HttpdConnection object, wrapping the socket, and attaches that object to the key for later retrieval.
The main loop of LargerHttpd is fairly straightforward. First we set up the ServerSocketChannel . This is similar to setting up a plain ServerSocket, except that we must first create an InetSocketAddress object to hold the local address and port combination of our server socket and then explicitly bind or socket to that address with the ServerSocketChannel bind() method. We also configure the server socket to nonblocking mode and register it with our main Selector, so that we can select for client connections in the same loop that we use to select for client read and write readiness.
In the main select loop, we check whether the key is ready for an accept operation and if so we call acceptClient(); if not we set the key's interest set to zero with the interestOps() method and dispatch the key to our queue for work to be done. It's important that we set the interest set to zero to clear it before the next loop; otherwise we'd be in a race to see whether the thread pool performed its maximum work before we detected another ready condition. Setting the interest ops to 0, and resetting it in the HttpdConnection object, combined with synchronization in our ClientQueue object, ensures that only one thread is handling a client at a time.
Prior to entering the main select loop, we start one or more threads, each entering the handleClient() method, which blocks until a key is ready on the queue. (The queue itself simply uses wait() and notify() to block until new keys arrive. See the Producer/Consumer example in Section 8.3.3 in Chapter 8.) For each ready key, we retrieve the associated HttpdConnection object and call the appropriate service method based on whether the key is ready for reading or writing. After that, it's up to the connection object to do its job. Each call to the read() method simply does what would be one iteration of a read loop in a thread-bound application. Each read gets as much data as available and checks to see if we've reached the end of a line (a \n newline character). Upon reaching the end of line we dispatch the call to the processRequest() method, which turns the byte buffer into text and uses the same techniques as our TinyHttpd to parse the request into a file pathname. On each incomplete call to read(), we set the interest ops of our key back to OP_READ. Upon completing the read and processing the request, we switch to using OP_WRITE, because we are now ready for sending a response.
The write() method keeps track of whether it's sending a text response (error message) or a file, using the response and file instance variables. When sending a file, we use the FileChannel 's transferTo() method to transfer bytes from the file directly to the network socket, without copying them into Java's memory space. (This is indeed an efficient little web server.) And that's about it. When we're done, we close the client socket and cancel our key, which causes it to be removed from the Selector's key set during the next select operation (discarding our HttpdConnection object with it).
12.5.4 Nonblocking Client-Side Operations
Our example showed SocketChannel used for nonblocking, selectable I/O in a typical server application. It's less common to need nonblocking I/O from a client, but there is certainly no reason you can't do it. Perhaps you're writing a peer-to-peer (P2P) application that manages many connections from both sides.
For the client side of communications, there is one additional tool provided: a nonblocking socket-connect operation. The process of creating a TCP connection from the client side involves contacting the remote host in a two-phase acknowledgement. This process normally blocks until the connection is established. However the NIO package provides an alternative that allows you to initiate the connection and then poll for its status. When set to nonblocking mode, a call to a SocketChannel's connect() method returns immediately. The connection is then attempted (and possibly succeeds or fails) in the background. Later, a Selector can be used, checking for the OP_CONNECT flag to see when the socket is ready to "finish connecting." The connection is finished by invoking the SocketChannel's finishConnect() method, which either returns or throws an IOException indicating the failure. The process of finishing the connection is really more about collecting the results of the asynchronous connection acknowledging its success or failure than about doing work.
[1] For a discussion of sockets in general, see Unix Network Programming by Richard Stevens (Prentice-Hall). For a complete discussion of network programming in Java, see Java Network Programming by Elliotte Rusty Harold (O'Reilly).
| CONTENTS |
EAN: 2147483647
Pages: 30