Chapter 19. Drawing with the 2D API
| CONTENTS |
- 19.1 The Big Picture
- 19.2 The Rendering Pipeline
- 19.3 A Quick Tour of Java 2D
- 19.4 Filling Shapes
- 19.5 Stroking Shape Outlines
- 19.6 Using Fonts
- 19.7 Displaying Images
- 19.8 Drawing Techniques
- 19.9 Printing
In the last few chapters, you've caught a glimpse of how graphics operations are performed in Java. This chapter goes into more depth about drawing techniques and the tools for working with images in Java. In the next chapter, we'll explore image-processing tools in more detail, and we'll look at the classes that let you generate images, pixel by pixel, on the fly.
19.1 The Big Picture
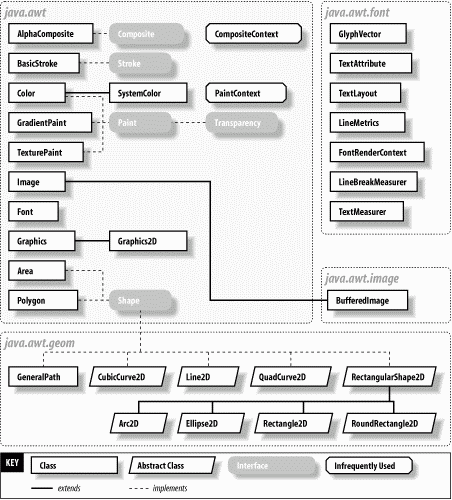
The classes you'll use for drawing come from six packages: java.awt, java.awt.color, java.awt.font, java.awt.geom, java.awt.image, and java.awt.print. Collectively, these classes make up most of the 2D API, a comprehensive API for drawing shapes, text, and images. Figure 19-1 shows a bird's-eye view of these classes. There's much more in the 2D API than we can cover in two chapters. For a full treatment, see Jonathan Knudsen's Java 2D Graphics (O'Reilly).
Figure 19-1. Graphics classes of the 2D API
An instance of java.awt.Graphics2D is called a graphics context. It represents a drawing surface such as a component's display area, a page on a printer, or an offscreen image buffer. A graphics context provides methods for drawing three kinds of graphics objects: shapes, text, and images. Graphics2D is called a graphics context because it also holds contextual information about the drawing area. This information includes the drawing area's clipping region, painting color, transfer mode, text font, and geometric transformation. If you consider the drawing area to be a painter's canvas, you might think of a graphics context as an easel that holds a set of tools and marks off the work area.
There are four ways to acquire a Graphics2D object. The following list shows them in order, most common to least.
- From AWT or Swing as the result of a painting request on a component
-
In this case, a new graphics context for the appropriate area is created and passed to your component's paint() or update() method. (The update() method really applies only to AWT components, not the newer Swing components.)
- Directly from an offscreen image buffer
-
In this case, we ask the image buffer for a graphics context directly. We'll use this when we discuss techniques such as double buffering.
- By copying an existing Graphics2D object
-
Duplicating a graphics object can be useful for more elaborate drawing operations; different copies of a Graphics2D object can draw on same area, but with different attributes and clipping regions. A Graphics2D can be copied by calling the create() method.
- Directly from an onscreen component
-
It's possible to ask a component to give you a Graphics2D object for its display area. However, this is almost always a mistake; if you feel tempted to do this, think about why you're trying to circumvent the normal paint() /repaint() mechanism.
Each time a component's paint() method is called, the windowing system provides the component with a new Graphics2D object for drawing in the display area. This means that attributes we set during one painting session, such as the drawing color or clipping region, are reset the next time paint()is called. (Each call to paint() starts with a tidy new easel.) For the most common attributes, such as foreground color, background color, and font, we can set defaults in the component itself. Thereafter, the graphics contexts for painting in that component come with those properties initialized appropriately.
The paint() method can make no assumptions about what is already drawn on the screen. However if we are working in an AWT component's update() method, we can assume our onscreen artwork is still intact, and we need to make only whatever changes are needed to bring the display up to date. One way to optimize drawing operations in this case is by setting a clipping region, as we'll see shortly.
For backwards compatibility, a graphics context is always passed to the paint() method as a more primitive Graphics object. If you want to take advantage of the nifty features in the 2D API (as you almost undoubtedly will), you need to cast this reference to a Graphics2D. You'll see how this works in the upcoming examples.
19.2 The Rendering Pipeline
One of the strengths of the 2D API is that shapes, text, and images are manipulated in many of the same ways. In this section, we'll describe what happens to shapes, text, and images after you give them to a Graphics2D object. Rendering is the process of taking some collection of shapes, text, and images and figuring out how to represent them by coloring pixels on a screen or printer. Graphics2D supports four rendering operations:
-
Draw the outline of a shape, with the draw() method.
-
Fill the interior of a shape, with the fill() method.
-
Draw some text, with the drawString() method.
-
Draw an image, with any of the many forms of the drawImage() method.
The graphics context instantiated by a Graphics2D object consists of the following properties, whose values are controlled by corresponding accessor methods:
- paint
-
The current paint (an object of type java.awt.Paint) determines what color or pattern will be used to fill a shape. This affects the drawing of shape outlines and text, as well. You can change the current paint using Graphics2D's setPaint() method. Note that the Color class implements the Paint interface, so you can pass Colors to setPaint() if you want to use solid colors.
- stroke
-
Graphics2D uses the stroke to determine how to draw the outline of shapes that are passed to its draw() method. In graphics terminology, to "stroke" a shape means to take a path defined by the shape and effectively trace it with a pen or brush of a certain size and characteristics. For example, drawing the shape of a circle using a stroke that acts like a solid line would yield a washer or ring shape. The stroke object in the Graphics2D API is a little more abstract than that. In actuality it accepts the input shape to be stroked and returns an enclosed shape representing the outline, which the Graphics2D then fills. You can set the current stroke using setStroke(). The 2D API comes with a handy class, java.awt.BasicStroke, that implements different line widths, end styles, join styles, and dashing.
- font
-
Text is rendered by creating a shape that represents the characters to be drawn. The current font determines what shapes are created for a given set of characters. The resulting text shape is then filled. The current font is set using setFont(). The 2D API gives applications access to all the TrueType and PostScript Type 1 fonts that are installed.
- transformation
-
Shapes, text, and images are geometrically transformed before they are rendered. This means that they may be moved, rotated, and stretched. Graphics2D's transformation converts coordinates from "user space" to "device space." By default, Graphics2D uses a transformation that maps 72 units in user space to one inch on the output device. If you draw a line from point 0, 0 to point 72, 0 using the default transformation, it will be one inch long, regardless of whether it is drawn on your monitor or your printer. The current transformation can be modified using the translate(), rotate(), scale(), and shear() methods.
- compositing rule
-
A compositing rule determines how the colors of a new drawing operation are combined with existing colors on the Graphics2D's drawing surface. This attribute is set using setComposite(), which accepts an instance of java.awt.AlphaComposite. Compositing allows you to make parts of a drawing or image completely or partially transparent, or to combine them in other interesting ways.
- clipping shape
-
All rendering operations are limited to the interior of the clipping shape . No pixels outside this shape are modified. By default, the clipping shape allows rendering on the entire drawing surface (usually, the rectangular area of a Component). However, you can further limit this using any simple or complex shape, including text shapes.
- rendering hints
-
There are different techniques that can be used to render graphics primitives. Usually these represent a tradeoff between rendering speed and visual quality or vice versa. Rendering hints (constants defined in the RenderingHints class) specify which techniques to use.
Graphics primitives (shapes, text, and images) pass through the rendering engine in a series of operations called the rendering pipeline. Let's walk through the pipeline. It can be reduced to four steps; the first step depends on the rendering operation:
-
Transform the shape. For shapes that will be filled, the shape is simply transformed using the Graphics2D's current transformation. For shapes whose outlines are drawn using draw(), the current stroke is used to stroke the shape's outline. Then the stroked outline is transformed, just like any other filled shape. Text is displayed by mapping characters to shapes using the current font. The resulting text shapes are transformed, just like any other filled shape. For images, the outline of the image is transformed using the current transformation.
-
Determine the colors to be used. For a filled shape, the current paint object determines what colors should be used to fill the shape. For drawing an image, the colors are taken from the image itself.
-
Combine the colors with the existing drawing surface using the current compositing rule.
-
Clip the results using the current clipping shape .
The rendering hints are used throughout to control the rendering quality.
19.3 A Quick Tour of Java 2D
19.3.1 Filling Shapes
The simplest path through the rendering pipeline is for filling shapes. For example, the following code creates an ellipse and fills it with a solid color. (This code would live inside a paint() method somewhere. We'll present a complete, ready-to-run example a little later.)
Shape c = new Ellipse2D.Float(50, 25, 150, 150); g2.setPaint(Color.blue); g2.fill(c);
Here, g2 is our Graphics2D object. The Ellipse2D class is abstract but is implemented by concrete inner subclasses, called Float and Double. The Rectangle2D class, for example, has concrete subclasses Rectangle2D.Float and Rectangle2D.Double.
In the call to setPaint(), we tell the Graphics2D to use a solid color, blue, for all subsequent filling operations. Then, the call to fill() tells Graphics2D to fill the given shape.
All geometric shapes in the 2D API are represented by implementations of the java.awt.geom.Shape interface. This interface defines methods that are common to all shapes, like returning a rectangle bounding box or testing if a point is inside the shape. The java.awt.geompackage is a smorgasbord of useful shape classes, including Rectangle2D, RoundRectangle2D (a rectangle with rounded corners), Arc2D, Ellipse2D, and others. In addition, a few classes in java.awt are Shapes: Rectangle, Polygon, and Area.
19.3.2 Drawing Shape Outlines
Drawing a shape's outline is only a little bit more complicated. Consider the following example:
Shape r = new Rectangle2D.Float(100, 75, 100, 100); g2.setStroke(new BasicStroke(4)); g2.setPaint(Color.yellow); g2.draw(r);
Here, we tell the Graphics2D to use a stroke that is four units wide and a solid color, yellow, for filling the stroke. When we call draw(), Graphics2D uses the stroke to create a new shape, the outline, from the given rectangle. The outline shape is then filled, just as before; this effectively draws the rectangle's outline. The rectangle itself is not filled.
19.3.3 Convenience Methods
Graphics2D includes quite a few convenience methods for drawing and filling common shapes; these methods are actually inherited from the Graphics class. Table 19-1 summarizes these methods. It's a little easier to just call fillRect() rather than instantiating a rectangle shape and passing it to fill().
| Method | Description |
|---|---|
| draw3DRect() | Draws a highlighted, 3D rectangle |
| drawArc() | Draws an arc |
| drawLine() | Draws a line |
| drawOval() | Draws an oval |
| drawPolygon() | Draws a polygon, closing it by connecting the endpoints |
| drawPolyline() | Draws a line connecting a series of points, without closing it |
| drawRect() | Draws a rectangle |
| drawRoundRect() | Draws a rounded-corner rectangle |
| fill3DRect() | Draws a filled, highlighted, 3D rectangle |
| fillArc() | Draws a filled arc |
| fillOval() | Draws a filled oval |
| fillPolygon() | Draws a filled polygon |
| fillRect() | Draws a filled rectangle |
| fillRoundRect() | Draws a filled, rounded-corner rectangle |
As you can see, for each of the fill() methods in the table, there is a corresponding draw() method that renders the shape as an unfilled line drawing. With the exception of fillArc() and fillPolygon(), each method takes a simple x, y specification for the top left corner of the shape and a width and height for its size.
The most flexible convenience method draws a polygon, which is specified by two arrays that contain the x and y coordinates of the vertices. Methods in the Graphics class take two such arrays and draw the polygon's outline or fill the polygon.
The methods listed in Table 19-1 are shortcuts for more general methods in Graphics2D. The more general procedure is to first create a java.awt.geom.Shape object and then pass it to the draw() or fill() method of Graphics2D. For example, you could create a Polygon object from coordinate arrays. Since a Polygon implements the Shape interface, you can pass it to Graphics2D's general draw() or fill() method.
The fillArc() method requires six integer arguments. The first four specify the bounding box for an oval just like the fillOval() method. The final two arguments specify what portion of the oval we want to draw, as a starting angular position and an offset. Both the starting angular position and the offset are specified in degrees. The zero degree mark is at three o'clock; a positive angle is clockwise. For example, to draw the right half of a circle, you might call:
g.fillArc(0, 0, radius * 2, radius * 2, -90, 180);
draw3DRect() automatically chooses colors by "darkening" the current color. So you should set the color to something other than black, which is the default (maybe gray or white); if you don't, you'll just get a black rectangle with a thick outline.
19.3.4 Drawing Text
Like drawing a shape's outline, drawing text is just a simple variation on filling a shape. When you ask a Graphics2D to draw text, it determines the shapes that need to be drawn and fills them. The shapes that represent characters are called glyphs . A font is a collection of glyphs. Here's an example of drawing text:
g2.setFont(new Font("Times New Roman", Font.PLAIN, 64)); g2.setPaint(Color.red); g2.drawString("Hello, 2D!", 50, 150); When we call drawString(), the Graphics2D uses the current font to retrieve the glyphs that correspond to the characters in the string. Then the glyphs (which are really just Shapes) are filled using the current Paint.
19.3.5 Drawing Images
Images are treated a little differently than shapes. In particular, the current Paint is not used to render an image because the image contains its own color information (it is the Paint, effectively). The following example loads an image from a file and displays it (you'll have to use your own file here):
Image i = Toolkit.getDefaultToolkit( ).getImage("camel.gif"); g2.drawImage(i, 75, 50, this); In this case, the call to drawImage() tells the Graphics2D to place the image at the given location.
19.3.5.1 Transformations and rendering
Four parts of the pipeline affect every graphics operation. In particular, all rendering is transformed, composited, and clipped. Rendering hints are used to affect all of a Graphics2D's rendering.
This example shows how to modify the current transformation with a translation and a rotation:
g2.translate(50, 0); g2.rotate(Math.PI / 6);
Every graphics primitive drawn by g2 will now have this transformation applied to it (a shift of 50 units right and a rotation of 30 degrees counterclockwise). We can have a similarly global effect on compositing:
AlphaComposite ac = AlphaComposite.getInstance( AlphaComposite.SRC_OVER, (float).5); g2.setComposite(ac);
Now every graphics primitive we draw will be half transparent; we'll explain more about this later.
All drawing operations are clipped by the current clipping shape, which is any object implementing the Shape interface. In the following example, the clipping shape is set to an ellipse:
Shape e = new Ellipse2D.Float(50, 25, 250, 150); g2.clip(e);
You can obtain the current clipping shape using getClip(); this is handy if you want to restore it later using the setClip() method.
Finally, the rendering hints are used for all drawing operations. In the following example, we tell the Graphics2D to use antialiasing, a technique that smoothes out the rough pixel edges of shapes and text:
g2.setRenderingHint(RenderingHints.KEY_ANTIALIASING, RenderingHints.VALUE_ANTIALIAS_ON);
The RenderingHints class contains other keys and values representing other rendering hints. If you really like to fiddle with knobs and dials, this is a good class to check out.
19.3.6 The Whole Iguana
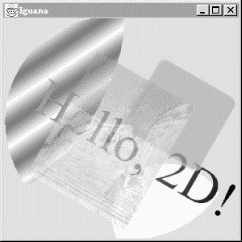
Let's put everything together now, just to show how graphics primitives travel through the rendering pipeline. The following example demonstrates the use of Graphics2D from the beginning to the end of the rendering pipeline. With very few lines of code, we are able to draw some pretty complicated stuff (see Figure 19-2)
Figure 19-2. Exercising the 2D API
Here's the code:
//file: Iguana.java import java.awt.*; import java.awt.event.*; import java.awt.geom.*; import javax.swing.*; public class Iguana extends JComponent { private Image image; private int theta; public Iguana( ) { image = Toolkit.getDefaultToolkit( ).getImage( "Piazza di Spagna.small.jpg"); theta = 0; addMouseListener(new MouseAdapter( ) { public void mousePressed(MouseEvent me) { theta = (theta + 15) % 360; repaint( ); } }); } public void paint(Graphics g) { Graphics2D g2 = (Graphics2D)g; g2.setRenderingHint(RenderingHints.KEY_ANTIALIASING, RenderingHints.VALUE_ANTIALIAS_ON); int cx = getSize( ).width / 2; int cy = getSize( ).height / 2; g2.translate(cx, cy); g2.rotate(theta * Math.PI / 180); Shape oldClip = g2.getClip( ); Shape e = new Ellipse2D.Float(-cx, -cy, cx * 2, cy * 2); g2.clip(e); Shape c = new Ellipse2D.Float(-cx, -cy, cx * 3 / 4, cy * 2); g2.setPaint(new GradientPaint(40, 40, Color.blue, 60, 50, Color.white, true)); g2.fill(c); g2.setPaint(Color.yellow); g2.fillOval(cx / 4, 0, cx, cy); g2.setClip(oldClip); g2.setFont(new Font("Times New Roman", Font.PLAIN, 64)); g2.setPaint(new GradientPaint(-cx, 0, Color.red, cx, 0, Color.black, false)); g2.drawString("Hello, 2D!", -cx * 3 / 4, cy / 4); AlphaComposite ac = AlphaComposite.getInstance( AlphaComposite.SRC_OVER, (float).75); g2.setComposite(ac); Shape r = new RoundRectangle2D.Float(0, -cy * 3 / 4, cx * 3 / 4, cy * 3 / 4, 20, 20); g2.setStroke(new BasicStroke(4)); g2.setPaint(Color.magenta); g2.fill(r); g2.setPaint(Color.green); g2.draw(r); g2.drawImage(image, -cx / 2, -cy / 2, this); } public static void main(String[] args) { JFrame frame = new JFrame("Iguana"); Container c = frame.getContentPane( ); c.setLayout(new BorderLayout( )); c.add(new Iguana( ), BorderLayout.CENTER); frame.setSize(300, 300); frame.setDefaultCloseOperation( JFrame.EXIT_ON_CLOSE ); frame.setVisible(true); } } The Iguana class itself is a subclass of JComponent with a fancy paint() method. The main() method takes care of creating a JFrame that holds the Iguana component.
Iguana's constructor loads a small image (we'll talk more about this later) and sets up a mouse event handler. This handler changes a member variable, theta, and repaints the component. Each time you click, the entire drawing is rotated by 15 degrees.
Iguana's paint() method does some pretty tricky stuff, but none of it is very difficult. First, user space is transformed so that the origin is at the center of the component. The user space is then rotated by theta:
g2.translate(cx, cy); g2.rotate(theta * Math.PI / 180);
Iguana saves the current (default) clipping shape before setting it to a large ellipse. Then Iguana draws two filled ellipses. The first is drawn by instantiating an Ellipse2D and filling it; the second is drawn using the fillOval() convenience method. (We'll talk about the color gradient in the first ellipse in the next section.) As you can see in Figure 19-2, both ellipses are clipped by the elliptical clipping shape. After filling the two ellipses, Iguana restores the old clipping shape.
Iguana draws some text next; we'll talk about this in more detail later. The next action is to modify the compositing rule as follows:
AlphaComposite ac = AlphaComposite.getInstance( AlphaComposite.SRC_OVER, (float).75); g2.setComposite(ac);
All this means is that we want everything to be drawn with transparency. The AlphaComposite class defines constants representing different compositing rules, much the way the Color class contains constants representing different predefined colors. In this case, we're asking for the source over destination rule (SRC_OVER), but with an additional alpha multiplier of 0.75. Source over destination means that whatever we're drawing (the source) should be placed on top of whatever's already there (the destination). The alpha multiplier means that everything we draw will be treated at 0.75 or three quarters of its normal opacity, allowing the existing drawing to "show through."
You can see the effect of the new compositing rule in the rounded rectangle and the image, which both allow previously drawn elements to show through.
19.4 Filling Shapes
Iguana fills its shapes with a number of colors, using the setPaint() method of Graphics2D. This method sets the current color in the graphics context, so we set it to a different color before each drawing operation. setPaint() accepts any object that implements the Paint interface. The 2D API includes three implementations of this interface, representing solid colors, color gradients, and textures.
19.4.1 Solid Colors
The java.awt.Color class handles color in Java. A Color object describes a single color. You can create an arbitrary Color by specifying the red, green, and blue values, either as integers between 0 and 255 or as floating-point values between 0.0 and 1.0. The (somewhat strange) getColor() method can be used to look up a named color in the system properties table, as described in Chapter 10. getColor() takes a String color property name, retrieves the integer value from the Properties list, and returns the Color object that corresponds to that color.
The Color class also defines a number of static final color values; these are what we used in the Iguana example. These constants, such as Color.black and Color.red, provide a convenient set of basic color objects for your drawings.
19.4.2 Color Gradients
A color gradient is a smooth blend from one color to another. The GradientPaint class encapsulates this idea in a handy implementation of the Paint interface. All you need to do is specify two points and the color at each point. The GradientPaint takes care of the details so that the color fades smoothly from one point to the other. For example, in the previous example, the ellipse is filled with a gradient this way:
g2.setPaint(new GradientPaint(40, 40, Color.blue, 60, 50, Color.white, true));
The last parameter in GradientPaint's constructor determines whether the gradient is cyclic. In a cyclic gradient, the colors keep fluctuating beyond the two points that you've specified. Otherwise, the gradient just draws a single blend from one point to the other. Beyond each endpoint, the color is solid.
19.4.3 Textures
A texture is simply an image repeated over and over like a floor tile. This concept is represented in the 2D API with the TexturePaint class. To create a texture, just specify the image to be used and the rectangle that will be used to reproduce it. To do this, you also need to know how to create and use images, which we'll get to a little later.
19.4.4 Desktop Colors
The Color class makes it easy to construct a particular color; however, that's not always what you want to do. Sometimes you want to match a preexisting color scheme. This is particularly important when you are designing a user interface; you might want your components to have the same colors as other components on that platform and to change automatically if the user redefines his or her color scheme.
That's what the SystemColor class is for. A system color represents the color used by the local windowing system in a certain context. The SystemColor class holds lots of predefined system colors, just like the Color class holds some predefined basic colors. For example, the field activeCaption represents the color used for the background of the titlebar of an active window; activeCaptionText represents the color used for the title itself. menu represents the background color of menu selections; menuText represents the color of a menu item's text when it is not selected; textHighlightText is the color used when the menu item is selected; and so on. You could use the window value to set the color of a Window to match the other windows on the user's screen whether or not they're generated by Java programs.
myWindow.setBackground( SystemColor.window );
Because the SystemColor class is a subclass of Color, you can use it wherever you would use a Color. However, the SystemColor constants are tricky. They are constant, immutable objects as far as you, the programmer, are concerned (your code is not allowed to modify them), but they can be modified at runtime by the system. If the user changes his color scheme, the system colors are automatically updated to follow suit; as a result, anything displayed with system colors will automatically change color the next time it is redrawn. For example, the window myWindow would automatically change its background color to the new background color.
The SystemColor class has one noticeable shortcoming. You can't compare a system color to a Color directly; the Color.equals() method doesn't return reliable results. For example, if you want to find out whether the window background color is red, you can't call:
Color.red.equals(SystemColor.window);
Instead, you should use getRGB() to find the color components of both objects and compare them, rather than comparing the objects themselves.
19.5 Stroking Shape Outlines
Just as a Graphics2D object's current paint determines how its shapes are filled, its current stoke determines how its shapes are outlined. The current stroke determines such drawing features as line thickness, line dashing, and end styles. (If you struggled with drawing in earlier versions of Java, you'll be very grateful that there's now a way to change the line thickness.)
To set the current stroke in a Graphics2D, just call setStroke() with any implementation of the Stroke interface. Fortunately, the 2D API includes a BasicStroke class that probably does everything you need. Using BasicStroke, you can create dashed lines, control what decoration is added to line ends, and decide how the corners in an outline should be drawn.
By default, Graphics2D uses a solid stroke with a width of 1. In the previous Iguana example, the line width is changed just before the outline of the rounded rectangle is drawn, like so:
g2.setStroke(new BasicStroke(4));
19.6 Using Fonts
Text fonts in Java are represented by instances of the java.awt.Font class. A Font object is constructed from a name, style identifier, and a point size. We can create a Font object at any time, but it's meaningful only when applied to a particular component on a given display device. Here are a couple of fonts:
Font smallFont = new Font("Monospaced", Font.PLAIN, 10); Font bigFont = new Font("Serif", Font.BOLD, 18); Font names come in three varieties: family names, face names (also called font names), and logical names. Family and font names are closely related. For example, Garamond Italic is a font name for a font whose family name is Garamond.
A logical name is a generic name for the font family. The following logical font names should be available on all platforms:
-
Serif (generic name for TimesRoman)
-
SansSerif (generic name for Helvetica)
-
Monospaced (generic name for Courier)
-
Dialog
-
DialogInput
The logical font name is mapped to an actual font on the local platform. Java's fonts.properties files map the font names to the available fonts, covering as much of the Unicode character set as possible. If you request a font that doesn't exist, you get the default font.
One of the big wins in the 2D API is that it can use most of the fonts you have installed on your computer. The following program prints out a full list of the fonts that are available to the 2D API:
//file: ShowFonts.java import java.awt.*; public class ShowFonts { public static void main(String[] args) { Font[] fonts; fonts = GraphicsEnvironment.getLocalGraphicsEnvironment( ).getAllFonts( ); for (int i = 0; i < fonts.length; i++) { System.out.print(fonts[i].getFontName( ) + " : "); System.out.print(fonts[i].getFamily( ) + " : "); System.out.print(fonts[i].getName( )); System.out.println( ); } } } Note, however, that the fonts installed on your system may not match the fonts installed on someone else's system. For true portability, you can use one of the logical names (although your application won't look exactly the same on all platforms) or go with the defaults. You can also allow your users to configure the application by choosing fonts themselves.
The static method Font.getFont() looks up a font name in the system properties list (like Color.getColor()). getFont() takes a String font property name, retrieves the font name from the Properties table, and returns the Font object that corresponds to that font.
The Font class defines three static style identifiers: PLAIN, BOLD, and ITALIC. You can use these values on all fonts. The point size determines the size of the font on a display. If a given point size isn't available, Font substitutes a default size.
You can retrieve information about an existing Font with a number of routines. The getName(), getSize(), and getStyle() methods retrieve the logical name, point size, and style, respectively. You can use the getFamily() method to find out the family name while getFontName() returns the face name of the font.
Finally, to actually use a Font object, you can simply specify it as an argument to the setFont() method of a Component or Graphics2D object. Subsequent text-drawing commands such as drawString() for that component or in that graphics context use the specified font.
19.6.1 Font Metrics
To get detailed size and spacing information for text rendered in a font, we can ask for a java.awt.font.LineMetrics object. Different systems have different real fonts available; the available fonts may not match the font you request. Furthermore, the measurements of different characters within a single font may be different, especially in multilingual text. Thus, a LineMetrics object presents information about a particular set of text in a particular font on a particular system, not general information about a font. For example, if you ask for the metrics of a nine-point Monospaced font, what you get isn't some abstract truth about Monospaced fonts; you get the metrics of the font that the particular system uses for nine-point Monospaced which may not be exactly nine points or even fixed width.
Use the getLineMetrics() method for a Font to retrieve the metrics for text as it would appear for that component. This method also needs to know some information about how you plan to render the text if you're planning to use antialiasing, for instance, which affects the text measurements. This extra information is encapsulated in the FontRenderContext class. Fortunately, you can just ask Graphics2D for its current FontRenderContext rather than having to create one yourself:
public void paint(Graphics g) { Graphics2D g2 = (Graphics2D)g; ... FontRenderContext frc = g2.getFontRenderContext( ); LineMetrics metrics = font.getLineMetrics("Monkey", frc); ... } The Font class also has a getStringBounds() method that returns the bounding box of a piece of text:
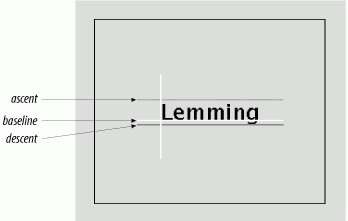
public void paint(Graphics g) { Graphics2D g2 = (Graphics2D)g; ... FontRenderContext frc = g2.getFontRenderContext( ); float messageWidth = (float)font.getStringBounds("Monkey", frc).getWidth( ); ... } The following application, FontShow, displays a word and draws reference lines showing certain characteristics of its font, as shown in Figure 19-3. Clicking in the application window toggles the point size between a small and a large value.
Figure 19-3. The FontShow application
//file: FontShow.java import java.awt.*; import java.awt.event.*; import java.awt.font.*; import javax.swing.*; public class FontShow extends JComponent { private static final int PAD = 25; // frilly line padding private boolean bigFont = true; private String message; public FontShow(String message) { this.message = message; addMouseListener(new MouseAdapter( ) { public void mouseClicked(MouseEvent e) { bigFont = !bigFont; repaint( ); } }); } public void paint(Graphics g) { Graphics2D g2 = (Graphics2D)g; g2.setRenderingHint(RenderingHints.KEY_ANTIALIASING, RenderingHints.VALUE_ANTIALIAS_ON); int size = bigFont ? 96 : 64; Font font = new Font("Dialog", Font.PLAIN, size); g2.setFont(font); int width = getSize( ).width; int height = getSize( ).height; FontRenderContext frc = g2.getFontRenderContext( ); LineMetrics metrics = font.getLineMetrics(message, frc); float messageWidth = (float)font.getStringBounds(message, frc).getWidth( ); // center text float ascent = metrics.getAscent( ); float descent = metrics.getDescent( ); float x = (width - messageWidth) / 2; float y = (height + metrics.getHeight( )) / 2 - descent; g2.setPaint(getBackground( )); g2.fillRect(0, 0, width, height); g2.setPaint(getForeground( )); g2.drawString(message, x, y); g2.setPaint(Color.white); // Base lines drawLine(g2, x - PAD, y, x + messageWidth + PAD, y); drawLine(g2, x, y + PAD, x, y - ascent - PAD); g2.setPaint(Color.green); // Ascent line drawLine(g2, x - PAD, y - ascent, x + messageWidth + PAD, y - ascent); g2.setPaint(Color.red); // Descent line drawLine(g2, x - PAD, y + descent, x + messageWidth + PAD, y + descent); } private void drawLine(Graphics2D g2, double x0, double y0, double x1, double y1) { Shape line = new java.awt.geom.Line2D.Double(x0, y0, x1, y1); g2.draw(line); } public static void main(String args[]) { String message = "Lemming"; if (args.length > 0) message = args[0]; JFrame frame = new JFrame("FontShow"); frame.setSize(420, 300); frame.setDefaultCloseOperation( JFrame.EXIT_ON_CLOSE ); frame.getContentPane( ).add(new FontShow(message)); frame.setVisible(true); } } You can specify the text to be displayed as a command-line argument:
% java FontShow "When in the course of human events ..."
FontShow may look a bit complicated, but there's really not much to it. The bulk of the code is in paint(), which sets the font, draws the text, and adds a few lines to illustrate some of the font's characteristics (metrics). For fun, we also catch mouse clicks (using an event handler defined in the constructor) and alternate the font size by setting the bigFont toggle variable and repainting.
By default, text is rendered above and to the right of the coordinates specified in the drawString() method. Think of that starting point as the origin of a coordinate system; the axes are the baselines of the font. FontShow draws these lines in white. The greatest height the characters stretch above the baseline is called the ascent and is shown by a green line. Some fonts also have parts of letters that fall below the baseline. The farthest distance any character reaches below the baseline is called the descent. FontShow illustrates this with a red line.
We ask for the ascent and descent of our font with the LineMetrics class's getAscent() and getDescent() methods. We also ask for the width of our string (when rendered in this font) with Font's getStringBounds() method. This information is used to center the word in the display area. To center the word vertically, we use the height and adjust with the descent to calculate the baseline location. Table 19-2 provides a short list of methods that return useful font metrics.
| Method | Description |
|---|---|
| getAscent() | Height above baseline |
| getDescent() | Depth below baseline |
| getLeading() | Standard vertical spacing between lines |
| getHeight() | Total line height (ascent + descent + leading) |
Leading space is the padding between lines of text. The getHeight() method reports the total height of a line of text, including the leading space.
19.7 Displaying Images
So far, we've worked with methods for drawing simple shapes and displaying text. For more complex graphics, we'll be working with images. The 2D API has a powerful set of tools for generating and displaying image data. These tools address the problems of working in a distributed and multithreaded application environment. We'll start with the basics of the java.awt.Image class and see how to get an image into an application and draw it on a display. In general we can let Java handle the details of this for us. In a typical Swing application, the simplest way to get an image onto the screen is to use an ImageIcon with a JLabel. But here we'll be talking about working with image data at a lower level, for painting. In the next chapter, we'll go further to discuss how to manage image loading manually as well as how to create raw image data and feed it efficiently to the rest of an application.
19.7.1 The Image Class
The java.awt.Image class represents a view of an image. The view is created from an image source that produces pixel data. Images can be from a static source, including GIF, JPEG, or PNG data files, or a dynamic one, such as a video stream or a graphics engine. The Image class in Java 2 also handlesGIF89a animations, so that you can work with simple animations as easily as static images.
Images are created by the getImage() and createImage() methods of the java.awt.Toolkit class. There are two forms of each method, which accept a URL or plain filename, respectively. When packaging images with your application, you should use the Class getResource() method (discussed in Chapter 11) to construct a URL that will references a file from the application classpath. getResource() allows you to bundle images along with your application, inside JAR files or anywhere else in the classpath. The following code fragment shows some examples of loading images with the getImage() method:
Toolkit toolkit = Toolkit.getDefaultToolkit( ); // Application resource URL URL daffyURL = getClass( ).getResource("/cartoons/images/daffy.gif"); Image daffyDuckImage = toolkit.getImage( daffyURL ); // Absolute URL URL monaURL = new URL( "http://myserver/images/mona_lisa.png"); Image monaImage = toolkit.getImage( monaURL ); // Local file Image elvisImage = toolkit.getImage("c:/elvis/lateryears/fatelvis1.jpg" ); The createImage() method looks just like getImage(); the difference is that getImage() "interns" images and shares them when it receives multiple requests for the same data. The createImage() method does not do this (it creates a new Image object every time) and relies on you to cache and share the image. getImage() is convenient in an application that uses a limited number of images for the life of the application, but it may not ever release the image data. You should use createImage() and cache the Image objects yourself when it's an issue.
Once we have an Image object, we can draw it into a graphics context with the drawImage() method of the Graphics2D class. The simplest form of the drawImage() method takes four parameters: the Image object, the x, y coordinates at which to draw it, and a reference to a special image observer object. We'll show an example involving drawImage() soon, but first let's find out about image observers.
19.7.2 Image Observers
Images are processed asynchronously, which means that Java performs image operations such as loading and scaling on its own time (allowing the user code to continue). In a typical client application this might not be important; images may be small, for things like buttons, and are probably bundled with the application for almost instant retrieval. However Java was designed to work with image data over the Web as well as locally, and you will see this expressed in the APIs for working with image data.
For example, the getImage() method always returns immediately, even if the image data has to be retrieved over the network from Mars and isn't available yet. In fact, if it's a new image, Java won't even begin to fetch it until we try to try to display or manipulate it. The advantage of this technique is that Java can do the work of a powerful, multithreaded image-processing environment for us. However, it also introduces several problems. If Java is loading an image for us, how do we know when it's completely loaded? What if we want to work with the image as it arrives? What if we need to know properties of the image (like its dimensions) before we can start working with it? What if there's an error in loading the image?
These problems are handled by image observers designated objects that implement the ImageObserver interface. All operations that draw or examine Image objects return immediately, but they take an image observer object as a parameter. The ImageObserver monitors the image's status and can make that information available to the rest of the application. When image data is loaded from its source by the graphics system, your image observer is notified of its progress, including when new pixels are available, when a complete frame of the image is ready, and if there is an error during loading. The image observer also receives attribute information about the image, such as its dimensions and properties, as soon as they are known.
The drawImage() method, like other image operations, takes a reference to an ImageObserver object as a parameter. drawImage() returns a boolean value specifying whether or not the image was painted in its entirety. If the image data has not yet been loaded or is only partially available, drawImage() paints whatever fraction of the image it can and returns. In the background, the graphics system starts (or continues) loading the image data. The image observer object is registered as interested in information about the image. It's then called repeatedly as more pixel information is available and again when the entire image is complete. The image observer can do whatever it wants with this information. Most often it calls repaint() to prompt the applet to draw the image again with the updated data; a call to repaint() initiates a call to paint() to be scheduled. In this way, an application or applet can redraw the image as it arrives for a progressive loading effect. Alternatively, it could wait until the entire image is loaded before displaying it.
Image observers are covered in Chapter 20. For now, let's avoid the issue by using a prefabricated image observer. The Component class implements the ImageObserver interface and provides some simple repainting behavior, which means every component can serve as its own default image observer. We simply pass a reference to our applet (or other component) as the image observer parameter of a drawImage() call:
public void paint( Graphics g ) { g.drawImage( monaImage, x, y, this ); ... Our component serves as the image observer and calls repaint() for us to redraw the image as necessary. If the image arrives slowly, our component is notified repeatedly as new chunks become available. As a result, the image appears gradually, as it's loaded. The awt.image.incrementaldraw and awt.image.redrawrate system properties control this behavior. redrawrate limits how often repaint() is called; the default value is every 100 milliseconds. incrementaldraw's default value, true, enables this behavior. Setting it to false delays drawing until the entire image has arrived.
19.7.3 Scaling and Size
Another version of drawImage() renders a scaled version of the image:
g.drawImage( monaImage, x, y, x2, y2, this );
This draws the entire image within the rectangle formed by the points x, y and x2, y2, scaling as necessary. drawImage() behaves the same as before; the image is processed by the component as it arrives, and the image observer is notified as more pixel data and the completed image are available. Several other overloaded versions of drawImage() provide more complex options: you can scale, crop, and perform some simple transpositions.
Normally, however, for scaling you want to make a scaled copy of an image (as opposed to simply painting one at draw-time), and you can use getScaledInstance() for this purpose. Here's how:
Image scaledDaffy = daffyImage.getScaledInstance(100,200,SCALE_AREA_AVERAGING);
This method scales the original image to the given size; in this case, 100 by 200 pixels. It returns a new Image that you can draw like any other image. SCALE_ AREA_AVERAGING is a constant that tells getScaledImage() what scaling algorithm to use. The algorithm used here tries to do a decent job of scaling at the expense of time. Some alternatives that take less time are SCALE_REPLICATE, which scales by replicating scan lines and columns (which is fast but probably not pretty). You can also specify either SCALE_FAST or SCALE_SMOOTH and let the implementation choose an appropriate algorithm that optimizes for time or quality. If you don't have specific requirements, you should use SCALE_DEFAULT, which, ideally, would be set by a preference in the user's environment.
Scaling an image before calling drawImage() can improve performance dramatically because the image loading and scaling takes place only once. Otherwise, repeated calls to drawImage() with scaling requirements cause the image to be scaled every time, wasting processing time.
The Image getHeight() and getWidth() methods retrieve the dimensions of an image. Since this information may not be available until the image data is completely loaded, both methods also take an ImageObserver object as a parameter. If the dimensions aren't yet available, they return values of -1 and notify the observer when the actual value is known. We'll see how to deal with these and other problems a bit later. For now, we'll continue to use our Component as the image observer and move on to some general painting techniques.
19.8 Drawing Techniques
Now that we've learned about the basic tools, let's put a few of them together. In this section, we'll look at some techniques for doing fast and flicker-free drawing and painting. If you're interested in animation, this is for you. Drawing operations take time, and time spent drawing leads to delays and imperfect results. Our goals are to minimize the amount of drawing work we do and, as much as possible, to do that work away from the eyes of the user. To do this, we use two techniques: clipping and double buffering. Fortunately, Swing now handles double buffering by default. You won't have to implement this logic on your own, but it's important to understand it.
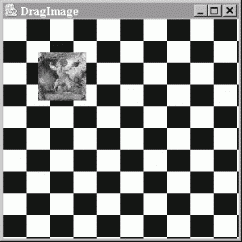
Our first example, DragImage illustrates some of the issues in updating a display. Like many animations, it has two parts: a constant background and a changing object in the foreground. In this case, the background is a checkerboard pattern, and the object is a small, scaled image we can drag around on top of it, as shown in Figure 19-4.
Figure 19-4. The DragImage application
import java.awt.*; import java.awt.event.*; import javax.swing.*; public class DragImage extends JComponent implements MouseMotionListener { static int imageWidth=60, imageHeight=60; int grid = 10; int imageX, imageY; Image image; public DragImage(Image i) { image = i; addMouseMotionListener(this); } public void mouseDragged(MouseEvent e) { imageX = e.getX( ); imageY = e.getY( ); repaint( ); } public void mouseMoved(MouseEvent e) {} public void paint(Graphics g) { Graphics2D g2 = (Graphics2D)g; int w = getSize( ).width / grid; int h = getSize( ).height / grid; boolean black = false; for (int y = 0; y <= grid; y++) for (int x = 0; x <= grid; x++) { g2.setPaint(black ? Color.black : Color.white); black = !black; g2.fillRect(x * w, y * h, w, h); } g2.drawImage(image, imageX, imageY, this); } public static void main(String[] args) { String imageFile = "L1-Light.jpg"; if (args.length > 0) imageFile = args[0]; // Turn off double buffering //RepaintManager.currentManager(null).setDoubleBufferingEnabled(false); Image image = Toolkit.getDefaultToolkit( ).getImage( DragImage.class.getResource(imageFile)); image = image.getScaledInstance( imageWidth,imageHeight,Image.SCALE_DEFAULT); JFrame frame = new JFrame("DragImage"); frame.getContentPane( ).add( new DragImage(image) ); frame.setSize(300, 300); frame.setDefaultCloseOperation( JFrame.EXIT_ON_CLOSE ); frame.setVisible(true); } } Run the application by specifying an image file as a command-line argument. Try dragging the image.
DragImage is a custom component that overrides the JComponent paint() method to do its drawing. In the main() method we load the image and prescale it to improve performance. We then create the DragImage component and place it in the content pane. As the mouse is dragged, DragImage keeps track of its position in two instance variables, imageX and imageY. On each call to mouseDragged(), the coordinates are updated, and repaint() is called to ask that the display be updated. When paint() is called, it looks at some parameters, draws the checkerboard pattern to fill the applet's area and finally paints the small version of the image at the latest coordinates.
This example brings up two important differences between using a JComponent and a plain AWT Component. First, the default JComponent update() method simply calls our paint() method. However, prior to Java 1.4, the AWT Component class's default update() method first cleared the screen area using a clearRect() call before calling paint. Recall that the difference between paint() and update() is that paint() draws the entire area; update() assumes the screen region is intact from the last draw. In AWT, update() was overly conservative; in Swing it's more optimistic. This is important to know if you are working with an older AWT-based application. In that case, you can simply override update() to call paint(). The next difference is that Swing by default performs double buffering.
19.8.1 Double Buffering
Double buffering means that instead of drawing directly on the screen, Swing first performs drawing operations in an offscreen buffer and then copies the completed work to the display in a single painting operation, as shown in Figure 19-5. It takes the same amount of time to draw a frame, but double buffering instantaneously updates our display when it's ready, so the user does not perceive any flickering or progressively rendered output.
Figure 19-5. Double buffering
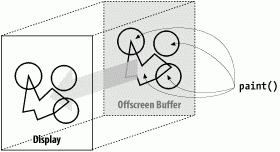
We'll show you how you could implement this technique yourself when we use an offscreen buffer later in this chapter. However Swing does this kind of double buffeing for you whenever you use a Swing component in a Swing container. AWT components do not have automatic double-buffering capability.
It is interesting and instructive to take our example and turn off double buffering to see the effect. Each Swing JComponent has a method called setDoubleBuffered() that can be set to false to disable the technique. Or you can disable it for all components using a call to the Swing RepaintManager, as we've indicated in comments in the example. Try uncommenting that line of DragImage and observe the difference in appearance.
The difference is most dramatic when you are using a slow system or doing complex drawing operations. Double buffering eliminates all of the flickering. However on a slow system, it can decrease performance noticeably, especially on older Unix or X-Windows systems. In some cases it may be beneficial to provide an option to disable double buffering in that environment.
Our example is pretty fast, but we're still doing some wasted drawing. Most of the background stays the same each time it's painted. You might think of trying to make paint() smarter, so that it wouldn't redraw these areas but remember that paint() has to be able to draw the entire scene because it might be called in situations when the display isn't intact. The solution is to draw only part of the picture whenever the mouse moves. Next we'll talk about clipping.
19.8.2 Limiting Drawing with Clipping
Whenever the mouse is dragged, DragImage responds by updating its coordinates and calling repaint(). But repaint() by default causes the entire component to be redrawn. Most of this drawing is unnecessary. It turns out that there's another version of repaint() that lets you specify a rectangular area that should be drawn in essence, a clipping region.
Why does it help to restrict the drawing area? Well, foremost, drawing operations that fall outside the clipping region are not displayed. If a drawing operation overlaps the clipping region, we see only the part that's inside. A second effect is that, in a good implementation, the graphics context can recognize drawing operations that fall completely outside the clipping region and ignore them altogether. Eliminating unnecessary operations can save time if we're doing something complex, such as filling a bunch of polygons. This doesn't save the time our application spends calling the drawing methods, but the overhead of calling these kinds of drawing methods is usually negligible compared to the time it takes to execute them. (If we were generating an image pixel by pixel, this would not be the case, as the calculations would be the major time sink, not the drawing.)
So we can save some time in our application by redrawing only the affected portion of the display. We can pick the smallest rectangular area that includes both the old image position and the new image position, as shown in Figure 19-6. This is the only portion of the display that really needs to change; everything else stays the same.
Figure 19-6. Determining the clipping region

A smarter algorithm could save even more time by redrawing only those regions that have changed. However, the simple clipping strategy we've implemented here can be applied to many kinds of drawing and gives good performance, particularly if the area being changed is small.
One important thing to note is that, in addition to looking at the new position, our updating operation now has to remember the last position at which the image was drawn. Let's fix our application so it will use a specified clipping region. To keep this short and emphasize the changes, we'll take some liberties with design and make our next example a subclass of DragImage. Let's call it ClippedDragImage.
import java.awt.*; import java.awt.event.*; import javax.swing.*; public class ClippedDragImage extends DragImage { int oldX, oldY; public ClippedDragImage( Image i ) { super(i); } public void mouseDragged(MouseEvent e) { imageX = e.getX( ); imageY = e.getY( ); Rectangle r = getAffectedArea( oldX, oldY, imageX, imageY, imageWidth, imageHeight); repaint(r); // repaint just the affected part of the component oldX = imageX; oldY = imageY; } private Rectangle getAffectedArea( int oldx, int oldy, int newx, int newy, int width, int height) { int x = Math.min(oldx, newx); int y = Math.min(oldy, newy); int w = (Math.max(oldx, newx) + width) - x; int h = (Math.max(oldy, newy) + height) - y; return new Rectangle(x, y, w, h); } public static void main(String[] args) { String imageFile = "L1-Light.jpg"; if (args.length > 0) imageFile = args[0]; // Turn off double buffering //RepaintManager.currentManager(null).setDoubleBufferingEnabled(false); Image image = Toolkit.getDefaultToolkit( ).getImage( ClippedDragImage.class.getResource(imageFile)); image = image.getScaledInstance( imageWidth,imageHeight,Image.SCALE_DEFAULT); JFrame frame = new JFrame("ClippedDragImage"); frame.getContentPane( ).add( new ClippedDragImage(image) ); frame.setSize(300, 300); frame.setDefaultCloseOperation( JFrame.EXIT_ON_CLOSE ); frame.setVisible(true); } } You may or may not find that ClippedDragImage is significantly faster. Modern desktop computers are so fast that this kind of operation is child's play for them. However the fundamental technique is important and applicable to more sophisticated applications.
So what have we changed? First, we've overridden mouseDragged() so that instead of setting the current coordinates of the image, it figures out the area that has changed. A new, private method helps it do this. getAffectedArea() takes as arguments the new and old coordinates and the width and height of the image. It determines the bounding rectangle as shown in Figure 19-6, then calls repaint() to draw only the affected area of the screen. mouseDragged() also saves the current position by setting the oldX and oldY variables.
Try turning off double buffering on this example and compare it to the unbuffered previous example to see how much less work is being done.
19.8.3 Offscreen Drawing
In addition to serving as buffers for double buffering, offscreen images are useful for saving complex, hard-to-produce, background information. We'll look at a simple example, the doodle pad. DoodlePad is a simple drawing tool that lets us scribble by dragging the mouse, as shown in Figure 19-7. It draws into an offscreen image; its paint() method simply copies the image to the display area.
Figure 19-7. The DoodlePad application
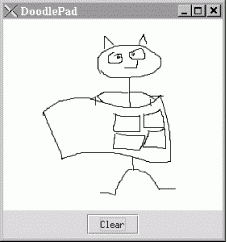
//file: DoodlePad.java import java.awt.*; import java.awt.event.*; import javax.swing.*; public class DoodlePad { public static void main(String[] args) { JFrame frame = new JFrame("DoodlePad"); Container content = frame.getContentPane( ); content.setLayout(new BorderLayout( )); final DrawPad drawPad = new DrawPad( ); content.add(drawPad, BorderLayout.CENTER); JPanel panel = new JPanel( ); JButton clearButton = new JButton("Clear"); clearButton.addActionListener(new ActionListener( ) { public void actionPerformed(ActionEvent e) { drawPad.clear( ); } }); panel.add(clearButton); content.add(panel, BorderLayout.SOUTH); frame.setSize(280, 300); frame.setDefaultCloseOperation( JFrame.EXIT_ON_CLOSE ); frame.setVisible(true); } } // end of class DoodlePad class DrawPad extends JComponent { Image image; Graphics2D graphics2D; int currentX, currentY, oldX, oldY; public DrawPad( ) { setDoubleBuffered(false); addMouseListener(new MouseAdapter( ) { public void mousePressed(MouseEvent e) { oldX = e.getX( ); oldY = e.getY( ); } }); addMouseMotionListener(new MouseMotionAdapter( ) { public void mouseDragged(MouseEvent e) { currentX = e.getX( ); currentY = e.getY( ); if (graphics2D != null) graphics2D.drawLine(oldX, oldY, currentX, currentY); repaint( ); oldX = currentX; oldY = currentY; } }); } public void paintComponent(Graphics g) { if (image == null) { image = createImage(getSize( ).width, getSize( ).height); graphics2D = (Graphics2D)image.getGraphics( ); graphics2D.setRenderingHint(RenderingHints.KEY_ANTIALIASING, RenderingHints.VALUE_ANTIALIAS_ON); clear( ); } g.drawImage(image, 0, 0, null); } public void clear( ) { graphics2D.setPaint(Color.white); graphics2D.fillRect(0, 0, getSize( ).width, getSize( ).height); graphics2D.setPaint(Color.black); repaint( ); } } Give it a try. Draw a nice moose or a sunset. We just drew a lovely cartoon of Bill Gates. If you make a mistake, hit the Clear button and start over.
The parts should be familiar by now. We have made a type of JComponent called DrawPad. The new DrawPad component uses inner classes to supply handlers for the MouseListener and MouseMotionListener interfaces. Mouse dragging is handled by drawing lines into an offscreen image and calling repaint() to update the display. DrawPad's paint() method simply does a drawImage() to copy the offscreen drawing area to the display. In this way, DrawPad saves our sketch information.
What is unusual about DrawPad is that it does some drawing outside of paint(). In this example, we want to let the user scribble with the mouse, so we should respond to every mouse movement. Therefore, we do our work, drawing to the offscreen buffer in mouseDragged() itself. As a rule, we should be careful about doing heavy work in event-handling methods because we don't want to interfere with other tasks the windowing system's painting thread is performing. In this case, our line-drawing option should not be a burden, and our primary concern is getting as close a coupling as possible between the mouse movement events and the sketch on the screen.
In addition to drawing a line as the user drags the mouse, the mouseDragged() handler maintains a set of old coordinates to be used as a starting point for the next line segment. The mousePressed() handler resets the old coordinates to the current mouse position whenever the user moves the mouse. Finally, DrawPad provides a clear() method that clears the offscreen buffer and calls repaint() to update the display. The DoodlePad application ties the clear() method to an appropriately labeled button through another anonymous inner class.
What if we wanted to do something with the image after the user has finished scribbling on it? As we'll see in the next chapter, we could get the pixel data for the image and work with that. It wouldn't be hard to create a save facility that stores the pixel data and reproduces it later. Think about how you might go about creating a networked "bathroom wall," where people could scribble on your web pages.
19.9 Printing
Earlier in this chapter, we hinted at the possibility that you could draw the same stuff on the screen and the printer. It's true; all you really need to do is get a Graphics2D that represents a printer rather than an area of the screen. Java 2's Printing API provides the necessary plumbing. There isn't room here to describe the whole Printing API, but we will provide you with a short example that will let you get your feet wet (and your paper blackened).
The printing classes are tucked away in the java.awt.print package. You can print anything that implements the Printable interface. This interface has only one method you guessed it, print(). This method, like the paint() methods we've already worked with, accepts a Graphics object that represents the drawing surface of the printer's page. It also accepts a PageFormat object that encapsulates information about the paper on which you're printing. Finally, print() is passed the number of the page that is being rendered.
Your print() implementation should either render the requested page or state that it doesn't exist. You can do this by returning special values from print(), either Printable.PAGE_EXISTS or Printable.NO_SUCH_PAGE.
You can control a print job, including showing print and page setup dialogs, using the PrinterJob class. The following class enables you to get something on paper:
//file: UnbelievablySimplePrint.java import java.awt.*; import java.awt.print.*; public class UnbelievablySimplePrint implements Printable { private static Font sFont = new Font("Serif", Font.PLAIN , 64); public int print(Graphics g, PageFormat Pf, int pageIndex) throws PrinterException { if (pageIndex > 0) return NO_SUCH_PAGE; Graphics2D g2 = (Graphics2D)g; g2.setFont(sFont); g2.setPaint(Color.black); g2.drawString("Save a tree!", 96, 144); return PAGE_EXISTS; } public static void main(String[] args) { PrinterJob job = PrinterJob.getPrinterJob( ); job.setPrintable(new UnbelievablySimplePrint( )); if (job.printDialog( )) { try { job.print( ); } catch (PrinterException e) {} } System.exit(0); } } There's not much to this example. We've created an implementation of Printable, called UnbelievablySimplePrint. It has a very simple print() method that draws some text.
The rest of the work, in the main() method, has to do with setting up the print job. First, we create a new PrinterJob and tell it what we want to print:
PrinterJob job = PrinterJob.getPrinterJob( ); job.setPrintable(new UnbelievablySimplePrint( ));
Then we use the printDialog() method to show the standard print dialog. If the user presses the OK button, printDialog() returns true, and main() goes ahead with the printing.
Notice, in the print() method, how we perform the familiar cast from Graphics to Graphics2D. The full power of the 2D API is available for printing. In a real application, you'd probably have some subclass of Component that was also a Printable. The print() method could simply call the component's paint() method to create a component that performs the same rendering to both the screen and the printer.
| CONTENTS |
EAN: 2147483647
Pages: 30