| Now that you know how to connect to the Internet, let's look at browsing the web. The first time you open a Web browser, such as Internet Explorer, on your computer it goes to a special location called a home page. A home page is similar to the cover of a book. It's the introductory page of a Web site. A typical home page will tell you about the site and offer fast access to other parts of the site (or to other sites with similar content). Using Internet Explorer  -
Click the Internet Explorer icon on the Dock to launch Apple's default browser (if it's not there, check the Applications folder). This will launch the Microsoft browser and create an Internet connection if one hasn't already been created. When connected, the home page set as your browser default will appear (see Figure 4.7). Figure 4.7. The default home page for your browser will appear when you launch your browser while connected to the Internet.  -
Click any title or button where the mouse cursor changes to a hand to see another page. -
To return to the previous page (whatever it is), click the Back arrow on the toolbar. The Forward arrow takes you back to the page you visited before clicking Back (if there is one). Click the Home icon to go back to the home page set for our browser. Feel free to spend a little time clicking here and there to see whatever information suits your fancy. A quick click of the Home icon on the toolbar gets you back where you started. Your browser will track your visits via a history file, which we will cover in more detail in just a little while.  | If you've visited a lot of sites during your session, you can access any one of them quickly by clicking the Go menu and selecting that site from the list. |
Making Sense of URLs The clever people who designed the World Wide Web devised a way to summon a site quickly without knowing the exact route. Unfortunately, it's not in plain English, so it might seem a little confusing. You call up a Web site by its URL. URL is short for Uniform Resource Locator, and it's the syntax used to identify a Web site so that it can be accessed. I'll dissect a URL in the upcoming pages, so you can see the stuff from which they're made. Let's see what all those little letters and numbers mean by calling up a common, garden-variety Web siteApple's. You can access it this way: Accessing a Web Site -
Click the Address field below your browser's toolbar. -
Enter the following: http://www.apple.com (do it exactly as I have written it). -
Press the Return or Enter key on your Mac's keyboard. Your Web browser will send the request for the site across the Internet, and then retrieve the information to display in your computer. In a few seconds, you'll see Apple Computer's home page, just as you see in Figure 4.8. Figure 4.8. Welcome to the home of the "Think Different" folks, Apple Computer, Inc. 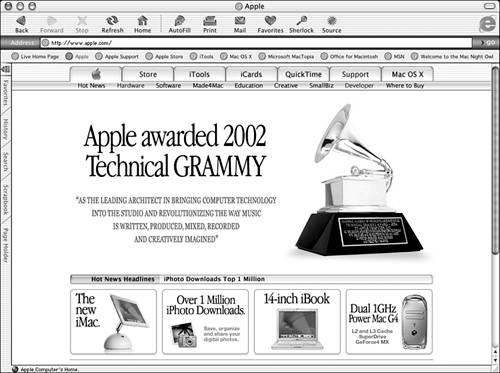 | | When you open your Internet Explorer browser, you'll find there's already an icon for Apple Computer and other Apple Web pages right below the Address field. To add a site to the toolbar just access the site, click the icon next to its address, and drag it to the toolbar. You can also drag URLs right to the Dock and have them a click away from access. If you want to remove an item from the tool bar, Command-click the item and choose Delete from the pop-up (Contextual) menu. You can also drag the URL to the trash to accomplish the same result. |
-
To see more information at Apple's site just click any of the colorful pictures. | | Not all pictures you see at a Web site can be clicked to take you to another destination. You'll know you can access such a destination (or link) with a picture when your mouse cursor changes to a hand whenever you point it over the picture. |
Let's dissect Apple's URL to see what the information means: -
http:// This prefix, short for hypertext transfer protocol, tells the browser that you're asking for a Web site. If it has an ftp:// prefix, it means you're accessing a file transfer site instead (it stands for file transfer protocol, and we'll talk more about it in Chapter 27. -
www This information tells the browser this is the URL for a Web site, though a number of URLs don't include it. Rather than guess, just use whatever address is given for the site to be sure you get the right one. | | If a site's URL has the telltale www letters in it (and not all do), you can skip the http:// prefix and just enter the rest of the address. The Web browser is clever enough to know what you want. |
-
apple This is the first part of the site's domain name . A domain is the online equivalent of the Web site's street address. It tells the browser where to go to get what you want.  | Each part of a URL, except for the prefix, is separated by a period (referred to as a "dot" in the computer universe) or a slash. Don't forget to enter the correct character where needed to get to the right place. |
-
com This identifies the site as commercial. The suffix edu means the site is an educational institution, org represents an organization of some sort (usually a charitable organization or club), and gov represents a U.S. government agency. If you see be as the suffix the site is located in Belgium. When the suffix is ca the site is located in Canada, whereas uk represents the United Kingdom (and co identifies a commercial site from that country). Additional suffixes are found in other parts of the world, and others are added from time to time. | | If you've visited a site before, you'll notice your Web browser will try to fill (or autofill) the missing information when you begin to enter the URL, by putting up a pop-up menu. Just move the mouse to select the site you want, if you see the correct one, and press Return or Enter to get to where you want. Otherwise, continue to enter the proper address. |
| | URLs are usually not case sensitive, so it really shouldn't matter whether you enter the address with uppercase or lowercase letters. But if a site has a password as part of a URL, you'll need to type that perfectly (uppercase and lowercase, as required). |
Making Your Own List of Web Favorites Over time, you'll visit Web sites you want to return to again and again, but the Go menu's history file is only good for a few dozen sites. The older sites are automatically removed from the list. What to do? Fortunately, your browser has a way to store the URLs of sites for quick retrieval. You can take advantage of this feature by using the Favorites menu. It's the best trick this side of Star Trek's "beam me up Scotty" routine to quickly get where you want to go. Storing URLs -
Access the site you want to revisit regularly. -
Click the Favorites menu (see Figure 4.9) and choose the first option, Add Page to Favorites. The site you've opened will immediately become a part of this menu. Real neat! Figure 4.9. Your Favorites menu can be quickly customized to your taste. 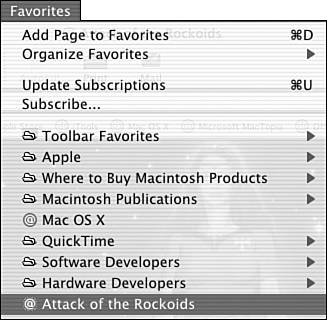 | | You can save a trip to the Favorites menu by typing Command-D to add the page to the list. |
-
If you want to check the sites you've added to change or remove them, choose the second command in the Favorites menu, Open Favorites, instead. Or choose the Favorite button on the toolbar. -
To remove a site, simply select it from your Favorites directory and press the Delete key. Acknowledge your decision to delete on the next screen and zapit's gone. Once again, you can also access your Favorites by clicking on the tab at the left of the browser window. Take That Cache and Zap It The word cache has several meanings, but for our purposes it's a secret place where you store things. I suppose a Web browser's cache is secret because it's not visible unless you look for it. But, it's a place where recent artwork you've accessed from a Web site is stored, so you can revisit the place and not have to wait as long for the page to appear. Normally, your Web browser is designed to empty older cached artwork, so it doesn't get too large and slow down performance. At times, though, things still bog down anyway. What to do? The easiest step to take is simply to empty the cache, which means your browser will have to build it again. But, more often than not, it makes your computer seem faster when accessing the Internet. | | Here's how it's done with Internet Explorer (just check the preferences of other browsers to look for delete cache options): | -
With Internet Explorer running, choose Preferences from the application menu. -
Click the arrow next to Web Browser to make sure it points down. -
Now click Advanced and look for the Cache category and click the Empty Now button (see Figure 4.10). Figure 4.10. Tell that cache to take a ride. 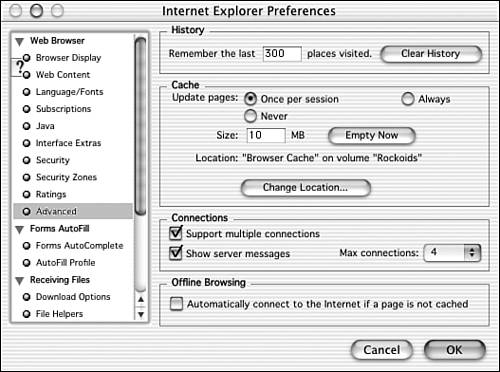 -
To finish up, click the OK button. This action will clear the contents of the cache file used by Internet Explorer. Downloading To update your software or get new software, you might need to download a file from the Internet as discussed in Chapter 6, "Installing Additional Software." IE makes this task easy with the Download Manager (shown in Figure 4.11), which opens when you're downloading a file to show you the file's status (such as how far it has progressed) and to enable you to stop the download if you change your mind. The Download Manager also shows you the last 10 files you downloadeda handy feature when you can't remember what you have done and what you haven't. Figure 4.11. The Download Manager is a separate window in Internet Explorer.   | When you're downloading files, you should be aware that you're transferring someone else's files to your hard drive and those files could carry a virus. A virus is a malicious program meant to harm your hard drive or network. When downloading, use a reputable site and never download a file if you don't know what that file does. You might also want to have antivirus software on your computer to scan for viruses. See Chapter 29, "Recovering from Crashes and Other Problems." |
Refer to Chapter 6 for examples of downloading and installing programs. Setting Preferences So far you've learned how to use a Web browser to visit different sites on the Internet. You're now going to take a look at all the aspects of IE that can be customized and altered to fit your needs. To do this, you use the Preferences dialog box found in the Explorer application menu. Click on Explorer in the menu bar and select Preferences, or simply press Command-;. The first time it's opened, the dialog box shows preferences from the Browser Display category on the left. After that, it remembers the last thing you chose. If it isn't already open, click Browser Display in the Preferences dialog box. Here you can change your default home page. In the Home Page section in the middle of the Browser Display panel, select the URL (Web address) in the Address field, and type http://www.google.com. This makes the Google search engine page your home page, so it appears whenever you open Internet Explorer. Click OK. Close IE by choosing File, Quit from the menu bar, or by using Command-Q. Open IE again by clicking the icon in the Dock or in your Applications folder. Notice that the page that opens first is Google. You can set any page on the Web or on your hard drive to be your home page. | | Whenever you want to view this home page, click the Home button in the button bar. |
Although there are far too many categories of preferences to cover here, there are a few you should be aware of. One is the Toolbar Settings in the Browser Display category. By default, the toolbar displays both icons and text. If you're running low on screen space, you might want to have these buttons display only icons or text to reduce the height of the toolbar. If you select the Web Content category in the list in Internet Explorer Preferences, you can choose several options that speed up the time it takes to load a page in your browser. The most useful thing you can do if you're using a slow connection is to uncheck the Show Pictures check box. If this box isn't checked, the large picture files that slow down many pages aren't displayed. | | Many sites today rely heavily on pictures to create their menu structure and convey the general message of the Web site. Although a good Web designer should have alternative tags that display text instead of the picture, many designers don't take the time to code them into their pages, rendering the text tags useless if you don't display the pictures. |
In the Advanced panel of the Preferences dialog box, as shown in Figure 4.12, you find some of the settings referred to earlier in this section. One setting is the number of pages you visited that your browser stores in its history. The history stores 300 pages by default, but this number can vary from 0 to 1,000. Another thing to notice in the History section is the big button labeled Clear History. Regardless of how many places you've told the browser to remember, when you click Clear History, all those places are no longer part of the browser's history. You might say they're history! Doing so prevents anyone who is using your account from discovering where you've been. Figure 4.12. The Advanced panel in the Preferences dialog box is where you can go to clear the history.  |