Creating an Internet Connection
| The first step in connecting to any network (including the Internet) is determining what, exactly, is being connected. Mac OS X supports a number of technologies out of the box, such as standard wired (ethernet) networks, wireless AirPort networks, and, of course, broadband and dial-in ISPs. For each different type of network, you must collect connection information before continuing. Your network administrator or ISP should be able to provide you with the details of your network access, including
If you're using a dial-in connection, chances are good that all you need are a phone number, an account name, and a password. You should be absolutely positive that you have all the necessary information before you continue; otherwise , your computer could behave strangely when attempting to connect with incomplete or inaccurate information.
With connection information in hand, open System Preferences, and click the Network button in the Internet & Network section. You should now be looking at the control center for all your network connections. Near the top of the panel is a Show pop-up menu. Use this menu to choose between the different types of connections that your computer uses, such as Internal Modem, Built-in Ethernet, AirPort, and Internet Sharing (Ethernet). Let's look at each one and how it can be set up for your ISP.
Internal ModemIf you use a modem to connect to the Internet, choose the appropriate Modem option in the Show pop-up menu. The lower portion of your screen changes slightly to reflect the type of connection you're configuring. You see four tabs that lead to four individual setting panes:
In the PPP tab, enter the username and password you were given for your ISP, along with the phone number for the ISP's servers. If you'd like to keep your password stored with the machine, click the Save Password check box. There are a number of settings you might want to look at by clicking the PPP Options button. You can configure settings in a sheet to give you the ability to redial a busy connection, automatically connect when starting TCP/IP applications, and automatically disconnect if you choose Log Out from the Apple menu. Click Apply Now to save the settings. If you chose the PPP option to connect automatically when needed, you should be able to start Internet Explorer and begin surfing the Web.
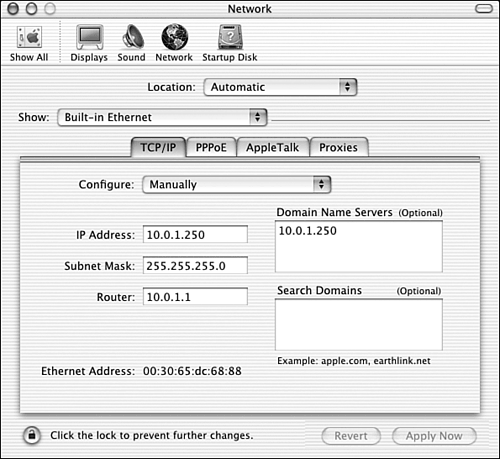
Built-in EthernetThe next type of connection we look at is the built-in ethernet connection. If you have a wired 10BASE-T LAN or a DSL/cable modem hookup, this is where you'll need to focus your attention. Choose Built-in Ethernet in the pop-up menu. Again, the onscreen tabs change to enable you to fine-tune several related areas. The tabs for the Ethernet settings are
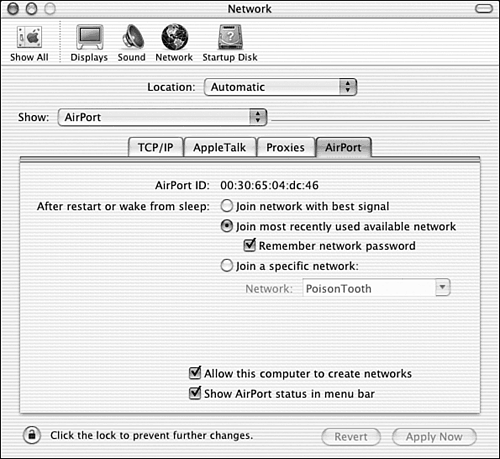
As you can see in Figure 4.2, you definitely need a few items before you can successfully operate an ethernet connection. Fill in the information that you collected from your network administrator or ISP now. If you're lucky, at least a portion of these settings can be configured automatically by a BOOTP (boot protocol) or DHCP Dynamic Host Configuration Protocol) server on your network. BOOTP and DHCP often provide automatic network setup on corporate and cable modem networks. If your network supports one of these services, you can use the Configure pop-up menu in the TCP/IP tab to select the appropriate protocol for your connection. Again, it's important that you do not guess what you need to connect ”using invalid settings could disrupt your entire network. If you're required to use PPPoE, click the PPPoE tab. In this pane, you can supply a username and password for your connection and enter optional identifying data for the ISP. Near the bottom of the pane is a check box that enables you to view your PPPoE status in the menu bar. Clicking this check box adds a new Menu Extra that displays activity on your connection and gives you quick control over your settings. Click the Apply Now button when you're satisfied with your ethernet setup. You should be able to immediately use the network software on your computer, such as Mail and Internet Explorer. AirPortThe next connection method, AirPort, is available only if you've added an AirPort card to your system and are within range of a wireless base station. AirPort is Apple's 802.11b-based wireless networking device that enables you to connect to the Internet without the burden of running network wires or phone lines. To configure your AirPort connection, choose AirPort in the Show pop-up menu. AirPort setup, surprisingly, is identical to ethernet. The same TCP/IP, AppleTalk, and Proxies tabs apply. There is, however, one additional tab that's essential to configure properly: the AirPort tab, shown in Figure 4.3. Figure 4.3. Choose the AirPort network you want to connect to or set criteria so that your system can choose. In the AirPort tab, you can direct your computer to Join the Network with Best Signal, Join the Most Recently Used Available Network, or Join a Specific Network. AirPort networks are identified by a network name. When the Join a Specific Network radio button is selected, you can use the Network pop-up menu to choose one of the detected AirPort (or AirPort-compatible) networks, or manually type the name into the Preferred Network text field. Finally, as with the modem and PPPoE settings, you can activate yet another Menu Extra ”the AirPort signal strength ”by clicking Show AirPort Status in Menu Bar. This Menu Extra also gives you the ability to instantly switch between the different available wireless networks and even shut down AirPort service if you like. Click Apply Now to start using your wireless network. Internet Sharing (Ethernet)The final Networking option is a bit different from the ones previously discussed. Internet Sharing allows computers with multiple network cards to be connected to the Internet in a traditional way (using modem, ethernet, or AirPort) and to share their connection with another computer using either ethernet or AirPort. Although it's an interesting feature, it should be used with great care because this configuration can interfere with established networks. Click the Start button to start sharing your active Internet connection. Other computers should be configured to obtain their settings automatically (DHCP) and should be connected to the same network interface that's being shared. For example, let's imagine that you have a computer connected via Ethernet and you want to share the connection via its AirPort card. First, start Internet Sharing, and then configure your other AirPort-capable computers to connect to the wireless network you just created. The client computers that have their AirPort TCP/IP settings configured to DHCP are immediately able to connect to the Internet. Internet Sharing uses your computer to create a miniature local TCP/IP network that it manages. It controls all the settings on the client computers and ensures that requests to (and from) the Internet move back and forth as they should. |

EAN: 2147483647
Pages: 349