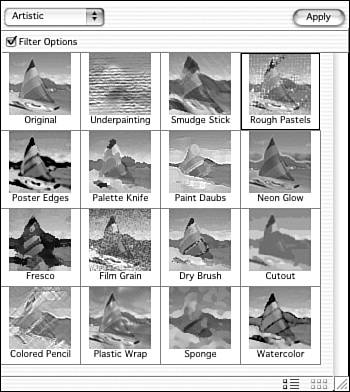
Working with Filters
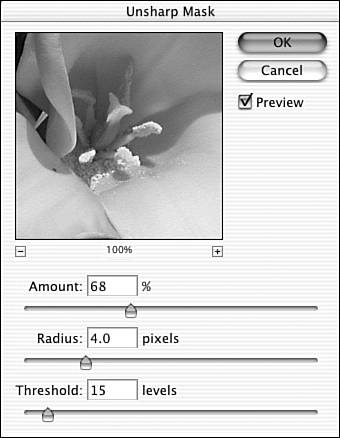
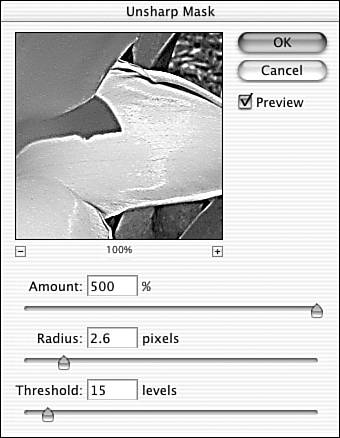
| The filters that we're going to be working with first are all "corrective" filters. They are used to change focus or to add or remove noise and speckles. All the filters in this chapter will be applied to the current layer, or a selection within the current layer. When using a selection, it's usually best to feather the edge to create a better transition between the affected area and the rest of the image. If your image has multiple layers , you can apply the filter to each layer and blend the effects by adjusting each layer's opacity. In most cases, if you want to apply a filter, your image must be using RGB mode. (Some filters may be applied to images using Grayscale mode as well.) Filters are found on the submenus of the Filter menu. Some filters are applied without making any selections at all, while others let you make adjustments before applying them. The last filter you used, with the exact settings you selected, will be listed at the top of the Filter menu. To reapply it with those settings, simply choose the filter from there rather than from the submenu. You can compare filters visually using the Filters palette, shown in Figure 25.1. Change from one category to another using the drop-down list. The filters in each category are displayed in sample thumbnails so you can compare them. To compare the sample original image with the selected filter style, click the List View button at the bottom of the palette. To display thumbnails again, click the Thumbnails button, also located at the bottom of the palette. Double-clicking the thumbnail will open the filter's dialog box, if there is one. If this is one of the filters with no options to set, such as the Blur or Blur More filters that you'll learn about later in this chapter, Elements will simply go ahead and apply it. Figure 25.1. Browse through the many filters using the Filters palette. Using the Sharpen FiltersThere are four filters in this set: Sharpen, Sharpen More, Sharpen Edges, and Unsharp Mask. You'll find them all on the Filters, Sharpen menu. The first three are very straightforwardthere are no options to set. You select them from the Filter menu, and your picture changes accordingly . Sharpen More gives twice as much sharpening as Sharpen, and Sharpen Edges only sharpens areas where there is a lot of contrast between adjacent pixelssuch as the edges of the flower next to the dark background, the shadow in the center, and the light-colored stamen. The Sharpen Edges filter treats these contrasting pixels as edges, and increases the contrast between them. It does not increase the contrast everywhere, as Sharpen and Sharpen More do. Figure 25.2 shows some examples. Figure 25.2. You can try applying any of these filters a second time if the first application doesn't do enough. Just be careful not to oversharpen. The Unsharp Mask filter is a lot more complicated. It also visually sharpens the photo by seeking out edges and adding contrast to them, like Sharpen Edges, but with the variables involved, it can do a much more selective and therefore better job. Choosing Filters, Sharpen, Unsharp Mask opens the dialog box shown in Figure 25.3. Figure 25.3. The Unsharp Mask dialog box. As you can see, there are three settings you must deal with: Amount, Radius, and Threshold. Amount refers to the degree of contrast (sharpness) you'll be adding to the edges of objects in the picture. Radius determines the size of the area that will be sharpened. A large radius sharpens a large area around each perceived edge. A small one sharpens a smaller area. Threshold lets you determine how much of a difference there should be between adjacent pixels before Elements treats them as an edge and enhances them. When you have areas with only minor differences in color , such as sky or skin tones, a very low Threshold setting can make them look blotchy. Still, you want to keep the Threshold as low as you can without letting it add unwanted noise or spottiness to the picture. Sharpening with any of the filters, and particularly with the Unsharp Mask, should always be the very last thing you do to your picture before saving it. If you were to sharpen an image first, and then make additional changes, you would probably make the sharpness that Elements put in stick out like a sore thumb. Task: Applying the Unsharp Mask Filter
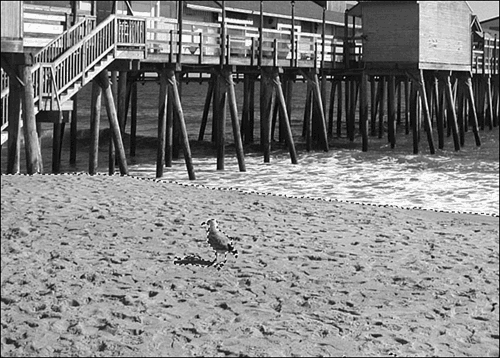
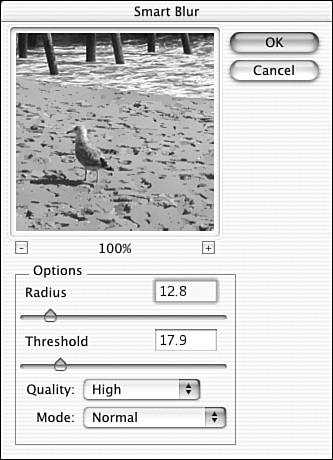
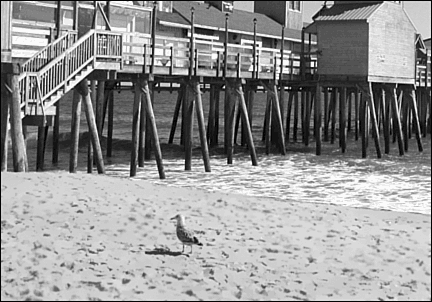
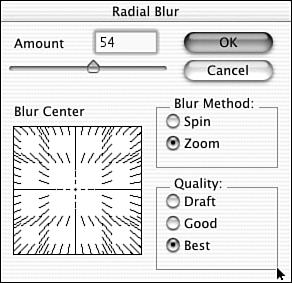
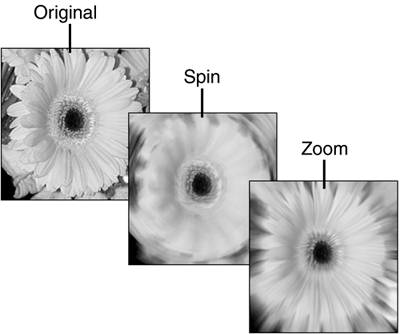
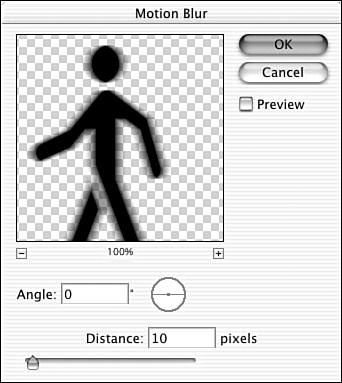
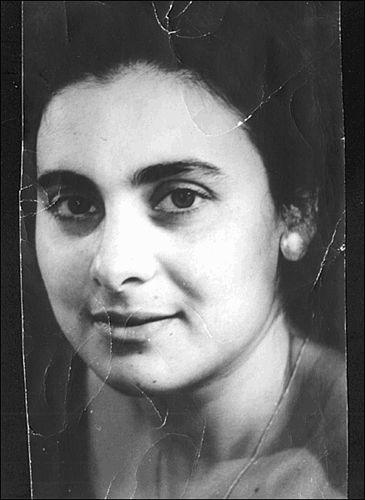
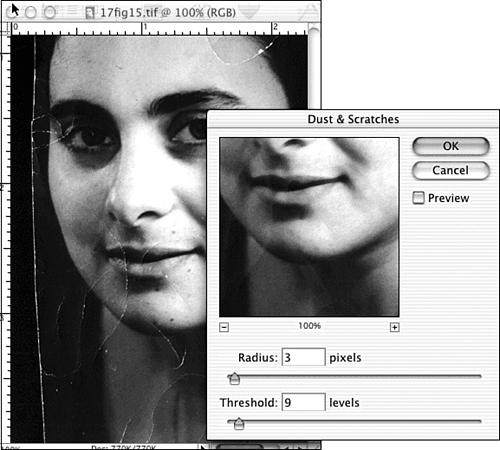
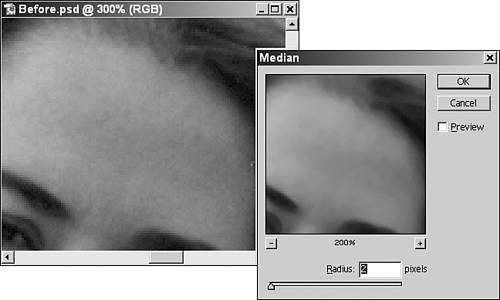
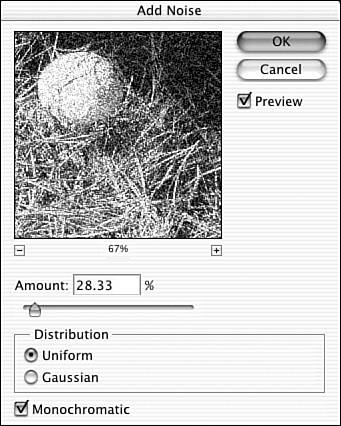
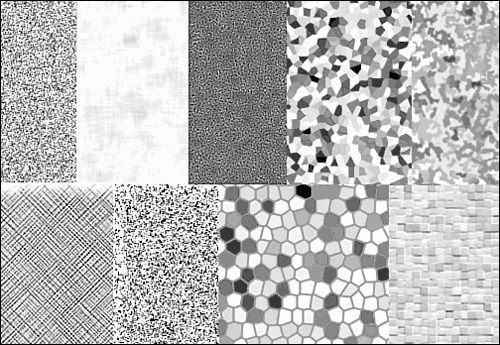
Using the Blur FiltersThe Blur filters logically ought to be the direct opposite of the Sharpen filters. Some are. Blur and Blur More have the same global, one amount fits all, method of application. Choose either one of these two filters from the Filter, Blur menu, and the filter is applied automatically, without options. I actually tried a sequence of Blur, Sharpen, Blur More, and Sharpen More on a picture, and aside from some obvious quality loss, I got back to about where I started. However, I don't recommend this as a technique. The image loses some detail at each step. Blurring, generally , is not something you want to do to the entire image. If you are applying a combination of filters for a special effect, Blur could certainly be one of them, but most of the time we want our pictures sharp. Blurring part of the image, though, is a very useful technique. When you blur an object against a sharp background, you create the illusion that it's in motion. When you blur a background, you create the illusion of depth of field, where the subject is in focus, but the background is so far away that you can't see all the details. Blur and Blur More are best applied to selections. Smart BlurIn Figure 25.5, I'm going to use one of the Blur tools to clean up the beach . The heavy shadows on the sand from too many footprints create a texture that nearly hides the seagull. I've selected the sand and everything on it except the gull. Figure 25.5. Before blurring the sand. Now I'll open the Smart Blur dialog box (Filter, Blur, Smart Blur). Smart Blur has the most flexibility of any of the Blur tools. In its dialog box, which is shown in Figure 25.6, you can set Radius and Threshold, just as you can for Unsharp Masking. You have a choice of Quality settings: High, Medium, or Low. High creates more blur than Low. You also have a choice of effects modes: Normal (which applies the effect to the entire layer or selection), Edge Only (which applies the effect to the edges), or Overlay Edge (which also applies the effect at the edges). The difference between Edge Only and Overlay Edge is the effectEdge Only makes the image or selection black and the edges white, while Overlay Edge doesn't change the colors in the image, but makes the edges white. Figure 25.6. The Smart Blur dialog box. Setting the Radius and Threshold here are the same in theory as setting them for Unsharp Masking. The Radius determines how much of the area around the perceived edge is blurred. The Threshold determines how much difference there needs to be between adjacent pixels before Elements will interpret them as an edge, and will apply the blur to the area. Figure 25.7 shows the final version of this picture. Figure 25.7. Now the sand looks better, and the gull doesn't get lost in the texture. Gaussian BlurThe Gaussian Blur filter is less adjustable than Smart Blur. Its only adjustment is for Radius. What makes it so useful, though, is that it has a built-in randomness factor that varies the amount of blur applied. This gives it a much more natural look, so you can actually use quite a lot of blur without it being obvious. Gaussian Blur is a wonderful tool for portraits. It evens out skin tones, removes fine lines and wrinkles , and takes years off with a single click. Keep in mind, however, that too much blur tends to make skin look as if it were made from plastic. Radial BlurThe Radial Blur filter is just plain fun, especially when you apply it to a round object. The only drawback to using it is that there's no way to preview, so you have to be prepared to do and undo your changes several times until you find the right setting. Figure 25.8 shows the Radial Blur dialog box. There are two different kinds of blur available: Spin and Zoom. Spin simply rotates the pixels around the center point (which you can move). Zoom blurs them outward from the center (again, you can move this spot). Both effects are interesting, if not particularly useful. Figure 25.9 shows examples of both. The Spin amount was only 10, but the Zoom amount was 50. Zooming requires much more "travel distance" within the image to see the full effect. Figure 25.8. The Radial Blur dialog box. Figure 25.9. Three flavors of flower: Original, Spin, and Zoom. To use Radial Blur, select the type of blurSpin or Zoomand the Amount of blur you desire . To adjust the center point of the blur effect, click in the Blur Center box and drag the center point. Note the quality settings in the window, too. They determine how quickly, and how carefully , the blur is applied. The Draft setting works very fast, and leaves some rough edges. Good is sort of a compromise between speed and smoothness, and Best, which is noticeably smoother, can take several minutes to apply on an older, slower computer. Motion BlurWhen we see lines drawn behind a car, a cat, or a comic strip character, we instinctively know that the subject is supposed to be in motion. Those lines represent motion blur , which is actually a photographic mistake caused by using a slow shutter speed on a fast subject. The Motion Blur filter (Filter, Blur, Motion Blur) can add the appearance of motion to a stationary object by placing a directional blur for a predetermined distance. In the Motion Blur dialog box, shown in Figure 25.10, you can set both the distance and direction of the blur according to how fast and in what direction you want the object to appear to be traveling. The Distance sets how much of a blur is appliedor how far the original image is "moved." The Angle sets the direction of the blur. To adjust, drag the directional bar in the circle, or enter precise values into the Angle box next to it. The trick is to select the right area to which to apply Motion Blur. To get a convincing blur, you need to blur the space where the object theoretically was, as well as the space to which it has theoretically moved. You don't want to blur the entire image, so you might want to select the area to blur before using the Motion filter. Figure 25.10. Using the Motion Blur filter is tricky at best. Adding or Removing NoiseThe Noise filters have nothing to do with sound. The kind of noise we're dealing with here is electronic noise. It's displayed on a TV screen or computer monitor as a pattern of random dots, usually in color. It's also called snow, and before we all got cable TV, it was common whenever you tried to tune in a TV station that was too far away. Noise doesn't sound like a useful tool, but rather something you'd like to get rid of. Three of the four Noise filters are, in fact, designed to remove noise. It's fairly obvious from the names what Despeckle and Dust & Scratches are trying to remove, but what about Median? Median reduces noise by looking for individual pixels that are too bright or too dark, and changing them to the median brightness value of the pixels around them. Sometimes you don't want to remove noise, but add it, and of course, that's what the Add Noise filter is for. DespeckleDespeckle is the easiest of the filters to use. All you have to do is select it from the menu. It automatically looks for areas that have sharply contrasting pixels, and blurs the "misfits" to blend into the pixels around them. If you have a scan from a magazine that's showing visual banding or other noise, this filter will usually remove it. But be careful about using it on photos with fine detail. The Despeckle filter is likely to blur the detail. Dust & ScratchesThe Dust & Scratches filter, unlike Despeckle, has a dialog box with Threshold and Radius settings. This makes it much more useful, in that you can set the Threshold to the amount of blur you're willing to tolerate , and still get rid of dust, cat hair, and whatever else is messing up the picture. The Radius setting controls the size of the area that's examined for dissimilarities. In Figure 25.11, I have scanned an old photo with many scratches and cracks in the paper. Figure 25.11. Can we lose the scratches without losing the face? Finding the right combination of Threshold and Radius settings simply requires patience and a willingness to experiment, but as you can see in Figure 25.12, it is possible to get rid of all but the heaviest scratch without losing too much sharpness. The remaining one can then be easily Clone Stamped out of the picture. Typically, it's best to try keeping the Threshold at the lowest value possible (to avoid losing too much detail) while gradually increasing the area to examine (the Radius). If you can't seem to find a proper balance, try selecting the area that contains the largest amount of dust and dirt, and applying the filter just to that area. Figure 25.12. This sure beats stamping out every line. MedianAs I mentioned earlier, the Median filter removes noise caused by neighboring pixels that vary too much in lightness or darkness . This filter blurs details even at very low levels, so be careful when using it. I use it sometimes to even out skin tone, reduce freckles, and the like. It seems to work better than applying any of the blur filters, at least when I select a small area, as shown in Figure 25.13. Figure 25.13. Median is useful when removing unevenness in tone from small areas. To use Median, select the area you want to affect, then choose Filters, Noise, Median. There's only one option to setthe Radius of the area that's examined for discrepancies. You'll want to leave this set very low, to avoid losing detail. Of course, if you lose some detail, you may be able to put it back in using the Unsharp Mask. Add NoiseGiven that Elements offers you so many tools to remove noise, why would you want to add any? Actually, noise can be very helpful. I use it a lot when I am creating backgrounds from scratch, as part of the process of turning photos into paintings, or to cover up areas I've retouched a lot. You can apply noise to a picture, as I've done in Figure 25.14. In this case, I want the finished product to look like a hand-colored steel engraving . Adding monochromatic (black) noise and then using the Find Edges filter will give me the look I want, with very little work. Figure 25.14. Choose colored or monochrome noise, and an even or Gaussian distribution. If you apply noise to a blank canvas, and then apply another filter (or two or three), you can create some beautiful textured backgrounds for Web pages or anything else you might think of using them for. In Figure 25.15, I've used Gaussian colored (non-Monochromatic) noise to put down a layer of confetti (shown here in the upper left), and I've added some other filters to change the original. See if you can identify the Stained Glass, Colored Pencil, Sumi-e, Mosaic Tiles, and Crystallize filters. You'll get to play with these filters yourself later in this chapter. Figure 25.15. By changing the amount of noise, you could change each of these to something quite different. |

EAN: 2147483647
Pages: 349