Putting Together Stitched Panoramas
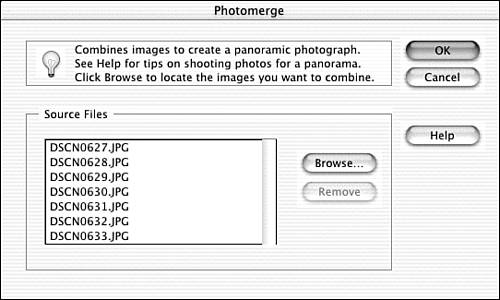
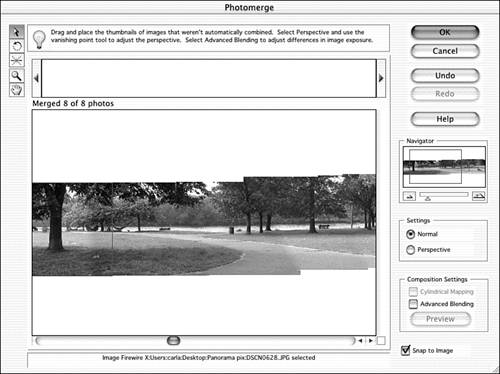
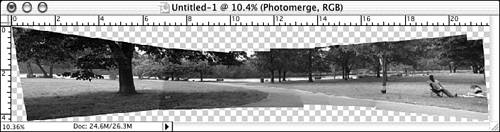
| People have been sticking photos together to create panoramic images for close to a hundred years , with varying degrees of success. The scissors and glue method rarely succeeds. Shooting a panorama all in one photo with a wide-angle lens seems to work, until you notice that the ends of the Grand Canyon are very fuzzy, or the two outermost bridesmaids in the wedding lineup appear fifty pounds heavier than they actually are. Distortion is the main problem. Wide-angle lenses aren't good choices in situations where you want to avoid distortion. The more curve you apply to the front of the lens, the more glass the image has to pass through. Glass adds distortion. The more logical way to shoot a panorama that stays in focus from one end to the other is to take a series of pictures and splice them together. Prior to computers, that was exceptionally difficult, though it certainly was done. Now, thanks to clever software, it's easier than ever to get good results with panoramic photography. Working with PhotomergePhotomerge is a plug-in that automates the process of assembling a panorama. After you've gone out and taken the photos, you plug your camera or memory stick into the computer and download the pictures. Then you open Elements and Photomerge (File, Photomerge), and tell it where to find the pictures you want to use. The dialog box is shown in Figure 24.84. Click Browse and navigate to the folder in which your separate images are contained, select the pictures you want to use, and then click OK. Figure 24.84. It's easiest if you download your pictures to a single folder. That way you don't have to go hunting for them. When you click OK, the magic begins. First, Elements opens all the photos you specified, and opens a new image file. Then it arranges them in order, matching the edges where images overlap. It opens a window similar to the one shown in Figure 24.85, so you can watch its progress. Figure 24.85. A panorama in progress. The pictures appear to come in at 50% opacity, so the computer can easily line up areas of major contrast. In this series of pictures, tree trunks seem to be the major point of reference for matching. Pictures that Photomerge can't match are left at the top of the strip, so you can drag them from the box at the top of the window into the work area at the bottom of the window and match them later. When all the pictures have been merged in (see Figure 24.86), Photomerge continues the process by adjusting the brightness and contrast of each pair of pictures so you have a consistent expo sure from one end to the other. If the sun has gone behind a cloud and emerged again, as it did for me, you'll have to do some extra tweaking. Apparently, it can only cope with logical changes. Figure 24.86. Processing the exposures. You can do some tweaking using the tools in the Photomerge dialog box. Drag a corner of any image in the work area with the Rotate Image tool to rotate it. Move the panorama within the work area by scrolling or by dragging it with the Move View tool. Zoom in with the Zoom tool. By clicking Perspective in the Settings pane, you can make some other adjustments. To establish which image contains the vanishing point (which image contains the highest point on the horizon, and therefore should be treated as the "middle" image), click that image with the Vanishing Point tool. It will be highlighted with a blue border. The other images will be adjusted in relation to this new vanishing point. If needed, make your own adjustments as well by clicking the Select Image tool and scooting the non-vanishing point images up or down. There are other options you can choose as well. The Cylindrical Mapping option transforms the panorama as if it were on a cylinder, reducing the bow-tie effect shown in Figure 24.86. This brings the viewer closer and into the panorama a bit, but you'll gain a lot of extra image space for cropping, so it's worth a look to see which view you prefer. If your panorama has some inconsistencies with brightness and contrast, try the Advanced Blending option. It blends together areas of color , while retaining detail. The effect is a softening of these differences, making the panorama seem more like a whole image rather than a collection of images. After choosing Cylindrical Mapping, Advanced Blending, or both, click Preview to view the results. Click Exit Preview to return to Normal view. When you're through making adjustments in the Photomerge window, click OK. The finished product is an untitled file (Figure 24.87) with all the pictures assembled and matched as well as possible. Unfortunately, when you get it, the image has already been flattened, making it difficult to adjust the exposure of one frame that's a little "off." Figure 24.87. The edges suggest that this is more than one photo. It's still up to you to crop the picture, if you want to. Some photographers argue that the slanting edges and unevenness of the "raw" panorama somehow add to the experience. Others, myself included, prefer to crop. A lot depends on whether, and how, you intend to print the picture. The eight images I assembled for this test of Photomerge produced a strip 4 inches high by 36 inches long. At 300 dpi resolution, that's a 37MB file. I can print it myself if I want to do so; one of my inkjet printers takes banner paper. But I'd prefer to go to a service bureau and come home with a strip 8 inches high by 6 feet long on a nice shiny, heavy poster paper. Considerations When You Shoot a PanoramaObviously, the main thing to consider when you shoot pictures for a panorama is that you should hold the camera steady at one height. Don't take it away from your eye while you're shooting. If you get interrupted mid-sequence, start again. Better yet, if possible, use a tripod to keep the camera steady. Remember, digital photos don't waste film. Stay away from the focus and zoom buttons . Autofocus the first picture and let that one dictate the focus for the rest. Practice the "panorama shuffle." Start shooting with your body aimed at one end of the scene. Take small steps circling to your right as you shoot your pictures from left to right. Don't use a flash. Particularly, don't use auto-flash, as it will throw varying amounts of light as it sees a need. This makes the exposure all but impossible to correct. Use a normal lens for best results. Set your zoom lens about halfway between zoom and telephoto , and leave it there. Don't use a wide-angle or fish-eye lens. Such lenses defeat the purpose of the panorama, which is to have everything in the same focus and not distorted . Nothing distorts more than a fish eye. Make sure you have enough overlap between pictures, but not too much. Somewhere around 20% is good. As you pan across the scene, remember what was on the right side of each picture you take, and just cover it again on the left of the next shot. Take a picture of something clearly different between shooting panorama sequences. That way you won't try to assemble pictures that don't go together. Keep each set of pictures in a separate file as you download from the camera. Have fun creating your panorama! |
EAN: 2147483647
Pages: 349