Image Correction Tools
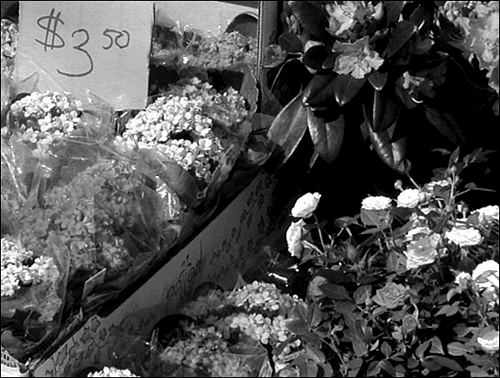
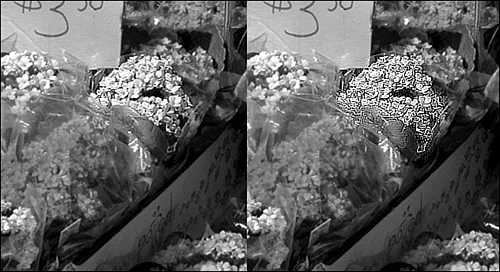
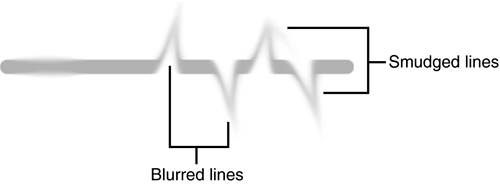
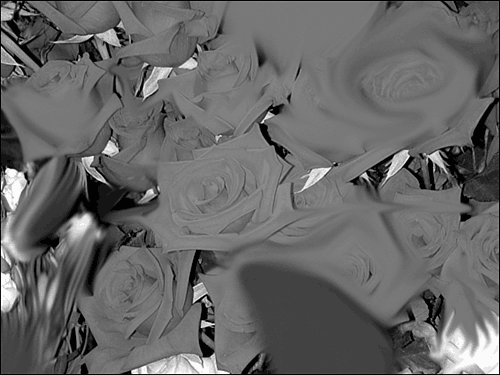
| The Elements toolbox has several image correction tools, grouped together on the toolbar. If you look at the third section of the toolbox, you'll see a pair of focus tools: Blur and Sharpen. Blur looks like a drop of water. Sharpen looks like the tip of a pencil or some other sharp instrument. Below them are the Sponge tool, which looks like a natural sponge, and the Smudge tool, a hand with an extended index finger. (Considering the millions of smudged fingerprints I've wiped up over the years , this is a very appropriate icon.) The last two tools in the group , Dodge and Burn, were discussed in detail in a previous section. Blur and SharpenThe Blur tool blurs individual pixels by lowering the contrast between them and their adjacent neighbors. Using brush shapes , sizes, and blending modes, you can design a blur to hide a background, to remove graffiti from a fence, or to make faces in a crowd less obvious. When you're trying to pretend your subject is out in the forest, you can blur the cell phone tower and power lines showing though the trees. You can blur the gum wrappers and soda cans in an otherwise pristine landscape. To use the Blur tool, select it in the toolbox. Choose your brush tip from the drop-down list, and set the brush Size. Choose an Effect Mode ( essentially the blending mode ”the various types are described in Chapter 26), and then set the strength of the blur. You can drag the Blur tool over a hard edge to soften it or over an image area to eliminate detail. The Sharpen tool is theoretically and literally the opposite of the Blur tool. Instead of decreasing the contrast between adjacent pixels, it increases it. The additional contrast has the effect of making the image appear sharper. To use the Sharpen tool, follow the same steps as before: Select the tool, choose a hard or soft brush tip, adjust the brush size, select an Effects mode (see the discussion of blending modes in Chapter 26), and adjust the strength of the sharpening effect. Then simply drag over the part of your image you want to sharpen. Figure 24.59 shows a nice but rather ordinary picture of some flowers. I think that if one of the bundles of flowers were better defined, the picture might be more interesting. This is definitely a case for the Sharpen tool, with a fairly small brush and medium strength. Figure 24.59. Right now, there's no real center of interest. Sharper flowers would create one. The one thing to watch out for when you use this tool is that you don't overdo it. Figure 24.60 has two examples: first, the flowers correctly sharpened, and second, the flowers oversharpened. As you can see, when you oversharpen, the image eventually breaks down to a random pattern of black and white, as the tool keeps on increasing the contrast until nothing else is left. Figure 24.60. Here's proof that you can have too much of a good thing. The fun doesn't stop here; there are other ways to blur and sharpen an image, as you'll learn in Chapter 25. The Sponge ToolThe sponge represents a piece of photographic history. Darkroom photographers often kept a clean sponge next to the jug of developer. When the picture in the developing tray wasn't "coming up" fast enough, they'd grab the sponge and the jug, and slosh some fresh chemical on the paper. The combination of fresh developer and the friction from the sponge rubbing it in were generally enough to darken the image and save the print. In your digital darkroom, the Sponge tool does much the same thing. Because this sponge works in color, rather than merely darkening whatever it touches, it changes color saturation. Unlike the sponge in the darkroom, though, it can desaturate as well as saturate, making colors either less intense or more intense . If the image is grayscale, the Sponge tool will increase or decrease the contrast as it raises or lowers the intensity of the gray pixels. To use the Sponge tool, select it and choose a brush tip and sponge size. To increase color/gray value intensity (saturation), choose Saturate from the Mode list. To tone down colors/gray values, choose Desaturate instead. To control how much the tool adjusts saturation, change the Flow value. To smudge all visible parts of the image rather than just the current layer, turn on Use All Layers. By the way, if you're looking for a way to make an image look as if it had been painted with a sponge, try the Sponge filter. You'll learn more about it and the other Artistic filters in Chapter 25. The Smudge ToolIt's easy to get the Blur tool and the Smudge tool mixed up. They sound as if they might do the same thing, but they don't. The Smudge tool picks up the pixel(s) where you click, and moves them where you drag. If you imagine dragging your finger through wet paint, you'll get an idea of the effect that the Smudge tool reproduces. In Figure 24.61, I have drawn a line with some sharp up V 's and down V 's using a hard-edged brush. On the left, I've blurred the two V 's at 50% strength using the Blur tool. On the right, I've smudged the two other V 's at the same strength using the Smudge tool. There's quite a difference. Figure 24.61. There's a big difference between using the Blur tool and using the Smudge tool. To use the Smudge tool, select it and then choose a brush tip and size. Choose a blending mode (again, these will be discussed in Chapter 26.) Adjust the Strength to control the effect ”a lower value creates less smudging . To smudge all visible parts of the image rather than just the current layer, turn on Use All Layers. The Smudge tool also has a setting called Finger Painting. It places a brush full of paint (the foreground color) on the screen, and then smudges it as you drag. The effect you get when using the Smudge tool is a combination of brush size and softness, and the Strength setting. Higher Strength numbers drag a longer tail behind the brush. Figure 24.62 shows the effects of using the Smudge tool on a photo. Figure 24.62. Smudging can give you interesting effects. |
EAN: 2147483647
Pages: 349
- Integration Strategies and Tactics for Information Technology Governance
- Linking the IT Balanced Scorecard to the Business Objectives at a Major Canadian Financial Group
- Measuring ROI in E-Commerce Applications: Analysis to Action
- Governing Information Technology Through COBIT
- Governance Structures for IT in the Health Care Industry


