Straightening an Image
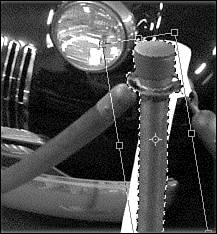
| Frequently, you need to straighten just part of the picture. It might be a perspective problem, or perhaps the furniture really is crooked. Antiques frequently lean a little. In the example below, I love the effect of the wide-angle lens on the car, but not on those brass posts holding up the rope around it. My choices are to get rid of the posts and the rope, which would be a lot of work, or to straighten the posts. Being lazy, my course is clear. I'll just fix the posts. Figure 23.33 shows the basic car. Figure 23.33. The brass posts don't look right. The posts lean in different directions, so I'll have to fix them separately. First, select one. The magnetic lasso is ideal for this job. After tracing carefully around the post, I can use the Image, Rotate, Free Rotate Selection command to make it vertical. Figure 23.34 shows this step. Figure 23.34. Just a little kick to the left and it's straight again. Now all I need to do is fill in where it was. The Clone Stamp tool is a good choice for this job. I cover it in more detail in Chapter 24, so here I'll just gloss over the details so you can get the idea of how I used it to fix my photo. Two preparations will help you use the Clone Stamp tool. First, zoom in close enough to see what you are doing. This sounds obvious, but many people forget about the magnifying glass and just squint or leave nose prints on the monitor. Press Z to select the zoom tool and click the part you want to see close up. When you need to work in close quarters replacing a background, as you often do when using the Clone Stamp, a second trick for making your work easier is to select the area you need to work on. Use the Magic Wandand click in the open area to select. Once the area is selected, it's as if you'd masked everything around it: You can stamp like crazy and only the selected area will pick up the color . Figure 23.35 shows the selection trick applied to a zoomed-in section of the car. Figure 23.35. Working only on the selection is much easier. On the car image, if I crop off the tilting signs and the other post on the far left, I can forget about the red velvet rope and leave the rest of the photo as is, at least for now. Figure 23.36 and the color section both show the final picture. Figure 23.36. The picture is all done and much less distorted . |
EAN: 2147483647
Pages: 349