Working with Layers
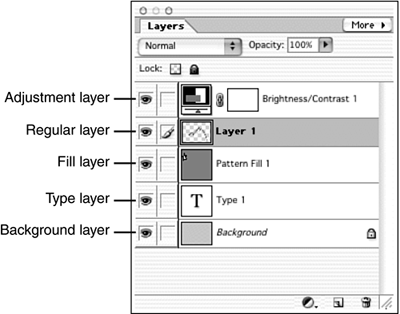
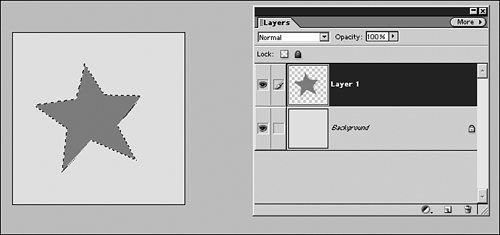
Working with LayersLayers sound complicated, but they're not. They're really quite simple, if you've ever seen an animated cartoon. Animators work with two kinds of materials, sheets of white Bristol board, or something similar as backgrounds, and sheets of heavy transparent cellophane, called cells . The background holds the things that don't change: trees, grass, Marge's kitchen walls, Homer's couch . There are up to four or five cell layers for each character. Hands and feet move more than heads and trunks, so that the bodies are dismembered and placed on different layers. If Homer is to wave, for example, three or four drawings will be done of just his arm in different positions , from down to up. Then the sequence will be photographed with a different arm in each frame of film. It's layers that make it possible to see this movement. Working with layers enables you to build up multipart collages of many images, paint over an original photo without destroying it, make color corrections that you can apply selectively to parts of the picture, stack picture elements behind others, andI can go on and on. When you open a new image in Elements, it has a background layer. No others. If you then paste something in what you've copied to the Clipboard, you'll automatically make a new layer. You can use the Layers palette to keep track of your layers. Think of it as a sort of command center for layer management. You can add and remove layers from the palette itself and manage them with its menu. In Figure 23.16, I've assembled a page with a bunch of different layers. Type goes on a separate layer. Adjustment layers enable you to correct color and exposure, with the advantage of letting you also control how much of the correction you want to apply. A layer can change both opacity and blending mode as needed. Figure 23.16. A variety of layers. You can start a new layer in any of several ways. Whether you're pasting something in, or dragging it from another open file, the new part of the image will automatically be placed on a new layer. As soon as you position the Type tool on the picture and start entering letters , you've created a type layer to set them on. Because they are on their own layer, you can move the words around, correct spelling, even erase them and try different words or a different font, without risking the rest of the image. However, if you want to paint on a new layer over your image, create a new layer manually by selecting New from the Layer menu, or by clicking on the small New Layer icon at the bottom of the Layers palette. As you add more and more layers to your document, you'll probably need to give them more descriptive names , so that you can easily identify their content. To change the name of a layer, double-click the layer to open the Layer Properties dialog box. Type the name of the layer in the text box, and click OK. You can also simply double-click the name in the Layers palette, and type the new name right there. Press Enter when you're done. Task: Experimenting with Layers
|
EAN: 2147483647
Pages: 349
- Challenging the Unpredictable: Changeable Order Management Systems
- The Second Wave ERP Market: An Australian Viewpoint
- Distributed Data Warehouse for Geo-spatial Services
- Relevance and Micro-Relevance for the Professional as Determinants of IT-Diffusion and IT-Use in Healthcare
- Development of Interactive Web Sites to Enhance Police/Community Relations

