Creating Documents in Groff or LaTeX
You can create documents for either of Linux’s Groff (troff/nroff) or LaTeX (TeX) styles of publishing using any text editor. Fedora comes with several text editors, or you can download others from the Internet. See the “Choosing a Text Editor” sidebar for more information.
The process of creating documents in Groff or LaTeX consists of the following general steps:
-
Create a document with any text editor. The document will contain text and markup.
-
Format the document using a formatting command that matches the style of the document that you created (for example, with groff or latex). During this step, you may need to indicate that the document contains special content, such as equations (eqn command), tables (tbl command), or line drawings (pic command).
-
Send the document to an output device. The device may be a printer or display program.
If you are used to a word processor with a GUI, you may find these publishing tools difficult. In general, Groff is useful to create man pages for Linux. LaTeX is useful if you need to produce mathematical documents, perhaps for publication in a technical journal.
Text processing with Groff
The nroff and troff text formatting commands were the first interfaces available for producing typeset quality documents with the UNIX system. They aren’t editors; rather, they are commands that you send your text through, with the result being formatted pages:
-
nroff — Produces formatted plain text and includes the ability to do pagination, indents, and text justification, as well as other features.
-
troff — Produces typeset text, including everything nroff can do, plus the ability to produce different fonts and spacing. The troff command also supports kerning.
Hardcore UNIX or Linux users tend to edit files with either the vi or emacs text editor. These editors have been around a long time and are hard to learn, but efficient to use. (Your fingers never leave the keyboard.) The emacs editor has some GUI support, though it will run fine in a Terminal window. There are also GUI versions of vi and emacs that add menu and mouse features to the editors. These are GVim (gvim command in the vim-X11 package) and Xemacs (xemacs command) editors.
Some of the other, simpler text editors that can run on your graphical desktop are:
-
gedit (gedit command) — This text editor, which comes with Fedora, is the lightweight text editor for GNOME. It has simple edit functions (cut, copy, paste, and select all) and settings let you set indentations and word wrap. Special functions, such as a spell checker and a diff feature are included. You can start gedit by typing gedit from a Terminal window. Go to http://gedit.sourceforge.net for more information.
-
Advanced Editor (kwrite command) — This text editor includes a menu bar to create, open, or save files. It also has simple edit functions (cut, copy, paste, undo, and help). Other edit features let you set indents, find and replace text, and select all text. This tool comes with the KDE desktop.
-
Text Editor (kedit command) — Another simple text editor. Features let you open files from your file system or from a URL. It also includes a convenient toolbar and a spell checker. It comes with the KDE desktop.
-
nedit (nedit command) – nedit is a rather plain-looking, but very advanced, X-based text editor. It provides all the usual editing functions as well as syntax-highlighting modes for a plethora of programming languages, as well as an advanced macro system. Despite its advanced features, it is also simple for beginners to figure out and use.
-
joe (joe command) – joe is a text-mode editor which is much simpler than either vi or emacs. joe also has the ability to mimic other text editors, such as vi, emacs, pico, and even the late, lamented WordStar. In addition to standard features like search and replace, arrow key movements for the cursor, and so on, joe also offers macros, code editing features, and the ability to move or format large chunks of text easily.
The groff command is the front-end for producing nroff/troff documentation. Because Linux man pages are formatted and output in Groff, most of the examples here help you create and print man pages with Groff.
People rarely use primitive nroff/troff markup. Instead, there are common macro packages that simplify creating nroff/troff formatted documents, which include:
-
man — The man macros are used to create Linux man pages. You can format a man page using the -man option to the groff command.
-
mm — The mm macros (memorandum macros) were created to produce memos, letters, and technical white papers. This macro package includes macros for creating a table of contents, lists of figures, references, and other features that are helpful for producing technical documents. You can format an mm document using the -mm groff option.
-
me — The me macros were popular for producing memos and technical papers on Berkeley UNIX systems. Format an me document using the -me groff option.
Groff macro packages are stored in /usr/share/groff/*/tmac. The man macros are called from the an.tmac file, mm macros are from m.tmac, and me macros are from e.tmac. The naming convention for each macro package is xxx.tmac, where xxx is replaced by one or more letters representing the macro package. In each case, you can understand the name of the macro package by adding an m to the beginning of the file suffix.
| Tip | Instead of noting a specific macro package, you can use -mandoc to choose a macro package. |
When you run the groff formatting command, you can indicate on the command line which macro packages you are using. You can also indicate that the document should be run through any of the following commands that preprocess text for special formats:
-
eqn — This preprocessor formats macros that produce equations in groff.
-
pic — This preprocessor formats macros that create simple line drawings in groff.
-
tbl — This preprocessor formats macros that produce tables within groff.
The formatted Groff document is output for a particular device type. The device can be a printer, a window, or (for plain text) your shell. Here are output forms supported by Groff:
-
ps — Produces PostScript output for PostScript printer or a PostScript previewer.
-
lj4 — Produces output for an HP LaserJet4 printer or other PCL5-compatible printer.
-
ascii — Produces plain-text output that can be viewed from a Terminal window.
-
dvi — Produces output in TeX dvi, to output to a variety of devices described later.
-
X75 — Produces output for an X11 75 dots/inch previewer.
-
X100 — Produces output for an X11 100 dots/inch previewer.
-
latin1 — Produces typewriter-like output using the ISO Latin-1 character set.
Formatting and printing documents with Groff
You can try formatting and printing an existing Groff document using any man pages on your Fedora system (such as those in /usr/share/man/*). (Those man pages are compressed, so you can copy them to a temporary directory and unzip them to try out Groff.)
These commands copy the chown man page to the /tmp directory and unzips it. Then, groff formats the chown man page in plain text so you can page through it on your screen.
$ cp /usr/share/man/man1/chown.1.gz /tmp $ gunzip /tmp/chown.1.gz $ groff -Tascii -man /tmp/chown.1 | less
In the previous example, the chown man page (chown.1.gz) is copied to the /tmp directory, is unzipped (using gunzip), and is output in plain text (-Tascii) using the man macros (-man). The output is piped to less, to page through it on your screen. Instead of piping to less ( | less), you could direct the output to a file (> /tmp/chown.txt).
To format a man page for typesetting, you could specify PostScript or HP LaserJet output. You should either direct the output to a file or to a printer. Here are a couple of examples:
$ groff -Tps -man /tmp/chown.1 > /tmp/chown.ps $ groff -Tlj4 -man -l /tmp/chown.1
The first example creates PostScript output (-Tps) and directs it to a file called /tmp/chown.ps. That file can be read by a PostScript previewer (such as ghostscript) or sent to a printer (lpr /tmp/chown.ps). The next example creates HP LaserJet output (-Tlj4) and directs it to the default printer (-l option).
Creating a man page with Groff
Before HOW-TOs and info files, man pages were the foundation for information about UNIX (and UNIX-like) systems. Each command, file format, device, or other component either had its own man page or was grouped on a man page with similar components. To create your own man page requires that you learn a few macros (in particular, man macros). Figure 6-3 shows the source for a fictitious man page for a command called waycool.
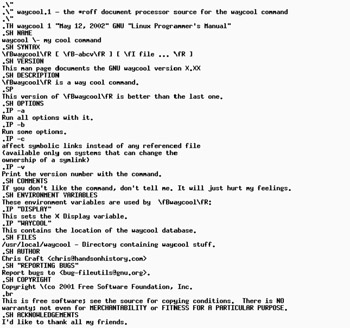
Figure 6-3: Simple markup is required to create man pages.
| Tip | Most man pages are stored in subdirectories of /usr/share/man. Before you create a manpage, refer to similar man pages to see the markup and the headings they include. In man1 are commands; man2 has system calls; man3 has library functions; man4 has special device files (/dev/*); man5 has file formats; man6 has games; man7 has miscellaneous components; and man8 has administrative commands. |
A few other kinds of macros are used in the man page. The .IP macros format indented paragraphs for things such as options. The man page also contains some lower-level font requests; for example, \fB says to change the current font to bold, \fI changes the font to italic, and \fR changes it back to regular font. (This markup is better than asking for a particular font type because it just changes to bold, italic, or regular for the current font.) Figure 6-4 shows what the waycool man page looks like after it is formatted with groff:
$ groff -man -Tps -l waycool.1
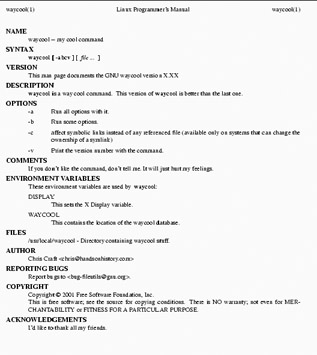
Figure 6-4: Man page formatting adds headers and lays out the page of text.
Table 6-1 lists the macros that you can use on your man pages. These macros are described on the man(7) manual page (type man 7 man to view that page).
| Macro | Description |
|---|---|
| .B | Bold |
| .BI | Bold, then italics (alternating) |
| .BR | Bold, then roman (alternating) |
| .DT | Set default tabs |
| .HP | Begin a hanging indent |
| .I | Italics |
| .IB | Italics, then bold (alternating) |
| .IP | Begin hanging tag. For options. Long tags use .TP. |
| .IR | Italics, then roman (alternating) |
| .LP | Begin paragraph |
| .PD | Set distance between paragraphs |
| .PP | Begin paragraph |
| .RB | Roman, then bold (alternating) |
| .RE | End relative indent (after .RS) |
| .RI | Roman, then italics (alternating) |
| .RS | Begin relative indent (use .RE to end indent) |
| .SB | Small text, then bold (alternating) |
| .SM | Small text. Used to show words in all caps. |
| .SH | Section head |
| .SS | Subheading within a .SH heading. |
| .TH | Title heading. Used once at the beginning of the man page. |
| .TP | Begin a hanging tag. Begins text on next line, not same line as tag. |
Creating a letter, memo, or white paper with Groff
Memorandum macros (which are used with the -mm option of Groff) were once popular among UNIX users for producing technical documents, letters, and memos. Although more modern word processors with a variety of WYSIWYG templates have made mm outdated, in a pinch mm can still be a quick way to create a typeset-style document in a text environment.
To format and print (to a PostScript printer) a document with mm macros, use the following:
$ groff -mm -Tps -l letter.mm
The following is a simple example of how to use mm macros to produce a letter:
.WA "Christopher T. Craft" 999 Anyway Way Anytown, UT 84111 USA .WE .IA John W. Doe 111 Notown Blvd. Notown, UT 84111 .IE .LO RN "Our telephone conversation" .LO SA "Dear Mr. Doe:" .LT In reference to our telephone conversation on the 4th, I am calling to confirm our upcoming appointment on the 18th. I look forward to discussing the merger. I believe we have a win-win situation here. .FC "Yours Truly," .SG
The output of the letter, if you use the groff command line mentioned in the paragraph preceding the code example, is shown in Figure 6-5.
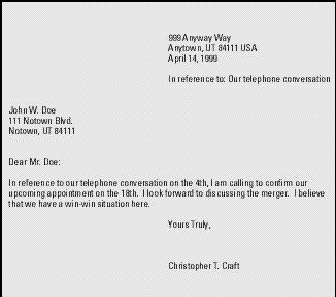
Figure 6-5: Create a simple letter using mm macros.
The mm macros were often used to produce technical memos. The following is an example of a sign-off sheet that might go at the front of a larger technical memo.
.TL Merger Technical Specifications .AF "ABC Corporation" .AU "Christopher Craft" .AT "President" .AS This memo details the specifications for the planned merger. .AE .MT "Merger Description and Marching Orders" As a result of our talks with XYZ corporation, we plan to go forward with the merger. This document contains the following: .BL .LI Schedule and time tables. .LI Financial statements. .LI Asset allocations. .LE .SP Please add any corrections you have, then sign the approval line indicated at the bottom of this sheet. .FC .SG .AV "John W. Doe, XYZ Corporation President" .AV "Sylvia Q. Public, XYZ Corporation CFO" .NS Everyone in the corporation. .NE
Figure 6-6 shows the output of this memo.
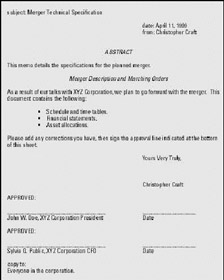
Figure 6-6: Add headings and approval lines automatically to memos.
| Note | For a complete listing of mm macros, see the groff_mm man page. More than 100 mm macros exist. Also, dozens of defined strings let you set and recall information (such as figure names, tables, table of contents information, and text) that is automatically printed with different headings. |
Adding equations, tables, and pictures
To interpret special macros for equations, tables, and line drawings, you can run separate commands (eqn, tbl, and pic commands) on the file before you run the groff command. Alternatively, you can add options to the groff command line to have the file preprocessed automatically by any of the commands (-e for eqn, -t for tbl, and -p for pic).
Here are some examples of EQN, TBL, and PIC markup included in a Groff document. The first example shows an equation that can be processed by eqn for a Groff document:
.EQ a ~ mark = ~ 30 .EN .sp .EQ a sup 2 ~ + ~ b sup 2~lineup = ~ 1000 .EN .sp .EQ x sup 3 ~ + ~ y sup 3 ~ + ~ z sup 3~lineup = ~ 1400 .EN
If this appeared in a memo called memoeqn.mm, the memo would be preprocessed by eqn and then sent to the printer using the following command:
$ groff -Tps -l -mm -e memoeqn.mm
All data between the .EQ and .EN macros are interpreted as equations. The resulting output from the equation would appear as shown in Figure 6-7.
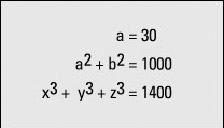
Figure 6-7: Produce equations in documents with the use of the eqn command’s .EQ and .EN macros.
To create a table in a Groff document, use the .TS and .TE macros of the tbl preprocessor. The following is an example of the markup used to produce a simple table.
.TS center, box, tab(:); c s s c | c | c l | l | l. Mergers and Acquisitions Team = Employee:Title:Location =_ Jones, James:Marketing Manager:New York Office Smith, Charles:Sales Manager:Los Angeles Office Taylor, Sarah:R&D Manager:New York Office Walters, Mark:Information Systems Manager:Salt Lake City Office Zur, Mike:Distribution Manager:Portland Office .TE
After the .TS macro starts the table, the next line indicates that the table should be centered on the page (center) and surrounded by a line box and that a colon will be used to separate the data into cells (tab(:)). The next line shows that the heading should be centered in the box (c) and should span across the next two cells (s s). The line after that indicates that the heading of each cell should be centered (c | c | c) and that the data cells that follow should be left justified (l | l | l).
| Caution | There must be a period at the end of the table definition line. In this case, it is after the l | l| l. line. If the period is not there, tbl will try to interpret the text as part of the table definition. In thiscase, tbl will fail and stop processing the table, so the table will not print. |
The rest of the information in the table is the data. Note that the tab separators are colon characters (:). When the table is done, you end it with a .TE macro. If the table were in a memo called memotbl.mm, tbl could preprocess the memo and then send it to the printer using the following command:
$ groff -Tps -l -mm -t memotbl.mm
Data between .TS and .TE macros are interpreted as tables. Figure 6-8 displays this example.

Figure 6-8: Set how text is justified and put in columns with the use of the tbl command’s .TS and .TE macros.
The PIC macros (.PS and .PE) let you to create simple diagrams and flow charts to use in Groff. PIC is really only qualified to create simple boxes, circles, ellipses, lines, arcs, splines, and some text. The following is some PIC code that could be in a Groff document:
.PS box invis "Start" "Here"; arrow box "Step 1"; arrow circle "Step 2"; arrow ellipse "Step 3"; arrow box "Step 4"; arrow box invis "End" .PE
After the .PS, the first line indicates an invisible box (invis) that contains the words Start Here, followed by an arrow. That arrow connects to the next box containing the words Step 1. The next elements (connected by arrows) are a circle (Step 2), an ellipse (Step 3), another box (Step 4), and another invisible box (End). The .PE indicates the end of the pic drawing.
If these lines appeared in a document called memopic.mm, you could preprocess the PIC code and print the file using the following command:
$ groff -Tps -l -mm -p memopic.mm
Figure 6-9 shows an example of this drawing.

Figure 6-9: Create simple flow diagrams with the pic command’s .PS and .PE macros.
Text processing with TeX/LaTeX
TeX (pronounced tech) is a collection of commands used primarily to produce scientific and mathematical typeset documents. The most common way to use TeX is by calling a macro package. The most popular macro package for Tex is LaTeX, which takes a higher-level approach to formatting TeX documents. TeX and LaTeX tools are contained in the tetex-latex package.
| Note | The tetex-* packages needed to use the TeX examples shown in this chapter are found on the DVD that accompanies this book. |
TeX interprets the LaTeX macros from the latex format file (latex.fmt). By default, the latex.fmt and plain.fmt format files are the only ones that are automatically built when the TeX package is installed. Other macro files that you can use with TeX include:
-
amstex — Mathematical publications, including the American Mathematical Society uses this as their official typesetting system.
-
eplain — Includes macros for indexing and table of contents.
-
texinfo — Macros used by the Free Software Foundation to produce software manuals. Text output from these macros can be used with the Linux info command.
You can create a TeX/LaTeX file using any text editor. After the text and macros are created, you can run the tex command (or one of several other related utilities) to format the file. The input file is in the form filename.tex. The output is generally three different files:
-
filename.dvi — This is the device-independent output file that can be translated for use by several different types of output devices (such as PostScript).
-
filename.log — This is a log file that contains diagnostic messages.
-
filename.aux — This is an auxiliary file used by LaTeX.
The .dvi file produced can be formatted for a particular device. For example, you could use the dvips command to output the resulting .dvi file to your PostScript printer (dvips filename.dvi). Or you could use the xdvi command to preview the dvi file in X.
Creating and formatting a LaTeX document
Because LaTeX is the most common way of using TeX, this section describes how to create and format a LaTeX document. A LaTeX macro (often referred to as a command) appears in a document in one of the two following forms:
-
\string{option}[required] — First there is a backslash (\), which is followed by a string of characters. (Replace string with the name of the command.) Optional arguments are contained in braces ({}), and required arguments are in brackets ([]).
-
\?{option}[required] — First there is a backslash (\), which is followed by a single character that is not a letter. (Replace ? with the command character.) Optional arguments are contained in braces ({}), and required arguments are in brackets ([]).
Each command defines some action to be taken. The action can control page layout, the font used, spacing, paragraph layout, or a variety of other actions on the document. The minimum amount of formatting that a LaTeX document can contain is the following:
\documentclass{name} \begin{document} TEXT GOES HERE! \end{document} You should replace {name} with the name of the class of document you are creating. Valid document classes include article, book, letter, report, and slides. The text for the file, along with your formatting commands, goes between the begin and end document commands.
The best way to get started with LaTeX is to use the LyX editor. LyX provides a GUI for creating LaTeX documents. It also contains a variety of templates you can use instead of just creating a document from scratch. Figure 6-10 shows an example of the LyX editor.
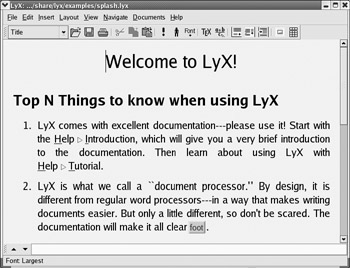
Figure 6-10: Create LaTeX documents graphically with the LyX editor.
| Note | The LyX editor doesn’t come with Fedora. Find an RPM package for LyX from the LyX site at ftp://ftp.lyx.org/pub/lyx/bin. Look for a Fedora or Red Hat RPM. |
If you want to edit LaTeX in a regular text editor, you need to be familiar with the LaTeX commands. For a complete listing of the LaTeX commands, type info latex and then go to the section "Commands within a LaTeX document."
Using the LyX LaTeX Editor
Start the LyX LaTeX editor with the lyx command. LyX comes with a lot of supporting documentation. Click Help to select a Tutorial, User’s Guide, or other information.
To start your first document, I recommend that you select one of the templates provided with LyX. Templates are located in /usr/share/lyx/templates. To open a template, click File ® New from Template. A list of available templates appears. You can use them to create letters, slides, and articles, for example.
Besides offering standard editing functions, such as cut, copy, and paste, you can perform a variety of markup functions from the Layout menu. As for mathematical functions, the Math menu enables you to insert fractions, square root, exponent, sum, and integral functions into your document. When you are done, you can:
-
Print the file to a PostScript printer or output a PostScript (.ps) file. (Click File ® Print, select the printing method, and then click OK.)
-
Export the file to LaTeX, DVI, PostScript, or ASCII Text. (Click File ® Export and choose from the list of file formats.)
LyX calls itself a WYSIWYM editor — What You Say Is What You Mean. As a result, what you see on the screen as you edit is not exactly what the printed document will look like. For example, no extra white space will appear between lines by pressing Enter multiple times.
Because LyX supports style files, it enables you to create documents that meet several different standards. For example, LyX supports typesetting for the American Mathematics Society (AMS) journals using the article text class. Other text classes supported include:
-
article — One-sided paper with no chapters.
-
report — Two-sided report, tending to be longer than an article.
-
book — Same as report, with additional front and back matter.
-
slides — For producing transparencies.
-
letter — Includes special environments for addresses, signatures, and other elements.
Printing LaTeX files
Whether you create your own LaTeX file, export one from the LyX LaTeX editor, or download one from the Internet, several utilities are available to format, print, or display the output. Here are some of your choices:
-
To format a LaTeX file (filename.tex), run the following command:
$ latex filename.tex
-
To print a DVI file (filename.dvi), send it to your default PostScript printer, and type the following:
$ dvips filename.dvi
-
To display a DVI file in an X window, type the following:
$ xdvi filename.dvi
-
To print a DVI file to a PCL printer, such as an HP LaserJet, type the following:
$ dvicopy filename.dvi $ dvilj filename.dvi
-
The dvilj command doesn’t support virtual fonts directly. The dvicopy command converts the fonts so that the PCL printer can handle them.
Converting documents
Documents can come to you in many different formats. Search just some of the Linux FTP sites on the Internet and you will find files in PostScript, DVI, man, PDF, HTML, and TeX. There are also a variety of graphics formats. Fedora comes with lots of utilities to convert documents and graphics from one format to another. The following is a list of document and graphics conversion utilities:
-
dos2unix — Converts a DOS text file to a UNIX (Linux) text file.
-
fax2ps — Converts TIFF facsimile image files to a compressed PostScript format. The PostScript output is optimized to send to a printer on a low-speed line. This format is less efficient for images with a lot of black or continuous tones. (In those cases, tiff2ps might be more effective.)
-
fax2tiff — Converts fax data (Group 3 or Group 4) to a TIFF format. The output is either low-resolution or medium-resolution TIFF format.
-
g32pbm — Converts a Group 3 fax file (either digifax or raw) to a portable bitmap.
-
gif2tiff — Converts a GIF (87) file to a TIFF format.
-
man2html — Converts a man page to an HTML format.
-
pal2rgb — Converts a TIFF image (palette color) to a full-color RGB image.
-
pbm2g3 — Converts a portable bitmap image to a fax file (Group 3).
-
pdf2dsc — Converts a PDF file to a PostScript document dsc file. The PostScript file conforms to Adobe Document Structuring Conventions (DSC). The output enables PostScript readers (such as Ghostview) to read the PDF file a page at a time.
-
pdf2ps — Converts a PDF file to a PostScript file (level 2).
-
pfb2pfa — Converts Type 1 PostScript font (binary MS-DOS ) to ASCII-readable.
-
pk2bm — Converts a TeX pkfont font file to a bitmap (ASCII file).
-
ppm2tiff — Converts a PPM image file to a TIFF format.
-
ps2ascii — Converts PostScript or PDF files to ASCII text.
-
ps2epsi — Converts a PostScript file to Encapsulated PostScript (EPSI). Some word processing and graphic programs can read EPSI. Output is often low quality.
-
ps2pdf — Converts PostScript file to Portable Document Format (PDF).
-
ps2pk — Converts a Type 1 PostScript font to a TeX pkfont.
-
pstotext — Converts a PostScript file to ASCII text. pstotext is similar to ps2ascii, but handles font encoding and kerning better than ps2ascii. pstotext doesn’t convert PDFs.
-
ras2tiff — Converts a Sun raster file to a TIFF format.
-
texi2html — Converts a Texinfo file to HTML.
-
tiff2bw — Converts an RGB or Palette color TIFF image to a grayscale TIFF image.
-
tiff2ps — Converts a TIFF image to PostScript.
-
unix2dos — Converts a UNIX (Linux) text file to a DOS text file.
Besides these tools many graphical applications, such as The GIMP, let you save images into several different formats (BMP, JPEG, PNG, TIFF, and so on), using the Save As feature.
Creating DocBook documents
Documentation projects often need to produce documents that are output in a variety of formats. For example, the same text that describes how to use a software program may need to be output as a printed manual, an HTML page, and a PostScript file. The standards that have been embraced most recently by the Linux community for creating what are referred to as structured documents are SGML, XML, and DocBook.
Understanding SGML and XML
Standard Generalized Markup Language (SGML) was created to provide a standard way of marking text so that it could be output later in a variety of formats. Because SGML markup is done with text tags, you can create SGML documents using any plain-text editor. Documents consist of the text of your document and tags that identify each type of information in the text.
Unlike markup languages such as Groff and HTML, SGML markup is not intended to enforce a particular look when you are creating the document. So, for example, instead of marking a piece of text as being bold or italic, you would identify it as an address, paragraph, or a name. Later, a style sheet would be applied to the document to take the tagged text and assign a look and presentation.
Because SGML consists of many tags, to simplify producing documents based on SGML other projects have cropped up to better focus the ways in which SGML is used. In particular, the Extensible Markup Language (XML) was created to offer a manageable subset of SGML that would be specifically tailored to work well with Web-based publishing.
So far in describing SGML and XML, I have only referred to the frameworks that are used to produce structured documents. Specific documentation projects need to create and, to some extent, enforce specific markup definitions for the type of documents they need to produce. These definitions are referred to as Data Type Definitions (DTDs). For documentation of Linux itself and other open source projects, DocBook has become the DTD of choice.
Understanding DocBook
DocBook is a DTD that is well suited for producing computer software documents in a variety of formats. It was originally created by the OASIS Consortium (www.oasis-open.org) and is now supported by many different commercial and open-source tools.
DocBook’s focus is on marking content, instead of indicating a particular look (that is, font type, size, position, and so on.). It includes markup that lets you automate the process of creating indices, figure lists and tables of contents, to name a few. Tools in Fedora let you output DocBook documents into HTML, PDF, DVI, PostScript, RTF, and other formats.
DocBook is important to the Linux community because many open-source projects are using DocBook to produce documentation. For example, the following is a list of organizations, and related Web sites, that use DocBook to create the documents that describe their software:
-
Linux Documentation Project (www.tldp.org/LDP/LDP-Author-Guide)
-
GNOME Documentation (developer.gnome.org/projects/gdp/handbook/gdp-handbook)
-
KDE Documentation Project (www.kde.org/documentation)
-
FreeBSD Documentation Project (www.freebsd.org/docproj)
If you want to contribute to any of the above documentation projects, refer to the Web sites for each organization. In all cases, they publish writers’ guides or style guides that describe the DocBook tags that they support for their writing efforts.
Creating DocBook documents
You can create the documents in any text editor, using tags that are similar in appearance to HTML tags (with beginning and end tags appearing between less-than and greater-than signs). There are also word processing programs that allow you to create DocBook markup.
The following procedure contains an example of a simple DocBook document produced with a plain-text editor and output into HTML using tools that come with Fedora.
-
Create a directory in your home directory to work in and go to that directory. For example, you could type the following from a Terminal window:
$ mkdir $HOME/doctest $ cd $HOME/doctest
-
Open a text editor to hold your DocBook document. For example, you could type:
$ gedit cardoc.sgml
(A text editor such as jedit, which you can get at www.jedit.org, can also be useful for dealing with the long tag names used in docbook.)
-
Enter the tags and text that you want to appear in your document. Most DocBook documents are either <book> type (large, multi-chapter documents) or <article> type (single chapter documents). To try out a DocBook document, type the following:
<xml version="1.0"> <article> <title>Choosing a new car</title> <artheader> <abstract> In this article, you will learn how to price, negotiate for, and purchase an automobile. </abstract> </artheader> <section> <title>Getting Started</title> <para> The first thing you will learn is how to figure out what you can afford. </para> </section> <section> <title>The Next Step</title> <para> After you know what you can afford, you can begin your search. </para> </section> </article>
There are a few things you should notice about this document. The entire document is wrapped in article tags (<article> </article>). The article title is in title tags (<title> </title>). The section tags (<section> </section>) indicate sections of text that have a title and paragraph each. These sections can later be treated separately in the TOC.
-
Save the file and exit from the text editor.
-
Next, you can try translating the document you just created into several different formats. For example, to create HTML output you could type the following:
$ db2html cardoc.sgml
The result is a new directory called cardoc. The result from db2html in the cardoc directory was: stylesheet-images directory, t2.html file, and x12.html file.
-
To view the HTML file just created, I typed the following:
$ epiphany $HOME/doctest/cardoc/t2.html
Figure 6-11 shows an example of the output created from the db2html command. The screen on the left shows the first page. Click the Next link at the top of the page. The second page that you see is shown on the right. During conversion to HTML, the db2html command adds Next/Previous buttons to each page. It also puts the title of each section in a Table of Contents on page one and in the browser’s title bar.
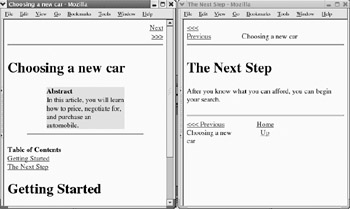
Figure 6-11: The DocBook file is output in HTML with the db2html command.
From this point, you can continue to add content and different types of tags. If you are writing documents for a particular project (such as the Linux projects mentioned earlier), you should get information on the particular tags and other style issues they require.
Converting DocBook documents
The previous example shows how to create a simple DocBook document and convert it to HTML output. The following Fedora utilities convert DocBook to other formats:
-
docbook2dvi — Converts a DocBook file to Device Independent file format.
-
docbook2html — Converts a DocBook file to HTML format.
-
docbook2man — Converts a DocBook file to man page format.
-
docbook2pdf — Converts a DocBook file to Portable Document Format (PDF).
-
docbook2ps — Converts a DocBook file to PostScript format.
-
docbook2rtf — Converts a DocBook file to Rich Text Format (RTF).
-
docbook2tex — Converts a DocBook file to TeX format.
-
docbook2texi — Converts a DocBook file to GNU TeXinfo format.
-
docbook2txt — Converts a DocBook file to a bare text format.
EAN: 2147483647
Pages: 286