| What's one of the first rules you'll learn, as you build large maintainable applications? You'll learn to break your applications into manageable chunks, or components. By breaking your application into multiple components packaged as DLLs, you'll find that your application will be easier to develop. (Multiple developers working on different portions of an application, based on a specification that links the various components, makes for a productive working environment.) When you're maintaining your applications, being able to focus on specific components that provide various small well-understood blocks of functionality will make the job easier, as well. In the sample application you have built so far throughout this book, you have kept all the functionality within a single project. It might be better to separate one or more of the components from the project into another project, compiled as a separate DLL. For example, the DataHandler and DataHandlerSqlClient classes can easily be split out into a separate DLL. These classes can be reused in many different projects, including both desktop and Web applications. As you become more experienced creating .NET applications, you'll want to take advantage of the power provided by the Common Language Runtime and the .NET Framework. In this section, you'll investigate several common techniques, including the following: Using components to make it easier to manage development and deployment Creating your own namespaces so you can unambiguously refer to components that share the same names Adding assembly information so you can embed information about you, your company, and your project within the assemblies you create Along the way, you'll break the data-handling classes in your sample application into their own project and call the classes from the original Northwind sample project. Creating a Class Library In this portion of the chapter, you'll create a separate class library containing the data access code. Follow these steps: -
Open the Northwind.sln project you've been building throughout the book. -
Select the File, Add Project, New Project menu item, displaying the New Project dialog box. -
Select Class Library from the Templates list. -
Name the project DataClasses. Click OK to add the new project to your solution. -
In the Solution Explorer window, select Class1.vb within the new project. Delete Class1.vb you won't need it. -
In the Solution Explorer window, select both DataHandler.vb and DataHandlerSqlClient.vb (click one and then Ctrl+click on the other). -
In the Solution Explorer window, drag the selected files into the new project. (The files should appear within the new project and be removed from the original project.) You've now created the new project, which will create DataClasses.dll a separate component you can use from within multiple applications. You still have a few issues to tackle before using this component, however. You must set a reference to the component as well as fix up code errors, because the classes are no longer local to the Northwind project. Adding a Reference Just as VB6 developers used COM type libraries to add references to COM components to their applications, .NET developers can use the metadata included in .NET assemblies to reference the functionality in those external components. Follow these steps to add a reference to DataClasses.vb, to your Northwind project: -
In the Solution Explorer window, right-click the DataClasses project and select Build from the context menu. (This step creates DataClasses.dll.) -
In the Solution Explorer window, right-click the Northwind project and select Add Reference from the context menu, displaying the Add Reference dialog box. -
On the Add Reference dialog box, select the .NET tab and then click Browse. Navigate to the DataClasses\bin folder, select DataClasses.dll, and click Open to select the file. Figure 26.1 shows the Add Reference dialog box after you've selected the new DLL. Figure 26.1. Select the new DLL to add its reference to the current project.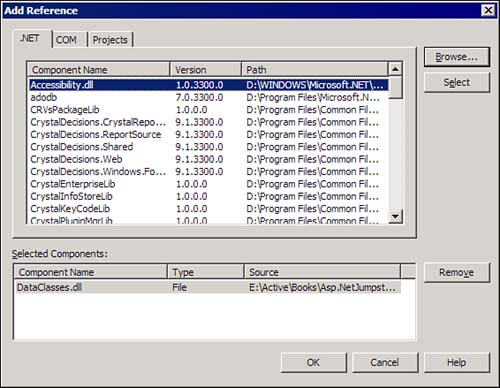
-
Click OK to dismiss the dialog box. Once you've added the reference, your Solution Explorer window should look something like Figure 26.2. With this reference set, you can refer to the members of the DataHandler and DataHandlerSqlClient classes as if they were still part of the current project, without having to explicitly load the files into the project. Figure 26.2. After adding the reference, DataClasses appears in the References list.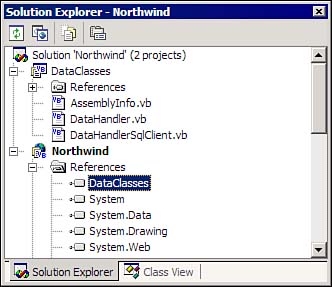
The one big problem that's still left is that your code can't determine how to find the various members, without taking one more step. If you attempt to compile your application at this point, you'll receive all sorts of errors, indicating that either DataHandler or DataHandlerSqlClient is not declared. You'll fix this problem in the next section. Accounting for Namespaces When you're working within a single project, every public member of every class is available to any other class or file within the project. Because, by default, every item within a single project shares the same namespace the same "naming context" (a term we've made up) any item can find any other. By default, this namespace has the same name as the project. You were previously able to call the GetDataSet method of the DataHandler class from anywhere within the Northwind project because your code and the GetDataSet method existed within the same namespace. When you entered code such as ds = DataHandler.GetDataSet(<parameters here>) you were actually using this code instead: ds = Northwind.DataHandler.GetDataSet(<parameters here>) Because your code and the GetDataSet method both existed within the same namespace, leaving out Northwind didn't matter the .NET runtime was able to determine which method you were calling and take care of the details for you. Now that you've split the code out into separate projects, your code is still looking for GetDataSet within the current namespace, but it exists within a separate namespace. To find the GetDataSet method now, you need to write code like this: ds = DataClasses.DataHandler.GetDataSet(<parameters here>) When you write code in Visual Studio .NET, you have three choices as to how you handle this namespace fixup: You can add the DataClasses prefix to each and every reference to the classes and their members. (This is a tedious prospect, at best.) You can add an Imports statement at the top of each file in your project that needs to refer to these classes, like this: Imports DataClasses You can modify the Northwind project so that it automatically sets up the Imports statement "under the covers" for every file in the project. Looking for the lowest-impact solution, we recommend the third solution. Follow these steps to finish creating and consuming the DataClasses component: -
In the Solution Explorer window, right-click the Northwind project. -
Select Properties from the context menu. -
In the Northwind Property Pages dialog box, select the Imports node. Type the namespace (DataClasses), as shown in Figure 26.3. Figure 26.3. Add the project-wide Imports statement.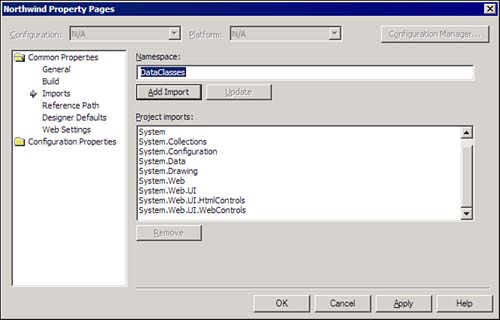
-
Click Add Import to add the new namespace to the Project imports list. -
Click OK to dismiss the dialog box. Once you've resolved all the namespace issues, you should now be able to run the project, just as you did before breaking the data classes out into their own assembly. Were you to use the DataClasses assembly in a different project, you would just need to repeat the steps shown here, and the members of the assembly would be available to your new project. More on Namespaces When you separated the data-handling classes into their own class library, Visual Studio used the name of the project as the namespace for all classes contained within the new project this is the default behavior. Why do namespaces exist? Imagine that your application already contains a class named DataHandler, and you add a reference to the DataClasses assembly. How would your code differentiate between the DataHandler classes in the two projects? Using separate namespaces for the two classes removes the ambiguity. If your project shares a namespace with the DataClasses assembly, your code wouldn't be able to compile. Unless the compiler can unambiguously determine which class you're referring to in your code, it can't compile the code. When creating your own assemblies, you'll want to assign a unique root namespace for the classes you'll expose. (Many developers use their company's URL as part of the name that URL is guaranteed to be unique.) To assign a root namespace for an entire project, you can use the project's property pages, as shown in Figure 26.4. The name you place here becomes the root namespace for the classes in the project. Rather than referring to DataHandler.GetDataSet, you could use DataClasses.DataHandler.GetDataSet (the full name, including the namespace). Figure 26.4. Use the project's property pages to modify the namespace for the project.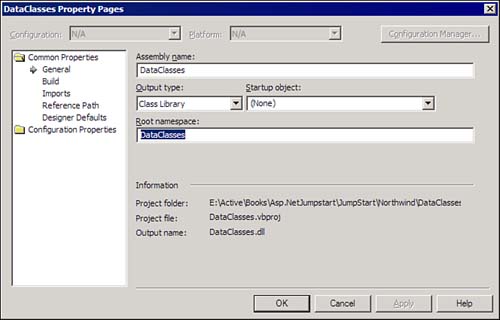
You can also assign namespaces to subsets of your project (one or more classes within a file, or even multiple files) by adding namespace declarations in your code. For example, imagine that your application's root namespace is NorthwindSales. Your project includes Customer and Invoice classes, and you want to group them both within the Data namespace. You could create the Data namespace like this (leaving out all the nonrelevant code here): Namespace Data Public Class Customer End Class Public Class Invoice End Class End Namespace With this setup, you could refer to the LastName property of the Customer class like this: strLastName = NorthwindSales.Data.Customer.LastName INVESTIGATING ASSEMBLIES What exactly is an assembly, anyway? Although you might think of an assembly like a DLL, it's more than this. Generally, Microsoft describes an assembly as "the .NET unit of reuse, versioning, security, and deployment." The simplest assembly actually will be a single DLL or EXE file, but assemblies can consist of multiple files. In addition to the results of compiling your code, each assembly contains information that describes the assembly that is, a manifest containing information about the locale, the procedures, and the dependencies of the assembly. You can think of an assembly's manifest information as being analogous to COM's typelibs, but there's much more information in a manifest than in a typelib. By default, assemblies are private that is, they're stored in the same file system "tree" as the code using the contents of the assembly. When you build your Web project, you'll find a DLL file in the \bin folder within the folder with your ASPX files. The .NET CLR doesn't require this behavior, however you can create public assemblies, as well, by placing them in the Global Assembly Cache (GAC). Visual Studio .NET's Setup and Deployment projects can install assemblies there for you, or you can use the .NET Frameworks' GacUtil.exe program to do it. You can't simply copy files into the GAC, however. Because of the versioning information .NET maintains for you, you must use the utility. |
Managing Assembly Information Each assembly you create has space set aside within the compiled assembly for version information. You can store version numbers, copyright information, and more within the assembly. To make it easy for you to control this information, each project you create within Visual Studio .NET contains a file, AssemblyInfo.vb, that contains nothing but attributes that describe your assembly, as shown in Listing 26.1. Listing 26.1 The Default Contents of AssemblyInfo.vb <Assembly: AssemblyTitle("")> <Assembly: AssemblyDescription("")> <Assembly: AssemblyCompany("")> <Assembly: AssemblyProduct("")> <Assembly: AssemblyCopyright("")> <Assembly: AssemblyTrademark("")> <Assembly: CLSCompliant(True)> 'The following GUID is for the ID of the typelib if this 'project is exposed to COM <Assembly: Guid("1298341F-35DF-4D2E-ADB1-646CE8A0C3E5")> ' Version information for an assembly consists of the ' following four values: ' ' Major Version ' Minor Version ' Build Number ' Revision ' ' You can specify all the values or you can default the ' Build and Revision Numbers ' by using the '*' as shown below: <Assembly: AssemblyVersion("1.0.*")> You fill in the values within the attributes, and the compiler does the rest of the work. For example, you might modify the first block of attributes, setting information about your organization: <Assembly: AssemblyTitle( _ "Northwind Traders Web Application")> <Assembly: AssemblyDescription("Sample Northwind Site")> <Assembly: AssemblyCompany( _ "PDSA, Inc. and KNG Consulting, Inc.")> <Assembly: AssemblyProduct("Northwind")> <Assembly: AssemblyCopyright("Copyright 2002")> The AssemblyVersion attribute, at the bottom of the AssemblyInfo.vb file, allows you to set a version number for your assembly. By default, Visual Studio assigns the value 1.0.* to your project. The asterisk indicates that you want the compiler to automatically increment the version number (for example, to increment from 1.0.7 to 1.0.8) each time you compile the DLL. You can elect to hard-code a complete version number by simply entering its value into this attribute. After you compile the resulting DLL, you can retrieve this information in Windows Explorer by right-clicking the DLL and selecting the Version tab to view the assembly attributes. Figure 26.5 shows the Windows Explorer Properties dialog box, after setting the version number to 2.0.*. Figure 26.5. You can view assembly information from Windows Explorer.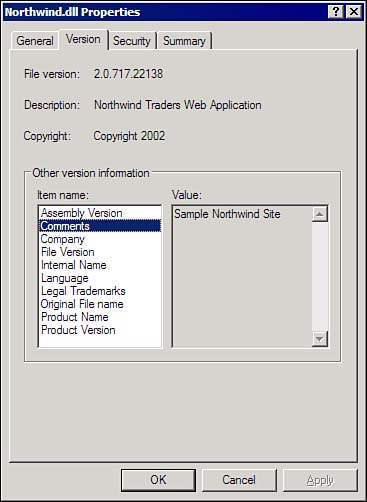
|
