| In this chapter, you'll walk through creating a reasonably complex page that's aimed specifically for mobile devices. Although the page works fine when browsed using Internet Explorer, its appearance is a little "tame" for standard browsing. Although we've attempted to have the page use as many different controls as is reasonable, there are several other controls we didn't cram into this example. TIP The first difference you'll notice between standard ASP.NET pages and mobile pages is that mobile pages are broken up into one or more forms. Each page must contain at least one form but can contain as many as you require. The Microsoft Mobile Internet Toolkit manages breaking the forms up, as required by the capabilities of the requesting browser.
To begin creating the example for this chapter, you will first need to have the Microsoft Mobile Internet Toolkit on your development machine. If you have not already done so, download the toolkit from the Microsoft Web site. Instead of publishing the URL on the Microsoft Web site (because Microsoft rearranges its site so often), we can only suggest that you browse to www.microsoft.com and perform a search for the Mobile Internet Toolkit. Follow the instructions to install this toolkit on your machine. Creating the Page and First Two Forms The page you'll build allows you to investigate customers in the Northwind sample database, filtering first by country and then by city. You'll view detailed information about the selected customer and will be able to view the total number of orders for the customer, as well. The page is broken up into five forms, and Figure 25.1 shows the first two, which allow you to enter a password and then select a country. Figure 25.1. The first two forms allow you to enter a password and then view a list of countries.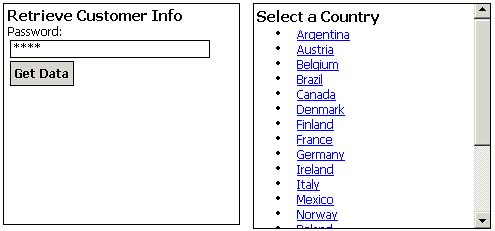
NOTE These screenshots were taken using the Pocket PC browser clearly, the display would be significantly different using any other browser.
Creating the Password Form Follow these steps to create the page and the first form: -
Open Visual Studio .NET and create a new Visual Basic .NET project, selecting Mobile Web Application from the Templates list. Name the new project MMITSample. -
Find MobileWebForm1.aspx in the Solution Explorer window and change the name of the page to CustomerInfo.aspx. -
Open CustomerInfo.aspx in Design view, and you should see a single form named Form1. Make sure the Properties window is visible and then select the form. Set the form's ID property to frmMain. -
Add controls to frmMain using the controls and properties in Table 25.1 as your guide. When you are done, your form should look similar to Figure 25.2. Figure 25.2. The Password screen to enter the mobile application.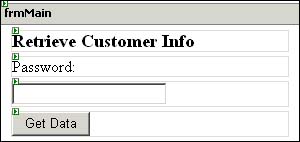
Table 25.1. Add These Controls, with the Listed Properties, to frmMain | Control | Property | Value | | Label | StyleReference | Title | | | Text | Retrieve Customer Info | | Label | Text | Password: | | TextBox | ID | txtPassword | | | MaxLength | 10 | | | Password | True | | Command | ID | cmdGo | | | SoftkeyLabel | Go | | | Text | Get Data | As you add controls, note that you can only manage the order of the placement of the controls from top to bottom. If you follow the instructions, in order, you shouldn't have any troubles. Also, you won't add all the controls right now you'll come back in later sections and add a few more, such as the RequiredFieldValidator control on frmMain. TIP To place a control between two others, the simplest solution is to select the control preceding the location where you want the new control. Double-click the control you want to create in the Toolbox, and your new control will appear in the designer immediately following the selected control. If you accidentally place a control outside a form, simply drag it into the destination form. Don't spend any time attempting to resize or apply careful layout attributes to your controls. You simply don't get much control over the layout of the pages.
Creating the Country Form On the second form, you'll use the List control to display a list of available countries. Follow these steps to set up the List control on the second form: -
Click the page, outside frmMain, to place the insertion point. -
Double-click the Form control in the Toolbox to add a new form to the page. -
Set the new form's ID property to frmCountry. -
Add controls to frmCountry using the controls and properties in Table 25.2 as your guide. When you are finished, your completed form should look similar to Figure 25.3. Figure 25.3. Display a list of countries using the List control.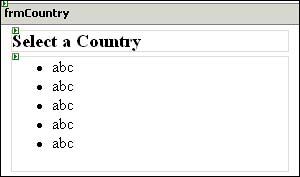
Table 25.2. Add These Controls, with the Listed Properties, to frmCountry | Control | Property | Value | | Label | StyleReference | Title | | | Text | Select a Country | | List | ID | lstCountry | | | Decoration | Bulleted | Navigating from Form to Form In order to navigate from one form to another, you must add one line of code to the Click event handler for the Command control on the first form. Follow these steps to hook up the navigation: -
In the first form, double-click the Get Data button, loading the code editor with the cmdGo_Click procedure selected. -
Modify the procedure so that it looks like this: Private Sub cmdGo_Click( _ ByVal sender As System.Object, _ ByVal e As System.EventArgs) _ Handles cmdGo.Click ActiveForm = frmCountry End Sub NOTE We've modified the layout of the code so that it fits on the printed page. You needn't add the line-continuation characters in the procedure declaration they don't affect the behavior of the code.
Setting the ActiveForm property of the page to a specific form causes the page to navigate to the selected form. In this case, clicking the Command control navigates to the frmCountry form. Adding Data to the List Control In order to display the list of countries in the List control, you'll need to add data-handling support. In this section, you'll get the data hooked up, and you'll fill the List control with its list of countries. To add support for data handling, follow these steps: -
Copy the DataHandler.vb file from your Northwind.sln solution into this project. (You can use Windows Explorer to help. Simply find the file, copy it to the Clipboard, and then paste it into your project.) -
In the Solution Explorer window, right-click CustomerInfo.aspx and select View Code from the context menu. Add the following procedure, which fills lstCountry with a list of countries from the Customers table: Private Sub FillCountry() Dim ds As DataSet Dim strConn As String Dim strSQL As String strConn = DataHandler.ConnectStringBuild("sa", "") strSQL = _ "SELECT DISTINCT Country FROM Customers " & _ "ORDER By Country" ds = DataHandler.GetDataSet(strSQL, strConn) With lstCountry .DataTextField = "Country" .DataValueField = "Country" .DataSource = ds .DataBind() End With End Sub TIP By setting the List control's DataTextField and DataValueField properties, you're indicating to the control which fields from its data source it should use to represent the text displayed on the page (DataTextField) and the field it should use for the Value property of each list item. In this case, they're the same values in many cases, you might display one string but use a different string to represent each item programmatically. (For example, you might want to display a customer name but use the CustomerID programmatically.) This code also sets the DataSource property of the control and calls its DataBind method. -
You also need to call the FillCountry procedure as you navigate to the second form. Find the cmdGo_Click procedure and modify it so that it looks like this, calling the new procedure: Private Sub cmdGo_Click( _ ByVal sender As System.Object, _ ByVal e As System.EventArgs) _ Handles cmdGo.Click FillCountry() ActiveForm = frmCountry End Sub -
Use the Build, Rebuild All menu item to rebuild your project.  | You are now poised and ready to try your first mobile Web application. If you've installed an emulator, you can use it to browse to your page at this location: |
http://localhost/MMITSample/CustomerInfo.aspx If you have not installed an emulator, just run the project within Internet Explorer or your local browser. The Microsoft Mobile Internet Toolkit renders output for full-featured browsers in addition to mobile browsers. TIP You may receive an error from Internet Explorer, complaining about a missing or expired cookie. You can either refresh the browser or reload the page to bypass the problem.
To try out the sample page, follow these steps: -
Press F5 to run the application (or browse to the page from any device or emulator). -
Fill in any password and click Get Data. You should now see a list of countries displayed. You will notice that in the list of countries, the items aren't displayed as hyperlinks. The List control won't display hyperlinks for any of its data until you add code for the control telling it what to do when you select an item. You'll add this code in the next step. Displaying Cities Now that you have filled the List control with a list of countries from the Customers table, you can now drill down and view a list of cities from the selected country. Follow these steps to create the form containing the list of cities: -
Click to the right of frmCountry and then double-click the Form control in the Toolbox window. -
Set the ID property of this new form to frmCity. -
Add controls to frmCity using the controls and properties in Table 25.3 as your guide. When you're finished, your form should look like Figure 25.4. Figure 25.4. Use a SelectionList control to display a list of cities.
Table 25.3. Add These Controls, with the Listed Properties, to frmCity | Control | Property | Value | | Label | ID | lblCity | | | StyleReference | Title | | | Text | Select a City | | SelectionList | ID | slstCity | | | SelectType | Radio | | Command | ID | cmdCustomers | | | SoftkeyLabel | GO | | | Text | Customers | | Label | ID | lblValidate | | | ForeColor | Red | | | Text | (empty) | TIP Investigate the other SelectType property values for the SelectionList control. Other values allow for multiple selections and other layouts. Note that the SelectionList control won't generate its own postback, so you'll need some mechanism for posting to the server in this case, you're using a Command control.
NOTE Why set the SoftkeyLabel property of the Command control? On some devices, the Command control doesn't appear as a button but instead migrates to the softkey button this happens often on phones. There's not much space for text on the softkey label, so keep this value very short.
Navigating to the City Form Once you've selected a country, you can navigate to a form that displays cities within that country. You'll need to supply a procedure to fill the SelectionList control with a list of cities. In addition, you'll need to add code so that you navigate to the page containing cities once you select a country. Follow these steps to add these features: -
Add the following procedure to your page's class: Private Sub FillCity(ByVal Country As String) Dim ds As DataSet Dim strConn As String Dim strSQL As String strConn = DataHandler.ConnectStringBuild("sa", "") strSQL = String.Format( _ "SELECT DISTINCT City FROM Customers " & _ "WHERE Country = '{0}' ORDER By City", Country) ds = DataHandler.GetDataSet(strSQL, strConn) lblCity.Text = "Select a City in " & Country With slstCity .DataTextField = "City" .DataValueField = "City" .DataSource = ds .DataBind() End With End Sub TIP The FillCity procedure sets the DataTextField and DataValueField properties of the SelectionList control, just as the FillCountry procedure did for the List control. In this procedure, the DataSource property includes a WHERE clause that limits the cities to just the country selected in the previous form. -
From the Class Name drop-down list (the upper-left list at the top of the code editor window), select lstCountry. From the Method Name list (the upper-right list), select ItemCommand. The code editor creates the stub of the lstCountry_ItemCommand procedure for you. -
Modify the lstCountry_ItemCommand procedure so that it looks like this: Private Sub lstCountry_ItemCommand( _ ByVal source As System.Object, ByVal e As _ System.Web.UI.MobileControls.ListCommandEventArgs) _ Handles lstCountry.ItemCommand FillCity(e.ListItem.Value) ActiveForm = frmCity End Sub TIP When you select an item in a List control, the ItemCommand event procedure receives a parameter (e) of type ListCommandEventArgs. This object provides a ListItem property that represents the selected item. The Value property of this object provides the data in the selected row of the field you supplied in the DataValueField property. The corresponding Text property corresponds to the value in the field you specified in the DataTextField property. | You can now try out all three pages to see how you navigate from one form to another in your mobile Web application. To do so, follow these steps: |
-
Press F5 to run the application (or browse to the page from an emulator). -
Enter any password and click Get Data. -
Click a country to view all the cities for the selected country. Different Views Depending on the emulator or actual device you use, the forms on your page display differently. Figure 25.5 shows all the forms on the finished page using the UP.SDK emulator. Figure 25.6 shows the same forms using the Pocket PC browser. (You'll add the rest of the pages shown in these figures in the following sections.) Figure 25.5. The sample ASP.NET page displayed on the UP.SDK browser.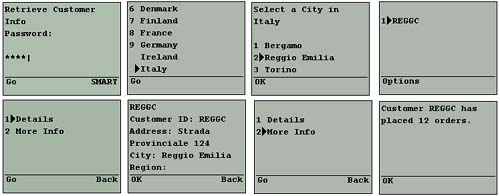
Figure 25.6. The same application looks much different when you use the Pocket PC browser.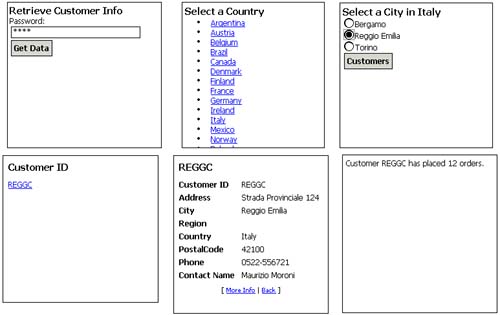
In the next section, you'll learn to use the most powerful control in the Microsoft Mobile Internet Toolkit toolbox the ObjectList control. |
