Building a WCF Service
Visual Studio 2005 provides the ideal environment for building WCF services and applications. The Visual Studio Development Tools for the .NET Framework 3.0 include a project template that you can use for creating a WCF service. You will use this template to create a simple service that exposes methods for querying and maintaining information stored in a database. The database used is the sample AdventureWorks database. The Introduction to this book contains instructions for installing this database. The AdventureWorks company manufactures bicycles and accessories. The database contains details of the products that they sell, sales information, details of customers, and employee data. In the exercises in this chapter, you will build a WCF service that provides operations enabling a user to:
-
List the products sold by AdventureWorks
-
Obtain the details of a specific product
-
Query the current stock level of a product
-
Modify the stock level of a product
Figure 1-1 shows the tables in the AdventureWorks database used by the exercises in this chapter, and how these tables are related.
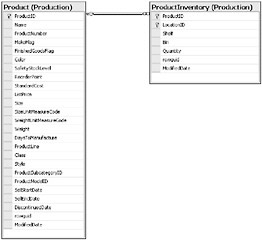
Figure 1-1: Tables holding product information in the AdventureWorks database.
To simplify the code that you need to write to access the database, but also to ensure that exercises are as realistic as possible, you will make use of the Data Access Application Block (DAAB). This is part of the Microsoft Enterprise Library. The purpose of the Enterprise Library is to simplify enterprise application development by providing a library of classes that you can use for performing the common tasks frequently required by professional applications. The DAAB contains classes that enable you to query and maintain information stored in a database. You can use the DAAB to write generic code that is independent of the underlying database technology–the DAAB hides the specific details of the database by using an application configuration file. Therefore, before using the DAAB in an application, you must create a configuration file for the application, which is what you will do first.
| More Info | For additional information about using the Enterprise Library, please visit the Microsoft Patterns and Practices Web site at http://msdn.microsoft.com/practices/guidetype/AppBlocks/default.asp. |
Preliminary exercise–Configure the Data Access Application Block
-
On the Windows Start menu, point to All Programs, point to Microsoft Patterns & Practices, point to Enterprise Library, and then click Enterprise Library Configuration.
-
In the Enterprise Configuration console, in the File menu, click New Application.
The Application Configuration node appears in the tree view in the left pane of the console.
-
Right-click the Application Configuration node, point to New, and then click Data Access Application Block.
The Data Access Application Block node and several child nodes appear in the tree-view in the left pane of the console.
-
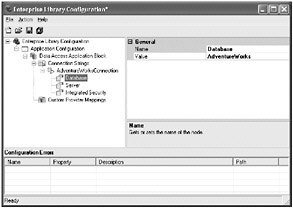
In the tree-view in the left pane, select the Connection String node. In the right pane, change the Name property to AdventureWorksConnection. This is the name that you will use to refer to the connection in your applications. Verify that the ProviderName property is set to System.Data.SqlClient–this is the provider used to connect to Microsoft SQL Server.
-
In the tree view in the left pane, select the Database node. In the right pane, change the Value property to AdventureWorks. This is the name of the sample database.
Important Be sure to change the Value property and not the Name property.
-
In the tree view in the left pane, select the Server node. In the right-hand pane, change the Value property to the name of the SQL Server instance you are using.
Tip If you are using a local instance of SQL Server 2005 Express Edition, you can leave the Value property of the Server node at its default setting.
-
In the tree view in the left pane, select the Integrated Security node. In the right pane, verify that the Value property is set to SSPI.
Note If you are not using integrated security, you will need to change this value and specify a username and password when you access SQL Server. However, it is highly recommended that you use integrated security when connecting to SQL Server.
-
In the Action menu, click Validate. Verify that no messages are reported in the Configuration Errors pane at the bottom of the console.
-
In the File menu, click Save Application. Save the application configuration file as
 Web.config in your C:\Documents and Settings\Your Name\My Documents\ folder. Replace YourName in this path with your Windows user name.
 -
Close the Enterprise Library Configuration console.
Use the .NET Framework 3.0 and Visual Studio 2005 to create a WCF service project
-
Start Visual Studio 2005.
-
On the File menu, point to New and then click Project.
-
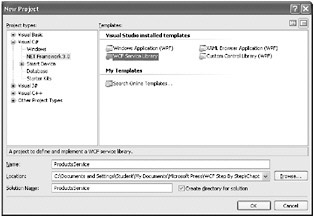
In the New Project dialog box, expand the Visual C# node in the Project types tree, and then click NET Framework 3.0.
-
In the Templates pane, select the WCF Service Library template.
Visual Studio 2005 actually provides two templates for creating a WCF service; the WCF Service Library template that you are using here, and the WCF Service template that is available when you create a new Web site (because of the similarity in the names, I will refer to this one as the WCF Service Web site template to avoid confusion). If you are creating a WCF service that is always going to be deployed by using IIS, then you could use the WCF Service Web site template. In the case of the service you are about to build, although you will initially deploy it to IIS, you will reuse it in a variety of other scenarios, so you will create it by using the WCF Service Library template. It is also instructive to understand the tasks involved in deploying a WCF service to IIS in case you ever need to perform them yourself, and using the WCF Service Library template gives you this opportunity!
You will get some practice at using the WCF Service Web site template in Chapter 5, “Protecting a WCF Service over the Internet.”
-
In the Name field, type ProductsService.
-
In the Location field, type C:\Documents and Settings\YourName\My Documents\Microsoft Press\WCF Step By Step\Chapter 1 if you are using Windows XP, or C:\Users\YourName\Documents\Mirosoft Press\WCF Step By Step\Chapter 1 if you are using Windows Vista. To save space throughout the rest of this book, I will simply refer to the path “C:\Documents and Settings\YourName\My Documents” or “C:\Users\YourName\Documents as your “\My Documents” folder.
-
Ensure that the Create directory for solution check box is selected, and then click OK. Visual Studio 2005 creates the new project.
Note From here on, I will assume that you understand how to create a new project by using Visual Studio 2005, and so I will simply ask you to create a new project, although I will specify the template and any specific project names you should use.
-
Using Solution Explorer, rename the Class1.cs file as
 ProductsService.cs.
 -
In the Project menu, click Add Reference. In the Add Reference dialog box, click the Browse tab, and add references to the following assemblies required by the DAAB. You can find these assemblies in the C:\Program Files\Microsoft Enterprise Library\bin folder:
-
Microsoft.Practices.EnterpriseLibrary.Data.dll
-
Microsoft.Practices.EnterpriseLibrary.Common.dll
-
Microsoft.Practices.ObjectBuilder.dll
-
-
In the code view window displaying
 ProductsService.cs, add the following statements to the top of the file:
using Microsoft.Practices.EnterpriseLibrary.Data; using System.Data;
-
In the Project menu, click Add Existing Item. In the Add Existing Item dialog box, move to your \My Documents folder, and add the
 Web.config file that you created earlier.
Tip Select All Files in the Files of type list box to see the
 Web.config file listed in the dialog box.
At this point, it is worth examining the code and comments that the WCF Service template contains. At the top of the ![]() ProductsService.cs file, apart from the statements you have just added, you will find the usual using statements referencing the System, System.Collections.Generic, and System.Text namespaces, followed by two additional statements referencing the System.ServiceModel and System.Runtime.Serialization namespaces, as shown in Figure 1-2.
ProductsService.cs file, apart from the statements you have just added, you will find the usual using statements referencing the System, System.Collections.Generic, and System.Text namespaces, followed by two additional statements referencing the System.ServiceModel and System.Runtime.Serialization namespaces, as shown in Figure 1-2.
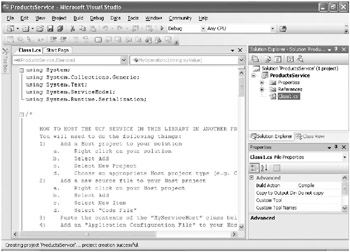
Figure 1-2: Visual Studio 2005, showing the code generated for a WCF service project.
The System.ServiceModel namespace contains the classes used by WCF for defining services and their operations. You will see many of the classes and types in this namespace as you progress through this book. WCF uses the classes in the System.Runtime.Serialization namespace to convert objects into a stream of data for transmitting over the network (a process known as serialization) and to convert a stream of data received from the network back into objects (deserialization). You will learn a little about how WCF serializes and deserializes objects later in this chapter and look at serialization and deserialization in more depth as you progress through this book. In Solution Explorer, in the References folder, you will see references to the System.ServiceModel and System.Runtime.Serialization assemblies, which contain the code that implement the classes in these namespaces. You should also notice a reference to the System.IdentityModel assembly. This assembly contains namespaces and types that you-can use to manage security and identity information, helping to protect a WCF service. You will learn more about security and protecting services in Chapter 4, “Protecting an Enterprise WCF Service,” and Chapter 5.
Returning to the code view window displaying the ![]() ProductsService.cs class, you will find instructions on how to write an application that can host a WCF service. Feel free to read these instructions, but we will cover this process in more depth in Chapter 2, “Hosting a WCF Service.” Below these instructions are more comments describing the structure of a WCF service. Again, feel free to examine these comments, but we are going to cover these concepts in detail, and expand upon them considerably, in the exercises throughout this book. Finally, towards the end of the file, you will see that the template defines a namespace for the ProductsService WCF service and includes some sample code for this service.
ProductsService.cs class, you will find instructions on how to write an application that can host a WCF service. Feel free to read these instructions, but we will cover this process in more depth in Chapter 2, “Hosting a WCF Service.” Below these instructions are more comments describing the structure of a WCF service. Again, feel free to examine these comments, but we are going to cover these concepts in detail, and expand upon them considerably, in the exercises throughout this book. Finally, towards the end of the file, you will see that the template defines a namespace for the ProductsService WCF service and includes some sample code for this service.
Defining Contracts
The structure of a WCF service enables you to adopt a “contract-first” approach to development. When performing contract-first development, you define the interfaces, or contracts, that the service will implement and then build a service that conforms to these contracts. This is not a new technique; COM developers have been using a very similar strategy for the last decade or so. The point behind using contract-first development is that it enables you to concentrate on the design of your service. If necessary, it can quickly be reviewed to ensure that it does not introduce any dependencies on specific hardware or software before you perform too much development; remember that in many cases client applications might not be built using WCF, or even be running on Windows.
In the following exercises, you will define the data and service contracts for the ProductsService WCF service. The data contract specifies the details of products that the WCF service can pass to operations. The service contract defines the operations that the WCF service will implement.
Define the data contract for the WCF service
-
Comment out the sample code and namespace in the
 ProductsService.cs file, as you are going to write your own code.
 -
Add the following namespace to the end of the file:
namespace Products { } -
Add the Product class shown below to the Products namespace:
// Data contract describing the details of a product [DataContract] public class Product { [DataMember] public string Name; [DataMember] public string ProductNumber; [DataMember] public string Color; [DataMember] public decimal ListPrice; }The DataContract attribute identifies the class as defining a type that can be serialized and deserialized as an XML stream by WCF. All types that you pass to WCF operations or return from WCF operations must be serializable by WCF. You can apply the DataContract attribute to classes, structures, and enumerations.
You mark each member of the type with the DataMember attribute; any members not tagged in this way will not be serialized.
Note You can use any other types that already have a data contract defined for them as the types of data members inside a data contract. You can also use any serializable type. This includes types such as string, int, and decimal, as well as many of the more complex types such as the Collection classes.
Define the service contract for the WCF service
-
Add the IProductsService interface shown below to the Products namespace, underneath the Product class:
// Service contract describing the operations provided by the WCF service [ServiceContract] public interface IProductsService { // Get the product number of every product [OperationContract] List<string> ListProducts(); // Get the details of a single product [OperationContract] Product GetProduct(string productNumber); // Get the current stock level for a product [OperationContract] int CurrentStockLevel(string productNumber); // Change the stock level for a product [OperationContract] bool ChangeStockLevel(string productNumber, int newStockLevel, string shelf, int bin); }Note that a service contract should be defined by using an interface rather than a class, as this enables you to separate the definition of the contract from its implementation. You use the ServiceContract attribute to mark the interface as a service contract (the WCF runtime relies on the interface being tagged with this attribute when it is generating metadata for client applications that wish to use this service). Each method that you want to expose should be tagged with the OperationContract attribute. It is also worth noting that you can use generic types, such as List<>, as parameters or return values in a WCF service contract. As long as the types you use are serializable by WCF, that is all that matters. You will learn much more about service contracts as you proceed through this book.
Implementing the Service
Now that you have specified the structure of the data passed to the WCF service by using a data contract and defined the shape of the WCF service by using a service contract, the next step is to write the code that actually implements the service contract. As with any interface, you must implement every method defined by the service contract in the WCF service. Note that if you define additional methods in the WCF service that are not in the service contract, then these methods will not be visible to client applications using the service.
Implement the WCF service
-
Add the following class to the Products namespace, underneath the IProductService service contract:
// WCF service class that implements the service contract public class ProductsServiceImpl : IProductsService { }Notice that a class that provides a WCF service should indicate that it implements a service contract, in this case, IProductService, by using standard C# inheritance notation.
-
Add the ListProducts method to the ProductsServiceImpl class:
public List<string> ListProducts() { // Read the configuration information for connecting to // the AdventureWorks database Database dbAdventureWorks = DatabaseFactory.CreateDatabase("AdventureWorksConnection"); // Retrieve the details of all products by using a DataReader string queryString = @"SELECT ProductNumber FROM Production.Product"; IDataReader productsReader = dbAdventureWorks.ExecuteReader(CommandType.Text, queryString); // Create and populate a list of products List<string> productsList = new List<string>(); while (productsReader.Read()) { string productNumber = productsReader.GetString(0); productsList.Add(productNumber); } //Return the list of products return productsList; }Tip This code is available in the file
 ListProducts.txt in the Microsoft Press\WCF Step By Step\Chapter 1 folder under your \My Documents folder.
This code uses the DatabaseFactory.CreateDatabase method of the DAAB to obtain the connection parameters referenced by the AdventureWorksConnection settings that you defined earlier. The ExecuteReader method uses this information to connect to the database and perform its query. When the ListProduct method completes, the DAAB automatically disconnects from the database.
The code invokes the ExecuteReader method of the DAAB Database object to run a SQL query that returns a list of product numbers from the database. The data is returned as a DataReader object. The code then iterates through this list, retrieving each product number and storing them in a generic List<string> collection. The ListProducts method returns this List<string> object when the method completes.
Important For the sake of clarity, this method does not include any exception handling. In the real world, you should check for exceptions and handle them accordingly. For more information, see Chapter 3, “Making Applications and Services Robust.”
-
Add the GetProduct method to the ProductsServiceImpl class:
public Product GetProduct(string productNumber) { Database dbAdventureWorks = DatabaseFactory.CreateDatabase("AdventureWorksConnection"); // Retrieve the details of the selected product by using a DataReader string queryString = @"SELECT ProductNumber, Name, Color, ListPrice FROM Production.Product WHERE ProductNumber = '" + productNumber + "'"; IDataReader productsReader = dbAdventureWorks.ExecuteReader(CommandType.Text, queryString); // Create and populate a product Product product = new Product(); if (productsReader.Read()) { product.ProductNumber = productsReader.GetString(0); product.Name = productsReader.GetString(1); if (productsReader.IsDBNull(2)) { product.Color = "N/A"; } else { product.Color = productsReader.GetString(2); } product.ListPrice = productsReader.GetDecimal(3); } //Return the product return product; }Tip This code is available in the file
 GetProduct.txt in the Microsoft Press\WCF Step By Step\Chapter 1 folder under your \My Documents folder.
This method uses a technique very similar to that of the ListProducts method to connect to the database and retrieve the details of the specified product. The important point to pick up from this method is that it returns a Product object–you defined this type by using a data contract in the previous exercise.
-
Add the CurrentStockLevel method to the ProductsServiceImpl class:
public int CurrentStockLevel(string productNumber) { Database dbAdventureWorks = DatabaseFactory.CreateDatabase("AdventureWorksConnection"); // Obtain the current stock level of the selected product // The stock level can be found by summing the quantity of the product // available in all bins in the ProductInventory table // The ProductID value has to be retrieved from the Product table string queryString = @"SELECT SUM(Quantity) FROM Production.ProductInventory WHERE ProductID = (SELECT ProductID FROM Production.Product WHERE ProductNumber = '" + productNumber + "')"; int stockLevel = (int)dbAdventureWorks.ExecuteScalar(CommandType.Text, queryString); //Return the current stock level return stockLevel; }Tip This code is available in the file
 CurrentStockLevel.txt in the Microsoft Press\WCF Step By Step\Chapter 1 folder under your \My Documents folder.
Products are stored in one or more numbered bins in the warehouse, and each bin is on a named shelf. This method sums the current volume of the specified product held in all the bins on all the shelves where it is stored.
-
Add the ChangeStockLevel method to the ProductsServiceImpl class:
public bool ChangeStockLevel(string productNumber, int newStockLevel, string shelf, in t bin) { Database dbAdventureWorks = DatabaseFactory.CreateDatabase("AdventureWorksConnection"); // Modify the current stock level of the selected product // The ProductID value has to be retrieved from the Product table string updateString = @"UPDATE Production.ProductInventory SET Quantity = Quantity + " + newStockLevel + "WHERE Shelf = '" + shelf + "'" + "AND Bin = " + bin + @"AND ProductID = (SELECT ProductID FROM Production.Product WHERE ProductNumber = '" + productNumber + "')"; int numRowsChanged = (int)dbAdventureWorks.ExecuteNonQuery(CommandType.Text, updateString); // If no rows were updated, return false to indicate that the input // parameters did not identify a valid product and location // Otherwise return true to indicate success return (numRowsChanged != 0); }Tip This code is available in the file
 ChangeStockLevel.txt in the Microsoft Press\WCF Step By Step\Chapter 1 folder under your \My Documents folder.
This method updates the quantity in stock for the specified product, in the specified bin, on the specified shelf. If this product is not actually located in this bin and shelf, the method returns false to indicate a possible user error (the user has probably just specified a wrong bin and shelf combination), otherwise it returns true.
Important If you are an experienced database developer, you will probably be about to e-mail me telling me that using string concatenation to build SQL queries is bad practice. This approach renders your service vulnerable to SQL Injection attacks. However, this is intentional, and you will address this issue in Chapter 6, “Maintaining Data Contracts and Service Contracts,” so for the time being, grit your teeth and bear with me.
On the other hand, if this is the sort of code that you usually write when accessing a database, and have never heard of a SQL Injection attack, then pay special attention when you reach Chapter 6.
-
Build the project, and correct any syntax errors if necessary.
Configuring, Deploying, and Testing the WCF Service
You must host a WCF service in an application in order to run it and make it accessible to clients. You have several options available for hosting a WCF service, including creating a custom host application, building a Windows service application, and using IIS. In the following exercises, you will configure the ProductsService WCF service as a Web service hosted by IIS. You will then verify that you have configured and deployed it correctly by performing a simple test with Internet Explorer.
| Note | As mentioned earlier, if you use the WCF Service Web site template for building a WCF service, then the service will automatically be deployed to IIS (or the Visual Studio Development Web Server, depending on the options that you select). The exercises in this section give you a feel for some of the tasks that Visual Studio 2005 performs when using this template, and how it varies from using the WCF Service Library template. |
IIS expects the assemblies containing the code for Web services and Web applications to be located in the bin folder of the Web site. Therefore, to configure a WCF service as a Web service that can be hosted by IIS, you must ensure that the project assemblies are built in the bin folder of the project rather than the bin\Debug or bin\Release folders. You must also add a service definition file. This is a file that specifies the name of the class that IIS will execute, and the name of the assembly holding this class. Finally, you must edit the ![]() Web.config file and add endpoint information for the Web service. IIS uses this information to specify binding information for the Web service indicating how a client should communicate with the service, and the contract that the Web service implements.
Web.config file and add endpoint information for the Web service. IIS uses this information to specify binding information for the Web service indicating how a client should communicate with the service, and the contract that the Web service implements.
Configure the WCF service
-
On the Project menu, click ProductsService properties to display the Property pages for the project.
-
Click the Build tab. In the Output section of the page, change the Output path property to bin.
-
On the File menu, click Save All.
-
On the Project menu, click Add New Item.
-
In the Add New Item dialog box, select the Text File template. Change the name of the file to
 ProductsService.svc, and then click Add. This is the service definition file for the Web service.
Important The service definition file must have the same name as the Web service, and have the .svc suffix.
-
Add the following code to the
 ProductsService.svc file displayed in the code view window:
<%@ServiceHost Service="Products.ProductsServiceImpl" %> <%@Assembly Name="ProductsService" %>
The Service attribute of the ServiceHost directive specifies the namespace (Products) and the class (ProductsServiceImpl) that implements the service. The Assembly directive specifies the name of the assembly (ProductsService) containing this namespace and class.
-
Edit the
 Web.config file for the project. Currently, this file just contains a <Configuration> section containing the information generated by the Enterprise Library Configuration tool for connecting to the database. Edit the file, and add the following sections shown in bold:
<?xml version="1.0" encoding="utf-8" ?> <configuration> <configSections> <section name="dataConfiguration" type="Microsoft.Practices.EnterpriseLibrary. Data.Configuration.DatabaseSettings, Microsoft.Practices.EnterpriseLibrary.Data, Versi on=2.0.0.0, Culture=neutral, PublicKeyToken=null" /> </configSections> <dataConfiguration defaultDatabase="AdventureWorksConnection" /> <connectionStrings> <add name="AdventureWorksConnection" connectionString="Database= AdventureWorks;Server=(local)\SQLEXPRESS;Integrated Security=SSPI;" providerName="System.Data.SqlClient" /> </connectionStrings> <system.serviceModel> <services> <service name="Products.ProductsServiceImpl"> <endpoint address="" binding="basicHttpBinding" contract="Products.IProductsService" /> </service> </services> </system.serviceModel> </configuration>
The <serviceModel> section of the
 Web.config file contains the configuration information for a WCF Web service. The <services> section contains the details for each service implemented. The name attribute of the <service> element specifies the namespace and class that implement the service..
The <endpoint> element provides the details of the service that client applications require in order to communicate with the service. An endpoint comprises three pieces of information: an address, a binding, and a contract. The address is the location that the application hosting the service uses to advertise the service. In the case of IIS, the address element actually is ignored as IIS will use a URL containing the name of the virtual directory holding the service and the name of the .svc file as the endpoint (in this case, http://localhost/ProductsService/ProductsService.svc). The binding element specifies items such as the transport mechanism used to access the Web service, and the protocol to use, amongst other items. You can specify one of a number of standard bindings built into WCF that implement pre-configured binding information. In this case, the service uses the basicHttpBinding binding, which is compatible with many existing Web service client applications built using technologies other than WCF. You will learn much more about bindings as you progress through this book. Finally, the contract element indicates the contract that the service implements.
-
Build the solution.
You can now deploy the service to IIS by creating a virtual folder. You must also ensure that the account used to run the code for the Web service, the local ASPNET account on your computer by default, has sufficient rights to access the contents of this folder.
| Note | Windows Vista and Windows XP use different versions of IIS, with different user interfaces. There are two versions of the next exercise. Please follow the instructions appropriate to your operating system. |
Deploy the WCF service to IIS (Windows Vista only)
-
In the Windows Control Panel, click System and Maintenance, click Administrative Tools, and then double-click Internet Information Services (IIS) Manager.
The Internet Information Services (IIS) Manager starts.
-
In the Internet Information Services (IIS) Manager, expand the node corresponding to your computer in the tree-view, and then expand Web sites.
-
Right-click Default Web Site, and then click Add Application.
The Add Application dialog box appears.
-
In the Add Application dialog box, in the Alias text box type ProductsService.
-
Click the browse button (with the ellipses “…”) adjacent to the Physical path text box. In the Browse for Folder dialog box, select the folder Microsoft Press\WCF Step By Step\Chapter 1\ProductsService\ProductsService under your \My Documents folder, click then click OK.
-
In the Add Application dialog box, click OK.
The ProductsService Web application should appear under the Default Web site node in the Internet Information Services (IIS) Manager.
-
Close the Internet Information Services (IIS) Manager.
Deploy the WCF service to IIS (Windows XP only)
-
On the Windows Start menu, click Run.
-
In the Run dialog box, type inetmgr, and then click OK.
The Internet Information Services console starts.
-
In the Internet Information Services console, expand the node corresponding to your computer in the tree-view, and then expand Web sites.
-
Right-click Default Web Site, point to New, and then click Virtual Directory.
The Virtual Directory Creation Wizard starts.
-
In the Welcome to the Virtual Directory Creation Wizard page, click Next.
-
In the Virtual Directory Alias page, type ProductsService, and then click Next.
-
In the Web Site Content Directory page, click Browse, select the folder Microsoft Press\WCF Step By Step\Chapter 1\ProductsService\ProductsService under your \My Documents folder, click OK, and then click Next.
-
In the Access Permissions page, accept the default values, and then click Next.
-
In the You have successfully completed the Virtual Directory Creation Wizard page, click Finish.
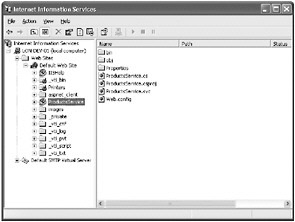
The ProductsService virtual directory should appear under the Default Web site node in the Internet Information Services console:
-
Close the Internet Information Services console.
You can now verify that you have correctly configured and deployed the service. The simplest way to check this is to use Internet Explorer to browse to the Web service.
Test the WCF service deployment
-
On the Windows Start menu, click Internet Explorer.
-
In the Address bar, type the address http://localhost/ProductsService/ProductsService.svc, and then click Go.
You should see a page like this:
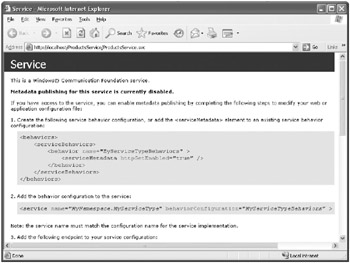
Client applications require access to the metadata of a service so that they can determine the operations the service implements. For security reasons, WCF disables metadata publishing from services. You can obtain metadata information directly from the assembly holding the service contract, but this approach might not always be convenient. For example, if you are building a client application running on a computer that is different from that hosting the service, you might not have access to the service contract assembly. In the following steps, you will enable metadata publishing for the service. This will enable developers to obtain the metadata for the service by querying the service.
-
Return to Visual Studio 2005, and edit the
 Web.config file for the ProductsService project. Make the changes shown in bold to the <system.serviceModel> section this file, and then save your changes:
<system.serviceModel> <services> <service name="Products.ProductsServiceImpl" behaviorConfiguration="ProductsBehavior"> <endpoint address="" binding="basicHttpBinding" contract="Products.IProductsService" /> </service> </services> <behaviors> <serviceBehaviors> <behavior name="ProductsBehavior"> <serviceMetadata httpGetEnabled="true" /> </behavior> </serviceBehaviors> </behaviors> </system.serviceModel>
These changes add a behavior called ProductsBehavior to the service. A service behavior extends the functionality of a service (you will learn a lot more about behaviors throughout this book). The definition of the ProductsBehavior behavior enables metadata publishing by setting the httpGetEnabled attribute of the <serviceMetadata> element to true.
-
Return to Internet Explorer and click Go again. The service will now display a different page:
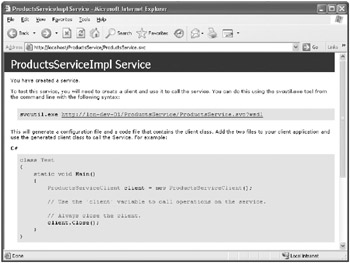
This page describes how you can obtain the metadata describing the service and use this information to help build a client application.
-
In the address bar, change the address to http://localhost/ProductsService/ProductsService.svc?wsdl, and then click Go:
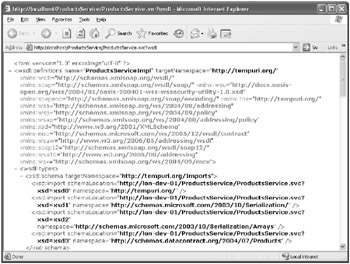
The service displays a page containing the metadata description of the service. You can see that this is XML. Visual Studio 2005 can query the service and use this information to generate a proxy class when building a WCF client application.
-
Close Internet Explorer.
EAN: 2147483647
Pages: 105