5.2. Shared Workspaces SharePoint Services supports shared workspaces, which allow users to work collaboratively on documents. SharePoint supports two types of shared workspaces:
- Document workspaces
-
A document workspace site focuses on one or more documents that users can work on collaboratively.
- Meeting workspaces
-
Meeting workspace sites are used to store all the information and material needed for meetings.
5.2.1. Using Shared Workspaces in Microsoft Office When you open a shared workspace document in Microsoft Office 2003, the SharePoint Services shared workspace menu is displayed in the Office task pane alongside the document. Integrating the SharePoint shared workspaces menu provides access to all of the SharePoint Services associated with the site where the document is stored without leaving the Office environment. Figure 5-3 shows a typical Word file opened from a shared workspace. The shared workspace menu (on the righthand side) provides collaboration options made possible by SharePoint Services and shows the online status of all team members. Figure 5-3. Shared workspace 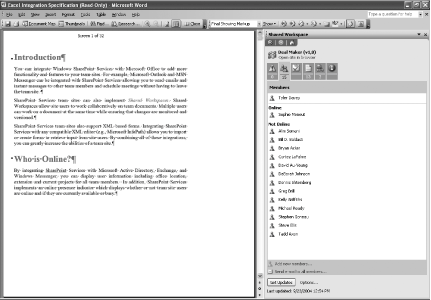
Other icons provide access to additional features supported by the site, such as a task list or alerts. The shared workspace menu implements the following SharePoint Web Parts:
- Status
-
The status Web Part displays any changes in the status of the document.
- Document library
-
The document library gives a user access to any documents in the shared library.
- Links list
-
The links list displays any hyperlinks that are available to site users.
- Task list
-
The task list displays tasks that are assigned to users on the team site. Figure 5-4 shows two tasks linked to a particular document.
- Members
-
The members Web Part displays a list of all the site members. The members Web Part shows whether or not a user is currently online and allows you to send instant messages and emails to any site member.
- Document information
-
The document information Web Part lists all the document information, including which user created the document, which user last modified the document, and a link to all previous versions of the document.
Figure 5-4. Task list in Microsoft Word 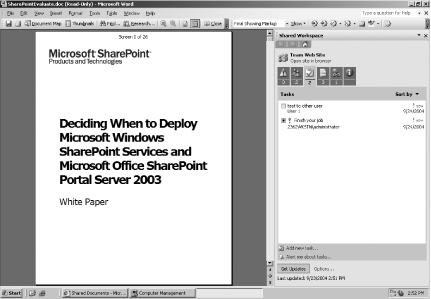
5.2.2. Configuring Shared Workspace Options By implementing shared workspaces, you allow more than one user to work on a document at the same time. Therefore, you must configure how a document handles any updates made by users. You can configure the shared workspace to: Automatically update the document or workspace Always ask a user before performing updates Never update the document or workspace when the document is open
You can set the service options by clicking the Options... link at the bottom of the SharePoint shared workspaces menu. Clicking the Options... link launches the Service Options dialog box. The Service Options dialog box is shown in Figure 5-5. To change the settings of the shared workspace: Select Shared Workspace from the Category list. Edit the properties in the dialog box.
Figure 5-5. Service Options dialog box 
For example, you could set up a shared workspace for a business analyst writing a project specification document. By adding the specification document to a shared workspace, other employees working on the project can read the document, record comments, and make changes. The business analyst can then accept or delete any changes and republish the document to the appropriate people. 5.2.3. Document Workspaces A document workspace site focuses on one or more documents that users can work on collaboratively. Document workspaces support all the features of a basic SharePoint Services team site with the additional functionality of shared workspaces. The home page of your document workspace site automatically displays the members Web Part. The members Web Part lists all the users who have the proper permissions to use the site. The members Web Part also contains all the user information for site users, including their online status. You can use the information to send a user an email, book a meeting, or send instant messages to other online team members. Figure 5-6 shows the functionality that the member Web Part offers team members. Figure 5-6. Features of the members Web Part 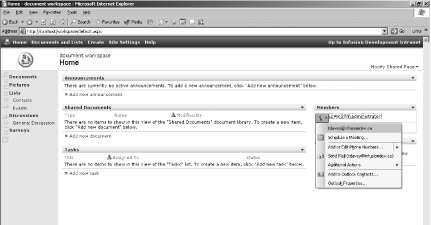
In addition to the members Web Part, you can also configure additional Web Parts relevant to your document space. For example, you can add an announcements list Web Part or a tasks list Web Part so that team members know what needs to be done on any set of documents. 5.2.3.1 Creating an empty document workspace Figure 5-7 shows the New SharePoint Site page, which is used to create new SharePoint sites (in this case, a document workspace site). To create an empty document workspace site: Click Create in the top menu bar. Click Sites and Workspaces. Type a title for your new site in the Title text field. Type a brief description of your new site in the Description text area. Enter the URL you want for your document workspace in the URL name field. Select the permissions for your new site by selecting the "Use same permissions as parent site" or "Use unique permissions" radio button. Click Create. In the Template Selection page, select Document Workspace from the Template list box. Click OK.
Figure 5-7. New SharePoint Site page 
5.2.3.2 Creating a document workspace for existing documents To create a document workspace for existing documents: Click Document and Lists in the top menu bar. Select the document library that contains the document. Select the document, and click the Edit arrow. Click Create Document Workspace.
5.2.3.3 Publishing a document from the document workspace to a document library If your document is stored in a document library on the team site, you must publish the document back to the original document library once any changes are made in the document workspace. To publish back to the document library: Navigate to the document workspace in a web browser. Click Documents and Lists in your site's top menu bar. Click Document Workspace on the side menu. Click on your desired document workspace. Select the document and click the Edit arrow. Click Publish to Source Location from the menu that appears.
5.2.4. Meeting Workspaces Meeting workspace sites are used to store all the information and material needed for meetings. You can publish meeting agendas that are sent to all attendees as well as the documents that will be discussed in the meeting. The workspace also allows you to edit documents and to track tasks during and after the meeting. Figure 5-8 shows a standard meeting workspace. Figure 5-8. Meeting workspace 
5.2.4.1 Types of meeting workspaces Meeting workspaces can be created when you add an event to an existing event list, or through the Create page in SharePoint. When creating a meeting workspace, SharePoint Services includes five templates from which you can choose:
- Basic meeting workspace
-
The basic meeting workspace template contains all the basic functionality needed to organize and track meetings. The template contains the objective, attendees, and agenda lists Web Parts.
- Blank meeting workspace
-
The blank meeting workspace template allows you to create a fully customized meeting workspace.
- Decision meeting workspace
-
The decision meeting workspace template allows you to review documents and record decisions. The template includes all the lists in the basic meeting template, as well as the document library and tasks and decisions lists.
- Social meeting workspace
-
The social meeting template is used to plan social events. The template includes a picture library and a discussion board for meeting attendees to post logos and comments. The template also contains the attendees, directions, things to bring, and discussions lists.
- Multipage meeting workspace
-
The multipage meeting workspace template includes all the functionality of the basic meeting workspace template, but also provides two blank pages to allow you to customize your template.
5.2.4.2 Creating a meeting workspace through an event If your existing team site has an existing events list, you can create a meeting workspace site when you add an event: Select the event list on your team site. Click "Add new event." Enter the required information for the event. Select the "Use a Meeting Workspace to organize attendees, agendas, documents, minutes and other details for this event" checkbox. Click Save and Close. The "New or Existing Meeting Workspace" page opens (see Figure 5-9). Select the "Create a new Meeting Workspace" radio button. Fill in the title, description, and web site address and set the permissions. Choose a meeting workspace template from the Template list box. Click OK.
Figure 5-9. New or Existing Meeting Workspace page 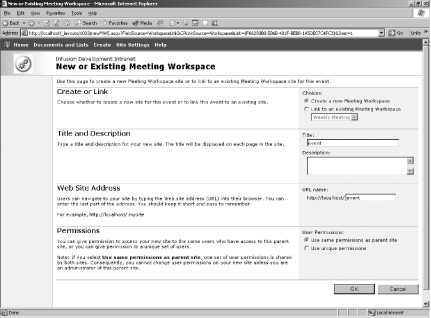
5.2.4.3 Creating a meeting workspace through the Create page To create a meeting workspace through the Create page without adding an event: Click Create in the top menu bar. Click Sites and Workspaces. Enter a title, description, and web site address and set the permissions. Click Create. Choose the meeting workspace template you want from the Template list box. Click OK.
5.2.4.4 Meeting workspace Web Parts Meeting workspaces incorporate the following Web Parts:
- Objectives list
-
The objective list details the overall purpose of your meeting. Adding an objective list to your meeting workspace lets attendees know what to expect in the meeting and helps all attendees come prepared.
- Agenda list
-
The agenda list outlines the subjects that will be covered in your meeting, as well as who is responsible for leading the discussions.
- Things to bring list
-
The things to bring list helps ensure all meeting attendees come to the meeting with the required documents and supplies.
- Decisions list
-
The decisions list allows users to track any decisions made in your meeting. This feature helps track the progress of any decisions made in your meeting, and to outline the important points of the meeting for users who were unable to attend the meeting.
- Attendees list
-
The attendees list displays all users who are invited to a meeting. You can also add attendees to the list. If Windows or MSN Messenger is installed, you can implement messaging for all users on the attendees list to invite them to the meeting workspace. Anyone invited to attend the meeting is listed in the attendees list. The attendees list also tracks comments and responses for all meeting attendees. For example, you can reply to a meeting invitation, but note that you will be fifteen minutes late due to a scheduling conflict.
5.2.4.5 Managing the attendees list The attendees list should be set up for each new meeting workspace. Figure 5-10 shows the Attendees: New Item page, which is used to add attendees to your meetings. To add an attendee to the attendees list: Navigate to the meeting workspace. Click Documents and Lists in the top menu bar. Click on Meeting Workspace on the side menu. Click on your desired meeting workspace. Click Manage Attendees. Click Add Attendee. If the Address Book feature is available, click on the Address Book button and select the user you want to add to the list. If the Address Book is not available, type in the email address or the username of the person you want to add to the list.
Figure 5-10. Attendees: New Item page 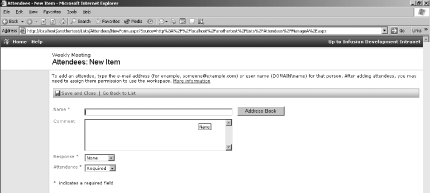
5.2.4.6 Editing an existing attendee To edit an existing attendee: Navigate to the meeting workspace. Click Documents and Lists in the top menu bar. Click Meeting Workspace on the side menu. Click on your desired meeting workspace. Click Manage Attendees. Click the Edit icon for the attendee you want to edit. Edit the existing material by changing the name, comment, response, or attendance fields. Click Save and Close.
5.2.4.7 Deleting an existing attendee To delete an existing attendee: Navigate to the meeting workspace. Click Documents and Lists in the top menu bar. Click Meeting Workspace on the side menu. Click on your desired meeting workspace. Click Manage Attendees. Select the attendee you want to delete from the attendees list and click the arrow that appears. Select "Delete this item" from the menu. Click OK in the Confirm Delete dialog box.
|