Getting Started with Replication
There are several ways to implement and monitor replication. There are many options, and each replication project’s configuration will depend on the type of replication and the options you choose. Replication is composed of the following stages:
-
Configure a replication topology
-
Create a publication
-
Apply the initial snapshot
-
Create a push or pull subscription
-
Modify or transform the replicated data (if necessary)
-
Synchronize and propagate the data and schedule automatic synchronization
Rather than describing each and every step in dry, excruciating steps, let’s get right down to configuring replication. We will first pull from an already-established publication partner; in the examples shown here, SQL Server 2005 subscribed to a publication on a SQL Server 2000 database. As mentioned in Chapter 4, replication can be configured interactively using SQL Server Management Studio, or with T-SQL scripts. Let’s first configure replication with Management Studio before we talk about scripting.
Subscribing to a Publication
To subscribe to a publication (assuming a publication has been created), you need to take the following steps:
-
Open Management Studio and start the New Subscription Wizard. The fastest route to this Wizard is to drill down to the server that is going to become a subscriber and expose the Replication folder. Expand the folder to expose two subfolders, Local Publications, and Local Subscriptions. Right-click the Local Subscriptions folder and select New Subscriptions. Click Next to proceed.
-
The Publication step in the wizard now appears. You can select a Publisher, a SQL Server instance somewhere, from the combo-box, and then select the publication offered by the server. Select the publication, as illustrated in Figure 8–1, and click Next.
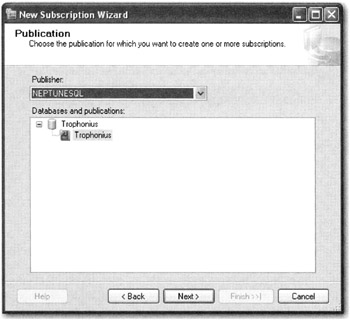
Figure 8–1: Selecting the publication -
Your next choice is to select the distribution agent for your subscription. A distribution agent can be installed at the Publisher’s host, or it can be any other machine running SQL Server. The default option, as shown in Figure 8–2, is to run the agent at the Publisher.
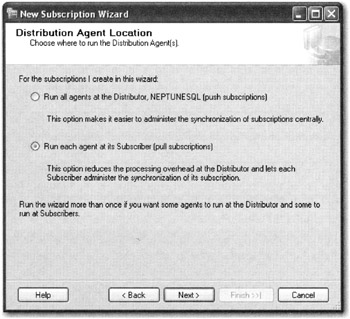
Figure 8–2: Running the agent -
Next you get to choose any server on your network to receive the subscription; you are not restricted to the local host you may be at. As you can see from Figure 8–3, you can check any number of qualified servers. Choose a Subscription database from the Subscription Database column and click Next.
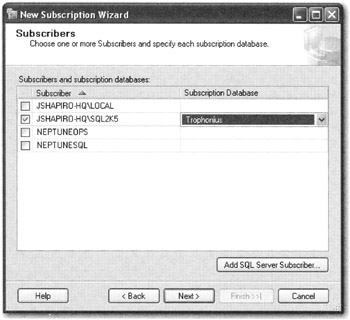
Figure 8–3: Choosing the subscription database -
The next chore is to configure Replication Security. As shown in Figure 8–4 you can elect to choose default accounts or specific accounts (see Chapter 5). Click Next.
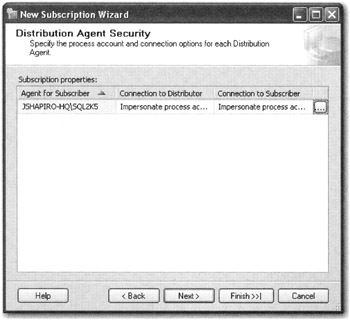
Figure 8–4: Configuring replication security -
The Schedule step in the wizard now appears, as shown in Figure 8–5. Click the Agent Schedule drop-down to choose the replication schedule. You can choose to run the agent continuously or at certain times of the day that fit in with production schedules and maintenance windows. Click Next.
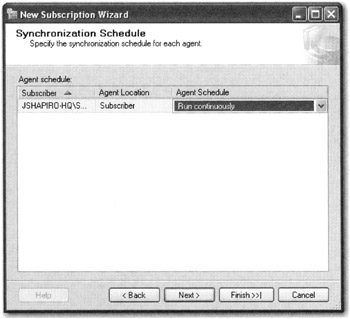
Figure 8–5: Configuring the schedule -
The next step, shown in Figure 8–6, allows you to determine when you want to initialize the subscription. At first synchronization of the data is the usual choice, but you may have other plans, and delaying the initialization after the first synchronization is an option. Choose your option and click Next.
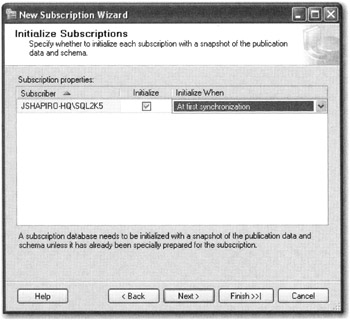
Figure 8–6: Initializing the subscription -
The next step in the wizard prompts you to choose what runs after you click Finish. You have the option of delaying the creation of the subscription, and you can also generate a script. The two options are shown in the Figure 8–7. I mentioned at the beginning of this procedure that you can also run T-SQL against SQL Server to set up a replication plan. There was a reason that I said we should wait and configure the replication options first using Management Studio. Now you see can see why. The wizard lets you generate a script of everything we have configured interactively so far. This is a very useful option because you will see after you generate the script that it not something even the most experienced T-SQL programmer would want to do in code alone. The script is not exactly a piece of cake.
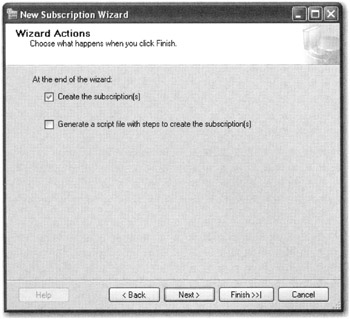
Figure 8–7: Determining when to the create the subscription
After you click Finish in the wizard, if you chose to create the subscription immediately, SQL Server will begin building the subscription. This process is shown in Figure 8–8. You can click on the Status column at any time to see a more detailed progress dialog.
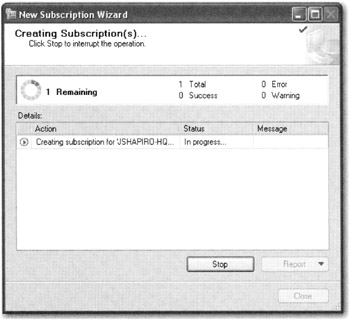
Figure 8–8: Building the subscription
Configuring a Publisher
To configure a Publisher, you need to take the following steps:
-
Open Management Studio and start the New Publication Wizard. The fastest route to this Wizard is to drill down to the server that is going to become a Publisher and expose the Replication folder. Expand the folder to expose two subfolders, Local Publications and Local Subscriptions. Right-click the Local Publication folder and select New Publication. Click Next to proceed.
-
The Distributor step, as illustrated in Figure 8–9, loads. Notice here that the server you are setting up is configured as its own Distributor by default. Also notice, however, that you can select another server as a Distributor, but it must already be configured as such for selection here. We want to keep things this way using the default, so click Next.
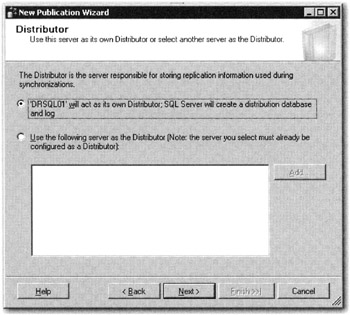
Figure 8–9: Distributor setup options -
The Specify Snapshot Folder dialog box, as illustrated in Figure 8–10, loads. Here again, accept the default and move on. You will then notice a warning about the share name used for the replication folder. By default, it is made accessible only to logins with local administrative rights. Let’s not worry about that now, but remember that you may need to change this for remote services like pull agents at another time. Click OK to close the share warning, and then click Next.
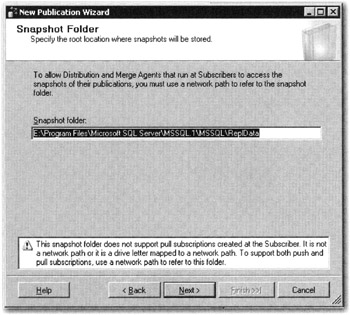
Figure 8–10: Snapshot folder -
Accept the defaults chosen by the wizard, or you can go in and “tweak” the settings. Later, you can work with advanced settings and go over some of this stuff in more detail. Click Next and then click Finish.
Creating a Publication
Using transactional replication, you will now be able to set up replication that lets changes made at the Publisher we have just configured flow to Subscribers. But before that can happen, you first need to create a publication on the publisher. The publication allows our Subscribers to update their data from the Publisher in almost real time. Transactions will be set to replicate as soon as they commit in the publication, or they can be propagated to the subscribers at regular intervals. In other words, the publication will be configured to allow the subscribers to update either via Immediate Updates or Queued Updates.
To do this, we need to perform a series of steps using the Create Publication Wizard as follows:
-
Connect to your server as described earlier and expose the Replication folder. Right-click the Publications folder and select New Publication. Notice that SQL Server takes you direct to the database list because the server has already been configured for publications. The Publication Database loads. Select the database for the publication, as shown in Figure 8–11, and then click Next.
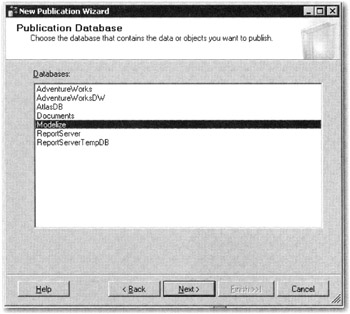
Figure 8–11: Choosing the Publication folder -
The Select Publication Type dialog box, as illustrated in Figure 8–12, loads. In that we are looking to replication transaction from one OLTP database to another, choose Transactional publication and then click Next.
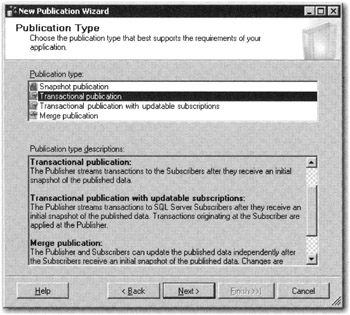
Figure 8–12: Choosing Publication type -
The Articles dialog box, as illustrated in Figure 8–13, loads. In the tree check all the objects that you want to replicate. As illustrated, you can choose tables, stored procedures, and user-defined functions. (Any tables that do not contain primary keys are ignored for publication.) Click Next.
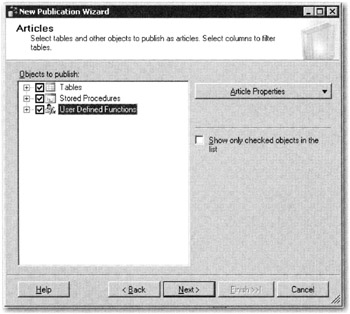
Figure 8–13: Choosing the Articles -
The Articles Issues now loads and lets you take note of any replication issues that you need to deal with. Click Next to go directly to the Filter Table Rows step. The step shown in Figure 8–14 appears. Add filters as needed. These are simply T-SQL statements you can apply to the data transfer process as shown in Figure 8–15.
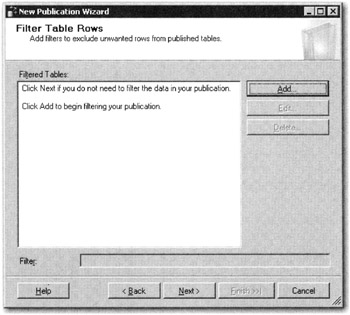
Figure 8–14: Filtering Table Rows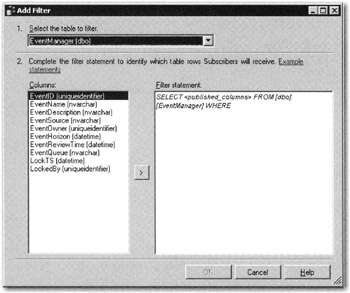
Figure 8–15: Application of Filters -
The remaining steps are identical to ones in the subscription process we discussed earlier (see Figures 8–5 to 8–7). First the Schedule step in the wizard appears. You can choose to run the agent continuously or at certain times of the day that fit in with production schedules and maintenance windows. Click Next.
-
The next step lets you configure Replication Security. You can elect to choose default accounts, or specific accounts. Click Next.
-
The final step in the wizard prompts you to choose what runs after you click Finish. You have the option of delaying the creation of the publication, and as before, you can also generate a script.
That’s pretty much all it takes to set up and configure a basic transactional replication scenario. Before you go off and replicate the world, consider the following advice on replication planning and deployment.
EAN: 2147483647
Pages: 239