Using Buffers: A Paint Program
| [ LiB ] |
We have now learned a lot about buffers. Let's put all of our knowledge together and write a full program. The program that will be demonstrated is a paint program. It allows the player to draw content in the main part of the screen, and the picture can be saved. This program is on the CDdemo06-08.bb. I recommend that you have this program open on your computer while reading this section, because it will be much easier to understand if you have the full source directly in front of you.
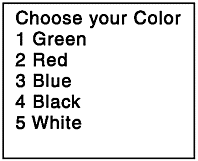
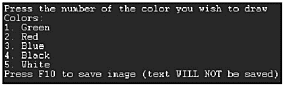
Let's brainstorm for a bit on what we will need in this program. In this case, let's think about how we will accomplish our goalto create a program that allows the user to draw. First off, for this program, I gave the user the option to draw in five colors: green, red, blue, black, and white. The user can change the selected color by pressing each color's corresponding number. The color choice menu will look something like Figure 6.19.
Figure 6.19. A prospective color menu.
NOTE
Why Do We Draw Outlines?
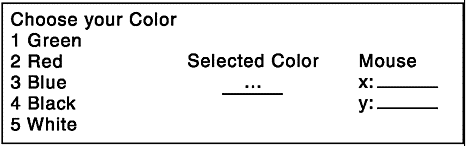
You have probably noticed that the last figure was a drawing instead of a screenshot. I am trying to simulate the actual creation process of a program or game. Before writing the first line of code, you should know exactly what you are writing. A good way to do this is do draw an outline of your program. Pictures are best, but words are good also. Try to illustrate what will happen when the user performs an action. Also, show what the characters or images in the game will look like.
We will definitely need to add some text that tells the user what he chose as his selected color. Also, just for kicks, we will add a position indicator that informs the user where the mouse is located.
NOTE
Mouse? What the heck is that? The mouse (most likely) is the thing in your right hand that you are using to pinpoint objects on the screen. For this program, I was forced to use a mouse to make it user-friendly. Since we do not know how to use the mouse in programs, don't worry about it.You will be educated on using input via the mouse in a later chapter.
Let's put the position and selection indicator next to the color choice menu. This will be our HUD, which stands for heads-up-display. The outline for the full HUD can be seen in Figure 6.20.
Figure 6.20. A full HUD outline.
NOTE
What Is a HUD?
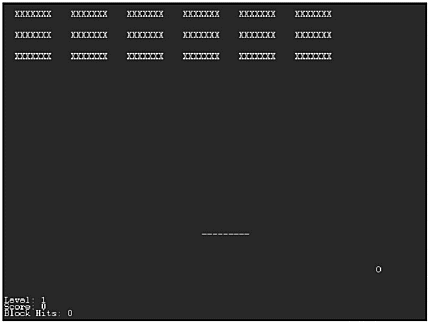
A HUD, otherwise known as a heads-up-display (a phrase taken from the cockpits of fighter jets ), is the control panel for most programs. The word "HUD" is usually used in the context of video games , but it can be carried over to other programs, such as this one. An example of a HUD would be the lower-left corner of Figure 6.21, which displays the user's statistics. In essence, the HUD is the section of the screen that is devoted to information, rather than gameplay.
The HUD within a game.
Well, because the top part is being taken up by the HUD, let's have the rest of the window taken up by the painting. Now we need to get into actually writing the program.
Initialization
As always, we begin with a properly marked initialization section. The initialization section begins with the Graphics call.
;Set up Windowed Graphics Mode Graphics 640,480,0,2
You might have forgotten what all four parameters mean. The first two refer to the width and height of the program, respectively; the third parameter deals with the number of colors in the program; and the fourth parameter selects the mode. In this program, the window is created with a 640x480 resolution, a default number of colors, and is set up as windowed mode (2 means windowed mode).
After the Graphics call, set up the back buffer. Next, we define the constants: ;Backbuffer SetBuffer BackBuffer() ;Constant the keyboard keys Const ESCKEY = 1, ONEKEY = 2,TWOKEY = 3, THREEKEY = 4, FOURKEY = 5, FIVEKEY = 6, F10KEY = 68 ;Tweak these numbers Const BUFFERHEIGHT = 480, BUFFERWIDTH = 640
You can change the height and width of the buffer if you'd like. Tweaking these values will change the amount of space you have to draw on. (Note: the drawing space cannot be more than 640x480.)
Next, we must load all the images that will be in our program. In this case, I chose that the user could choose between five colors: green, red, blue, black, and white. Thus, we will need to load five images of those colors. When the user decides to draw one of the colors, he will in actuality be drawing an image of the color on the screen.
;Global Images Global greenimage = LoadImage("greencolor.bmp") Global redimage = LoadImage("redcolor.bmp") Global blueimage = LoadImage("bluecolor.bmp") Global blackimage = LoadImage("blackcolor.bmp") Global whiteimage = LoadImage("whitecolor.bmp") Figure 6.22 shows how big each color image is (8 pixels by 8 pixels).
Figure 6.22. A single color image.
![]()
We also need to load the mouse cursor image. This image will show the user where his mouse is located (as opposed to the mouse x and y indicator, which tells the user where the mouse is).
Global mouseimage = LoadImage("mousearrow.bmp") The final image is the most important. This image is the canvas on which the actual drawing takes placeI call it a picture buffer. The picture buffer is not loaded; instead, it is created. It is produced in this call:
; Create a blank image that will be used to draw on Global picturebuffer = CreateImage(BUFFERWIDTH,BUFFERHEIGHT)
Now that the picture buffer is loaded, all we need is a call to ImageBuffer with picture- buffer as a parameter so the screen can be drawn to. This call will occur in a later function.
We now move to the variables section of our code. There is only one defined variable: selectedcolor .
This line of code automatically makes green the default color.
;Automatically select green as the color Global selectedcolor = 1
The five color choices are
-
Green
-
Red
-
Blue
-
Black
-
White
The final section of the initialization part of the code is a section called Masks. If you remember, a mask allows the program to change the color that is made transparent on the images. In this program, there are two masks.
MaskImage mouseimage,255,255,255 ;Mask the white around icon MaskImage blackimage,255,255,255 ;change mask so black is visible
The first mask is in the mouse image. The background of the mouse image is white, so we need to mask it to get rid of the white block that normally would exist behind the cursor. See Figure 6.23; it shows the mouse cursor and the mask. The second mask is a little bit different. Since the black image is pure black, and the default mask color is black, I changed the mask so none of it would be deemed invisible. If I had left this off, drawing with black would have made no difference.
Figure 6.23. The masked mouse cursor.

Well, that's the end of the initialization section. Next, we are in the main loop.
Main Loop
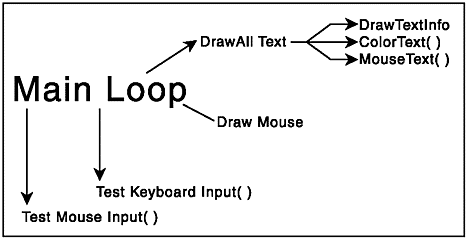
Usually I try to make the main loop as short as possible, and this program is no exception. The main loop only makes a few calls to other functions. It also draws the picture buffer on the screen. See Figure 6.24 for an outline.
Figure 6.24. The main loop.
;MAIN LOOP While Not KeyDown(ESCKEY) ;Clears the screen Cls ;Draws everything text related DrawAllText() ;Draws the mouse cursor DrawMouse() ;Test what keyboard buttons were pressed TestKeyboardInput() ;Test to see if user pressed any mouse buttons TestMouseInput() ;draw the picture DrawImage picturebuffer,0,100 ;flip the buffers Flip Wend ;END MAIN LOOP
As you can see, almost nothing is done by the main loop itself; rather, the radiating functions do the work. Table 6.9 details all of the functions and what they do.
Table 6.9. Demo06-08.bb's Function List
| Function | Description |
|---|---|
| DrawAllText() | This function calls all of the functions that relate to the text panel. This is the same as drawing the HUD. |
| DrawMouse() | This function draws the mouse cursor wherever the user positions the mouse. |
| TestKeyboardInput() | This function tests all of the keyboard input. It is usually used when the user wants to take a screenshot or change the selected color. |
| TestMouseInput() | This function tests where the user moves the mouse and if he presses the left mouse button (in order to draw). |
Along with the function list, this main loop also includes some of the intrinsic calls to most video game programs. Cls clears the screen, and Flip flips the front and back buffers. The program also draws the picture buffer on the screen:
;draw the picture DrawImage picturebuffer,0,100
The picture is drawn at (0,100) so that it doesn't mess with the HUD.
Well, that is the end of the main loop! The final part of the program is the function list.
Functions
Functions, functions, functions. There are a lot of them.
The first called function is named DrawAllText() . This function calls the other functions that draw the HUD. DrawAllText() is defined as this:
;;;;;;;;;;;;;;;;;; ;Function DrawAllText() ;Calls functions that draw HUD of program ;No Parameters ;;;;;;;;;;;;;;;;;; Function DrawAllText() ;Draws the color choices DrawTextInfo() ;Draws the selected color ColorText() ;Draws the location of the text MouseText() End Function
Of course, this doesn't make any sense without seeing DrawTextInfo() , ColorText() , and MouseText() . DrawTextInfo() looks like this:
;;;;;;;;;;;;;;;;;; ;Function DrawTextInfo() ;Displays the user's color choices ;No Parameters ;;;;;;;;;;;;;;;;;; Function DrawTextInfo() Locate 0,0 ;Put cursor at top left of screen ;Display color choice Print "Press the number of the color you wish to draw" Print "Colors:" Print "1. Green" Print "2. Red" Print "3. Blue" Print "4. Black" Print "5. White" Print "Press F10 to save image (text WILL NOT be saved)" End Function ColorText() is defined like this: ;;;;;;;;;;;;;;;;;; ;Function ColorText() ;Chooses the selected color and writes it on the scren ;No Parameters ;;;;;;;;;;;;;;;;;; Function ColorText() ;Assign the name of the color to selectedcolortext$ Select (selectedcolor) Case 1 selectedcolortext$ = "Green" Case 2 selectedcolortext$ = "Red" Case 3 selectedcolortext$ = "Blue" Case 4 selectedcolortext$ = "Black" Case 5 selectedcolortext$ = "White" End Select ;Write out the selected color Text 240, 20, "Selected Color: " + selectedcolortext$ End Function And last, MouseText() looks like this: ;;;;;;;;;;;;;;;;;; ;Function MouseText() ;Writes the mouses location on the screen ;No Parameters ;;;;;;;;;;;;;;;;;; Function MouseText() mousextext$ = "Mouse X: " + MouseX() mouseytext$ = "Mouse Y: " + MouseY() Text 540,20,mousextext$ Text 540,40,mouseytext$ End Function
These functions look long, right? Actually, they ain't too difficult. Let's get into each one.
First off, we have DrawTextInfo() . This function tells the user what his color choices are. It also explains how to save the picture. Figure 6.25 is the output of the DrawTextInfo() function.
Figure 6.25. Output of DrawTextInfo() .
NOTE
Compare Figure 6.25 with Figure 6.19, the outline that we made earlier. Notice that both are very similar, but there are a few minor changes from 6.19 to 6.25. This is important: although an outline should always be drawn, it is rarely definite. You can always change it a little, but try to keep the infrastructure intact.
If you forgot , the function Locate changes the position of the cursor for Print commands. This allows the Print command to reside only at 0,0 instead of scrolling down.
The next function is ColorText() . This function draws out the selected color on the screen. As you know, the user changes the selected color by pressing 1, 2, 3, 4, or 5. Since we want to write out what color the user has picked, instead of just a number, we use a switch statement. This statement assigns a variable, selectedcolortext$ , to the selected color based on what the selection number is. After the select statement, the chosen color is drawn on the screen.
The final function is MouseText() . You don't know anything about mice yet, so in essence, this function finds what the x and y values of the mouse are and writes them to the screen. Figure 6.26 shows the entire HUD. Compare it with Figure 6.22 and see how it has changed.
Figure 6.26. The complete HUD.

NOTE
You might have noticed that I skipped a function, DrawMouse() .I decided not to include an explana tion for it because we haven't learned mouse input yet. However, it is pretty simple to understand, so if you want to read it, just boot up the CD and run demo06-08.bb.
Alright, one function down and just a few more to go. The next function we will look at is TestKeyboardInput() . This function reads in whatever the user presses and makes it react accordingly .
Our program has only a few input possibilities: a color change or a screenshot. There are five color changes, so we need to test for those.
;;;;;;;;;;;;;;;;;; ;Function TestKeyboardInput() ;Tests if the keyboard wants to change the selected color or take a screenshot ;No Parameters ;;;;;;;;;;;;;;;;;; Function TestKeyboardInput() ;If user presses a number, select the corresponding color If KeyDown(ONEKEY) selectedcolor = 1 ElseIf KeyDown(TWOKEY) selectedcolor = 2 ElseIf KeyDown(THREEKEY) selectedcolor = 3 ElseIf KeyDown(FOURKEY) selectedcolor = 4 ElseIf KeyDown(FIVEKEY) selectedcolor = 5 EndIf ;If user presses F10, take a screenshot If KeyDown(F10KEY) ;Save the picture buffer as screenshot.bmp SaveBuffer ImageBuffer(picturebuffer), "screenshot.bmp" EndIf End Function
NOTE
If you try to name ONEKEY "1key," the program will not work. Why is that? When defining variables, you must begin the name with a character or an underscore " _ ".You cannot begin with a number or a symbol (#,$, and so on).
This block of code tests each of the color selection keys to see if they were hit. ONEKEY , TWOKEY , THREEKEY , FOURKEY , and FIVEKEY are all defined in the constant section of the initialization of the code. Each key name corresponds to same key number. ( ONEKEY is the same as "1", TWOKEY is the same as "2", and so on.)
The final line of this function takes a screenshot of the drawn picture.
;If user presses F10, take a screenshot If KeyDown(F10KEY) ;Save the picture buffer as screenshot.bmp SaveBuffer ImageBuffer(picturebuffer), "screenshot.bmp" EndIf
First off, this block of code tests the F10 key (located at the top of your keyboard). F10KEY is the key code for F10, and it is defined in the constant section. When the user presses F10, this action is performed:
SaveBuffer ImageBuffer(picturebuffer), "screenshot.bmp"
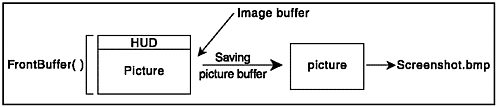
If you remember, SaveBuffer() saves a buffer (the first parameter) to a specified filename (the second parameter). Because we specified ImageBuffer(picturebuffer) to be saved, the text of the image will not be included in the saved file. See Figure 6.27 for an illustration of what is happening.
Figure 6.27. Using SaveBuffer .
NOTE
CAUTION
DO NOT try to save the image if you are running this program off the CD. Because the current directory is on the CD, and the CD cannot be written to, the saving operation will fail. To fix this problem, simply copy the program off the CD and onto your computer.
After the picture is readied, the image buffer is saved to screenshot.bmp. This save file can be found in the same directory as the sample program. Make sure that if you run this program, you copy it off the CD onto your computer. The operation will fail if you try to save the buffer while the executable is still on the CD.
The last function remaining in the program is TestMouseInput() . This function checks to see if the user has pressed any mouse buttons. If he has, the selected color is drawn.
TestMouseInput() looks like this:
;;;;;;;;;;;;;;;;;; ;Function TestMouseInput() ;If player presses on mouse, draw the color ;No Parameters ;;;;;;;;;;;;;;;;;; Function TestMouseInput() ;If player presses the left mouse button, draw the selected color If MouseDown(1) ;Begin drawing only on image SetBuffer(ImageBuffer(picturebuffer)) ; draw the selected color at the mouse location Select (selectedcolor) Case 1 DrawImage(greenimage,MouseX(),MouseY()-100) Case 2 DrawImage(redimage,MouseX(),MouseY()-100) Case 3 DrawImage(blueimage,MouseX(),MouseY()-100) Case 4 DrawImage(blackimage,MouseX(),MouseY()-100) Case 5 DrawImage(whiteimage,MouseX(),MouseY()-100) End Select End If ;reset the buffer back to the back buffer SetBuffer BackBuffer() End Function
NOTE
In the example of DrawImage , I made the image handle " *image . " In this case, the " * " symbol can mean one of five things: green, red, blue, black, or white.
The first action this function performs is a test to see if the left mouse key was pressed. If so, the program sets the default buffer to ImageBuffer(picturebuffer) . Thus, the player can draw only on the image surface, and not the rest of the program. The Select block checks to see which is the default color, and depending on what the color is, a certain block of color is drawn. The DrawImage command:
DrawImage(*image,MouseX(),MouseY()-100)
draws the specific image at the x and y position, although the y position is set to be 100 pixels higher because the image buffer is drawn 100 pixels below the top of the screen. Take out the -100 and see what happens!
Well, that's it for the sample program. Figure 6.28 shows a sample image in the program, and Figure 6.29 shows how the saved image looks. Notice that the title bar is gone. Once again, the reason for this is that only the ImageBuffer(picturebuffer) is saved. If you would like to save the entire image (including the text), change the line
Figure 6.28. The full demo06-08.bb program.
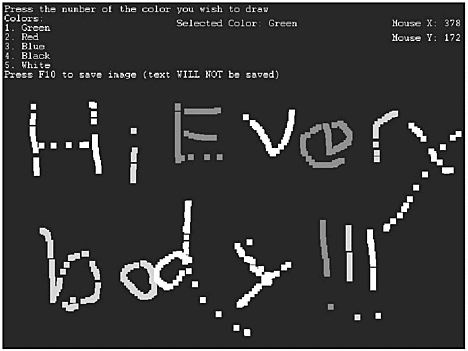
Figure 6.29. The saved picture from demo06-08.bb.

SaveBuffer ImageBuffer(picturebuffer), "screenshot.bmp"
to
SaveBuffer FrontBuffer(picturebuffer), "screenshot.bmp"
Here is an idea for a good exercise: change the program so that a different screenshot is created each time. This way, the user can save more than one image. Also, try to make the program allow the user to change where the file is saved to.
| [ LiB ] |
EAN: 2147483647
Pages: 94
If you may any questions please contact us: flylib@qtcs.net