Image Retouching
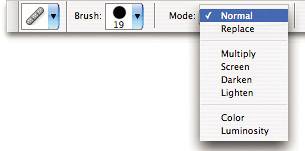
| Because a photographic image is rarely perfect, Photoshop offers many tools for retouching and correcting images. Retouching deals with fixing or touching up the small details in an image. These tasks can range from something as simple as removing red-eye to something as complicated as smoothing wrinkles. Some may see this as cheating, but you're really just trying to enhance a photograph so that it looks its best. I once heard Photoshop guru Scott Kelby speak about this issue at the Photoshop World convention. An audience member asked him how ethical it was to manipulate reality and change someone's appearance for the better. Scott's answer was interesting: He said that the purpose of retouching was to make a photograph look as good as real life. When you're talking to a friend, so much is happening that you may not notice that he has a small blemish on his face or a feature that is just a bit off. But when you're looking at a photograph of him, you have nothing else to concentrate on but the photograph itself. Because a still image is a moment frozen in time, you're much more likely to pick up on any problems. That's a great way to think about image retouching. So, with no further ado, let's jump right in and take a look at some of the image-retouching tools in Photoshop. The Healing BrushThe Healing Brush tool If you choose the Healing Brush tool, you'll notice the Options bar changes to display a few settings specific to the selected tool. As with other brushes in Photoshop, you can change the Mode in which the brush paints. Figure 4.4. Like other brushes, a Mode menu is available in the Options bar.
The next group is the Source settings. Choose Sampled to use the pixels from the current image in which you're working. Choose Pattern to repair the sampled area with pixels from a pattern. The pattern can be selected from the drop-down list next to the check box. Another key setting is the Use All Layers check box on the right. It instructs Photoshop to use all layers when sampling or to use only the active layer. Figure 4.5. Choose whether you want to sample all layers or just the active one before you start using the Healing Brush.
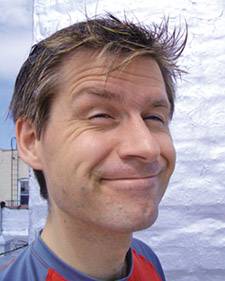
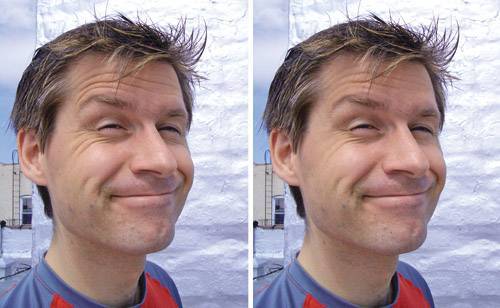
Note that it's best to work with small areas at a time. A general rule of thumb is to sample often. Even slight changes in texture and lighting values in the source image can wreak havoc on your healing abilities, so you'll want to make sure you're always sampling from an appropriate source. Figure 4.6. Various creases appear when a subject smiles, but we'll make them less severe with some retouching. The forehead creases will be smoothed with the Healing Brush tool, and then we'll use the Patch tool on the ones around the eyes.
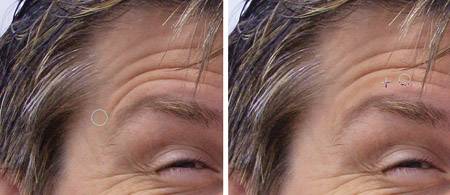
Political tip: When retouching photographs of your friends and family, never let them know that you've used the Healing Brush on them. As you can imagine, it's really not a compliment, and they'd be better off just thinking that they had a really good day at the time the photograph was taken. tip Duplicate the layer and use the Healing Brush tool on the top layer so that you can reduce the layer's transparency and soften the effects without affecting the original. Figure 4.7. A small area of the skin is sampled (left), then painted over the wrinkle (right) to smooth it out.
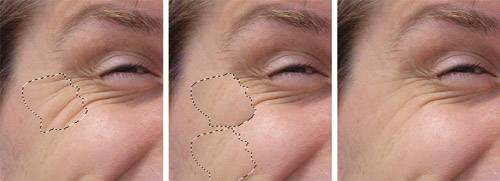
The Patch ToolThe Patch tool Figure 4.8. An area to patch is selected (left); the selection is placed over an area of smoother texture (middle); and the finished area takes on that texture.
A handy feature of the Patch tool is that it gives you a preview of what effect will be applied to the target area. This happens after you first select the area to be repaired. You'll notice that as you search the image for a sample to repair from, the selected area will display the sample so you can see how they match. note The Patch tool works only on the current layer. It doesn't offer the Use All Layers setting that the Healing Brush tool does, so be careful. To use the Patch tool, select an area to be repaired in the same way you select with the Lasso tool. Once you have selected a source area, position your cursor within the selection and begin to drag around the image to look for an area to sample from. Again, just like the Healing Brush, the Patch tool will try to match the color, texture, transparency, and luminosity of the sampled area with the source selection. When you've found a suitable source to sample from, release the mouse button and Photoshop will do the rest. Figure 4.9. The creases are now much softer (right), thanks to the Healing Brush and Patch tools, without being unrealistically smooth.
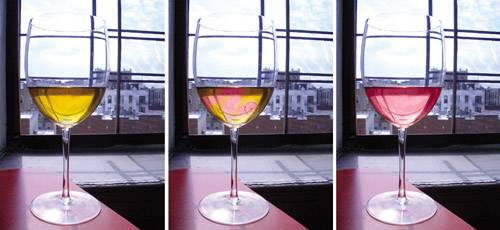
The Color Replacement ToolThe Color Replacement tool Because the Color Replacement tool functions as a brush, it can be applied with more precision than some other color replacement functions in Photoshop. Also, because the Color Replacement tool performs image analysis on the fly, it saves you the step of extracting a particular area from your image before applying color changes. Figure 4.10. The client wants a blush wine in the ad, and you've only got Bulgarian chardonnay? Not much you can do about the taste, but you can easily change the color.
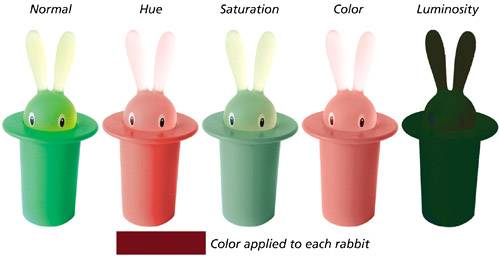
That said, the Color Replacement tool is extremely easy to use. Once it's selected, you'll see various settings in the Options bar, like Tolerance, which you should be familiar with from other tools. Figure 4.11. Familiar options for the Color Replacement tool.Figure 4.12. Notice how the rabbit is affected by each individual Mode and the sample color.
The Mode settings determine the ways in which the Color Replacement tool can be applied:
|
EAN: 2147483647
Pages: 103