Implementing Help
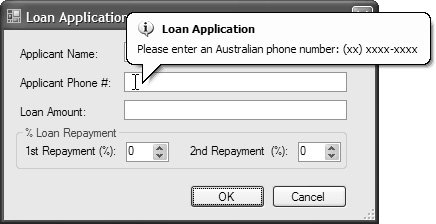
| As noticeable as the ErrorProvider user interface is (at least compared with the status strip), it's nice to provide user help that doesn't take the form of a reprimand. It also is useful to give users help without making them try something that fails. Windows Forms supports these goals in several ways. Tool TipsOne simple way is to provide each control with relevant instructions via a tool tip that appears when users hover the mouse pointer over the control, as shown in Figure 3.11. Figure 3.11. Using Tool Tips The Tool tip component allows you to add tool tips to any control in a form; when dropped onto a form, Tool tip adds a new property to each control that shows up as "ToolTip on toolTip" in the Properties window. Any new property added by one object to another object on a form is called an extender property, because the former object extends the latter with additional functionality via a property.[11]
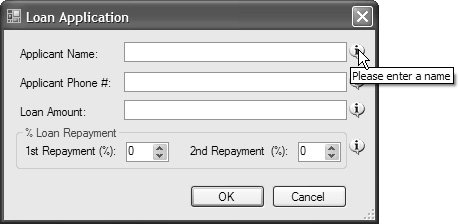
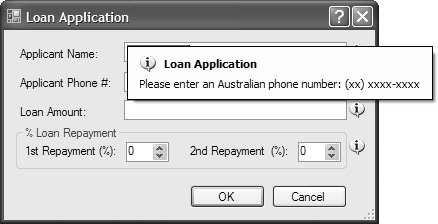
Setting the Tool tip extender property for a control gives it a tool tip as provided by the Tool tip component. You can also configure the Tool tip component to appear either as a rectangular tool tip or as a balloon with an icon and a title, as shown in Figure 3.11. Using ErrorProvider for General InformationThe problem with tool tips displayed after hovering is that the user may not know that they're available. (When was the last time you hovered your mouse pointer over a text box looking for help?) Luckily, ErrorProvider is really good at providing a visual indicator, so it can be used with a different icon, as shown in Figure 3.12.[12]
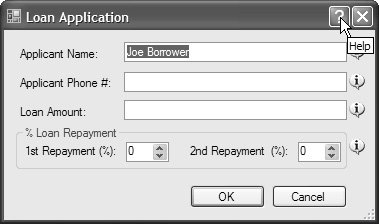
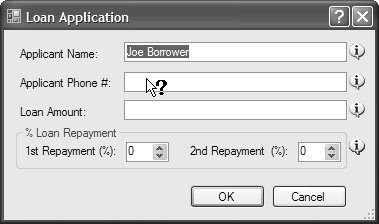
Figure 3.12. Combining Tool Tip with ErrorProvider If you like this approach, you can implement it using two error providers: one with a friendly information icon, also known as the information provider, and another with a mean error icon (as set using ErrorProvider's Icon property). The information provider is displayed without blinking when a form first loads and when there's no error. Otherwise, the error provider is used: void LoanApplicationDialog_Load(object sender, EventArgs e) { // Use tool tips to populate the "information provider" this.infoProvider.BlinkStyle = ErrorBlinkStyle.NeverBlink; foreach( Control control in this.Controls ) { string toolTip = this.toolTip.GetToolTip(control); if( toolTip.Length == 0 ) continue; this.infoProvider.SetError(control, toolTip); } } void applicantNameTextBox_Validating(object sender, CancelEventArgs e) { // Check that applicant name exists string toolTip = this.toolTip.GetToolTip((Control)sender); if( ((Control)sender).Text.Trim().Length == 0 ) { // Show the error when there is no text in the text box this.errorProvider.SetError((Control)sender, toolTip); this.infoProvider.SetError((Control)sender, null); e.Cancel = true; } else { // Show the info when there is text in the text box this.errorProvider.SetError((Control)sender, null); this.infoProvider.SetError((Control)sender, toolTip); } }Just as the ToolTip component adds the ToolTip extender property to each control on the form, ErrorProvider adds an Error property to each control. Setting a control's Error property in the Properties window is the equivalent of calling ErrorProvider.SetError, passing the control and an error string as the arguments. However, the Error property is not a good place to store a message, because clearing the message is the only way to hide an ErrorProvider's icon for a particular control. Instead, given that the Tool tip property never needs clearing, the example uses it whenever a message should be displayed: when the mouse is hovered over a control, when the information provider is showing, or when the error provider is showing. This has the added benefit of keeping hard-coded strings out of code and in a place that can easily be made localizable, as discussed in Chapter 13: Resources. If you use this technique, each Validating event handler is likely to use the same code to determine whether to enable or disable the ErrorProvider controls appropriately. Thus, it makes sense to provide a generic solution to save extra coding: void applicantNameTextBox_Validating( object sender, CancelEventArgs e) { UpdateErrorStatus( ((Control)sender).Text.Trim().Length != 0, (Control)sender, e); } void applicantPhoneNoTextBox_Validating( object sender, CancelEventArgs e) { UpdateErrorStatus( rgxOzPhone.IsMatch(((Control)sender).Text), (Control)sender, e); } void applicantLoanAmountTextBox_Validating( object sender, CancelEventArgs e) { UpdateErrorStatus( rgxLoanAmount.IsMatch(((Control)sender).Text), (Control)sender, e); } void UpdateErrorStatus( bool isValid, Control control, CancelEventArgs e) { string toolTip = this.toolTip.GetToolTip(control); if( isValid ) { // Show the info when there is text in the text box this.errorProvider.SetError(control, null); this.infoProvider.SetError(control, toolTip); } else { // Show the error when there is no text in the text box this.errorProvider.SetError(control, toolTip); this.infoProvider.SetError(control, null); e.Cancel = true; ) }Handling the Help Button and F1Although the little icons on the forms are useful, the standard way to provide this kind of information is to use the help button (the question mark) located in the upper-right corner of the form, as shown in Figure 3.13. Figure 3.13. Adding a Help Button to a Form You enable the help button by setting the HelpButton property of the form to true. When the button is pressed, the cursor changes as a visual cue for the user to click on the desired control, as shown in Figure 3.14. Figure 3.14. The Help Cursor When the user clicks on a control, the HelpRequested event is fired to the form. You handle this event to find the clicked control and display appropriate help: void LoanApplicationDialog_HelpRequested( object sender, HelpEventArgs e) { // Convert screen coordinates to client coordinates Point pt = this.PointToClient(e.MousePos); // Look for control user clicked on Control control = FindChildAtPoint(this, pt); if( control == null ) return; // Show help string help = this.toolTip.GetToolTip(control); if( string.IsNullOrEmpty(help) ) return; MessageBox.Show(help, "Help"); e.Handled = true; } // More useful version of GetChildAtPoint Control FindChildAtPoint(Control parent, Point pt) { // Find a child Control child = parent.GetChildAtPoint(pt); // If no child, this is the control at the mouse cursor if( child == null ) return parent; // If a child, offset our current position to be relative to the child Point childPoint = new Point(pt.X - child.Location.X, pt.Y - child.Location.Y); // Find child of child control at offset position return FindChildAtPoint(child, childPoint); }The HelpRequested handler uses both of the HelpEventArgs properties: namespace System.Windows.Forms { class HelpEventArgs : EventArgs { public bool Handled { get; set; } public Point MousePos { get; } } }MousePos represents the screen coordinates where the user clicked, and Handled lets us stop the HelpRequested event from going any further if we handle it. In the example, we convert MousePos, provided in screen coordinates, to client coordinates and call FindChildAtPoint to find the control the user clicked on. The Form class's GetChildAtPoint method searches only the immediate children of a form, but our custom FindChildAtPoint method searches through all containers to find the clicked control, taking containers such as group boxes into account. For example, if a user clicks the first repayment percentage numeric up/down control, GetChildAtPoint returns the container group box, whereas FindChildAtPoint returns the numeric up/down control. If FindChildAtPoint finds the clicked control, we put the control's tool tip into a message box and stop the event from propagating elsewhere. The help button is useful to most users, but keyboard-oriented Windows users are more familiar with the F1 key, which is meant to communicate to the application that help is requested on whatever is currently active, which is normally the control with focus. Pressing F1 also fires the HelpRequested event. However, you'll notice that the HelpEventArgs class provides no indication of how the event was fired. Therefore, if we want to do something such as open an HTML file when F1 is pressed, we must check whether it was a mouse button that triggered the event: void LoanApplicationDialog_HelpRequested( object sender, HelpEventArgs e) { // If no mouse button was clicked, F1 got us here if( Control.MouseButtons == MouseButtons.None ) { // open a help file... } // Help button got us here else { // show the message box... } }Because we know that a mouse click triggers the HelpRequested event when it comes from the help button, we need to know whether any mouse buttons were pressed when the HelpRequested event was fired. Consequently, we check the Control.MouseButtons property, which provides the state of the mouse buttons during the current event. If no buttons were pressed to fire this event, the user got to the handler using the F1 key; otherwise, the user pressed the help button. Using HTML HelpWhen you implement F1, it is not hard to launch a uniform resource locator (URL) to show an HTML page. However, when using the help button, users are accustomed to seeing help messages in shadowed tool tips, known as pop-up help, as shown in Figure 3.15. Figure 3.15. Using HelpProvider to Implement the Help Button You implement pop-up help with a call to the Tool tip component's Show method: void LoanApplicationDialog_HelpRequested( object sender, HelpEventArgs e) { if( Control.MouseButtons == MouseButtons.None ) { // Open a help file... } // Help button got us here else { // Convert screen coordinates to client coordinates Point pt = this.PointToClient(e.MousePos); // Look for control user clicked on Control control = FindChildAtPoint(this, pt); if( control == null ) return; // Show help string help = this.toolTip.GetToolTip(control); if( string.IsNullOrEmpty(help) ) return; this.toolTip.Show(help, this, pt, 3000); e.Handled = true; } }If you want to implement opening an HTML file using the F1 key, Tool tip doesn't help you. However, you'll find joy with the Help class, because it wraps the HTML Help functions provided by Windows and exposes them as one of the following methods for you to enjoy: namespace System.Windows.Forms { class Help { public static void ShowHelp(Control parent, string url); public static void ShowHelp(Control parent, string url, HelpNavigator command, object parameter); public static void ShowHelp(Control parent, string url, string keyword); public static void ShowHelp(Control parent, string url, HelpNavigator navigator); public static void ShowHelpIndex(Control parent, string url); public static void ShowPopup(Control parent, string caption, Point location); } }The following example uses the simplest variation of ShowHelp to display the HTML help file: void LoanApplicationDialog_HelpRequested( object sender, HelpEventArgs e) { if( Control.MouseButtons == MouseButtons.None ) { // Open a help file... string file = Path.GetFullPath("loanApplicationDialog.htm"); Help.ShowHelp(this, file); } ... }This code uses the Path.GetFullPath method (from the System.IO namespace) to turn a relative path name into a full path name. The URL argument to the ShowHelp method can be a full file path or a full URL, but ShowHelp doesn't seem to like relative path names. If you use this technique, F1 takes users to a page of HTML describing the form as a whole. However, users pressing F1 would probably prefer help that is specific to the currently active control; in other words, if they press F1 while in the Loan Amount field, they should see help for the Loan Amount field. For that to happen against a file in the local file system, you must move from HTML to Microsoft's compiled and indexed HTML Help format. Compiled HTML HelpWhen it was clear that HTML files were more flexible than the WinHelp help file format, Microsoft decided to switch from WinHelp to something HTML-based. However, WinHelp had a number of advantages over raw HTML, including tools for indexing and searching and support for having multiple pages in a single file. Merging the flexibility of HTML with the convenience of WinHelp yielded HTML Help, which consists of a set of functions, a set of tools, and a file format that compiles all pages into a single file with a .chm extension. The details of how to build real HTML Help files are beyond the scope of this book, so I recommend downloading the HTML Help Workshop from the Microsoft Developer Network site to experiment with it yourself.[13]
To create a minimal HTML Help file with the HTML Help Workshop, follow these steps:
When you have an HTML Help file, you can integrate it into your form using the Help class by passing the name of the .chm file to the ShowHelp function. Furthermore, you can enable scrolling to a particular subtopic inside a topic by using the HTML <a> tag to name a subtopic:
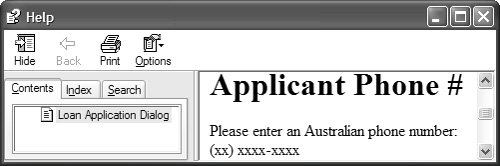
Now you can map the name of the subtopic to the control when F1 is pressed: void LoanApplicationDialog_HelpRequested( object sender, HelpEventArgs e) { // If no mouse button was clicked, F1 got us here if( Control.MouseButtons == MouseButtons.None ) { string subtopic = null; if( this.ActiveControl == this.applicantNameTextBox ) { subtopic = "name"; } else if( this.ActiveControl == this.applicantPhoneNoTextBox ) { subtopic = "phoneNo"; } else if( this.ActiveControl == this.applicantLoanAmountTextBox ) { subtopic = "loanAmount"; } else if( this.ActiveControl == this.firstNumericUpDown ) { subtopic = "firstrepaymentpercent"; } else if( this.ActiveControl == this.secondNumericUpDown ) { subtopic = "secondrepaymentpercent"; } Help.ShowHelp( this, "dialogs.chm", "loanApplicationDialog.htm#" + subtopic); e.Handled = true; } ... }Now when F1 is pressed and focus is on a specific control, the topic is brought up in the help viewer window, and the specific subtopic is scrolled into view, as shown in Figure 3.16. Figure 3.16. Showing the Applicant Phone Number ("phoneNo") Subtopic F1-Style Help with the Help ButtonSome applications, such as VS05, provide the same behavior for clicking a dialog's help button as by pressing F1 (namely, displaying context-sensitive help). If your application's help system uses this model, you must detect when the help button is clicked, prevent the special icon from being displayed, and open the help for the active control in the same way pressing F1 does. To do this, you handle the form's HelpButtonClicked event: void LoanApplicationDialog_HelpButtonClicked( object sender, CancelEventArgs e) { // Show help for currently active control string subtopic = null; if( this.ActiveControl == this.applicantNameTextBox ) { subtopic = "name"; } else if( this.ActiveControl == this.applicantPhoneNoTextBox ) { subtopic = "phoneNo"; } else if( this.ActiveControl == this.applicantLoanAmountTextBox ) { subtopic = "loanAmount"; } else if( this.ActiveControl == this.firstNumericUpDown ) { subtopic = "firstrepaymentpercent"; } else if( this.ActiveControl == this.secondNumericUpDown ) { subtopic = "secondrepaymentpercent"; } Help.ShowHelp(this, "dialogs.chm", "loanApplicationDialog.htm#" + subtopic); // Don't allow users to click a control to find its help, // because we just did that for the active control e.Cancel = true; }Here, we use the same code we did to handle the F1 button. Note that we want to prevent the HelpRequested event from being fired to avoid further help processing, including allowing the user to select a control to find its help and changing the cursor after opening the help file. We do this by setting the CancelEventArgs argument's Cancel property to true. Notice that we're back to mapping between controls and strings (subtopics, in this case); such mapping is better facilitated by a component that provides extender properties, allowing you to set the help information for each control using the Properties window and keeping that information out of the code. The component that provides extender properties to manage this information is HelpProvider. Using the HelpProvider ComponentHelpProvider implements both topic navigation support for the F1 key and pop-up help for the help button. HelpProvider is a wrapper around the Help class for a specific file, so it works well only for HTML Help. After dropping a HelpProvider component onto your form, you set its HelpNamespace property to the name of the file it is to manage, such as dialogs.chm. HelpProvider extends the host form and its controls with the following properties: string HelpKeyword; // Defaults to "" HelpNavigator HelpNavigator; // Defaults to AssociateIndex string HelpString; // Defaults to "" bool ShowHelp; // Defaults to true When F1 is pressed, an empty HelpKeyword displays the HelpString from pop-up help. Otherwise, F1 is detected by HelpProvider, which subsequently passes the HelpKeyword to ShowHelp and uses it in a manner determined by the HelpNavigator property, which can be one of the following: enum HelpNavigator { AssociateIndex = -2147483643, Find = -2147483644, Index = -2147483645, // What ShowHelpIndex does KeywordIndex = -2147483642, TableOfContents = -2147483646, Topic = -2147483647, // The default when ShowHelp is set to true TopicId = -2147483641 }For example, if HelpNavigator is Topic, then HelpKeyword is the name of the topic to showsay, loanApplicationDialog.htm. ShowHelp is a Boolean that determines whether HelpProvider should handle the HelpRequested event for the control. Setting ShowHelp to false allows you to handle the HelpRequested event manually, as we've done so far. However, after dropping a HelpProvider component onto our sample form, we don't have to handle the HelpRequested event at all. Instead, given that the HelpNamespace property is set to dialogs.chm, we can set the HelpProvider properties on each control on the form (as shown in Table 3.1), causing F1 and the help button to be handled automatically.
Showing Help Contents, Index, and SearchDialogs don't often have menuslet alone Help menus with Contents, Index, and Search menu itemsbut while we're on the topic of integrating help with forms, I thought it would be a good idea to mention how to implement these help menu items. You can do this easily by using the Help class: void helpContentsMenuItem_Click(object sender, EventArgs e) { Help.ShowHelp(this, "dialogs.chm", HelpNavigator.TableOfContents); } void helpIndexMenuItem_Click(object sender, EventArgs e) { Help.ShowHelpIndex(this, "dialogs.chm"); } void helpSearchMenuItem_Click(object sender, EventArgs e) { Help.ShowHelp(this, "dialogs.chm", HelpNavigator.Find, ""); } |
EAN: 2147483647
Pages: 216