| Now that you've screened your clips, you're ready to identify the portion you want to edit into the sequence. Once you determine what portion of a clip to use, you mark the starting and stopping points of the desired action or sound. These marks define the edit points of the clip. Later in this lesson, you will edit the marked clips into a sequence. But for now, you will practice different ways to mark a clip before editing it to the Timeline. NOTE You will be marking clips and building a sequence similar to the one in the Timeline. You can always play the Amanda Finished sequence as a reminder of what you're creating.
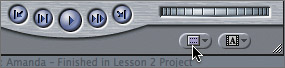
Marking with Buttons One way to mark edit points in a clip is to use the Viewer marking controls, also referred to as buttons. These controls are located beneath the shuttle control in the Viewer. 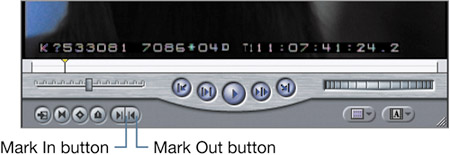
The Mark In button sets a starting point, or In point, in the clip. The Mark Out button sets a stopping point, or Out point, in the clip. 1. | From the Browser menu, open the 98A-amanda clip into the Viewer. Look at the Timecode Duration field.
The Timecode Duration field reflects the full length of the clip when there are no edit points. When you mark this clip, this duration will change to reflect the marked portion only.
| 2. | Press Home, and play the clip from the beginning. Stop when you see Amanda's face fully in the frame. You can adjust a few frames either way to account for background action.
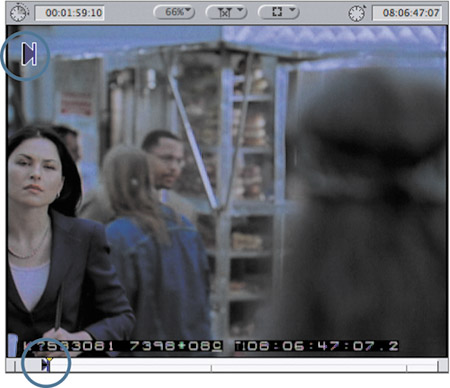
TIP To find a specific edit point, you can either drag the playhead in the scrubber bar, press the J or L key, or press K and J or K and L together to play slowly. To move a frame at a time, you can hold down K and tap the J or L key, or press the left or right arrow. If you work with a scrolling mouse, you can move the pointer over the image area or the scrubber bar and scroll to jog frame by frame. | 3. | In the Viewer, click the Mark In button to set an In point at this location.

A new In point appears in the scrubber bar where the playhead is located. Notice the In point overlay in the upper-left corner of the image area.
| 4. | Play the clip and stop after the man on the street says, "Thank you, sister."
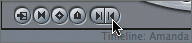
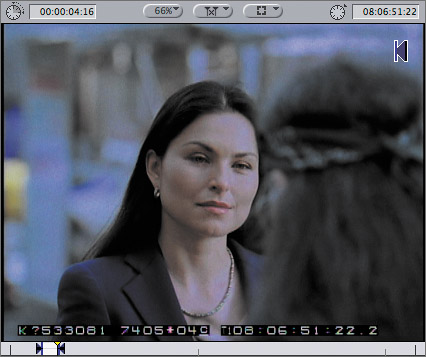
| 5. | Click the Mark Out button to set an Out point at this location.
A new Out point appears in the scrubber bar where the playhead is located and in the upper-right corner of the image area. The Timecode Duration field reflects the length of the marked portion of the clip, and the scrubber bar becomes gray outside of the marked area.
| 6. | Click the Play In To Out button to see just the marked portion of your clip.

This is the portion of the clip that will be edited into the sequence in a later exercise.
| 7. | In the Browser, click the disclosure triangle next to the Audio bin. Open the VO_16 clip, and play it.
This clip has just one channel of audio, which is displayed as a single waveform image on the Mono (a1) tab. You will learn more about this tab later in this lesson.
| 8. | To mark the full length of the VO_16 clip, click the Mark Clip button.

Marking the entire clip places an In point on the first frame of the clip and an Out point on the last frame of the clip.
|
Marking with Keyboard Shortcuts For some, working with keyboard shortcuts is a preferred way to edit, whereas others prefer clicking buttons on the interface. In Final Cut Pro, shortcuts are often created from the first letter of the functions. This is true for the Mark In and Mark Out shortcuts. All the keyboard shortcuts that relate to the In point use the letter I with or without a modifier key. All the shortcuts that relate to the Out point use the letter O. 1. | From the Clips bin, open the 98B-man clip in the Viewer. Play it, and stop after you hear the man say, "Thank you, sister."
Since you heard him say, "Thank you, sister," in the previous clip, you will cut to this camera angle for his next line.
| 2. | Press the I key to set an In point at this location.
An In point is placed in the scrubber bar at this location, as well as over the image area, just as it did when you clicked the Mark In button.
NOTE You can also mark clips while they're playing, with either the shortcut keys or the mark buttons. This is called marking on the fly. | 3. | Play from the In point, and without stopping, press O to set an Out point after the man says, "Nice suit. Armani?" Notice the duration in the Timecode Duration field because it will change in the next step.
| 4. | To move the playhead back to the In point, press Shift-I. Play from the In point, and this time set a new Out point after Amanda says, "Yeah," to allow time for the man to look up at her.
When you set a new In or Out point when one already exists, the new mark replaces the previous mark, and a new duration appears.
| 5. | Click the Play In To Out button to play the new marked portion of this clip.
| 6. | From the Browser, open the 98A-amanda clip again, or you can click the Recent Clips pop-up menu and select it.
Once you set edit points on a clip, those edit points stay with the clip until you remove them or remark the clip.
| 7. | From the Audio bin in the Browser, open the VO_17 clip, and play it. You will use this clip in its entirety.
| 8. | To apply the Mark Clip command using a shortcut, press the X key.
Just as when you used the Mark Clip button, an In point is placed on the first frame of this clip, and an Out point is placed on the last frame.
| 9. | Choose File > Save Project, or press Cmd-S, to save the edit points you've created.
|
TIP Choose Mark > Go To to see the shortcuts for going to edit points. You can also choose other mark options here, or use this menu to remind yourself of the keyboard shortcuts.
Marking Single Edit Points and Durations When you spend a lot of time editing, saving a few keystrokes here and there can be very useful. As you continue marking clips, it may be helpful to know you can use just one edit point or sometimes no edit points at all. And sometimes, when working with sound effects, or static video shots, you may choose to enter a duration to define the length of an edit, rather than find a specific In or Out point. 1. | Open the 97F-man cu clip and play it until you hear the man say, "Hey, Bro, how're ya doin'?"
| 2. | Set an In point at the beginning of this line, and click the Play In To Out button.
With no Out point, the clip plays from the In point to the end of the clip.

| 3. | Open the 97C-back slo-mo clip, and play it.
You will use this clip from the beginning, so you will not need to set an In point.
NOTE This clip, along with the 97B-walking slo-mo clip, has had a slow-motion effect applied to it. You will learn to change the speed of a clip in a later lesson. | 4. | Play the clip, and stop a beat after the woman with blonde hair leaves the right side of the frame. Set an Out point at this location. Click the Play In To Out button to view the marked portion of the clip.

Without an In point, this clip automatically starts at the beginning and plays to the Out point.
| 5. | From the Audio bin in the Browser, open the city sounds.aif clip, and play a few seconds of this sound effect.
In this clip, an In or Out point isn't as important as the length of time you will use the sound effect.
NOTE Audio clips created using Apple's Audio Interchange File Format have an aif suffix. However, many AIFF audio clips do not have the suffix attached to their names. | 6. | To create a 4-second duration, click the Timecode Duration field in the upper left portion of the Viewer, and type 4:00. Press Return to enter this duration.

An Out point is automatically created in the scrubber bar 4 seconds from the head of the clip. Having an In point at a different location would create a duration from that point. In this situation, it doesn't matter where the playhead is located when you enter the duration.
TIP You can also type this number without a colon (400), or with a period following the 4, such as 4., to represent zero frames. Substituting a period for double zeros is used throughout Final Cut Pro. | 7. | Let's change the duration to 7 seconds. Enter 7. (number seven followed by a period) in the Timecode Duration field, and press Return.
The Out point adjusts automatically to create a 7-second duration.
|
TIP If you change your mind, Cmd-Z, or Edit > Undo, removes the mark or returns you to a previous mark. The default number of undos is 10, but you can change that number in the User Preferences window (Option-Q).
Marking Timecode Numbers You can also screen and log timecode numbers for each clip and go to those numbers to set In and Out points. This procedure is used in many interview and reality television shows, where there is no shooting script. A screener views and logs source tapes, then a writer or producer creates what is sometimes called a paper cut, a list of timecode references to shots they want included in the show. In this situation, an editor cuts together a rough cut by entering selected timecode numbers and marking those points. 1. | Open the 97B-walking slo-mo clip, and scrub through it by dragging the playhead through the scrubber bar.
Although this clip does not have any dialogue, it has portions that are not as usable because the man walking behind Amanda becomes too prominent in the frame. The best portion has been noted for you.
| 2. | Click in the Current Timecode field, type 11:06:34:00, and press Return.
In the scrubber bar, the playhead jumps to the timecode location labeled 11 hours, 6 minutes, 34 seconds, and 0 frames.

NOTE When typing a timecode number, you don't need to type the zeros before the first digit if it's a single-digit hour, or the colons or semicolons that separate the values. Final Cut Pro will add those automatically. However, the text of this book uses colons to make the timecode numbers easier to read. | 3. | Set an In point at this location.
| 4. | This time, don't click in the Current Timecode field. Just type 11:06:42:08, and press Return.
When the Viewer window is active, any number you type is automatically entered into the Current Timecode field as a timecode number.
TIP You can move the playhead to specific timecode locations in the Canvas and Timeline by using this same approach. Make sure the appropriate window is active before typing a number. | 5. | Set an Out point at this location, and click the Play In To Out button to view the marked portion of this clip.
| 6. | Open the 98C-wide clip, and play it until you see Amanda start to walk away. To find the exact frame, type 13:02:10:23, and press Return. Set an In point at this location.
| 7. | Type 13:02:19:19, and press Return. Set an Out point at this location, and play from the In to the Out.
|
TIP Entering a timecode number for a clip is a great timesaver when marking clips, especially when others have taken the time to find a specific location for you.
Viewing and Removing Marks During the editing process, you will often need to review or change your edit points. In this exercise, you will learn additional ways to view, go to, and remove your marks using the Viewer transport buttons and keyboard shortcuts. These methods utilize the same keys you've been using for marking Ins and Outs I and O. For now, let's practice viewing and removing marks on a single clip. 1. | Open the 97B-walking slo-mo clip from the Browser, and press Shift-I to move the playhead to the In point. Press Shift-O to move it to the Out point.
| 2. | In the Viewer transport button area, click the Previous Edit button and then the Next Edit button. Click each several times in a row.
These buttons move the playhead backward or forward to an edit point and then to the head or tail of the clip.
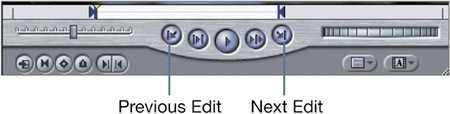
NOTE The straight vertical line in the transport controls represents an edit point. The arrows represent the direction the playhead will move to go to the next edit point, backward or forward that is, previous or next. | 3. | With the playhead at the head of the clip, press the down arrow several times, then the up arrow several times.
When edit points are present, the up and down arrows stop at each edit point, just as the Previous Edit and Next Edit buttons do.
TIP You can also press the : (colon) and ' (apostrophe) keys to perform this function. Since they're close to the J, K, and L keys, they may be more convenient. | 4. | To view the clip from the playhead to the Out point, drag the playhead to a point between the In and Out marks, and press Shift-P.
In a clip with a longer marked duration, this is a helpful way to review material up to the Out point.
| 5. | Move the playhead to the middle of the clip, and click the Play Around Current Frame button to play a little before the playhead location and a little after. You can also use the keyboard shortcut, which is the \ (backslash) key.

The Play Around Current Frame function is not tied to a mark. It will play around the current location of the playhead, wherever that is in the clip or sequence. There are many uses for this function. For instance, you can use it to move the playhead back a few seconds and give youself a running start to set a new edit point.
TIP You can set the distance the playhead moves back from its location to begin to play in the Preview Pre-roll entry in the User Preferences. | 6. | To remove the In point for this clip, press Option-I. Press Option-O to remove the Out point.
| 7. | To undo those steps and return the marks, press Cmd-Z twice.
| 8. | Press Option-X to remove both marks at the same time. Press Cmd-Z to return the marks.
| 9. | Press Cmd-S to save your project changes.
|
NOTE You can loop the playback of a clip or marked area by choosing View > Loop Playback, or pressing Ctrl-L. When this option is checked or active, the clip will automatically play again from the head of the clip after it reaches the end, or play from the In to Out repeatedly. When Loop Playback is active, it applies to any play activity in the Viewer, Canvas, and Timeline windows.
|