| Four primary windows make up the Final Cut Pro interface: the Browser, Viewer, Canvas, and Timeline. The most basic functions of these windows can be broken down into two areas. The Browser and Viewer windows are where you organize and view your unedited material, and the Canvas and Timeline are where you view your edited material. There are two secondary windows: The Tool palette contains an assortment of editing tools, and the audio meters allow you to monitor audio levels. 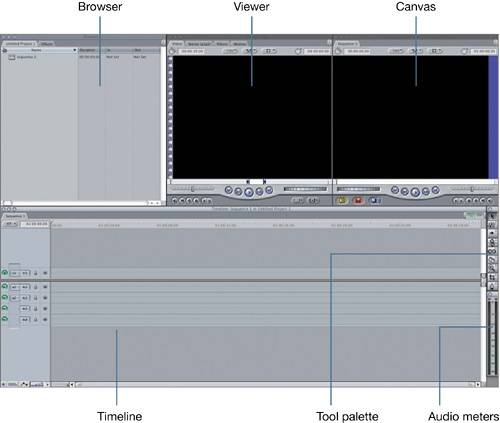 Each window fulfills a unique purpose in the editing process. Browser The Browser is where you organize all of the project elements you use when editing. You can view the different elements as a list or as icons. Viewer The Viewer is where you view your source material and choose edit points. But you can also edit audio, modify transitions and effects, and build titles here. Timeline The Timeline is a graphical representation of all the editing decisions you make. This is your workbench area, where you edit your material, trim it, move it, stack it, and adjust it. Here you can see all your edits at a glance. Canvas The Canvas and Timeline windows are different sides of the same coin. Both display your edited project, but whereas the Timeline shows your editing choices graphically, the Canvas displays those edits visually like a movie. Tool Palette The Tool palette is a collection of Final Cut Pro editing tools. Each tool has a shortcut key, so you can access each one directly from the keyboard. Audio Meters The audio meters window displays two audio meters that reflect the volume level of whatever audio is playing. It could be a source clip in the Viewer you screen before editing or the final edited piece you view in the Canvas. 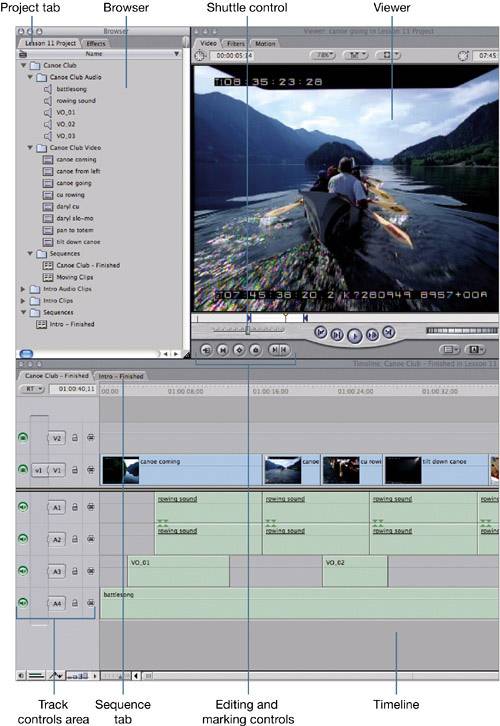 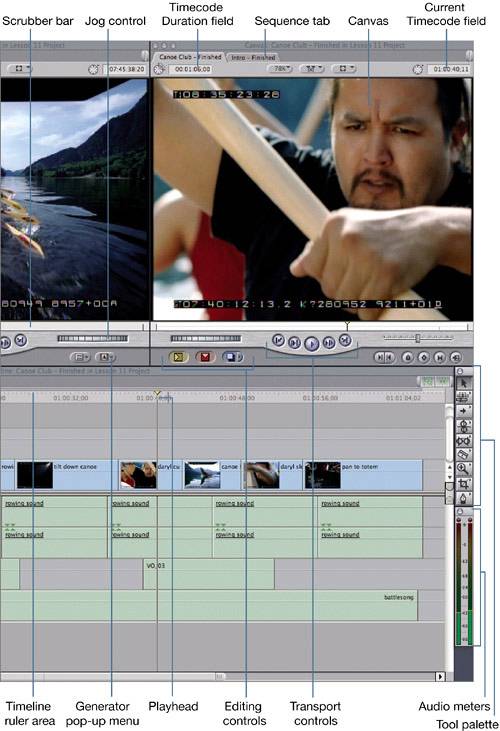 Window Properties Final Cut Pro's interface windows share similar properties with other OS X windows. They can be opened, closed, minimized, and repositioned using the OS X Close, Minimize, and Zoom buttons in the upper-left corner of the window. Each window displays its name in the title bar area. 1. | Click the Browser to make it the active window.
Active Browser window when selected 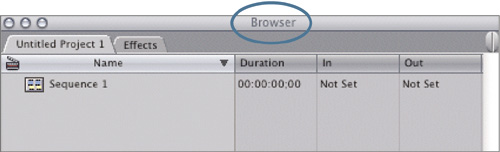
Inactive Browser window when another window is selected 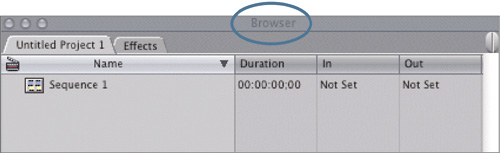
An active window has a lighter title bar, and you can easily read the window name. An inactive window has a dark gray title bar that blends in with the name. Only one window can be active at a time. Making a window active in the interface is an important part of the editing process because some editing functions will only be available to you if a specific window is active.
| 2. | Click the Viewer window to make it active, and then click the Close button in the upper-left corner.
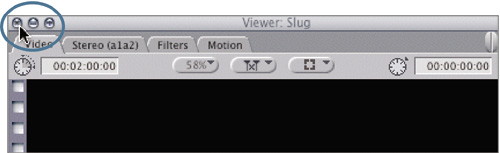
In most OS X windows, this button is red. In Final Cut Pro, this set of buttons takes on the gray of the interface. But these buttons still perform the same functions as they do in other OS X windows.
| 3. | To restore the Viewer window, choose Window > Viewer, or press Cmd-1.
You can open and close each interface window by choosing the window name in the Window menu or with a keyboard shortcut.
NOTE Because of the small size of the Tool palette and audio meters, they have just one button to close the window. | 4. | Drag the Browser window title bar to move this window away from its current position. Drag it again and allow it to snap back into its original position.
All Final Cut Pro interface windows snap together, even though they are separate windows.
|
Menus, Shortcuts, and the Mouse Final Cut Pro's editing functions can be selected in three ways: by choosing a menu selection, pressing a keyboard shortcut, or clicking a button. Most functions have keyboard shortcuts, but you can easily assign one to those that don't by using the customizable keyboard, which will be covered in a later lesson. Final Cut Pro's menu bar organizes editing functions by category, such as View, Modify, Effects, and so on. Within each menu, specific functions are grouped together if they share a similar purpose or topic. 1. | Choose the File menu in the menu bar of the interface.
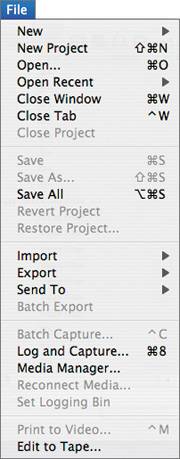
The New and Open functions are grouped together, as are the Save functions, Import, and so on. Like in all Apple menus, black menu options can be selected, but dimmed options cannot.
| 2. | Click the Window menu and choose Arrange.
A submenu appears.
| 3. | Place the cursor over Standard in the submenu, but don't release the mouse.
Keyboard shortcuts appear in menus and submenus to the right of the listed function. Similar functions often share the same shortcut letter.
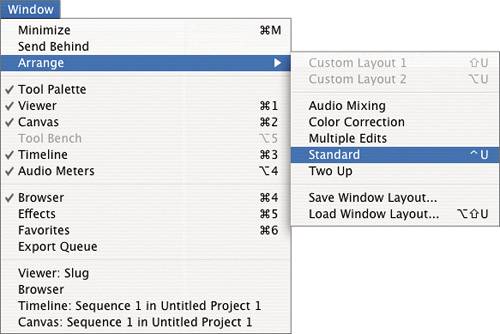
The shortcuts in this submenu all use the letter U with one or more modifier keys. There are four modifier keys: Shift, Control, Option, and Command (the Apple key).

| 4. | Click elsewhere in the interface to close the Window menu.
| 5. | In the Tool palette, move the pointer over the icon that looks like a magnifying glass.
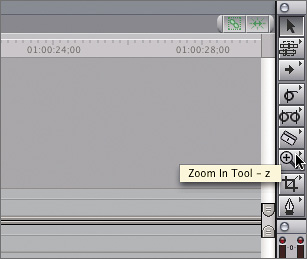
A tooltip appears with the tool name and keyboard shortcut. Tooltips also appear when you hold the mouse pointer over buttons and other areas in the interface.
NOTE You can turn tooltips off and on in the User Preferences window (Option-Q), which we will cover in a later lesson. | 6. | Move the pointer over the first tool in the Tool palette.
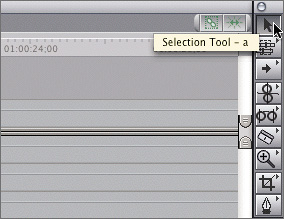
The Selection tool is the default tool you use most frequently. Its shortcut is the letter A.
TIP You will use different tools throughout the editing process, but it's a good habit to return to your Selection tool after you've used another tool. | 7. | Move the pointer over the horizontal double line in the Timeline. This is the audio/video dividing line.

Final Cut Pro has a position-sensitive mouse pointer. When you move it over certain parts of the interface, the pointer will automatically change to allow you to perform a specific function in that location. Here you can drag the audio/video dividing line up or down to allow more room for either audio or video tracks in the Timeline.
| 8. | Hold down the Control key and click in the gray area of the Name column in the Browser window.
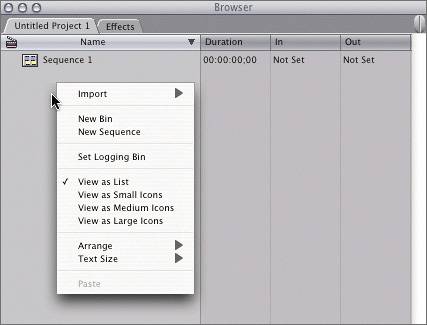
A shortcut menu appears with a list of options for that specific area. Ctrl-clicking in different areas of the Final Cut Pro interface will produce different shortcut menus from which you can choose or change your editing options.
|
TIP You can also access this shortcut menu by clicking in the same area with the right button of a two-button mouse.
|