| You can view many effects, even multiple streams or layers of effects, in real time in Final Cut Pro. How FCP plays back these effects depends on your computer hardware and video format, as well as some options you can choose. You sometimes have to give up either image quality or a consistent frame rate to see all the effects play together. Or you may have to preview or render the transition. Rendering is a process that takes just the transition between two clips and makes a separate clip out of it. That clip is stored in the Render Files folder on the designated scratch disk and played back in the sequence as a separate but invisible clip meaning that it does not appear in the Browser or the Timeline. There are settings that guide Final Cut Pro on how to play effects in each sequence, and an area in the Timeline that displays a color for each effect, indicating whether or not it needs to be rendered. 1. | In the current sequence, in the upper left of the Timeline under the sequence tabs, click the RT pop-up, but don't release the mouse.
You have been working in Unlimited RT. This setting tells Final Cut Pro to do what it has to do to play as many effects as possible in real time, even if it has to drop out some of the effect parameters or not play every frame. The other option is Safe RT. This option tells Final Cut Pro to play an effect only if it can do so without dropping frames.
| 2. | Look at the ruler area in the Timeline for any yellow or orange bars. Choose Safe RT from the RT pop-up menu, and release the mouse. Now look at the Cross Zoom transition you applied in the previous exercise.
| 3. | Click the RT pop-up again and look at the quality settings under Playback Video Quality and Playback Frame Rate.
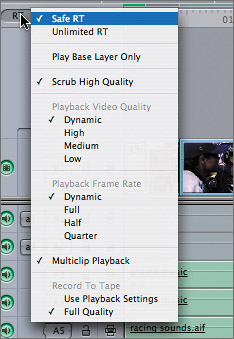
The lower the quality and frame rate, the more effects Final Cut Pro will be able to play in real time. Choosing Dynamic will ensure that at any given moment you will have the best quality possible at the best frame rate possible while also maximizing the number of effects that will play in real time.
The more complex the effects, the lower the quality will be, so your computer will still be able to play it in real time. When there are fewer demands on your computer, Final Cut Pro will use a higher video quality and frame rate.
| 4. | In the current sequence, zoom in to the Timeline where the cross zoom is located. You can use the markers as a reference.
The colored line above the transition is a render bar. The render bar actually contains two thin regions. The upper region represents video, the lower region audio. A render bar can appear in the ruler area above a transition, or above the body of a clip when a filter type effect has been applied.
NOTE You will see render lines above the bodies of some clips in this sequence because their colors were adjusted using a filter effect. You will learn to do this in a later lesson.  Different colored lines can appear in the render bar, indicating the status or capability of Final Cut Pro to play this effect in real time given the current RT settings. The render status of an effect will depend on the speed of the computer you are using. The status of an effect may be one of the following: Different colored lines can appear in the render bar, indicating the status or capability of Final Cut Pro to play this effect in real time given the current RT settings. The render status of an effect will depend on the speed of the computer you are using. The status of an effect may be one of the following:
| Needs to be rendered to play in real time. | | Exceeds computer's real-time playback capabilities but can still play if Unlimited RT is selected, although it may drop frames. | | Transition can play in real time but may approximate certain attributes. | | Will play in real-time but not at full quality. | | Capable of real-time playback and output with no rendering required. | | Material has been rendered. | | No rendering is required. |
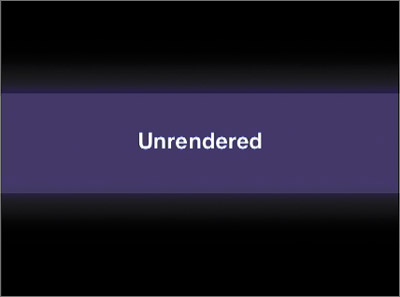
| 5. | Move the playhead to before the cross zoom transition and play it.
The outgoing clip plays at normal play speed until it gets to the transition, when Unrendered appears in the Canvas image area for the duration of the transition. With the Safe RT option, Final Cut Pro doesn't even try to play this effect in real time. Yet there is a way to preview this effect.
| 6. | Drag the playhead back before the transition once again. This time, press Option-P. You can also press Option-\ (backslash) or choose Mark > Play > Every Frame.
The clip plays at normal play speed until the playhead reaches the transition. At that point, the play speed slows down to process the transition, then picks up again when it has passed the transition area. When Final Cut Pro can't play all the effects, even set to the Unlimited RT option, previewing is a good way to get a sense of the effect without rendering it.
TIP If you use Option-P a lot, you might consider adding that function, Play Every Frame, to the Timeline or Canvas button bars. | 7. | This time drag the playhead manually through the transition area to see unrendered transition frames. Use the left and right arrow keys to move through it frame by frame.
This is somewhat like scrubbing an effect. But to see this effect play in real time at Safe RT, you must render it.
| 8. | In the Timeline, click the Cross Zoom transition once.
| 9. | To render it, choose Sequence > Render Selection, but don't release the mouse.
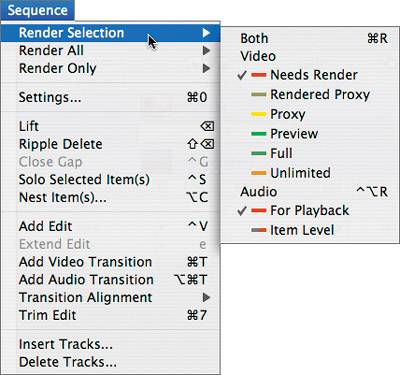
In the Render Selection submenu, the different render status colors appear. If the render color in the Timeline effect is not checked in this menu, your effect will not be rendered.
| 10. | Make sure the red render bar is checked, or whatever color appears in your Timeline, and choose Sequence > Render Selection > Video, or press Cmd-R.
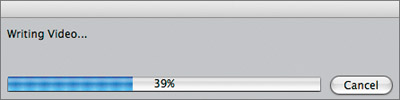
A window appears with a render progress bar. When rendering is complete, a blue render status line appears above the transition, indicating it has been rendered.
NOTE If a transition has already been rendered, changing its duration or any other aspect will require it to be rendered again. | 11. | In the Timeline, click the RT pop-up and choose Unlimited RT.
This is the best option to choose when trying out different effects.
|
NOTE To view or change the scratch disk designation where render files are saved, press Shift-Q to open the System Preferences window.
Project Practice To continue applying transitions and changing their parameters, use the markers in the ruler area of this sequence as a reference for what transition to apply at each location. You can also apply the yellow color you saved in the Colors window to the last transition in the sequence. Or you can be creative and add any transition you choose to any edit point. Don't forget to save your favorites! |