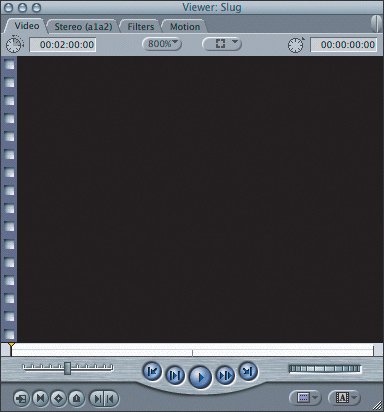
Viewing Clips


The primary purpose of the Viewer is to provide a place to view the clips you want to edit. The Viewer window has four tabs you can access during your editing process. The default is the first tab, Video, where you can see, hear, and mark your clips. There is a separate Stereo or Mono audio tab for working more closely with the audio of a clip. Filters and Motion tabs will be used when you start to create effects. If there is no audio present in the clip, no audio tab will appear. These tabs will be covered in more detail in later lessons.

The first use of the Viewer will be to view your original material or unedited source clips. To do this, you will use the Video tab.

Opening Clips in the Viewer

Opening a clip in the Viewer is the first step to screening your captured source clips. There are three different ways you can open a clip in the Viewer to screen it. You can double-click a clip, drag it into the Viewer, or select it and press Return. Let's practice opening clips all three ways.
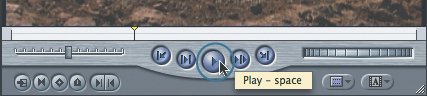
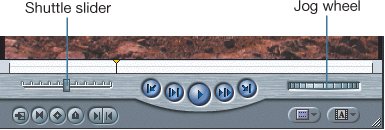
1.

Click in the Browser window.

2.

Click the disclosure triangle next to the Viewing and Marking bin to reveal the contents of that bin.

3.

To open the ab roller clip, double-click its clip icon.

The clip appears in the Viewer.

4.

To play this clip, click the Play button under the image area.

5.

Double-click the arm machine clip to open it in the Viewer. Play it if you like.

6.

Now drag the overhead dumbbells clip icon from the Browser into the Viewer image area and release.

7.

Drag the mountain bikers clip into the Viewer.

8.

Another way to open a clip is to select it and press Return. Click the dumbbell cu clip once in the Browser to select it, and then press Return to open it in the Viewer.

9.

To access a clip that has recently been opened in the Viewer, click the Recent Clips pop-up menu button in the lower right of the Viewer window. Drag down and choose the mountain bikers clip.

Note

You can adjust the number of recent clips displayed in the Recent Clips menu in the User Preferences window (Option-Q).

Playing Clips in the Viewer

Once the clip is in the Viewer, you can play it. There are several ways to play the clip, similar to the ways you played the sequence in the Timeline and in the Canvas.

The Viewer has a scrubber bar and a playhead just like the Canvas window. But whereas the Canvas scrubber bar represents the entire length of the active sequence, the Viewer scrubber bar represents the entire length of only one clip, and the playhead indicates where you are located within that single clip.

Practice different ways of playing a clip in the Viewer. Most of these are the same as playing a sequence in the Timeline or Canvas.
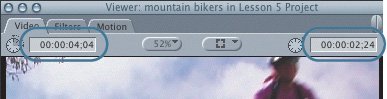
1.

With the Viewer window active, press the spacebar to start and stop the mountain bikers clip. Let it play to the end of the clip.

2.

Drag the playhead through the scrubber bar to scan, or scrub, the clip.

3.

Click the Play button beneath the scrubber bar to start and stop playing the clip.

Note

You will work with the other transport controls when you begin marking your clips in this lesson.

4.

Practice with the J-K-L keys. Press L to play the clip forward. Press K to stop. Press J to play the clip in reverse at normal speed. Press it again to increase the reverse speed. Press K to stop.

5.

Press the up arrow key to move to the head of the clip and the down arrow key to move to the end of the clip.

Note

Notice the vertical filmlike strips signaling the head and tail, or first frame and last frame, of the clip.

6.

Press the left or right arrow key to move backward or forward one frame.

7.

Shuttle through the clip by dragging left or right on the shuttle slider.

8.

Drag the jog wheel to the right to move frame by frame through your clip.

Viewing Display Information

The Viewer displays information about the clip that is helpful during editing. Like the Canvas, there is a Duration field in the upper-left corner. While the Canvas Duration field displays sequence length, the Viewer Duration field displays the duration or length of the clip in the Viewer. In the upper-right corner is a Location field that indicates the playhead's current time-code position in the clip.

Each number has four sets of two numbers divided by colons. From the left, these are hours, minutes, seconds, and frames. The number 00:00:04;04 reads 0 hours, 0 minutes, 4 seconds, and 4 frames.

Note

These timecode fields can display time in three ways: Non-Drop Frame timecode, Drop Frame timecode, and as individual Frames. The semicolon separating the last two digits from the rest of the timecode number indicates that the Drop Frame option is selected. This type of timecode can be used to time your sequence in real time. You can Ctrl-click either field in the Canvas or Viewer to change how time in the clip or sequence is displayed.


1.

Play the clip in the Viewer, and watch the number in the Location field change as the clip plays.

2.

Drag the playhead through the scrubber bar and see the timecode number change in the Location field.

3.

Press the left arrow key to move backward one frame and see the number in the Location field go down by one frame.

4.

Press the right arrow key to move forward one frame and see the number in the Location field go up by one frame.

5.

Hold down the Shift key and press the right or left arrow key to go forward or backward one second.

6.

What is the duration of the mountain bikers clip?

7.

From the Recent Clips pop-up menu, select dumbbell cu. What is its duration?

8.

Drag the playhead to 00:00:04;15 in the clip.


Apple Pro Training Series Final Cut Express HD
Apple Pro Training Series: Final Cut Express HD
ISBN: 0321335333
EAN: 2147483647
Year: 2006
Pages: 174
Authors: Diana Weynand

flylib.com © 2008-2017.
If you may any questions please contact us: flylib@qtcs.net