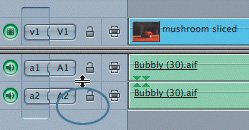
| In the Timeline, video and audio clips sit on horizontal tracks, which are linear representations of time. Time proceeds from left to right in the Timeline. The blue clips on top represent video, and the green clips below represent audio. To the left of the very first clips are track options and controls used during the editing process. 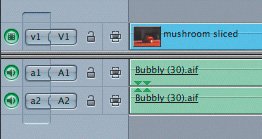 In Final Cut Express, you can work with multiple tracks. You can have up to 99 separate video tracks and up to 99 separate audio tracks. You might wonder why you need more than one video track and a couple of audio tracks since you can only see one thing at a time and hear one stereo sound track. Think about this. What if you wanted to place a title over your original source material? You would need two tracks, one for the source material and one for the title. And if you wanted to create a complex opening sequence that involved four different images moving about on your screen at the same time, each of the four clips would require its own track in the Timeline. Think how many tracks they must use when editing the opening to any James Bond movie! In later lessons, you will add tracks for titles and motion effects. For now, you will work with one video track and two audio tracks. Patching Source Tracks Each track in the Timeline is given a level ID number, such as Video 1, or V1, and Audio 1 and Audio 2, or A1 and A2. As you begin to edit with more tracks, you will want to make sure you are placing your source clip on the right track level. The way to do this is to connect or patch a source audio or video track to a specific destination track. In many cases, this is done for you automatically when you open a clip. This is discussed more in Lesson 5. The source and destination tracks appear in the Timeline track control area, with the source controls to the left of the destination tracks. The destination tracks are stationary and represent the tracks you see in the Timeline. The source tracks are indicated by a lowercase v for video and a for audio, while the destination tracks are indicated by an uppercase V or A. A DV audio/video clip has one video source track and two audio source tracks when there is stereo audio. 1. | Move the pointer over the v1 source control in the Timeline track area.
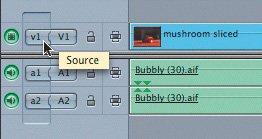 | 2. | Click the v1 source control repeatedly to connect and disconnect, or patch and unpatch, it from the V1 destination track.
| | | 3. | Click the a1 source control to unpatch it from the A1 destination track.
Note Assigning a source track to the appropriate destination track is only necessary during the editing process. It does not affect how the sequence plays in the Timeline. | 4. | Make sure the v1, a1 (left channel), and a2 (right channel) tracks are assigned and connected to the V1, A1, and A2 destination tracks respectively.
|
Changing Track Visibility There may be times during your editing process when you want to turn off the sound or picture of one of your tracks in order to focus on what you see or hear in the other tracks. For example, you may have used the original or background sound from one of your clips and added a narration and a music track. If you are trying to edit to the music beats, you may not want to hear the narration track. You can turn off a track by clicking the green Visible or Audible control on that track. 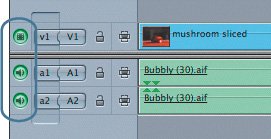 1. | Click the green Audible control on the A1 track.
The track turns dark in the Timeline to show it will not be heard.
| 2. | Click the green A2 Audible control so that both tracks are dark.
| 3. | Press the Home key to take the playhead to the top of the sequence. Play the sequence by pressing the spacebar.
You see the video of the clips play in the Canvas but don't hear any audio.
Note Whenever you toggle off the Visible or Audible control to a track, that track will not be seen or heard. | | | 4. | Click the A1 and A2 Audible controls again to turn them back on.
| 5. | Turn off the visibility for the V1 track and play the sequence.
Now you hear the sequence but don't see it.
| 6. | Turn on visibility for the V1 track to view and hear all tracks.
|
Locking Tracks Sometimes, you may need to make changes to some of the tracks in your Timeline without affecting any of the other tracks. To do this, you lock the tracks you do not want to affect. 1. | On the V1 track, click the lock next to the track number. This is the Track Lock control.
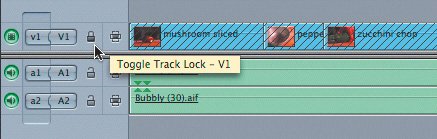 Diagonal lines appear across the track to indicate that track is locked.
| 2. | Play the sequence.
Note A locked track is visible and can play along with the other tracks, but it cannot be edited or changed. | 3. | Make the track active again by clicking the Track Lock control once more.
|
Adjusting Track Height The vertical height of the Timeline tracks can be adjusted to suit your personal preferences as well as the project requirements. If you are working with a lot of tracks, you may want to make them all smaller to see more tracks at one time. The Track Height control is at the lower left of the Timeline. | | 1. | In the bottom of the Timeline, move your mouse pointer over any column in the Track Height control area.
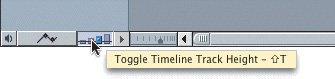 A tooltip appears above the four column heights identifying this as the Track Height control.
| 2. | Click the first column in the Track Height control.
The first column turns blue when selected, and all the tracks in the Timeline become very small.
| 3. | Click the second column to make the tracks taller. Then click the third and fourth track height.
Note When changing track heights, you change all the tracks to be the same height. | 4. | Press Shift-T several times to cycle through the different track heights.
As you cycle through using the keyboard shortcut, the active column height turns blue in the Timeline Track Height control area.
| 5. | Move the pointer in the Timeline over the split double line dividing the video and audio tracks.
The pointer turns into an up-down resize arrow.
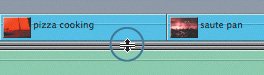 Tip In Final Cut Express, when you move the pointer over something that can be adjusted, the pointer changes to a different tool. | | | 6. | With the resize pointer, click and drag the double line up and down.
This creates space for additional audio or video tracks you may add later.
| 7. | Move the pointer over the boundary line between the A1 and A2 tracks in the track control area. When the pointer changes to a resize arrow, drag down to make just the A1 track taller.
 Tip To manually adjust all the audio or all the video tracks to the same height, press Option and drag a single track. To manually adjust all the tracks using this method, press Shift as you drag. | 8. | In the Track Height control in the Timeline, click the third column to bring the tracks back to a uniform height.
Note The sequences created for all the exercises in this book were saved in the third column height, although they may appear smaller in this book than on your computer screen. Feel free to change the sequence track height to your preference throughout the exercises. |
Changing the Thumbnail Display There are three ways you can view clips in the Timeline. You can see just the name of the clip, the name plus a thumbnail image of the clip, or a filmstrip representation of the clip. | | 1. | In the main menu, choose Sequence > Settings, or press Cmd-0 (zero).
Tip Make sure the Timeline or Canvas window is active so that this menu option can be selected. The Sequence Settings window appears, containing a Timeline Options tab.
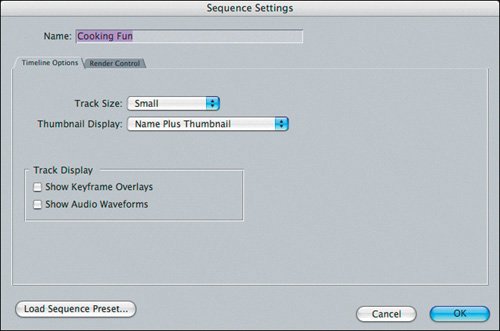 | 2. | In the Thumbnail Display pop-up menu, choose Name, but don't click OK.
Clips appear in the Timeline with only clip names.
| 3. | Click the Thumbnail Display pop-up menu again, and choose Name Plus Thumbnail.
A thumbnail image of the clip's first frame appears on each clip in the Timeline.
| 4. | Click the Thumbnail Display pop-up menu again and choose Filmstrip.
 The entire clip length has as many thumbnails as can fit in the clip area. Each thumbnail is different and represents a different portion of the clip. This is just a representation and is in no way subdividing your clip. The entire clip length has as many thumbnails as can fit in the clip area. Each thumbnail is different and represents a different portion of the clip. This is just a representation and is in no way subdividing your clip.
| | | 5. | Click the Thumbnail Display pop-up menu again and choose Name Plus Thumbnail. Click OK.
Whether you use a single thumbnail display or a filmstrip of thumbnails is a personal choice. Depending on your computer, working with more thumbnail images can slow some operations down a bit. Since we will make references to specific names of clips throughout the lessons, it will be helpful to have the names of the clips visible in the Timeline. So a good compromise for these lessons is to choose Name Plus Thumbnail.
|
Scaling and Zooming the Timeline In the lower-left portion of the Timeline are other controls for adjusting the horizontal scale and vertical height of the tracks within the Timeline, as well as the position of the sequence. 1. | In the Zoom control box, drag the Zoom control to the far right to show more of the sequence in the Timeline.
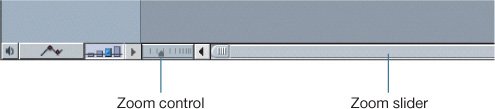 Note Keep in mind that the lengths of the clips are not being changed, only how the clips appear in the Timeline. | 2. | Now click or drag the Zoom control to the left to expand the sequence.
The sequence is expanded around the playhead position.
| 3. | Click the middle of the Zoom slider and drag to the left to see the beginning of the sequence.
| | | 4. | Drag the Zoom slider to the far right to see the end of the sequence and back to the left again to the head of the sequence.
| 5. | Click the tiny purple vertical line in the Zoom slider area.
 Note The purple line may or may not be on the Zoom slider itself, but it will be within the Zoom slider area. This purple line represents the location of the playhead in reference to the slider. Clicking it will take you to the playhead's parked position.
| 6. | With the playhead visible, press Option-+ (plus) to zoom in to the playhead location. Press Option- (minus) several times to zoom out.
| 7. | Drag the right thumb tab, or scored-end portion of the slider, to the right to zoom out of the sequence a little.
Note The size of the slider gets longer or shorter as you drag the scored tab on either end. | 8. | Press Shift-Z to make the entire sequence fit in the Timeline window.
|
Using Tools in the Timeline There are tools in the Tool palette you can select to zoom or view the sequence in the Timeline. These are the Zoom tool and the Hand tool. As in other desktop media programs, the tools that look like a magnifying glass are used to zoom in and out of something, and the tools that look like hands are used to reposition it. 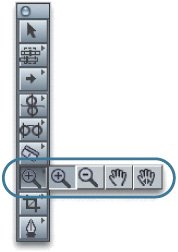 1. | In the Tool palette, click the Zoom In tool (the magnifying glass icon with the plus sign in it), or press Z.
When you move the mouse pointer back into the Timeline, it turns into the Zoom In tool.
 | 2. | Click the Zoom In tool anywhere in the Timeline sequence to zoom in to that particular area.
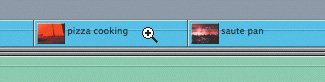
Tip You can also drag the Zoom In tool to create a marquee around a portion of the sequence, and that section will fill the Timeline. | 3. | In the Tool palette, click and hold on the Zoom In tool to bring up additional tools. Select the Hand tool without any arrows.
Note You can also press the shortcut key, H, for the Hand tool. | | | 4. | In the Timeline, click and drag the Hand tool left or right across the screen.
Note As you drag left or right, you can view a different area of the Timeline. Using the Hand tool does not change the position of the sequence within the Timeline, only what portion you are viewing. | 5. | Change back to the Zoom In tool by pressing Z.
| 6. | Hold down the Option key. The Zoom In tool changes to the Zoom Out tool (the plus inside the magnifying glass changes to a minus). Now click in the sequence to zoom out and display more of the sequence in the Timeline.
| 7. | Press A to return your mouse pointer to its default Selection tool.
| 8. | Press Shift-Z to make the entire sequence fit in the Timeline window.
|
|