Creating a Farm
| | ||
| | ||
| | ||
A prerequisite for clustering is being connected to a repository. The repository can be a file-based repository or it can be the Infrastructure installation. To be able to make use of the full range of features and benefits provided by 10g AS (such as OID and SSO), you'll be using the repository that comes with the Infrastructure installation.
Installing an Infrastructure
When you install an infrastructure you follow the same basic steps and requirements that you did in Chapter 16 except for the following:
-
You need more disk space (3 GB).
-
You need to configure shared memory and semaphore parameters for the asdb database.
-
Port 1521 needs to either be available or already used by a 9i database listener.
Assuming that you've configured your infrastructure node according to the Installation and Configuration Guide, the highlights of the installation are as follows :
-
Prior to installation, make sure to start any other 10g AS processes including WC and the ASC on the node in order to ensure that the new installation allocates new and distinct ports.
-
Select the Infrastructure installation type when prompted for a product as shown in Figure 21-2.
-
In the next page, select the large Identity Management and Oracle Metadata Repository installation as shown in Figure 21-3.
This installation will provide the 9i asdb database, OID and SSO components , Metadata Repository, and the J2EE installation as the infrastructure.
You may get a page asking you to verify that you have enough memory (you should have verified this prior to installation). If you see this page, it doesn't necessarily indicate that an error has occurred, and you may click OK to continue.
The Oracle Universal Installer (OUI) will display an overview page showing the steps for the Infrastructure installation. Click Next to continue.
The standard root privileges page will appear, prompting you to confirm that you can run root.sh as root when needed. Check the confirmation box and click Next.
-
The Select Configuration Options page will appear as shown in Figure 21-4.
In this page, select all the options except for High Availability Addressing and then click Next. In the example here you shouldn't be as concerned about making the infrastructure highly available as the mid tiers. However, for environments dependent on OID and SSO you would want to implement this option.
-
Accept the defaults for Specify Namespace in Internet Directory and click Next.
-
On the Specify High Availability Addressing page, leave the hostname a null value because you aren't configuring this feature. Click Next to continue.
-
For the Specify OCA (Oracle Certificate Authority) Distinguished Name page, select the Typical DN option. Enter values appropriate for your organization as shown in Figure 21-5.
-
The next page prompts you for a key length to be used when signing digital certificates. The larger the value, the more secure the certificate will be. Select 2048 and click Next.
-
You'll be prompted to provide an OCA Administrators password. Pick a password and click Next.
-
The OUI will prompt you for a database name. Under 9iAS the default was iasdb , but with 10g AS the default becomes asdb . Accept the default values for the Global Database Name to be asdb.name.domain and SID to be asdb , and then click Next.
-
As an improved security feature, the OUI now prompts you to create SYS and SYSTEM passwords instead of the standard change_on_install and manager defaults. Enter appropriate passwords and click Next.
-
Since the infrastructure is creating a full Enterprise Edition 9i database it needs to know where to put the data files. Regrettably, it doesn't allow you to specify multiple file systems, but it does allow you to select one location. You'll need approximately 1.4 GB for the database. The software is being installed into /u01/app/oracle/product/9.0.4inf1/OraHome1 so you can enter the following location for the database files: /u02/oradata .
The OUI needs to be able to write to that location and it will create the asdb subdirectory. Don't try to be helpful and specify /u02/oradata/asdb otherwise you'll get a /u02/oradata/asdb/asdb directory. This is perfectly functional, but not as clean. Click Next to continue to the next page.
-
OUI will prompt you for a database character set. Accept the default and click Next.
-
The next page prompts you for an instance name and ias_admin password just like when you installed the first mid- tier installation. Select an instance name to denote the infrastructure type such as 904infra1 , enter the password to be used for ias_admin , and click Next.
-
A summary page appears next and after you have validated that it's correct, click Install.
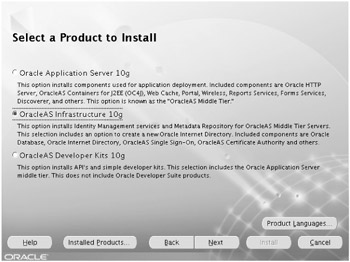
Figure 21-2: 10g AS Infrastructure installation selection
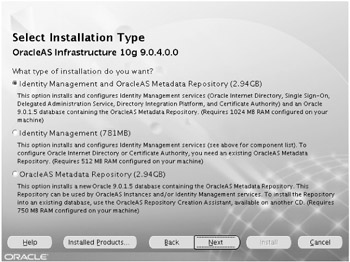
Figure 21-3: Identity Management and Oracle Metadata Repository installation
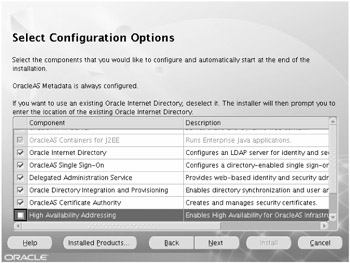
Figure 21-4: Select Configuration Options page
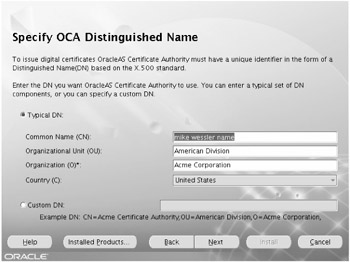
Figure 21-5: Specify OCA Distinguished Name page
The installation for an infrastructure will take longer than for a mid tier simply because there's more to install. Because the database asdb is being built from preseeded databases files that are being copied to disk ( essentially from a cold backup on CD with a rebuild control file step) the database creation step will be relatively short.
After the installation and relinking processes have completed, multiple configuration assistants will run. Once these have completed you'll be provided a page listing relevant URLs and ports, and you can then exit the OUI.
Ports allocated during the installation can be found in $ORACLE_HOME/install/portlist.ini . You'll find the database, listener, and OPMN managed processes running.
As shown in Chapter 16, use the opmnctl startall and opmnctl stopall commands to start and stop the processes. Unlike in the 9iAS 9.0.2 release, these commands also start and stop your OID processes so there aren't additional OID-specific commands to use. The following are the OPMN processes you can expect to see running in an infrastructure:
$ dcmctl getstate Current State for Instance:904infra1.mike.wessler.name Component Type Up Status In Sync Status ========================================================================= 1 HTTP_Server HTTP_Server Up True 2 OC4J_SECURITY OC4J Up True 3 home OC4J Down True(Disabled) 4 oca OC4J Up True $
Also different from 9iAS 9.0.2 is the fact that each installation on a node can have its own distinct ASC (then called a Web Based OEM) process running. Use emctl start iasconsole and emctl stop iasconsole to manage this process. The base URL will still be the same ( http://hostname.domain ), but the port will be incremented (for example, 1811) if other instances already exist on the same node.
After an installation, the asdb database and listener are already running. However, keep in mind that they're prerequisites for running the OPMN managed processes. If you forget to first start the database and listener, your infrastructure will not start correctly. Therefore, your infrastructure startup steps need to be as follows:
-
Verify ORACLE_HOME and ORACLE_SID , as follows:
$ echo $ORACLE_HOME /u01/app/oracle/product/9.0.4inf1/OraHome1 $ echo $ORACLE_SID asdb $
-
Start database listener, as shown here:
$ lsnrctl start
-
Start database asdb , as follows:
$ sqlplus "/ as sysdba" SQL> startup SQL> exit
-
Start the OPMN processes, as follows:
$ opmnctl startall opmnctl: starting opmn and all managed processes...
-
Start the ASC (if needed), as shown here:
$ emctl start iasconsole
The shutdown steps are in the reverse order with the database and listener being the last components stopped .
In this section we quickly covered the installation for an infrastructure assuming that you've read and followed the prerequisite steps identified in Chapter 16. Although outside the scope of this book, it's important to ensure that the asdb database is being backed up properly by the DBA. Make sure that the DBA puts the asdb database into ARCHIVELOGMODE , gets a good cold backup, and then either takes hot backups or uses Recovery Manager (RMAN).
Joining an Infrastructure
In Chapter 16 you installed a standalone J2EE and WC instance named 904mt1 . Although originally created as a standalone, this instance can join the infrastructure you just createdpostinstallto create a farm. To join an infrastructure, follow these steps.
-
Start up both the infrastructure and mid-tier instances.
-
Log in to the standalone mid-tier ASC utility.
-
Click the Infrastructure tab on the instance home page and you'll see the infrastructure configuration page shown in Figure 21-6.
From this page you'll configure Identity Management and Oracle AS Clusters Managed Using Database Repository to become part of the farm.
To obtain the correct port settings for the configuration, use the portlist.ini located in the infrastructure $ORACLE_HOME/install directory.
-
First click the Configure button for the Identity Management. A three-step wizard appears as shown in Figure 21-7.
-
For Host enter the node where OID is installed, in this case mike.wessler.name . Next, enter the Internet Directory Port, which is 3060, as it was obtained from the infrastructure portlist.ini file shown here:
Oracle Internet Directory port = 3060
Once these values are entered, leave the SSL box unchecked and click Next.
-
The next page prompts you for the orcladmin password, which should be the same as the ias_admin password for the Infrastructure installation. Enter the password and click Next as shown in Figure 21-8.
-
A final Validation page will appear before you're prompted to finish the configuration as shown in Figure 21-9. This step will shut down the mid-tier OPMN processes.
-
Click Finish and the process will run for a minute or two. For this test system, an error occurred stating all the processes could not be stopped. After validating, all the processes were down and after clicking Finish again, the step was successful. Now restart the OPMN managed processes, as follows:
$ opmnctl startall opmnctl: starting opmn and all managed processes... $
-
The next step is to configure the instance to use the asdb Metadata Repository. Click the Configure button for Oracle AS Clusters Managed Using Database Repository. Although this section says clusters, it's actually just joining the farm as a prerequisite step for joining a cluster.
-
A wizard asking you to join the asdb Metadata Repository starts, as shown in Figure 21-10.
-
This page allows you to select Oracle AS Metadata Repository or Existing database for your repository. Select Oracle AS Metadata Repository and click Next.
-
The next page prompts you for the orcladmin password, which is the same one you previously entered in step 6. This is shown in Figure 21-11.
-
Enter the password, leave the Use Only SSL Connections with Internet Directory box unchecked, and click Next.
-
The next page prompts you for the global database name of the Metadata Repository. This is shown in Figure 21-12.
-
In this case the wizard provides a drop-down box with the database name already provided. Once the correct value has been selected, click Next to continue.
-
The final page in the wizard is a validation page, as shown in Figure 21-13.
-
Click Finish to complete the wizard. This will take a few minutes.
-
After the wizard has completed successfully, you'll be provided the following Infrastructure page shown in Figure 21-14.
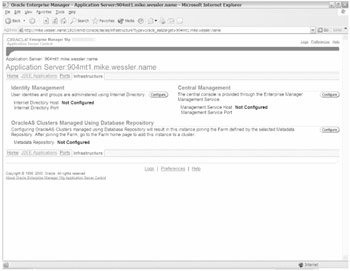
Figure 21-6: Infrastructure configuration page
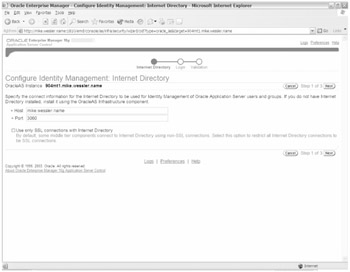
Figure 21-7: Configure Identity Management Internet Directory page
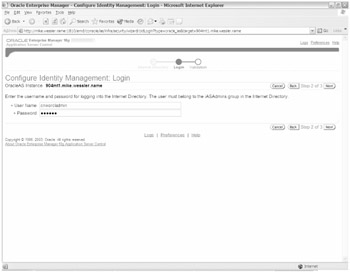
Figure 21-8: Configure Identity Management Login page
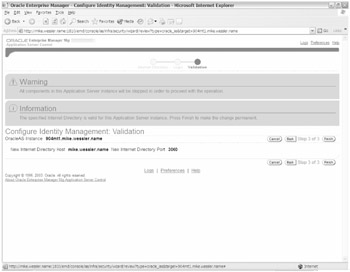
Figure 21-9: Configure Identity Management Validation page
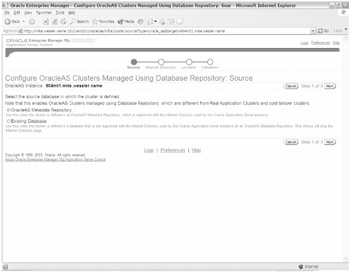
Figure 21-10: Configure Database Repository Source page
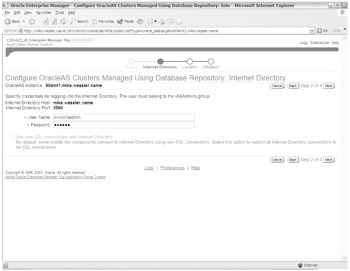
Figure 21-11: Configure Oracle AS Clusters Managed Using Database Repository Internet Directory page
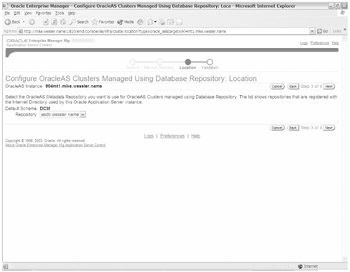
Figure 21-12: Configure Oracle AS Clusters Managed Using Database Repository Location page
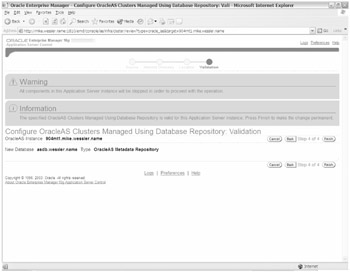
Figure 21-13: Configure Oracle AS Clusters Managed Using Database Repository Validation page

Figure 21-14: 904mt1 Infrastructure page
At this point the mid-tier instance is no longer a standalone instance and is now part of the farm. Restart the mid-tier OPMN managed processes, as shown here:
$ opmnctl startall opmnctl: starting opmn and all managed processes... $
Once this is complete, the asdb infrastructure Farm page will show the 904mt1 mid-tier instance as part of the farm, as shown in Figure 21-15.
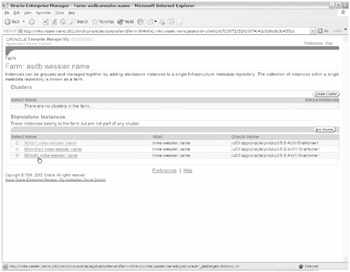
Figure 21-15: asdb Farm page
In Figure 21-15 you can see that there are two sections to this page: Clusters and Standalone Instances. There are currently no clusters defined, but there are three members of the farm. The term "Standalone Instances" is a little misleading because the three instances listed (a Business Intelligence, Infrastructure, and 904mt1 J2EE mid tier) are part of the asdb farm, so they aren't truly standalone.
Installing a Mid Tier
In practice a cluster is composed of two or more members, and currently you only have 904mt1 as a part of the farm. Therefore, you must install an additional J2EE and Web Cache installation named 904mt2 . During this installation you'll specify that the instance should be a member of the farm.
Since we've already shown you a J2EE standalone installation, how to join that installation to a farm, and the key points of an Infrastructure installation, we'll only show you the installation steps in which you'll identify the infrastructure you'll be joining as a farm member.
When selecting configuration options, you want to select Database-Based Cluster (farm) and Identity Management Access (OID). Select these options and click Next, as shown in Figure 21-16.

Figure 21-16: Mid-Tier Configuration Options page
The next page prompts you for the OID server to connect to, which is the same as the one you entered in step 5 of the previous section. For Host enter mike.wessler.name and for Port enter 3060 .
The password for the cn=orcladmin is the same as it was for ias_admin , as you entered in the previous section for step 6.
Next you're prompted for the infrastructure repository database to connect to. The appropriate response for this example is shown in Figure 21-17.
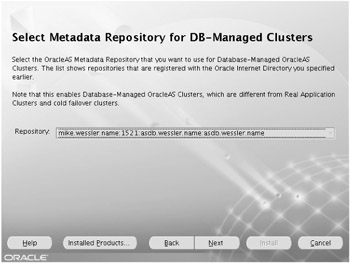
Figure 21-17: Metadata Repository selection page
Finally, you're prompted for an instance name and password for ias_admin . In this example we used a logical name 904mt2 . Once we entered that and chose the password, we installed the software as normal. Upon completion of the installation, the 904mt2 mid tier was visible in the infrastructure Farm page.
| | ||
| | ||
| | ||
EAN: 2147483647
Pages: 150