Secure Sockets Layer and Oracle Wallet Manager
| | ||
| | ||
| | ||
As we discussed in the previous section, standard HTTP traffic isn't encrypted. Therefore, anyone with the necessary network-monitoring equipment can possibly intercept and read your traffic. Clearly, this is something that you need to defend against. Encrypting your traffic using the SSL HTTPS Protocol renders your data unreadable even if someone intercepts it. The use of public and private keys virtually guarantees that only the authorized receiver of the message can read it.
Before sending a message, the sender applies a hashing algorithm to it, which creates a message digest. This message digest is then encrypted with the key, resulting in a digital signature. This is what is sent across the network. By using digital digests, which act as checksums for messages between the client and server, the checksum ensures that packets have not been tampered with during transmission. When a message is received, it contains this checksum (digital digest), which would now be different if it had been tampered with. The receiving machine runs its own checksum algorithm against the message and compares the results. If the two resulting digital digests match, the message hasn't been intercepted and modified in transit and is therefore valid.
The identity of the sender and receiver is confirmed because of the certificate on the server level and a generated digital signature for the message. Not only do you know who sent the message because of the digital signature, but it's difficult for the sender to deny sending the message because only she could have signed it (this is referred to as nonrepudiation ).
Therefore, you know the following when using SSL:
-
Data in the message hasn't been read because it's encrypted.
-
The packages you receive haven't been tampered with because the digital digest of the message is valid.
-
The sender of the message is who he is because of the digital signed signature and trusted certificate.
SSL is the standard for encrypting sensitive messages between clients and servers. To use SSL, use the HTTPS Protocol identified by https at the beginning of each URL. Since there's a performance overhead of encrypting every packet using SSL, commercial sites generally use SSL only for the critical components of a web transaction, such as credit card checkout at an online store.
Keys
It's important for the administrator to understand the basic concepts behind SSL and Public Key Infrastructure (PKI). A firm understanding of how keys are created and used will save immeasurable hours troubleshooting communication errors. Although OWM is the tool used to create keys and certificate requests within 10g AS, you can apply these concepts to all web servers using SSL.
SSL is based on PKI, which uses keys that are asymmetrically distributed at both the client and server to encrypt packets. The packets are then sent across the network to each other, then decrypted. Finally, you can read the message secure in the knowledge that you know who sent it and that it hasn't been tampered with.
A key consists of a string value, which, when applied to a mathematical algorithm, is used to encrypt and decrypt messages. Both the client and server have keys that correspond to each other, thereby forming a key pair. Only by applying this key value can you read a message encrypted by the other key. Theoretically, if you have enough high-power computers, you can eventually "break" the key encryption code and read the message without the key, but by using larger key values this becomes exponentially more difficult. The size of the key determines the key strength; the larger it is the better because it means more possible combinations may exist. Current key generation sizes provided by OWM for server certificates typically range from 512 KB to 4092 KB, with most systems using keys that are 1024 KB in length, which results in 128-bit client-server encryption.
Two keys initially exist on the server, but one is then downloaded to the client to encrypt the communication between the two machines when a session starts. Both keys are not identical. The client-side key is a public key and the server key is a private key.
-
Public key. A public key initially resides on the server and is matched to a private key. When an SSL connection to the server is initially established, the public key is automatically downloaded to the client. It's used to decrypt messages sent from the server and to encrypt outgoing messages to that server.
-
Private key. A private key always resides on the server and is never distributed to clients. It's matched to the public key that was downloaded to the client. The private key is used to encrypt outgoing messages to the client and is used to decrypt incoming messages from the client.
A critical concept in the public and private key model is that although the public key is freely distributed to clients and is used to read messages encrypted by the private key, it cannot be used to reverse engineer the private key. Therefore, you know that the private key can only exist on the one server. This guarantees that a message using that private key did in fact come from that server because the digital signature cannot be forged.
Certificates
A certificate contains a public key and confirms that the public key it contains is associated with the private key located on server that's providing the certificate. This establishes the digital identity of the sending server and binds that identity to the public key that will be included in the certificate. It's a way of confirming the identity of the origin of the keys and server you're communicating with.
Certificates are issued by CAs. A CA confirms the identity of the requestor and then signs the certificate stating that that the CA approved the public key in the certificate. This way you know who is vouching for the authenticity of the certificate. It also manages CAs by establishing expiration dates and revocation lists for invalid certificates. This is in contrast to a self-signed certificate in which the server certifies itself as being who it claims to be. These certificates are OK for testing or secure, internal environments, but not for public Internet applications.
There are numerous CAs available. Some include commercial companies such as VeriSign, thawte, and GTE CyberTrust while others include government agencies. A preconfigured list of trusted CAs is stored in your browser. If a certificate is received and the approving CA isn't listed in your preapproved list, the browser will issue a warning message. The certificate request process is generally as follows :
-
Generate your server side, private key. Along with that private key creation, also generate a public key certificate request corresponding to the private key.
-
Send that key request to a CA.
-
After verifying your identity, the CA approves the request by signing the request and returning a corresponding public key.
-
Save the public key and deploy it to the server along with the private key.
Once you have both the private and public keys, you're ready to deploy and implement SSL.
Starting with 10g AS (9.0.4), Oracle has become a CA for its own certificates as the Oracle Certificate Authority (OCA). You'll learn more about this in the next section.
Oracle Certificate Authority
The OCA is Oracle's entry into the CA realm starting with 10g AS (9.0.4). Although the traditional, commercial CAs can still be used with OWM, OCA allows certificates for Oracle products to be generated and signed internally.
OCA is installed within the Oracle Infrastructure installation and is integrated with Oracle Identity Management, which is discussed in the "Identity Management" section.
OCA processes are managed from the command line using the ocactl utility located in $ORACLE_HOME/oca/bin . This utility is password protected and the process needs to be started before accessing any OCA configuration pages.
The management of certificates within OCA occurs with a web-based utility. The URLs are specified in $ORACLE_HOME/install/setupinfo.txt , as follows:
OCA User Page: https://mike.wessler.name:4400/oca/user OCA Admin Page: https://mike.wessler.name:4400/oca/admin
OCA would be useful for sites using the Oracle Infrastructure installation or Identity Management, but for standalone J2EE installations the only option is OWM.
Oracle Wallet Manager
A container for the certificates must exist, and within Oracle this is in the OWM, which stores certificates within wallets on the file system. Additionally, it provides a GUI interface for creating new wallets, generating new certificate requests, and importing and exporting certificates. It's the tool to use when working with certificates under 10g AS.
Using Oracle Wallet Manager
To create a new wallet and certificate request, perform the following steps:
-
To start OWM, log in to the server where the request will be generated and configured for an X Windows session. Then execute $ORACLE_HOME/bin/own as shown here:
$ $ORACLE_HOME/bin/owm
OWM is then started, as you can see in Figure 20-7.
The first step within OWM is to create a new wallet. This is where your certificate and certificate request will be stored on the file system. OWM will attempt to create this in a default directory, but because a server may have multiple wallets, you'll need to make these more unique. Create the following directory with the UNIX mkdir command and be sure only oracle:dba can access the $ORACLE_HOME/ORACLE/WALLETS/wallet-1 directory.
-
Next create a wallet in this directory with OWM. Select Wallet New. OWM will initially state that the default wallet doesn't exist and ask if you want to create one. Select Yes and then enter an appropriate password for the new wallet when prompted.
-
Once you've created a new wallet password, you'll be prompted to create a new certificate request. Select Yes and enter the information, as shown in Figure 20-8.
The request has been generated, but not yet submitted to a CA. This is shown in Figure 20-9.
You can see that a certificate has been requested in the top left of Figure 20-9. The right side of the screen shows the details of the certificate.
Trusted certificates from trusted CAs that have been preloaded into OWM are shown on the left below the certificate request.
-
Export the request to a file using Operations Export Certificate Request. Save it as a file in your $ORACLE_HOME/ORACLE/WALLETS/wallet-1 location. Then submit the text in the saved file to the CA.
-
Be sure to save your request and wallet. Select Wallet Save As and save it to $ORACLE_HOME/ORACLE/WALLETS/wallet-1 . This directory will contain your wallet and the certificates
-
Once the request has been approved by your CA, copy the text (for example, cert.cer ) into a file and save it in $ORACLE_HOME/ORACLE/WALLETS/wallet-1 . This file would appear similar to the following:
$ more cert.cer -----BEGIN CERTIFICATE REQUEST----- MIICETCCAXoCAQAwgbkxCzAJBgNVBAYTAlVTMRAwDgYDVQQIEwdJbmRpYWw /DJFiKIQP30IApX615yU97oEUCN8FQLGB1CGAfWllHUvxogSNBRqvUe2Aaz ... 4T6o/fGbs0Dr5uxFjYphcLQ1QFI6Ed6h/cs6m30MLmmhYKZ3yNk28YyR1ug IJNt7z8= -----END CERTIFICATE REQUEST----- $
-
Then reopen your wallet and import it into OWM by selecting Operations Import Trusted Certificate. Once the certificate has been imported, the top left of the screen will list the certificate as Ready.
-
Choose Wallet Auto Login and click Save. This allows the certificate ( not the owm tool) to be used without having to provide the OWM wallet password.
-
Save the newly created wallet and certificate by selecting Wallet Save.
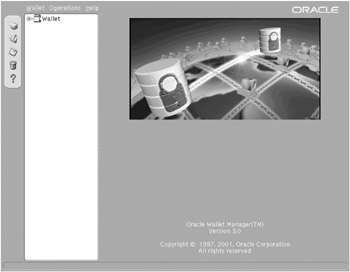
Figure 20-7: Oracle Wallet Manager
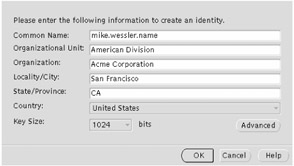
Figure 20-8: Create Certificate Request dialog box
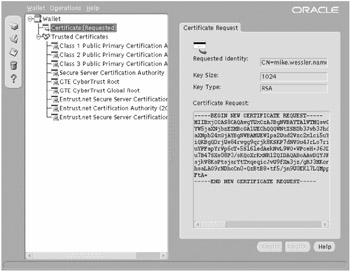
Figure 20-9: Generated certificate request
At this point the certificate has successfully been loaded into the wallet and is ready for use with SSL.
Setting Up SSL
In the Apache world, SSL is implemented via mod_ssl (see www.modssl.org ). However, within 10g AS, Oracle has modified this module and the Apache directives so that it's now referred to as Oracle SSL implemented via mod_ossl . It's important to note that many Apache SSL directives have been removed, beginning in 9iAS 9.0.2. This is because OWM now maintains and provides the certificates to OHS rather than using individual certificate files.
Setting up SSL for OHS assumes that you've requested and received your certificate, imported and saved it into OWM, and now have the path to the wallet directory.
To turn on SSL, insert the following directives into the OHS ssl.conf file:
SSLEngine on SSLWallet file:/u01/app/oracle/product/9.0.4mt1/OraHome1/ORACLE/WALLETS/wallet-1 SSLWalletPassword 05A34692B60497970018B3E1FA66C99EAF
The SSLWalletPassword is the password used to open the wallet via OWM. This directive can contain either the plain text password (not recommended) or the encrypted value. To generate the encrypted value, perform the following:
-
Change directories to $ORACLE_HOME/Apache/Apache/bin , as shown here:
$ cd $ORACLE_HOME/Apache/Apache/bin
-
For UNIX and Linux, issue iasobf and for Windows, use osslpassword . Enter the command, the password, and then the operating system user who will execute it. Since SSL runs on port 443 (below 1024), it needs to be executed as root , as follows:
$ iasobf -p owmpd123 root Obfuscated password: 05A34692B60497970018B3E1FA66C99EAF $
-
Use the obfuscated password in the SSLWalletPassword directive, as shown here:
SSLWalletPassword 05A34692B60497970018B3E1FA66C99EAF
-
Once these directives are in place, configure the Listen directives from port 80 or 7777 to port 443 as shown in the httpd.conf file:
Listen 192.168.1.11:443
-
It's also necessary to change the Port directive in the ssl.conf file to 443 from the default of 4443. Under 10g AS, the ssl.conf file is where SSL commands are to be.
-
If any virtual hosts will be used with SSL, you must configure them to listen on port 443 as well. These are included in the ssl.conf file and you must move the corresponding Listen directive into this file from the httpd.conf file.
-
Finally, with 10g AS, it's necessary to turn on SSL for OHS within opmn.xml . Failure to do this will result in a "hanging" screen when attempting to access an HTTPS URL. To enable this, edit the opmn.xml with the ASC utility. Change the OHS start-mode value from ssl-disabled to ssl-enabled as shown here:
<process-type id="HTTP_Server" module-id="OHS"> <module-data> <category id="start-parameters"> <data id="start-mode" value="ssl-enabled"/> </category> </module-data> <process-set id="HTTP_Server" numprocs="1"/> </process-type>
Then restart OHS and the URL should be accessed via the https rather than http URL prefix.
If errors occur and troubleshooting is necessary, use the OHS logging facilities within the ASC, or the files in $ORACLE_HOME/Apache/Apache/logs and $ORACLE_HOME/opmn/logs/ HTTP_Server~1 to help troubleshoot the problem. Also verify that port 443 on your IP is open on the firewall because this is a common problem when setting up SSL.
| | ||
| | ||
| | ||
EAN: 2147483647
Pages: 150