Creating a Dedicated OC4J Instance
| | ||
| | ||
| | ||
As we covered in Chapter 17, OC4J is composed of multiple OC4J instances. Each of those instances has one or more processes, each having one Java Virtual Machine (JVM) to execute the Java code. The OHS process routes incoming Java requests to the appropriate OC4J container via mod_oc4j and Apache JServ Protocol (AJP) for Servlets and JSPs. Once it has determinedbased on the mod_oc4j.conf to virtual directory mappingthe appropriate OC4J container to handle the request, the request is sent to one of the processes of that OC4J instance for processing. These processes may or may not be part of an island where application state is replicated to other processes. By having multiple processes per OC4J instance, these processes provide fault tolerance for failed processes and load balancing.
Benefits
The default OC4J instance is called home . Though you could deploy your applications to that instance, a better method is to create a dedicated instance. For example, you could create a Payroll instance for Payroll applications and Sales for the Sales application. The dedicated instance has its own OC4J container, processes, and configuration files. All of these can be tuned specifically for the deployed code and that container can be managed without impacting other containers. Creating a dedicated instance provides the following benefits:
-
Allows a clear separation of default OC4J applications from custom applications.
-
Allows custom applications to be configured and sized separately.
-
Starting, stopping, and restarting activities only impact the individually selected OC4J instance.
-
Logging and monitoring a dedicated instance is easier than monitoring a container hosting multiple applications because you're able to isolate each application.
-
The performance impact of having a separate instance is outweighed by the management, stability, and tuning benefits.
We run dedicated OC4J containers in our environments for each distinct application if for no other reason than the fact that management is easier, although there are other benefits, as we listed earlier. If we had a large number of J2EE applications and this became impractical or there were simply too many JVMs for the machine, we would consolidate the individual OC4J containers into webdev, webtest , and webprod OC4J containers. This method would still separate custom OC4J applications from home , but we would only have at maximum four containers ( home, webdev, webtest , and webprod ). This tends to be more common in development environments than in test or production environments.
Steps
The following are the necessary steps that you must follow to create a dedicated OC4J instance called webdev via the ASC tool.
-
From the mid- tier instance home page, click the Create OC4J Instance button located below the Memory Usage section as seen in Figure 18-1.
-
Name the dedicated instance, as shown in Figure 18-2. In this case, you should name it webdev since this is just development, although you could be more specific with Payroll or Sales .
-
The ASC will run for about a minute, thereby creating the new instance as shown in Figure 18-3.
-
Ultimately a positive response will come back stating the instance has been created. At this point the instance is created, but it's down by default. It's necessary to start the instance via ASC as shown in Figure 18-4.
Notice that just because this one webdev container is down (even though currently it hosts zero applications), the ASC marks the entire mid-tier instance as being down. This is rather deceptive because all other components such as OHS and OC4J home are still functioning.
After a few seconds of processing, the webdev instance will be started and the status of the mid-tier instance will be up as normal.
-
At this point the webdev instance is available for configuration as you saw in the previous chapter. It's also registered in the repository, accessible via Distributed Configuration Management (DCM) and Oracle Process Management Notification (OPMN), and ready to host applications, as shown here:
$ dcmctl getstate Current State for Instance:904mt1.mike.wessler.name Component Type Up Status In Sync Status ======================================================================= 1 home OC4J Up True 2 HTTP_Server HTTP_Server Up True 3 webdev OC4J Up True $
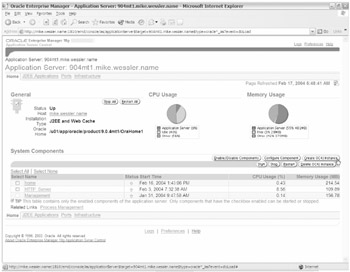
Figure 18-1: The Create OC4J Instance button on the Application Server page
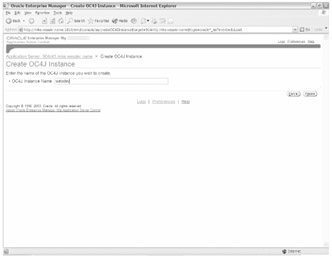
Figure 18-2: Name the OC4J Instance Name webdev
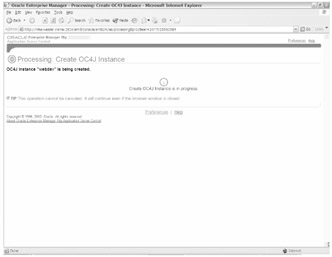
Figure 18-3: Create OC4J Instance webdev
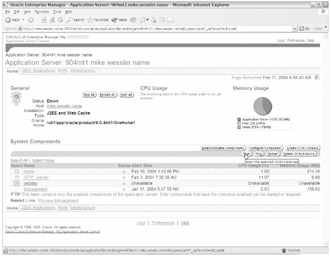
Figure 18-4: Starting the OC4J instance webdev
In the next section, you'll see how to deploy applications to the new webdev container.
| | ||
| | ||
| | ||
EAN: 2147483647
Pages: 150