Section 5.1. Data Binding
5.1. Data BindingData binding links data and an HTML element for its visual representation. In ASP.NET, data binding is used with controls such as the GridView, FormView, and DetailsView although it is, of course, also possible to tie data to a bulleted list, for instance. Atlas offers two approaches to data binding. One is programmatic, and the other uses a special kind of XML markup that Atlas interprets on the fly. 5.1.1. Using Code for Data BindingsDoing data binding programmatically sounds more complicated than it actually is. Basically, you have to instantiate a class and then set some properties. The client-side class that is used for all Atlas bindings is Sys.Binding.
After you have created a binding, provide the following information:
Some of this terminology will be new to ASP.NET users, such as the distinction between a data path and a property, because it was selected to be compatible with the vocabulary that will be used for Windows Presentation Foundation (WPF) in Windows Vista. But the approach is quite straightforward: you have a binding object that you can add to the target element (that's why you need both the source element and its data path, but only the target property). A transformer optionally changes, or transforms, the data during the binding process. Atlas comes with built-in transformers and enables you to define custom transformers as well. The transformers that ship with Atlas include:
Some of these transfomers take an argument that can be set with the set_transformerArgument() method. 5.1.1.1. Programmatic data binding using a built-in transformerLet's return to actual code. We are once again recycling an old exampleExample 4-8 from Chapter 4, the text box and the label, where a change in the text box changes the text of the Label control. This time we would like to connect these two using bindings. First, we need two elements in the HTML markup, like this: <input type="text" /><br /> <label ></label> Then we need code to instantiate them in JavaScript: function pageLoad() { var textbox = new Sys.UI.TextBox($("TextBox1")); var label = new Sys.UI.Label($("Label1")); Now to the binding. We first instantiate the Sys.Binding class: var binding = new Sys.Binding(); Then we must attach the binding's data source (data context). In this example, we are referencing the TextBox control: binding.set_dataContext(textbox); Since we want the text within the text box, the correct data path (that is, property name) is text: binding.set_dataPath("text"); The data will be written into the Label control's text property: binding.set_property("text"); Now to a transformation. As a transformer, ToString will be used: binding.transform.add(Sys.BindingBase.Transformers.ToString); If you do not provide a transformation argument, the input data is used as the argument. However, by providing an argument, you can provide additional text, such as formatting information: binding.set_transformerArgument("Text entered: {0}"); The binding is complete; now you have to add it to the target element, namely the Label control. First, load the current bindings with get_bindings(), then call the add() method: label.get_bindings().add(binding); Now to the tricky (and final) part. Both elements must be initialized: textbox.initialize(); label.initialize(); }
The complete code is shown in Example 5-1. When you enter some text in the text field, nothing happens at first. When you leave the text field, however, either by using the Tab key or by clicking outside the text field, the propertyChanged event fires, the binding is executed, and the text in the text field appears in the label. Example 5-1. Using Atlas data binding with a transformer
Figure 5-1 shows the result. Figure 5-1. The Label control's text is bound to the TextBox control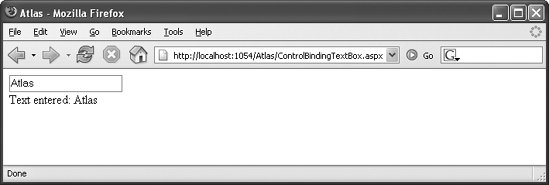 5.1.1.2. Binding directionBy default, a binding is "incoming," meaning that the data is copied from the source to the target. Imagine that you replace the Label control with a second text box and implement the binding as before. Then changes in the first text box are copied into the second one, but not vice versa. This behavior can be changed, however, by calling the Binding object's set_direction() method. The following values are possible:
The following command would make the binding bidirectional: binding.set_direction(Sys.BindingDirection.InOut); The binding direction is also important when using the Add or Multiply transformers. If you are using Sys.BindingDirection.Out, then Atlas interprets the transformers backward: it interprets the Add TRansformer as subtract, and the Multiply transformer as divide. 5.1.1.3. Using a custom transformerIf the built-in Atlas transformers are insufficient for your needs, it is easy to write a custom one. For instance, if you take a look at Example 5-1, you'll see that the HTML markup in the text box is not escaped (special characters like HTML markup converted to HTML entities) when putting it in the Label control. If a user enters HTML in the text box, the markup (for instance, <b>Text</b>) is applied as HTML in the Label control instead of being displayed (in the example, this would make the text appear in boldface). If the text contains JavaScript, the code will be executed instead of displayed. If you do not want this behavior, you must write a custom transformer that converts HTML charactersangle brackets and quotation marksinto the appropriate HTML entities. Looking at the Atlas JavaScript source code (the file Atlas.js, to be exact), you can find out how such a transformer is implemented. The function signature for a transformation expects two parameters: a sender (usually not used) and an event. The second parameter contains the data to be transformed: function myTransformer(sender, args) { var value = args.get_value(); ... After the transformation, the value must be written back to the event using its set_value() method: ... args.set_value(value); } Here is a possible implementation for the given taska transformer that escapes HTML markupusing JavaScript regular expressions. The g modifier at the end of the expression ensures that all occurrences of angle brackets or quotes are replaced. function customHtmlEncode(sender, args) { var value = args.get_value(); var newValue = value.replace(/&/g, "&") .replace(/</g, "<") .replace(/>/g, ">") .replace(/"/g, """) .replace(/'/g, "'"); args.set_value(newValue); } The last step is to add this function as the transformer for the data binding, just as you would do with one of the built-in transformers. Example 5-2 shows the complete code for a page that uses a custom transformer. Example 5-2. Using a custom transformer
Figure 5-2 shows the results of running this example. Figure 5-2. The HTML markup is escaped in the label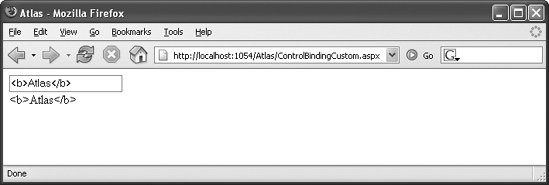 5.1.2. Using Markup for Data BindingThe programmatic approach to data binding works beautifully, but a declarative approach has its advantages as well. For instance, with a declarative approach, the issues that arise with use of the initialize() method, as explained in the previous section, simply do not exist anymore. With its preview releases of Atlas, Microsoft introduced xml-script, a special markup format for adding functionality to Atlas pages. The Atlas team believes that using inline XML is a good way to provide information that needs to be evaluated at runtime by the client's JavaScript interpreter and also offers developers a standards-compatible markup that is easier to read. On the downside, there is no IntelliSense support for xml-script in Visual Studio. (For more details on this decision, read the blog entry at http://www.nikhilk.net/AtlasXMLScript.aspx). Nikhil Kothari's web site at http://www.nikhilk.net is always a good read regarding Atlas, and it is also the place to visit for updates about the future of xml-script; as is true of all elements of Atlas, xml-script could be subject to change in the future. To see how xml-script is used, run the previous example and, in the browser, view the source. Have a look at the generated HTML code. You'll find that it contains the following section (reformatted for clarity): <script type="text/xml-script"> <page xmlns:script="http://schemas.microsoft.com/xml-script/2005"> <components /> </page> </script> Atlas relies on a markup element, <script>, but introduces the special type text/xml-script. This element is used to define Atlas functionality declaratively, such as data binding. Within the <script> element, the <page> element is used to provide information about elements on the page and about their bindings. (You can also load components in the <components> elements, a topic that will be covered in greater detail in Chapter 6.) The <components> section enables you to declaratively instantiate Atlas wrappers for elements on the page, as you have learned to do programmatically. The names of the tags for the supported HTML tags are very similar to the class names in Sys.UI, except they use camel casing. The following is a list of the elements you can use in the <components> section to reference HTML elements:
To identify which of these tags represents which element on the page, the id property is set: <label /> 5.1.1.4. Data bindingsA data binding is represented by the <binding> element. In it, you can set the properties listed in Table 5-1. These will be familiar to you from the examples earlier in this chapter.
It is obvious what the function of each of these attributes is. However, a convenience is that you do not need to provide the full namespace for transformers and directions, e.g., you can use ToString instead of Sys.Binding.Transformers.ToString, InOut instead of Sys.BindingDirection.InOut, etc. Using this xml-script markup, it is possible to bind data without writing any code. Note one important fact: referencing an HTML element in xml-script is equivalent to calling initialize() on it. To put it another way, for any control that you must initialize, you must reference it in xml-script. Therefore, you also have to reference the text box in the xml-script markup, even though the binding is attached to the <label> element. Example 5-3 shows how this is all done. Example 5-3. Using Atlas bindings via xml-script markup
5.1.1.5. Event handlingYou learned about event handling for Atlas client controls in Chapter 4. With xml-script, you can configure event handling in a fully declarative way. As with data binding, everything takes place in the <components> section of the xml-script block. For each event (for instance, click), there is an associated XML tag (for instance, <click>). Each event element supports the following three child elements:
Let's start with <setProperty>, using a slightly modified version of Example 4-9, which changes CSS classes dynamically. This time, the class is changed by setting the class property of the element. The <setProperty> tag supports the following attributes:
This action is triggered when the user clicks a button, so the event you want to capture is the <click> event. The following code snippet changes the class of a label when a button is pressed. <label /> <button > <click> <setProperty target="Label1" property="cssClass" value="style1" /> </click> </button> This leads to the markup shown in Example 5-4. Example 5-4. Setting properties via xml-script
Figure 5-3 shows the result. Figure 5-3. After clicking a button, the CSS class of the text changes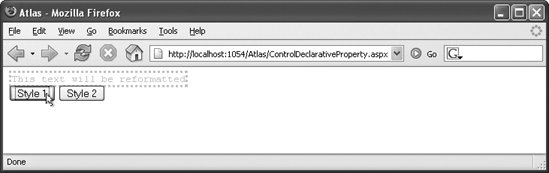 5.1.1.6. Method invocationSetting a property is convenient, but the ability to invoke a method when an event occurs is a must-have feature. As you might expect, this is also possible in xml-script. It requires two elements:
<invokeMethod> supports the following attributes:
This means that you can call only built-in functionality. To modify Example 4-8 (randomly changing CSS classes) to use declarative method invocation, you must call the built-in CSS methods. As a parameter, the class name must be provided. Submitting one or more parameters to such a function is easy: the <parameters> element contains all parameters, in the form of attributes! These attributes have the format parametername=parametervalue, so subelements are not required. The markup shown in the following snippet, for instance, would remove one CSS class and attach another one to an element (using set_cssClass() does not work). <button > <click> <invokeMethod target="Label1" method="addCssClass"> <parameters className="style1" /> </invokeMethod> <invokeMethod target="Label1" method="removeCssClass"> <parameters className="style2" /> </invokeMethod> </click> </button> With two buttons, the code shown in Example 5-5 implements the example scenario using just markup and no JavaScript programming. Example 5-5. Invoking methods via xml-script
|
