Using the Advanced Timeline to Fine-Tune Sound Events
The Advanced Timeline is turned off by default. When you turn it on, a timeline appears at the bottom of the Custom Animation pane, and indicators appear next to each clip to show how long it will take to play and at what point it starts. This is useful when you are trying to coordinate several sound and/or video clips to play sequentially with a certain amount of space between them. It also saves you from having to calculate their starting and ending times in relation to the initial appearance of the slide.
To turn the Advanced Timeline on, do the following:
-
If the Custom Animation pane does not already appear, click Custom Animation on the Animations tab.
-
Open the drop-down menu for any of the items in the pane and choose Show Advanced Timeline. The timeline appears.
-
(Optional) Widen the pane by dragging its left border toward the center of the slide, so that you have more working room.
-
(Optional) Click the word Seconds at the bottom of the pane. This opens a menu where you can choose Zoom In or Zoom Out to change the zoom on the timeline.
-
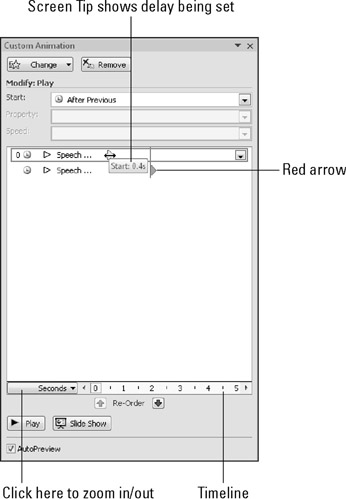
Click a clip to select it on the Custom Animation list. A red, right-pointing arrow appears next to the clip. The arrow position corresponds to the place on the timeline where the clip is currently set to begin. For example, Figure 16.14 shows two clips, with each clip beginning at a different point.

Figure 16.14: You can use a timeline to graphically set the timing between clips on a slide. -
Open the clip's drop-down menu and choose either With Previous or After Previous, depending on how you want it to relate to the earlier clip.
Caution If there is more than one sound clip set to After Previous, a vertical line appears where the first clip will finish. If a clip is set to After Previous, it cannot start before the clip that precedes it. Therefore, any delay that you set up for a subsequent clip will be in relation to the end of the preceding clip. If the clip is set to With Previous, the two can overlap.
-
(Optional) To reorder the clips on the list, click a clip and then click the up or down Re-Order arrow at the bottom of the pane.
-
To change the amount of delay that is assigned to a clip, drag the red arrow next to the clip to the right or left. This is the same as changing the number in the Delay text box in the clip's properties.
| EXPERT TIP | You can use custom animation to create complex systems of sounds that play, pause, and stop in relation to other animated objects on the slide. Although Chapter 18 contains full details, here is a quick explanation of how to use custom animation: add a sound to the Custom Animation pane by clicking Add Effect, then choose Sound Actions, and then select Play, Pause, or Stop. In this way, you can create separate actions for the same clip to start, pause, or stop at various points. |
EAN: 2147483647
Pages: 268