Inserting a Sound File as an Icon
The most elementary way to use a sound file in a presentation is to place the sound clip directly on a slide as an object. An icon appears on the slide, and you can click the icon during the presentation to play the sound. This method works well if you want to play the sound at exactly the right moment in the presentation.
| EXPERT TIP | To "hide" the sound icon, drag it off the edge of the slide. The sound still works, but the audience cannot see the icon. |
You can place a sound file on a slide in either of two ways: by selecting a sound from the Clip Organizer, or by selecting a sound from a file on your computer or network. The following sections cover each method.
| EXPERT TIP | You can also assign the sound to another object on the slide instead, as explained in the section "Assigning a Sound to an Object," later in this chapter. When you do this, the object to which you attach the sound serves the same function as an icon; you click the object to play the sound. |
Choosing a Sound from the Clip Organizer
You learned about the Clip Organizer in Chapter 12. Its primary function is to help you insert clip art (graphics), but it also manages sounds and movie files. The Clip Organizer is a good place to start if you are not sure which sound files are available or what kind of sound you want.
Follow these steps to choose a sound from the Clip Organizer:
-
Establish your Internet connection, if possible. This will make a much wider variety of clips available.
-
On the Insert tab, click the down arrow beneath the Sound button, and click Sound from Clip Organizer. The Clip Organizer appears with icons for the available clips.
EXPERT TIP If you are getting a lot of music files in the task pane that you don't want to wade through, open the Results Should Be list, click the plus sign next to Sounds, and deselect the check boxes for MP3 Format and Windows Media Audio.
-
(Optional) To narrow down the list of clips to only those with certain keywords, type the keyword in the Search For text box and press Enter.
-
(Optional) To preview the clip, do the following:
-
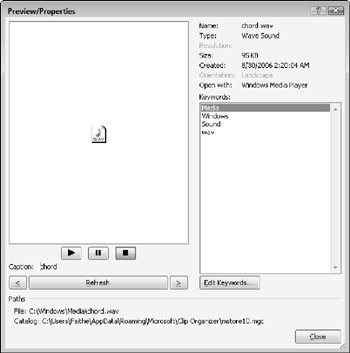
Right-click a clip and choose Preview/Properties from the shortcut menu. A Preview/Properties dialog box opens, and the sound plays.
-
If you want to play the sound again, click the Play button (right-pointing triangle), as shown in Figure 16.1.

Figure 16.1: You can preview a clip in the Preview/Properties dialog box. -
(Optional) To preview another clip, click the Next (≥) or Previous (≤) buttons.
-
To close the dialog box, click Close.
EXPERT TIP The Preview/Properties dialog box also enables you to change or add keywords to the clip, as you did with the clip art in Chapter 12. Click the Edit Keywords button to expand the dialog box to include controls for editing the keyword list.
-
-
Click the clip that you want to insert. A box appears, asking how you want it to play: Automatically or When Clicked. Choose one of these options. An icon for the sound appears in the center of the slide.
-
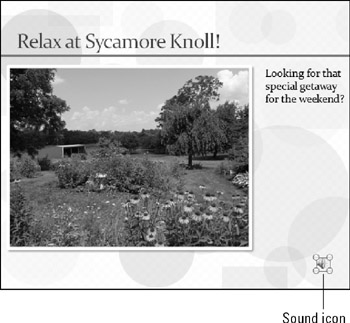
Reposition and resize the icon if necessary. For example, in Figure 16.2, the icon has been moved off to the corner where it is less noticeable. You can even drag it completely off the slide and it still works (but it does not appear on-screen).

Figure 16.2: The sound clip appears as a small speaker icon on the slide.Caution If you set a sound clip to play only when clicked, don't drag it off the edge of the slide or you won't have any way of playing it during the show.
-
If you want to insert another sound clip, repeat steps 3 to 6. If you are finished with the Clip Organizer for now, close it by clicking its Close (X) button.
Once the Sound icon is on the slide, you can move and resize it as you would any other object. You can also specify when the sound will play: when the mouse pointer moves over it, when you click it, or automatically. See the section "Fine-Tuning Sound Play Settings," later in this chapter for more details.
Choosing a Sound from a File
If the sound that you want is not accessible from the Clip Organizer, you can either add it to the Clip Organizer, as you learned in Chapter 12, or you can simply import it from a file. The former technique is better if you plan to use the clip a lot; the latter makes more sense if you are using the clip only once or expect to use it only infrequently.
| Note | If you installed PowerPoint or Office using the default options, then there are many sound files available in the Windows\Media folder on your hard disk. You can use one of these files if you want to practice the following steps. |
Follow these steps to insert a sound from a file:
-
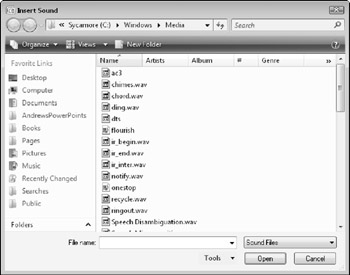
On the Insert tab, click the Sound button (or open its list and click Sound from File). The Insert Sound dialog box opens.
-
Navigate to the drive and folder that contain the sound that you want. If you do not know which location to use, try the Windows\Media folder on the hard disk where Windows is installed.
-
Click the sound file that you want to use, as shown in Figure 16.3, and then click OK.

Figure 16.3: Choose a sound file from your hard disk or other location (such as your company's network). -
A dialog box appears, asking how you want the file to play in the slide show. Choose Automatically or When Clicked. A Speaker icon appears on the slide, as shown in Figure 16.2.
| EXPERT TIP | When sound (WAV) files are smaller than the size specified in PowerPoint's options, they are embedded; sound files that are larger than the specified size are linked. To adjust the size limit, choose Office |
EAN: 2147483647
Pages: 268