Fine-Tuning Sound Play Settings
When you insert a sound, you can choose the options, Automatically or When Clicked. Automatically makes the sound play when the icon appears. If you don't have any animation set up for the slide, the sound icon appears at the same time as everything else on the slide, and so the sound plays when the slide appears. (See Chapter 18 to learn about animation that can make different items on a slide appear at different times.) The When Clicked option makes the sound play only when a user clicks the icon.
If you want to more precisely define when a sound will play, or change the volume for the sound, try the following method.
Playing on a Mouse Click or Mouseover
As you insert a sound, PowerPoint prompts you to choose whether it is played when clicked or automatically. You can change this behavior later by adding or changing the action setting.
| Caution | When you set a sound to play when clicked as you are inserting it, PowerPoint sets up both an Action setting and a custom animation for it, both of which play when clicked. If you turn off the action setting, the custom animation trigger will still be there, and it will still play when clicked. Vice versa applies too; if you delete the custom animation trigger, the action setting will still be there. |
| Caution | If you set up a sound to play automatically and also allow it to play on a mouse-click or mouseover, then you may end up with two copies playing, and they may not be synchronized. |
To play a sound when the mouse either clicks it (mouse-click) or moves over it (mouseover), or to modify the Action settings, do the following:
-
Click the icon to select it. Selection handles appear around it.
-
On the Insert tab, click Action. The Action Settings dialog box appears.
-
Click the Mouse Click or Mouse Over tab. Figure 16.4 shows the Mouse Click tab.
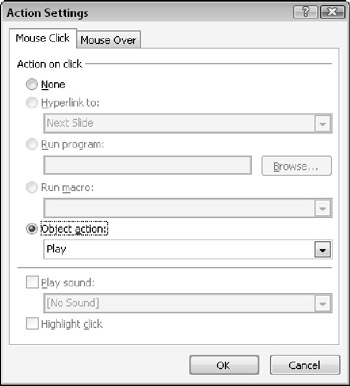
Figure 16.4: To make a sound play when the mouse pointer is over its icon, you can set it up on the Mouse Over tab. You can use the Mouse Click tab to make the sound play when you click it.EXPERT TIP You can have separate settings for the mouse-click and mouseover actions, and one does not preclude the other. For example, if you have already specified that the sound should play on mouse-click, and you set it up to play on mouseover, this does not change the mouse-click setting.
-
To make the sound play on mouse-click (or mouseover, depending on the tab that you selected), select the Object Action option. Then make sure that Play is selected from the Object Action drop-down list. To prevent the sound from playing on mouse-click (or mouseover), you can select the None option. (This doesn't take away any custom animation trigger, though.)
-
Click OK.
Adjusting the Sound Play Settings for Custom Animation
When you choose Automatically as the setting when you first place a sound, PowerPoint sets it up to play at the exact moment that the sound icon appears on-screen, with no delay. You can change this default so that there is a delay, or you can turn it off so that the sound does not play automatically.
To access a sound's animation settings, click Custom Animation on the Animations tab. The Custom Animation pane appears, with a clip at the top of the list. A clock icon next to the clip indicates that the clip has a Start After Previous designation; this means that the clip is set up to play automatically. A clip that is set up to play on mouse click or mouseover appears with a mouse icon. Both icon types appear in Figure 16.5.
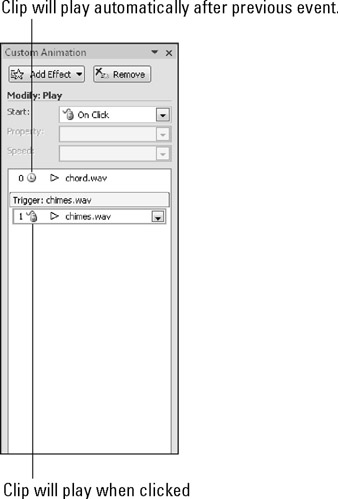
Figure 16.5: Custom animation settings allow you to specify when a sound plays.
Clips that you insert from the Clip Organizer have generic names, such as "Media 3." Clips that you insert manually with the Sound from File command have names that match the filename, such as chord.wav. You can rename them in the Selection and Visibility task pane (accessed from the Home tab), and the new name will appear in the Custom Animation pane.
| Note | The following sections give a brief overview of the animation settings in PowerPoint; for a fuller discussion, see Chapter 18. |
Turning Automatic Play On or Off
To turn the automatic play on or off for a clip, do the following:
-
On the Animations tab, click Custom Animation to open the Custom Animation pane if it does not already appear.
-
Select the icon for the sound. A gray box appears around its name in the pane.
-
Move your cursor over the sound on the pane, so that a drop-down arrow appears to its right. Click the arrow to open the menu, as shown in Figure 16.6.
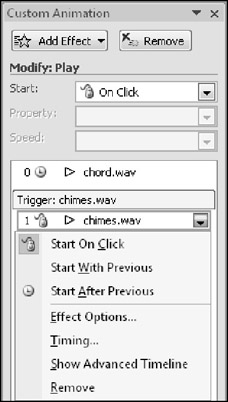
Figure 16.6: You can choose whether the sound should play automatically or only when a user clicks it. -
If you want the sound to play automatically, choose Start With Previous or Start After Previous. Otherwise, choose Start On Click.
| EXPERT TIP | Specifying Start On Click in the Custom Animation pane starts the sound file when a user clicks the mouse anywhere on the slide, even if they do not click the sound icon itself. However, you can mimic the on-mouse-click action settings by clicking the arrow to the right of the sound name in the Custom Animation pane and clicking Timing to open the Timing tab. You can then click the Triggers button, and select the sound in the Start Effect on Click of box. |
Delaying or Repeating a Sound
Depending on the situation, it may be useful to have a sound play after a short delay, or to repeat the sound more than once. In Chapter 18, you can learn more about setting animation options. However, here are some quick instructions for customizing a sound:
-
On the Animations tab, click Custom Animation to open the Custom Animation pane if it does not already appear.
-
Select the icon for the sound. A gray box appears around its name in the pane.
-
Open the menu for the sound clip, as shown in Figure 16.6, and choose Timing. The Play Sound dialog box opens with the Timing tab displayed, as shown in Figure 16.7.
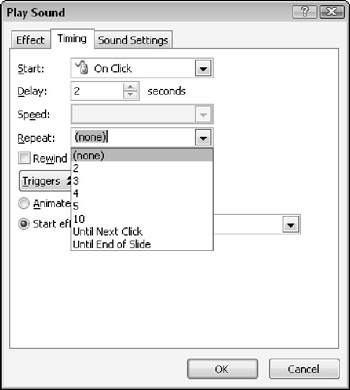
Figure 16.7: You can use the Timing controls to set a delay for when the sound will play. -
Enter a number of seconds in the Delay text box. The delay occurs between when the previous event happens (in this case, the event is the initial appearance of the slide on-screen) and when the sound begins.
-
Open the Repeat drop-down list and choose the number of times that the sound should repeat. You can choose 2, 3, 4, 5, or 10 times, as well as Until Next Click, and Until Next Slide. You can also type in your own number (up to 9999).
-
Click OK.
Choosing the Starting Point for a Sound Clip
There might be times when you want to start the clip from some point other than the beginning. For example, you may have a really good sound clip, except that the first 5 seconds are garbled or it may contain content that you do not want to use; or you may want to play just the first 15 seconds of the clip. To control the point at which a clip starts, do the following:
-
On the Animations tab, click Custom Animation to open the Custom Animation pane if it does not already appear.
-
Select the icon for the sound. A gray box appears around its name in the pane.
-
Open the menu for the sound clip and choose Effect Options. The Play Sound dialog box opens with the Effect tab displayed, as shown in Figure 16.8.
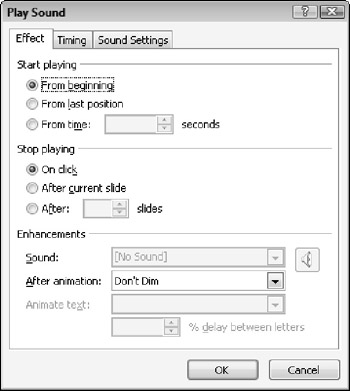
Figure 16.8: You can specify that a clip plays at a different time than the beginning, or set it to restart playing from wherever it left off if you stop it. -
In the Start Playing area, choose one of these options:
-
From the beginning, which is the default play mode.
-
From the last position if you want it to pick up where it left off when you stopped it.
-
From a specific time, and then enter the number of seconds into the clip that it should begin playing.
-
-
Click OK.
Choosing When the Sound Clip Will Stop
Normally a clip will stop playing after it has played once (or however many times you have set it up to play), or until a mouse-click. However, there may be times when you want it to stop earlier. For example, you may want a particular song to play while a certain slide is on-screen, but to stop when you move to the next slide. You may also want it to continue for the next two slides, and then stop.
To control when a sound clip stops, you can use the Effect tab of the Play Sound dialog box, as shown in Figure 16.8:
-
Perform steps 1 to 4 of the preceding section.
-
In the Stop Playing area, choose one of these options:
-
On Click to use the default play mode.
-
After Current Slide to stop the audio when you move to the next slide, or when the clip has finished playing, whichever comes first.
-
After ____ Slides, and then enter a number of slides; the audio will continue until the specified number of additional slides have passed.
-
-
Click OK.
| EXPERT TIP | If you want to play more than one sound back-to-back throughout your presentation (as a background track), type 999 in the After ____ Slides text box. PowerPoint will stop the first sound when it starts the second one. If you simply put the number of slides that you expect PowerPoint to play the sound, it will not work the way that you expect. For more information, go to this article: http://www.rdpslides.com/pptfaq/FAQ00047.htm. You can also use the Play Across Slides option in the Play Sound dialog box for this. |
Specifying the Sound Volume
When you give your presentation, you can specify an overall volume using the computer's volume controls in Windows. However, sometimes you might want the volume of one sound to be different than others. To set the volume for a specific sound, follow these steps:
-
On the Animations tab, click Custom Animation to open the Custom Animation pane if it does not already appear.
-
Select the icon for the sound. A gray box appears around its name in the pane.
-
Open the drop-down menu for the sound clip and choose Effect Options. The Play Sound dialog box opens with the Effect tab displayed.
-
Click the Sound Settings tab.
-
Click the Sound Volume button to display a volume slider. Drag the slider up or down to adjust the volume, as shown in Figure 16.9.
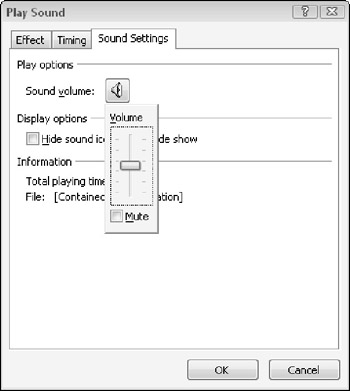
Figure 16.9: You can set the volume for an individual sound in comparison to the overall volume for the entire presentation. -
Click OK to close the Play Sound dialog box.
| EXPERT TIP | The sound will play at a consistent volume throughout the duration of the clip. If you need the volume to change partway through, you can use a sound-editing program to change the clip volume before inserting it. |
Setting Sound Options from the Ribbon
You can control some sound options from the Options tab, which appears when you select a sound clip. This tab allows you to quickly change some settings so that you do not have to open the full dialog boxes, For example, you can adjust the slide show volume, set a sound to play when clicked or automatically, set the sound's icon size, and so on. See Figure 16.10.

Figure 16.10: The Options tab allows you to adjust some sound settings.
EAN: 2147483647
Pages: 268