Learning Your Way Around PowerPoint
Now that you have seen some of the potential uses for PowerPoint, and toured the new features, let's get started using the program.
PowerPoint is one of the easiest and most powerful presentation programs available. You can knock out a passable presentation in a shockingly short time by skimming through the chapters in Parts I and II of the book, or you can spend some time with PowerPoint's advanced features to make a complex presentation that looks, reads, and works exactly the way you want.
Starting and Exiting PowerPoint
You can start PowerPoint just like any other program in Windows: from the Start menu. Follow these steps:
-
Click the Start button. The Start menu opens.
-
Click All Programs.
-
Click Microsoft Office.
-
Click Microsoft Office PowerPoint 2007. The program starts.
If you have opened PowerPoint before, a shortcut to it might appear in the Recently Used Programs list, which is directly above the All Programs command on the Start menu. See Figure 1-15. If you use other applications more frequently than PowerPoint, PowerPoint may scroll off this list and you therefore have to access it via the All Programs menu.
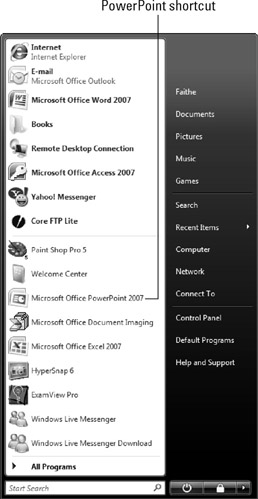
Figure 1.15: A shortcut to PowerPoint might appear on the top level of the Start menu.
| EXPERT TIP | If you don't want to worry about PowerPoint scrolling off the list of the most frequently used programs on the Start menu, right-click PowerPoint's name on the Start menu and choose Pin to Start Menu. PowerPoint will then appear on the list at the top of the left column of the Start menu. To remove it from there later, right-click it and choose Unpin from Start Menu. |
When you are ready to leave PowerPoint, select Office Exit or click the Close (X) button in the top-right corner of the PowerPoint window. (The Office button is the round button in the top left corner.) If you have any unsaved work, PowerPoint asks if you want to save your changes. Because you have just been playing around in this chapter, you probably do not have anything to save yet. (If you do have something to save, see Chapter 3 to learn more about saving.) Otherwise, click No to decline to save your changes, and you're outta there.
Understanding the Screen Elements
PowerPoint's interface is typical of any Windows program in many ways, but as you learned earlier in the chapter it also has some special Office 2007 specific features as well. The PowerPoint window contains these elements, pointed out in Figure 1-16:
-
Title bar: Identifies the program running (PowerPoint) and the name of the active presentation. If the window is not maximized, you can move the window by dragging the title bar.
-
Ribbon: Functions as a combination of menu bar and toolbar, offering tabbed "pages" of buttons, lists, and commands.
-
Office button: Opens the Office menu, from which you can open, save, print, and start new presentations.
-
Quick Access Toolbar: Contains shortcuts for some of the most common commands. You can add your own favorites here as well.
-
Minimize button: Shrinks the application window to a bar on the taskbar; you click its button on the taskbar to reopen it.
-
Maximize/Restore button: If the window is maximized (full screen), changes it to windowed (not full screen). If the window is not maximized, clicking here maximizes it.
-
Close button: Closes the application. You may be prompted to save your changes, if you made any.
-
Work area: Where active PowerPoint slide(s) appear. Figure 1-17 shows it in Normal view, but other views are available that make the work area appear differently.
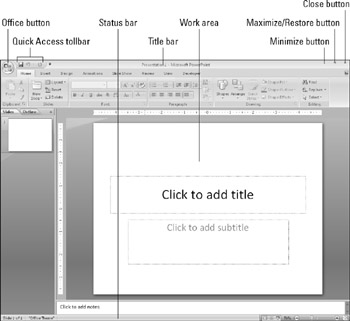
Figure 1.16: The PowerPoint window is a combination of usual Windows features and unique Office 2007 elements.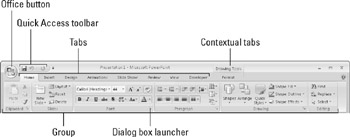
Figure 1.17: The Ribbon is PowerPoint 2007's primary user interface.CROSS-REF See the section "Changing the View" later in this chapter for details.
-
Status bar: Reports information about the presentation and provides shortcuts for changing the view and the zoom.
Note I don't dwell on the Windows controls in detail because this isn't a Windows book, but if you're interested in learning more about Windows-based programs in general, pick up Windows Vista For Dummiesor The Windows Vista Bible, also published by Wiley.
Working with the Ribbon
As mentioned earlier in the chapter, PowerPoint 2007's user interface is based on the Ribbon, which is a bar across the top of the window that contains tabbed pages of commands and buttons. Rather than opening a menu and selecting a command, you click a tab and then click a button or open a list on that tab.
Here are some important terms you need to know when working with tabs:
-
Ribbon: The whole bar, including all of the tabs.
-
Office button: A button that opens an Office menu, from which you can choose to start a new presentation, save, print, and perform other file-related activities. See Figure 1-7 for this button's location.
-
Quick Access Toolbar: A small toolbar adjacent to the Office button from which you can select commonly used commands.
EXPERT TIP To add a command to the Quick Access Toolbar, right-click it and choose Add to Quick Access Toolbar. To remove the command from there, right-click it and choose Remove from Quick Access Toolbar.
-
Tab: A tabbed page of the Ribbon. Figure 1-17 shows the Home tab, for example.
-
Contextual tab: A tab that appears only when certain content is selected, such as a graphic or a chart. The context name appears above the tab name. In Figure 1-17, Drawing Tools is the context name for the Format tab.
-
Group: A section of a tab. The Home tab shown in Figure 1-17 has the following groups: Clipboard, Slides, Font, Paragraph, WordArt Styles, and Editing.
-
Dialog box launcher: A small icon in the bottom-right corner of a group, from which you can open a dialog box related to that group.
Note To find out what a toolbar button does, point the mouse at it. A ScreenTip pops up explaining it.
Working with Collapsible Tab Groups
Within a tab, groups can expand or collapse depending on the width of the PowerPoint window. When the window is large enough (somewhere around 1100 pixels), everything within each group is fully expanded, so that each item has its own button. When the window is smaller, groups start collapsing so that all groups remain visible. At first, large buttons get smaller and stack vertically; if that's not enough, then groups collapse into single large buttons with drop-down lists from which you can select the individual commands. Figure 1-18 shows the same tab in three different widths for comparison.
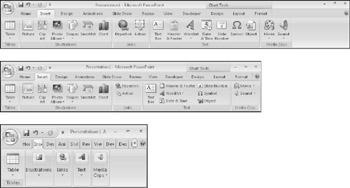
Figure 1.18: The size of the PowerPoint window determines how much the groups are collapsed or expanded on the Ribbon.
| Caution | Because of the Ribbon's collapsing ability, the exact steps for performing certain procedures depend on the active PowerPoint window's width. A small window may require an extra step of opening a button's menu to select a command, for example. For a large window, each command appears directly on the tab. This book assumes an average window size of 1024 x 768 pixels; if you run PowerPoint at a smaller resolution, you may occasionally have an extra step to access a command. |
Working with Office Menu Submenus
On the Office menu, some of the commands have arrows next to them. Clicking one of these arrows opens a submenu in the right side of the Office menu with additional choices. For example, Figure 1-19 shows the submenu for Print.
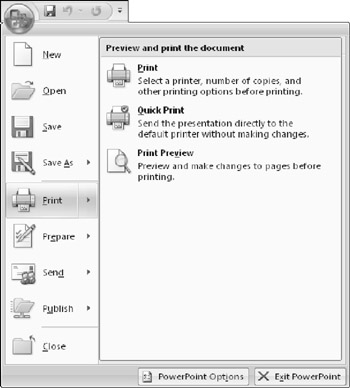
Figure 1.19: Some of the commands on the Office menu have submenus.
Notice in Figure 1-19 that the arrow next to the Print command on the Office menu is actually a separate button from Print itself. The Print command can also be individually clicked to open the Print dialog box, without opening the submenu. The Save As command has the same functionality; you can either select Save As directly from the first level, or you can open its submenu.
Not all of the arrows are like that, though. The Finish, Send, and Publish commands do not have separate top-level functions; clicking any of those simply opens their submenu.
Working with Dialog Boxes
Dialog boxes are PowerPoint's (and Windows') way of prompting you for more information. When you issue a command that can have many possible variations, a dialog box appears so you can specify the particulars.
The Print dialog box (File ![]() Print) is an excellent example of a dialog box because it has so many kinds of controls. Here are some of the controls you see on the Print dialog box shown in Figure 1-20:
Print) is an excellent example of a dialog box because it has so many kinds of controls. Here are some of the controls you see on the Print dialog box shown in Figure 1-20:
-
Check box: These are individual on/off switches for particular features. Click to toggle them on or off.
-
Option buttons: Each section of the dialog box can have only one option button chosen at once. When you select one, the previously selected one becomes deselected, like on a car radio. Click the one you want.
-
Text box: Click in a text box to place an insertion point (a vertical line) there, and then type.
-
Increment buttons: Placed next to a text box, these buttons allow you to increment the number in the box up or down by one digit per click.
-
Drop-down list: Click the down arrow next to one of these to open the list, and then click your selection from the menu that appears.
-
Command button: Click one of these big rectangular buttons to jump to a different dialog box. OK and Cancel are also command buttons; OK accepts your changes and Cancel rejects them.
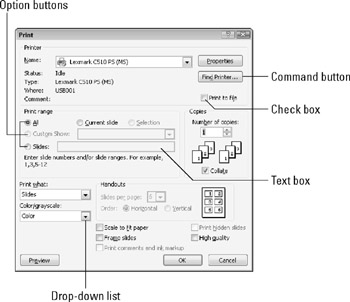
Figure 1.20: The Print dialog box is an excellent study in dialog box controls.
You might also sometimes see tabs at the top of a dialog box; this occurs when the dialog box has more controls than will fit on one screen. To move to a tabbed page, click the tab.
| CROSS-REF | Dialog boxes that open or save files have some special controls and icons all their own, but you learn about those in more detail in Chapter 3, where you also learn to open and save your files. |
EAN: 2147483647
Pages: 268