Configuring SecuRemote on FireWall-1
| The general steps for configuring FireWall-1 to use SecuRemote are listed below and described in the subsections that follow.
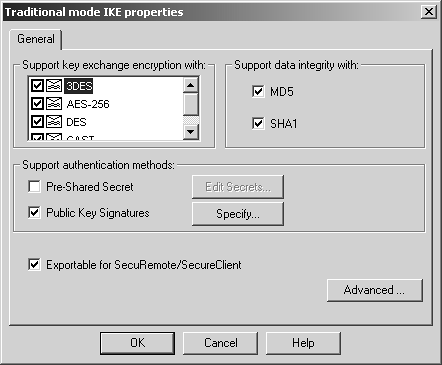
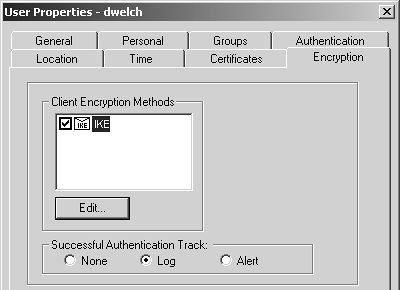
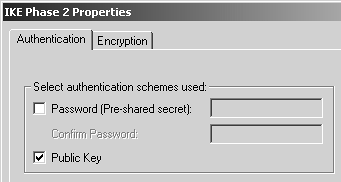
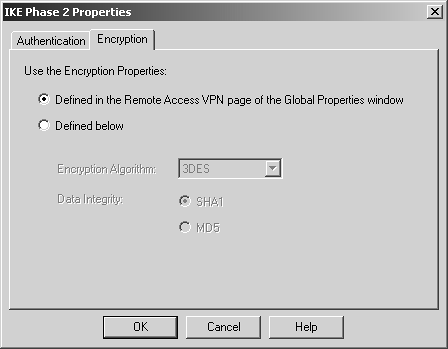
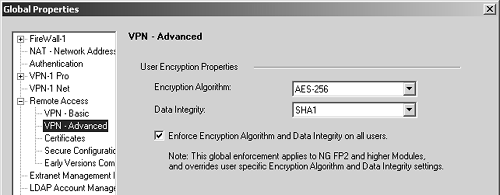
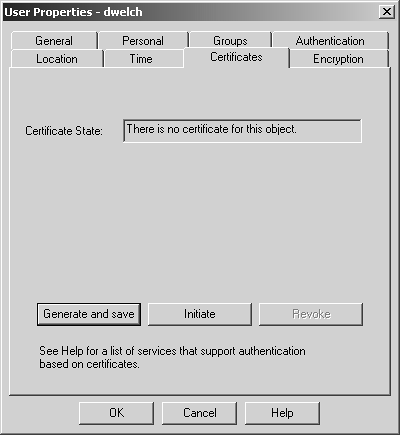
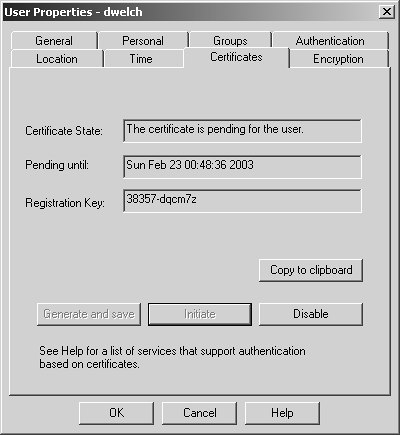
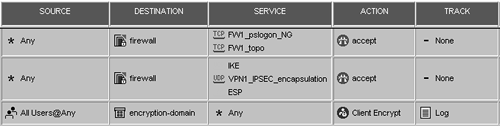
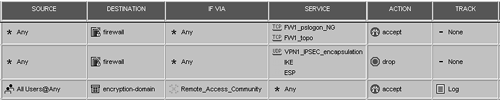
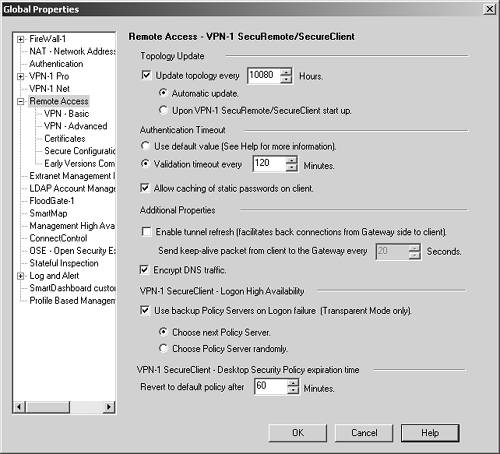
Configuring the Gateway Object for SecuRemoteSeveral areas of the FireWall-1 configuration relate to SecuRemote. At this time, I am going to touch on only what is necessary for basic SecuRemote functionality. Similar to site-to-site encryption, you must configure the firewall object with the appropriate encryption types and encryption domain. If using the simplified VPN setup, you also need to add the gateway object to the Remote Access community. The Remote Access community was created by default. Traditional mode provides a checkbox for the Exportable for SecuRemote/SecureClient option, as shown in Figure 12.1. Exportable for SecuRemote is somewhat of a misnomer because selecting this option actually means that when a SecuRemote client connects to the management console to request topology (i.e., the encryption domain), this firewall's encryption domain will be provided to the SecuRemote client. If this checkbox is not enabled, a SecuRemote client will not be able to download the encryption domain. Figure 12.1. Traditional mode IKE properties In Traditional mode, you need only enable the appropriate type of authentication (Pre-Shared Secret or Public Key Signatures options). The actual parameters specific to each user are defined in each user 's definition. Creating Users for Use with SecuRemoteYou can employ the same users you created for User Authentication for outbound access to authenticate SecuRemote users for inbound access. For more information on how to create users, see Chapter 8. The Encryption tab in the user definition is where you can specify which encryption schemes are defined for this particular user (see Figure 12.2). On this tab, you can also specify whether to log or alert when this user logs in via SecuRemote. Figure 12.2. User Properties, Encryption tab Figure 12.3 shows the options presented for the authentication of IKE sessions. Figure 12.3. IKE Phase 2 Properties, Authentication tab On the Authentication tab, you specify which authentication methods are supported: passwords (authentication based on a pre-shared secret) or public keys (authentication based on certificates). You would select the Password option only if you want to use a fixed password. If you want to use an external authentication server, like SecurID or RADIUS, leave this box unchecked. Ensure that the Hybrid Mode option is enabled in the Global Properties section, Remote Access, VPN Basic frame. On the Encryption tab, shown in Figure 12.4, you get to choose how this user will have his or her data encrypted in the IPSec session. (IKE parameters are defined on a per-gateway basis.) Figure 12.4. IKE Phase 2 Properties, Encryption tab A global property affects what encryption parameters users will have, specifically in the Remote Access, VPN Advanced frame (see Figure 12.5). If the Enforce Encryption Algorithm and Data Integrity option is checked, users on NG FP2 and above will be given these properties regardless of their individual settings. For pre-NG FP2 modules, they will be given whatever individual parameters they have defined. Figure 12.5. Global Properties, Remote Access, VPN Advanced frame If you wish to define a certificate for a user, click the user's Certificates tab to display the screen shown in Figure 12.6. Figure 12.6. User Properties, Certificates tab There are two ways to issue a certificate for a user: as a certificate file or as a reservation. In the former case, the certificate is generated on the management console and a copy is saved in the specified location on the SmartDashboard/Policy Editor station (click Generate and save). The administrator is then responsible for giving the end user the certificate. For certificates issued as reservations , the certificate is generated but is "reserved" for the end user to download from SecureClient. Clicking on the Initiate button and clicking OK in the warning dialog shows a screen similar to Figure 12.7. Figure 12.7. User Properties, Certificates tab, pending certificate The end user then uses the registration key to obtain the certificate using SecureClient. Right-click on the SecureClient envelope in the desktop tray and select Open or Configure. From the Certificates menu, select Check Point Certificates, then Create. A wizard takes you through saving the certificate to a file or smart card, then specifying the gateway IP and registration key. The certificate is then downloaded to the client and marked as usable in the management station. Defining Client Encryption Rules and Remote Access Community RulesThe rules defined for client encryption are very similar to the rules you created for combining authentication and encryption in Chapter 11 except the action used for the rule is Client Encrypt. These types of rules are used in Traditional mode policies. With a Simplified mode policy, you instead create a rule in terms of the Remote Access community. The first rule shown in Figure 12.8 permits your SecuRemote clients to fetch the topology from the management console. The FW1_topo service (TCP port 264) is what allows this. If you also are using the Policy Server functionality, FW1_pslogon_NG (TCP port 18231) allows this communication. Figure 12.8. Traditional rulebase for SecuRemote access The second rule allows VPN1_IPSEC_encapsulation, IKE, and ESP, which are all the various protocols used for encryption. This is necessary if the Enable FireWall-1 Control Connections property is unchecked. The third rule actually permits the SecuRemote users to enter your encryption domain. The Client Encrypt action (see Figure 12.9) has properties that look very similar to those used for User Authentication. The only difference between this screen and the User Authentication screen is the checkbox, which for Client Encrypt requires that the desktop configuration options be set correctly on SecureClient. You can set these options in the Global Properties screen, Remote Access, Secure Configuration Verification frame (see the Setting Up Desktop Security section). Figure 12.9. User Encryption Action Properties for the Client Encrypt action Figure 12.10 shows a simplified rulebase for remote access. Figure 12.10. Simplified rulebase for remote access Configuring Global PropertiesA number of items in the Global Properties screen affect client-to-site VPNs. Let's begin with the Remote Access frame, shown in Figure 12.11. Figure 12.11. Global Properties, Remote Access frame The list below outlines the options available in this screen.
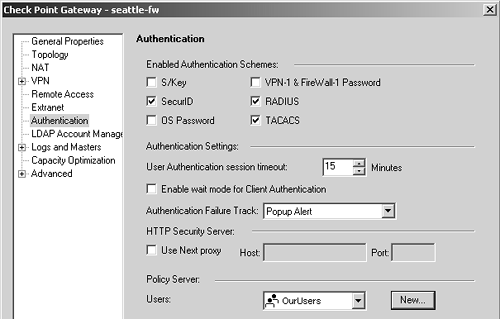
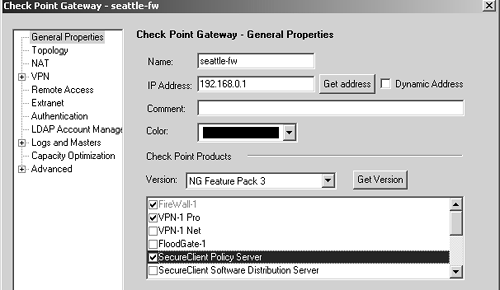
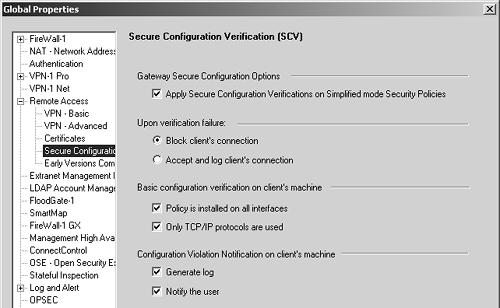
Setting Up Desktop SecurityTo use the Desktop Security options, you must have the Policy Server component loaded on your firewall module(s) and have the gateway object configured with the Policy Server as being present on the module. A user group that is allowed to access the Policy Server must be specified in the Authentication frame (see Figure 12.12). Figure 12.12. Defining a user group for the Policy Server In the General Properties frame, ensure that SecureClient Policy Server is checked, as shown in Figure 12.13. Figure 12.13. SecureClient Policy Server enabled in the gateway object In the Global Properties screen, the Remote Access Secure Configuration Verification (SCV) frame has some additional relevant options (see Figure 12.14). Figure 12.14. Global Properties, Secure Configuration Verification frame These options are listed below.
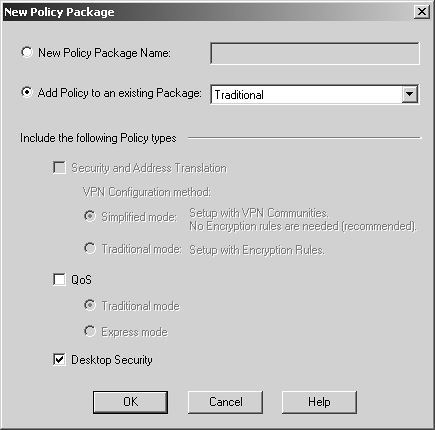
Once you've defined these property screens, you need to define a Desktop Security policy. If you did not specify this type of policy when you initially created your policy, you can select New from the File menu and simply add Desktop Security to an existing policy, as shown in Figure 12.15. Figure 12.15. Adding Desktop Security to an existing policy Now the Desktop Security tab is present in SmartDashboard/Policy Editor. You need to create both inbound (to the client) and outbound (from the client) rules. The rules are similar to the standard security policy rules except for the following differences.
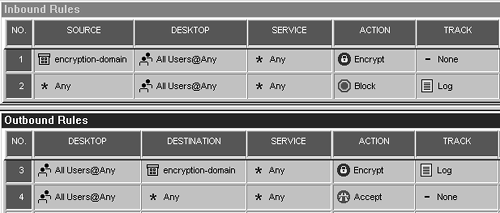
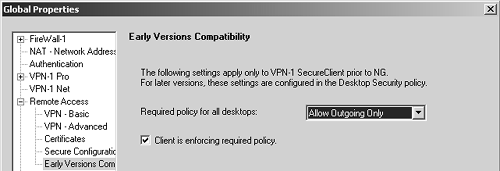
Figure 12.16 shows a rulebase that permits encrypted access only to the encryption domain and not to the Internet. To allow the client to access other Internet hosts as well, change Rule 4 so that its action is Accept, as shown in Figure 12.17. Figure 12.16. Sample Desktop Security policy for allowing encrypted access only Figure 12.17. Sample Desktop Security policy for allowing outgoing and encrypted access These are, of course, simplistic examples. If you manage some FireWall-1 4.1 gateways or have end users who still use SecureClient 4.1, the allowed policy must be a simple one. Figure 12.18 shows the Early Versions Compatibility frame (under Remote Access in the Global Properties section) where you can define this policy. Figure 12.18. Global Properties, Early Versions Compatibility frame You can choose from the following policies.
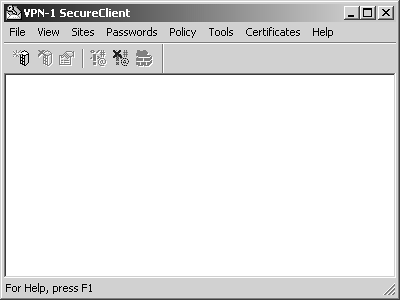
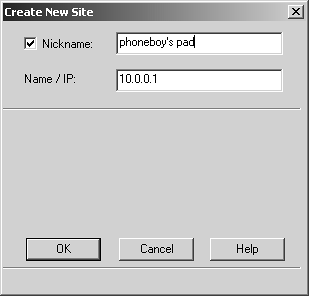
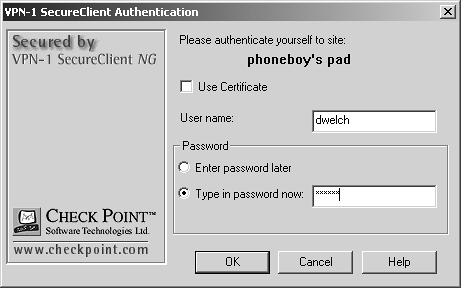
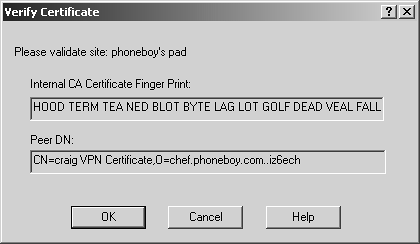
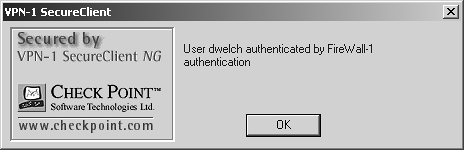
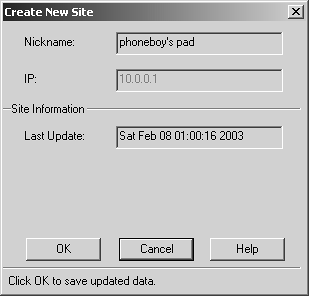
The checkbox for enforcing required policy, if selected, means that the user will not be allowed into the network and the SecuRemote client will be configured with a different policy than what is specified in this frame. The client receives an error to this effect when he or she authenticates. Installing SecureClientUsers must install SecuRemote before they can use it. There are different versions of SecureClient for Windows 9x/ME, Windows NT/2000, and Windows XP because the TCP/IP stacks are very different in these three versions of Windows. Make sure the correct version for your particular operating system is installed. Before running the enclosed setup.exe , read the README file to make sure you are about to install the correct version. You should also ensure that the version you are installing is the same as or later than your FireWall-1 installation (e.g., if your firewall is NG AI, SecureClient should be too). During installation, you will be asked if you want to install SecuRemote or SecureClient. Installing SecuRemote provides basic VPN functionality only. There is no reason not to include support for the Desktop Security features by also installing SecureClient, even if you do not plan to use it right away. Another question you will be asked during installation is if you would like to install only on the dial-up adapters or on all adapters. FireWall-1 recognizes only standard Microsoft Dial-up Adapters (or RAS in Windows NT/2000) as dial-up adapters, so if you need to use a special adapter (for AOL, for instance), install on All Adapters. During the installation process, your only choices are all or nothing; that is, you cannot choose to install interfaces only on specific adapters. In Windows 9x/ME, 2000, and XP, you can easily change the interfaces SecuRemote is bound to by modifying the network properties after SecureClient has been installed. Windows NT does not provide a way to change the interfaces to which SecureClient is bound. What does it mean if SecuRemote is bound to a particular interface? Simply put, if SecuRemote is bound to the interface, it can send encrypted traffic through it. This may have unintended consequences in some circumstances. Generally, binding SecuRemote only to those interfaces you intend to use to communicate with a remote encryption domain is the right thing to do. Binding SecuRemote to an interface does not preclude you from using that interface for nonencrypted traffic. Note that an administrator can change this behavior with the Desktop Security features. You must reboot in order for SecuRemote to be usable. In some cases, you will not be able to reboot correctly after installing SecuRemote. These problems are discussed in the Troubleshooting section later in this chapter. Once Windows comes up and you log in, you will see an icon in your taskbar that looks like this: Figure 12.19. VPN-1 SecureClient window This figure shows a blank configuration with no sites. To add a site, select Create New from the Sites menu or click the New Site icon. Enter the site IP address (which is usually the firewall) and a "nickname" for the site, as shown in Figure 12.20. Click OK. Figure 12.20. Starting to create a new site At this point, you will be prompted for authentication. Enter the appropriate username or password or specify a certificate. Figure 12.21 shows the dialog for the username and password. Figure 12.21. Authenticating with SecureClient Figure 12.22 shows a fingerprint validation screen that appears the first time you connect. This fingerprint should match what is shown in the ICA (or other certificate authority) certificate when " viewed " in SmartDashboard/Policy Editor. If it does match, accept it by clicking OK. Figure 12.22. Verifying the certificate fingerprint After you have authenticated successfully, you will see a dialog similar to Figure 12.23 that says what method was used to authenticate you (in this example, FireWall-1 Password ). Figure 12.23. Successful SecureClient authentication Finally, you can click OK in the Create New Site dialog when you see the Last Update field (see Figure 12.24). Figure 12.24. Creating a new site after the topology download Now that you've added the site, you can attempt to connect to it. Depending on whether the site requires login to a policy server or uses Office Mode, you might need to change the connection mode in the client. From the SecureClient menu, select Configure Client Mode from the Tools menu. You can choose either Transparent mode or Connect Mode. For a policy server login or Office Mode configuration, you need to configure the client in Connect Mode. If you change modes, you will have to restart the client. Select Stop VPN-1 SecureClient from the File menu to do this. There are a couple of options you can configure on the client that affect how the VPN connection takes place, such as forcing UDP encapsulation, IKE over TCP, or Visitor Mode. These options are discussed in the Troubleshooting section. All of this might be confusing to an end user. Fortunately, you can prepackage a custom version of SecureClient with the site definition and appropriate settings. The SecureClient Packaging Tool, discussed later in this chapter, enables you to do this. |


EAN: 2147483647
Pages: 143