Scenario
When you converted the user interface for your Order Entry application, the WebFacing Tool created a complete Web application that you can run in an application server. The WAS test environment and the Web project in the workbench are completely integrated so that you no longer need to publish (copy) your files to a production environment to test the application. You will use the index.html file, created by WebFacing conversion, as the default page for this Web application.
When the application is up and running, you will perform the same actions that you did in Chapter 2 (navigation through the green-screen panels of the Order Entry application). The difference is that you will navigate through the new WebFaced user interface.
Opening the index.html Page
Follow these steps to display the index.html page for your Web-enabled application:
-
Select your WebFacing project icon in the WebFacing perspective.
-
Right-click the wflabxx project as in Figure 5.1.
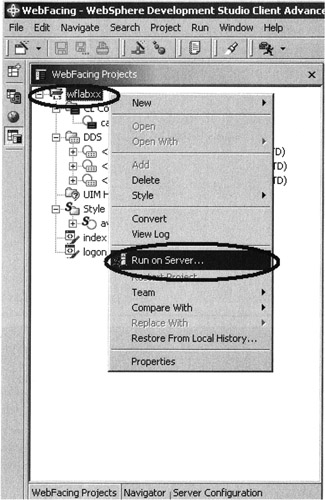
Figure 5.1: Pop-up menu for WebFacing project icon with Run on Server selected -
Select Run on Server from the pop-up menu.
A Server Selection dialog appears as shown in Figure 5.2.
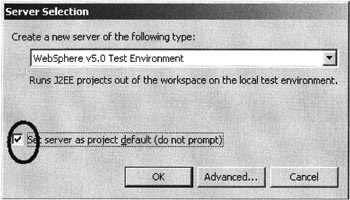
Figure 5.2: Server Selection dialog
To prevent this dialog from appearing every time you select Run on Server,
-
Select the check box Set server as project default (do not prompt).
-
Click on the OK push button.
You have just initiated the WAS test environment. After a few moments, the browser opens in the right pane of the workbench. Be patient; it takes time for the application server to load. The minimum memory requirement for running the WAS test environment is 768 MB according to the IBM announcement letter for Development Studio Client Version 5.0. Eventually, you will see the index.html page appear in the workbench's built-in browser.
| Note | Version Development Studio Client Version 4.0 users will also notice that the active perspective is now the Server perspective. |
Figure 5.3 shows the browser inside the workbench with the index.html page displayed.
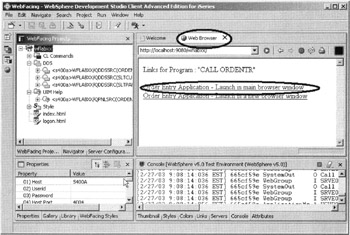
Figure 5.3: Browser with index page
| Tip | To enlarge the browser window to the size of the workbench window, double-click on the browser title bar. To reduce it to its original size , double-click on the enlarged browser window's title bar. |
Setting up the Test Environment for WAS Version 4.0
You have a choice of running WAS Version 4.0 or Version 5.0 in the WAS test environment. If you have followed my instructions using Development Studio Client Version 5.0, then you are already running WAS Version 5.0, in which case you can skip this topic and move on to the topic titled "Continuing for both Development Studio Client Version 4.0 and 5.0" on page 85.
If you decided to use WAS Version 4.0, or if you are working with Development Studio Client Version 4.0, you will need to follow the steps under this topic to set up WAS correctly.
Before you can use the WAS Version 4.0 test environment for your WebFaced application, you need to change the default application server settings. WebFacing applications are generated with support for UTF-8, a Unicode encoding to enable the display of Web pages with characters from any national language in the world. Because WAS Version 4.0 does not use UTF-8 encoding by default, you need to enable UTF-8 through the WAS administrative console. You need to perform this setup once for each server instance. In WAS Version 5.0, you can send the encoding parameter directly to the server, which is why you do not need to specify the UTF-8 encoding.
If you are using WAS Version 4.0 or Version 3.5.6 on your remote server, you need to set up your remote WAS environment as well. The WebFacing help documentation provides detailed setup information for these environments, so I will not go through the remote server WAS setup in this book.
If you are working with WAS Version 4.0, in the test environment,
-
Switch to the Navigator view by clicking the Navigator tab in the WebFacing Projects view (Figure 5.4).
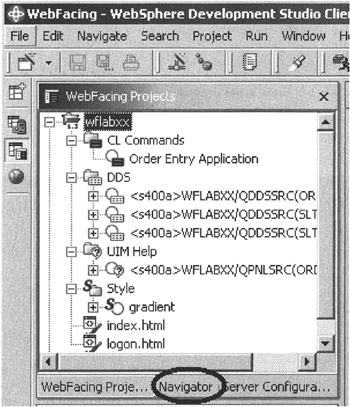
Figure 5.4: WebFacing Projects view with Navigator tab highlighted -
Expand the Servers folder in the Navigator view, as shown in Figure 5.5.
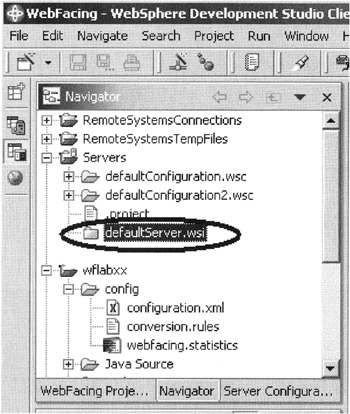
Figure 5.5: Expanding the Servers folder -
Double-click the defaultServer.wsi file.
Note For Development Studio Client Version 4.0 users, this file has the name defaultlnstance.wsi in your environment.
The WebSphere 4.0 Test Environment properties dialog is displayed, as shown in Figure 5.6.
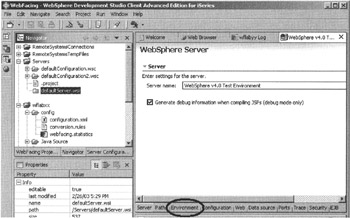
Figure 5.6: The WebSphere Version 4.0 properties dialog
-
Click the Environment tab; as shown in Figure 5.6.
The Environment Options page displays as shown in Figure 5.7.

Figure 5.7: The Environment Options page
-
Click the Add push button.
In the Add System Property dialog that appears, as shown in Figure 5.8,

Figure 5.8: Add System Property dialog
-
Enter client.encoding.override in the Name entry field.
-
Enter UTF-8 in the Value entry field.
Tip Make sure that you use exact spelling and that you enter the upper- and lowercase characters exactly as shown. Using a different case will cause problems later on when you run the application.
-
Click the OK push button.
Back in the workbench (Figure 5.9),
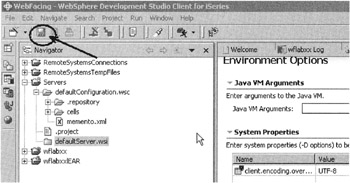
Figure 5.9: Saving the changes
-
Select the Save icon on the toolbar or use the File ’ Save option on the menu bar to save the changes.
The user interface you use to change the class loader setup depends on whether you work with Version 4.0 or 5.0 of Development Studio Client. I describe the steps for both environments separately. In Development Studio Client Version 5.0,
-
Click the Configuration tab.
-
Select MODULE in the Module visibility combination box, as shown in Figure 5.10.
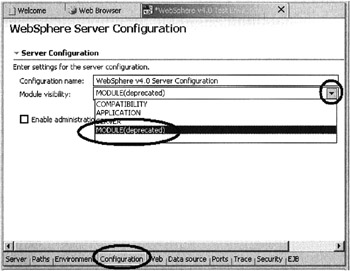
Figure 5.10: Changing the Module visibility to MODULE -
Save this setting by clicking the Save icon on the toolbar or select the File ’ Save option from the workbench menu bar.
In Development Studio Client Version 4.0,
-
Expand the defaultConfiguration.wsc folder in the Navigator view under the Servers folder.
-
Double-click the server-cfg.xml file.
In the dialog that appears, as shown in Figure 5.11.
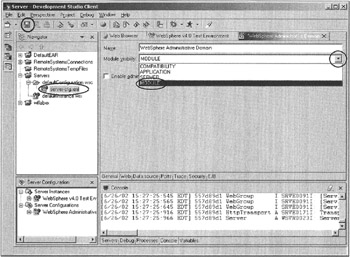
Figure 5.11: Module visibility
-
Click the down-arrow button in the Module visibility combo box.
-
Select MODULE from the selection list in the combo box.
-
Save this setting by clicking on the Save icon on the toolbar or select the File ’ Save option from the workbench menu bar.
Continuing for Both Development Studio Client Version 4.0 and 5.0
Close the editor windows and browser windows that have been opened in the workbench. It is important to close the browser window so that the browser discards cached information.
-
Click the X push button on the editor's Windows title bar, as shown in Figure 5.12.

Figure 5.12: Closing the editor dialogs
The application server is now set up. To apply these changes to the server setting, you need to restart the application server.
At the bottom of the workbench on the right side,
-
Click the Servers tab, as indicated in Figure 5.13.
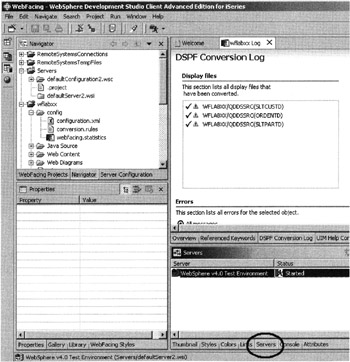
Figure 5.13: The Servers page -
Right-click the Server instance in the Servers list, as shown in Figure 5.14.
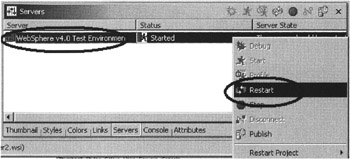
Figure 5.14: Pop-up menu for application server -
Select Restart from the pop-up menu.
After the Console view displays a message that the server is open for e-business, you can go back to the WebFacing Projects view in the WebFacing perspective of the workbench.
-
Right-click the wflabxx project
-
Select Run on Server from the pop-up menu.
The index.html page displays in the browser window.
Running the Web Application
In the browser window as shown in Figure 5.3, the WebFacing Tool creates two links for the Order Entry application automatically.
-
The top link uses the current browser session with all available toolbars and buttons .
-
The second link invokes a new browser session for the application. This new browser session displays only the window frame, without any of the browser menus or toolbars. This second link was added because many WebFacing users felt that the normal browser window could overwhelm some end users by offering too many capabilities, such as the Back button on the toolbar.
-
In your browser pane, click the top Order Entry Application link.
Tip For Development Studio Client Version 4.0 users, you have to click the link twice. The first click gives the browser focus, and the second click sends the click event.
After a few moments, the first application page appears in the browser, as shown in Figure 5.15.
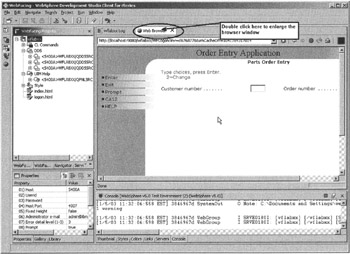
Figure 5.15: First application page in browser window
If you find the response time a bit slow, keep in mind that the first time the JSP file is requested , it has to be compiled into a servlet. If you run the application a second time, you will see improved performance because the servlet already exists. This is normal application server behavior.
Using the new interface, you can perform the same actions as in Chapter 2 to examine the results of the WebFacing conversion. This will give you a sense of how the default conversion changes your original application. You will then have a chance to improve the conversion results.
The one area that you cannot test in the built-in browser is the Help documentation support. If you press the F1 key in the internal browser, you will see an error message, as shown in Figure 5.16. You will have to start the application from an external browser. I will show you how to do this at the end of the chapter.
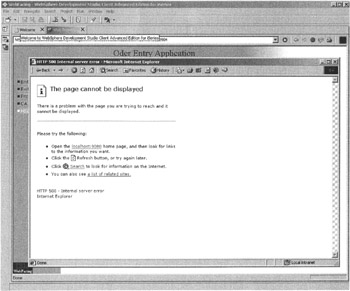
Figure 5.16: Help panel error message in built-in workbench browser
-
Click the Prompt push button, or press function key 4 to view the selection list window, shown in Figure 5.17.
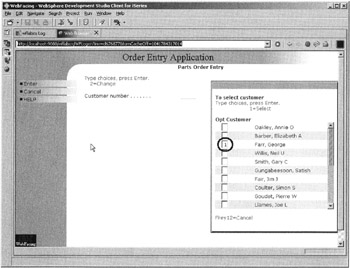
Figure 5.17: Customer selection list -
Select a customer from the subfile.
-
Press the Enter key.
You will return to the Order Entry Application screen, shown in Figure 5.18.
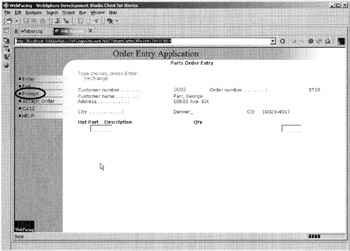
Figure 5.18: Order Entry Application screen with customer details
-
Click the Prompt push button or press function key 4 to display the parts selection list, as shown in Figure 5.19.
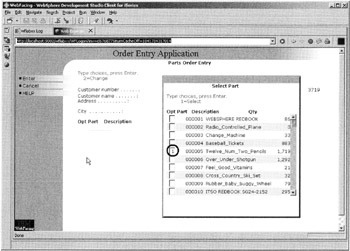
Figure 5.19: Parts selection list -
Select a part.
-
Press the Enter key.
On the Order Entry Application screen (Figure 5.20),
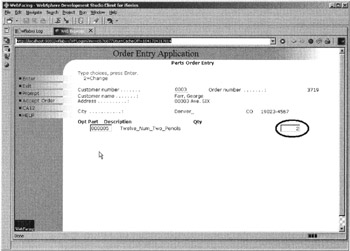
Figure 5.20: Order Entry Application screen with quantity specified
-
Enter a number in the Qty box.
-
Press the Enter key.
Continue ordering one or two more parts.
-
Press function key 6 to accept the order.
The application works in the same manner as in the 5250 environment, except that now you can navigate through the application with an Internet browser-based user interface.
Testing the Help Documentation Support
As I mentioned, the Help documentation support works only when you run the application in an external browser. Start Internet Explorer on your desktop and type in the following URL: http://localhost:9080/wflabxx/ . You could also copy and paste it from the internal browser URL bar.
Internet Explorer displays the index.html page as shown in Figure 5.21.
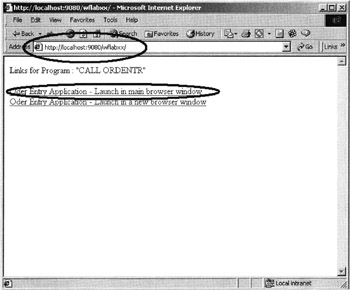
Figure 5.21: Internet Explorer with index.html page for wflabxx
-
Click the first link on this page.
The application opens in the browser. To view the Help,
-
Press the F1 key.
Another browser window opens with the help information, as shown as in Figure 5.22.
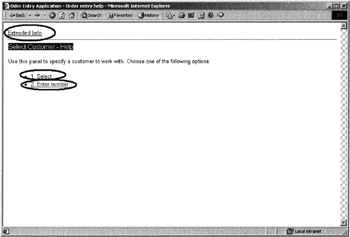
Figure 5.22: Help panel in browser
Now try the following links:
-
Select
-
Enter number
-
Extended help
Your UIM-based Help panels are all available in the WebFaced application.
Close the Help browser window and press F3 to end the application.
EAN: 2147483647
Pages: 153