Before You Start
To run this exercise you need WebSphere Development Studio Client for iSeries Version 5.0 or 4.0 installed on your workstation. Short instructions on how to install the product are provided in Chapter 1.
The figures in this book show sample user interface snapshots based on a workspace that is brand new. If you have already used the product, your environment will be slightly different, and you need to adjust for that fact when following my instructions or comparing my screen shots with your real desktop environment.
Starting the Development Studio Client Workbench
From the Start menu (refer to Figure 3.1),
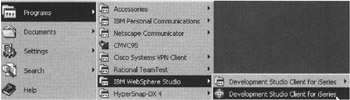
Figure 3.1: Starting WebSphere Development Studio Client Version 5
-
Click: Start ’ Programs ’ IBM WebSphere Studio ’ Development Studio Client for iSeries.
A dialog as shown in Figure 3.2 appears, asking you for the workspace location (unless you used Development Studio Client before and selected not to show this dialog again). The workspace contains all the information about your Development Studio projects. You can accept the default or you can use a separate workspace to store the work related to the WebFacing exercises in this book. You can create a new workspace at any time if, for example, you prefer not to mix these exercises with your real development.
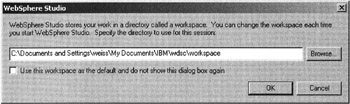
Figure 3.2: Dialog for workspace selection
-
Click the OK push button.
After a few moments, the workbench opens, and a window similar to the one shown in Figure 3.3 appears on your desktop.
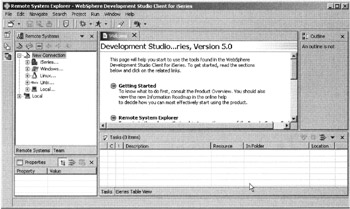
Figure 3.3: Initial window of Development Studio Client
| Note | If you did not reset the workbench, or you are working with the base edition of Development Studio Client or Development Studio Client Version 4.0, your environment will differ slightly from the screen captures in this book. |
Opening the WebFacing Perspective
Each perspective in Development Studio Client is customized with special views and tools to aid you in the tasks you want to perform. When you first open the workbench, the Remote System Explorer (RSE) perspective is active by default. In this perspective, you can work with iSeries objects, specify connections to iSeries servers, and use the interface as a programming environment similar to the green-screen environment of Program Development Manager (PDM). Although the Remote System Explorer is fundamental to Development Studio Client, it is not suited to Web-Facing tasks. This is why you need to use the WebFacing perspective.
To create a WebFacing project, you first need to open the WebFacing perspective (see Figure 3.4):

Figure 3.4: Workbench menu structure for opening a perspective
-
Select the Window item on the workbench menu bar.
-
Select Open Perspective from the pull-down menu.
-
Select the Other option from the submenu.
| Note | Version 4.0 users, instead of using the Window option on the menu bar, use the Perspective option: Perspective ’ Open ’ Other . |
A dialog similar to Figure 3.5 displays.
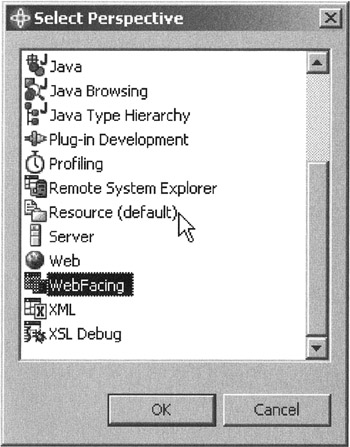
Figure 3.5: Select Perspective dialog
-
Select WebFacing from the list.
-
Click the OK push button.
The workbench now displays the WebFacing perspective and opens the WebFacing Projects view on the left-hand side of your workspace. You are ready to create a WebFacing project.
Creating a WebFacing Project
To create a WebFacing project in the workbench,
-
Select the File option on the workbench menu bar to display the File menu.
-
Select the New option from the File menu.
-
Select WebFacing Project from the submenu, as shown in Figure 3.6.
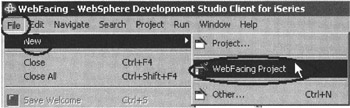
Figure 3.6: Menu structure to create a new WebFacing project
This invokes the WebFacing project wizard.
Completing the WebFacing Project Page
In the WebFacing project wizard you first see the WebFacing Project page (Figure 3.7).
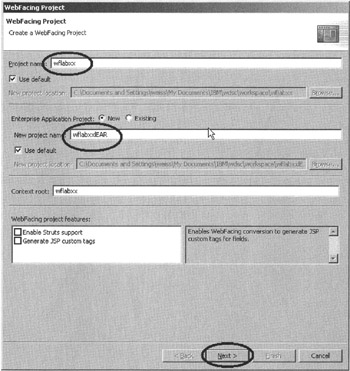
Figure 3.7: WebFacing project wizard, first page
| Note | The Figure 3.7 screen capture was taken using the advanced edition of Development Studio Client. If you are not using the advanced edition, you do not see the two WebFacing project features listed in the bottom left of this page. |
-
Type the project name , wflabxx.
-
Change the Enterprise Application Project name to wflabxxEAR. This creates a unique application file for this WebFacing project.
-
Click the Next push button.
The J2EE Setting page opens.
| Note | Version 4.0 users: The J2EE Setting page does not appear in your environment. Skip to the Select display file source members to convert page. |
On this page, you can specify the J2EE level you want the WebFacing Tool to use when creating WebFacing project files. Development Studio Client Version 5.0 is designed for use with WebSphere Application Server (WAS) Version 5.0. However, you can still use WAS Version 4.0 or earlier when you deploy. In real-life development, if you use WAS Version 5.0, then I recommend you select J2EE level 1.3. If you are using a previous version of WAS in your environment and are planning to deploy the WebFaced application to this version, then I recommend you select J2EE level 1.2. This is because older versions of WAS do not support level 1.3 J2EE. In this exercise you will use the WebFaced application in the WebSphere Test environment, which is version 5.0, so you should select J2EE level 1.3 (see Figure 3.8).
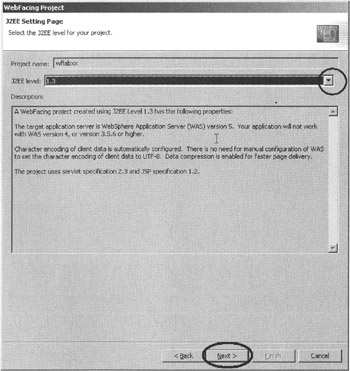
Figure 3.8: Page to select J2EE level
-
Click on the little arrow beside the J2EE level combination box.
-
Select 1.3 from the list.
-
Click the Next push button.
The Select display file source members to convert page opens as shown in Figure 3.9.
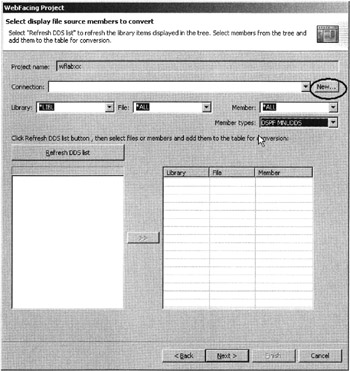
Figure 3.9: Selecting DDS source members
Selecting Display File Source Members to Convert
On the third page of the WebFacing project wizard you need to specify the name of the iSeries server that contains your display file DDS source. You also need to specify the source members you want to convert. Specifically, the WebFacing Tool needs to know these names :
-
Server name
-
Library name
-
Source file name
-
Member name
| Tip | You need to identify members for all record formats your application uses. If you miss one, then your user interface will show a Page not found error if that particular record format is requested at run time. |
First you need to specify the iSeries server name where the Data Description Source (DDS) is located. To do this, you configure a connection to the server.
Creating a New Connection in Development Studio Client
Because you are starting with a new workspace, you need to specify a connection to an iSeries server.
-
Click the New push button (on the right side of the page beside the Connection combination box) as shown in Figure 3.9.
The New personal profile dialog opens as shown in Figure 3.10.
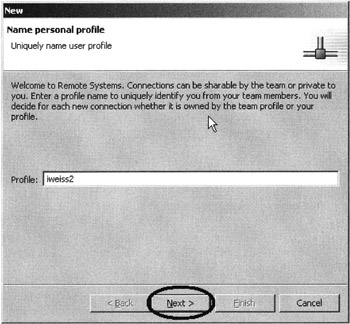
Figure 3.10: New personal profile dialog
-
Accept the default profile name.
-
Click the Next push button.
On the Remote iSeries System Connection page, as shown in Figure 3.11,
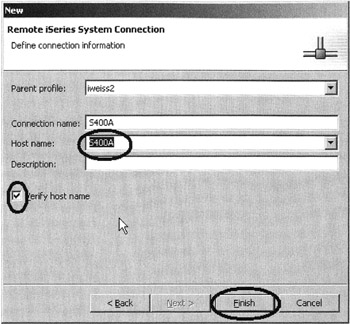
Figure 3.11: New connection dialog, second page
-
Enter the iSeries Host name.
| Important: | This is your iSeries server name; do not use the one in Figure 3.11, unless your system is named S400A. |
To keep things simple, the Connection name combination box is filled automatically with the same name.
| Note | Version 4.0 users: Enter your user ID in the user ID entry field. Use the same ID that you used in the emulation session when you ran the Order Entry application from the green screen. Make sure to also use this ID during conversion and when testing the application. |
-
Check the Verify host name check box.
-
Click the Finish push button.
The connection is created and can be reused by all tools in the workbench. The connection wizard also tests whether the iSeries host can be reached. If the test is successful, you will see the Select display file source members to convert page.
-
Check that your iSeries server is selected in the Connection combination box.
-
Make sure that *LIBL is selected in the Library combination box.
-
Click the Refresh DDS list push button.
A user ID and password dialog opens, as shown in Figure 3.12.

Figure 3.12: Log-on dialog to access iSeries server
-
Type your user ID. Use the same user ID that you used when running the Order Entry application earlier in this book.
-
Check the Permanently change user ID check box.
-
Type your password.
-
Check the Save password check box.
-
Click the OK push button on the Enter Password dialog.
A connection to the iSeries server is established. The library list of your iSeries job is displayed in the tree view list, on the WebFacing project wizard page as shown in Figure 3.13.
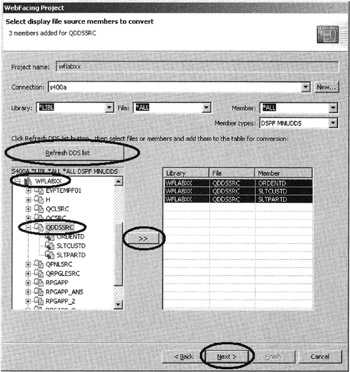
Figure 3.13: WebFacing project wizard, showing expanded library WFLABXX
-
Select the WFLABXX library from the list.
-
Expand it by clicking the plus sign (+) beside the library name.
-
Expand QDDSSRC, and select all members from the list by holding down the Shift key.
-
Click the >> push button in the middle of the page to copy the selected members over to the list of members to be converted.
Note To move all members in a source file, you can select the source file icon itself and click the >> push button. This will add all members in a source file to the list of members to be converted.
-
Click the Next push button at the bottom of the page to proceed to the next page of the wizard.
The WebFacing Tool now knows which DDS members to convert for this project. The conversion has not yet taken place, but the information is stored for future use.
The Select UIM source members to convert page opens, as shown in Figure 3.14.
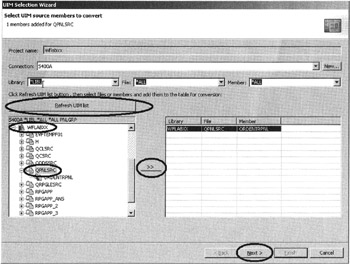
Figure 3.14: Selecting UIM source members
You now need to identify the panel group source containing the help information for the Order Entry application.
-
Click the Refresh UIM list push button.
-
Expand the WFLABXX library.
-
Select the QPNLSRC source file from the expanded list (of the WFLABXX library).
-
Click the >> push button in the middle of the page to copy all members over to the list of members to be converted.
There is only one panel group member in this source file: ORDENTRPNL.
-
Click the Next push button at the bottom of the Select UIM source page, to proceed to the next page of the wizard.
Completing the Specify CL Commands Page
You will now provide the information that the WebFacing wizard uses to create the initial index.html page. This is the page that will invoke the Order Entry application.
Do you remember what you typed on the command line to start the Order Entry application in the 5250 emulation session during the first exercise in Chapter 2? It was CALL ORDENTR .
Why is this important? The WebFacing run-time environment needs to know the invocation command for your application in order to send this invocation command to the iSeries server and start your application from the browser.
The page shown in Figure 3.15 is the WebFacing project wizard page where you specify the necessary information.
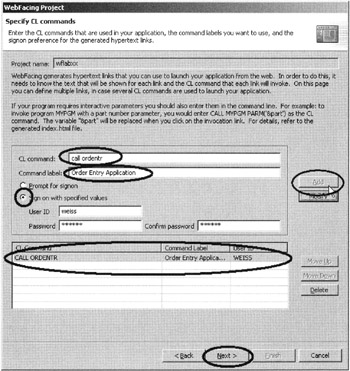
Figure 3.15: Specify CL commands page
-
Type CALL ORDENTR into the CL command entry field.
-
Type Order Entry Application into the Command label entry field.
Tip If you do not type anything into the Command label field, the CL input is copied into this entry field
-
Select the Sign on with specified values radio button.
Setting this radio button automatically applies the user ID and password you specified when connecting to your iSeries server. You will use this setup for testing purposes, to make life easier for you when starting the Order Entry application, so that you do not have to specify authentication information. You do not need to worry about security in your production environment because you can easily change the authentication, as I will show you later in the book.
-
Click the Add push button on the right side of the page.
Note Make sure the text and command you typed into the entry fields are shown in the list at the bottom of the page.
-
Click the Next push button at the bottom of the wizard page.
Choosing a Web Style
On the wizard page shown in Figure 3.16, you can select a Web style for your converted screens.

Figure 3.16: WebFacing project wizard, style selection page
-
Select gradient from the list of available styles.
-
Click the Next push button.
Completing the WebFacing Project Information
On the page shown in Figure 3.17, you have the choice to create the project and convert the source in one step, or only create the WebFacing project. At this point, you only need to create the WebFacing project. Conversion is part of the next exercise.
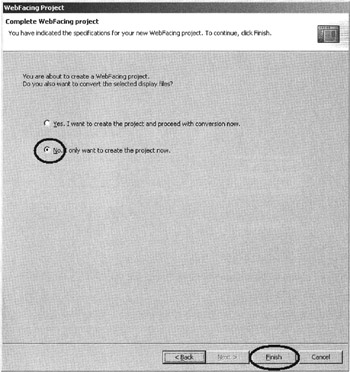
Figure 3.17: WebFacing project wizard, last page
-
Select the No, I only want to create the project now radio button.
-
Click the Finish push button.
The workbench takes a few moments to create the WebFacing project. Eventually, your new WebFacing project displays in the WebFacing Projects view as shown in Figure 3.18.
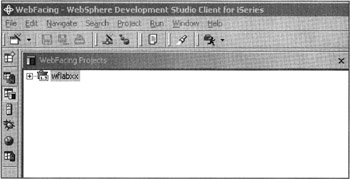
Figure 3.18: WebFacing Projects view with wflabxx project icon
The WebFacing Project Environment
Notice that the WebFacing project icon indicates which J2EE level the project will use.
If you expand the wflabxx project, you will notice that a couple of nodes have been added to this WebFacing project:
-
The display file source members to use for WebFacing conversion.
-
The panel group source members to convert
-
The CL command that will invoke the Order Entry application
-
The style to use for the converted screens.
When you expand the nodes in the tree view of your WebFacing project, you can see the information that is captured for this project.
-
Expand the nodes by clicking on the plus sign (+) beside them.
Figure 3.19 shows the expanded WebFacing project tree view.
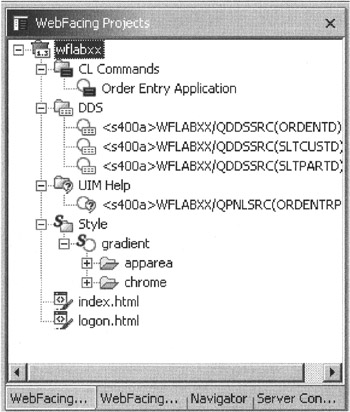
Figure 3.19: Tree view of new WebFacing project
| Tip | If you need to add source members to the WebFacing project later on, right-click the DDS or UIM Help icon and select the Add menu option from the pop-up menu; this will launch the WebFacing wizard and display the correct dialog. |
You are now ready to convert and run your application.
EAN: 2147483647
Pages: 153
- Enterprise Application Integration: New Solutions for a Solved Problem or a Challenging Research Field?
- Data Mining for Business Process Reengineering
- Healthcare Information: From Administrative to Practice Databases
- A Hybrid Clustering Technique to Improve Patient Data Quality
- Relevance and Micro-Relevance for the Professional as Determinants of IT-Diffusion and IT-Use in Healthcare