Users
 |
All users on a Solaris system have a number of unique identifiers and characteristics that can be used to distinguish individual users from each other, and also to logically group related users. Most physical users of a Solaris system will have a unique login assigned to them, which is identified by a username with a maximum of eight characters . Once a user account is created, it can be used for the following purposes:
-
Spawning a shell
-
Executing applications interactively
-
Scheduling applications to run on specific times and dates
-
Accessing database applications and other system services
In addition to user accounts, Solaris also uses a number of system accounts (such as root, daemon, bin, sys, lp, adm, and uucp) to perform various kinds of routine maintenance, including:
-
Allocation of system resources to perform specific tasks
-
Running a mail server
-
Running a web server
-
Process management
Users may access a Solaris system by accessing the console, or through a remote terminal, in either graphical or text mode. In each case, a set of authentication credentials is presented to the system, including the username and password. When entered, a user s password is compared to an encrypted string stored in the password database ( /etc/passwd ) or the shadow password database ( /etc/shadow ). Once the string entered by the user has been encrypted, it is matched against the already encrypted entry in the password database. If a match is made, authentication occurs and the user may spawn a shell. A Solaris username may have a maximum of eight characters, as may a Solaris password. Since the security of a Solaris system relies heavily on the difficulty of guessing passwords, user policies should be developed to either recommend or enforce the use of passwords containing random or semirandom character strings. The authentication sequence is shown in Figure 6-1.
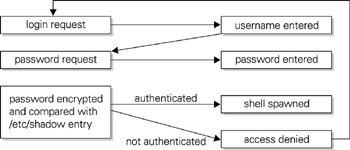
Figure 6-1: Solaris authentication sequence
User Characteristics
There are a number of other user characteristics that are associated with each user, in addition to a username and password. These features include:
-
The user ID (UID), which is a unique integer that begins with the root user (UID=1), with other UIDs typically (but not necessarily ) being allocated sequentially. Some systems will reserve all UIDs below 1023 for system accounts (for example, the apache user for managing the Apache web server), while those UIDs above 1024 are designated for ordinary users. The UID of 0 designates the superuser account, which is typically called root .
-
A flexible mechanism for distinguishing different classes of users, known as groups. Groups are not just sets of related users: the Solaris file system allows for group-designated read, write, and execute file access for groups, in addition to permissions granted to the individual user and to all users. Every UID is associated with a primary group ID (GID); however, UIDs may also be associated with more than one secondary group.
-
A home directory, which is the default file storage location for all files created by a particular user. If the automounter is used, home directories may be exported using NFS on /home or other directories. When a user spawns a login shell, the current working directory will always be the home directory.
-
A login shell, which can be used to issue commands interactively, or to write simple programs. A number of different shells are available under Solaris, including the Bourne shell (sh), the C shell (csh), the Bourne again shell (bash), and the Cornell shell (tcsh). The choice of shell depends largely on personal preference, user experience with C-like programming constructs, and terminal handling.
-
A comment, which is typically the user s full name , such as Paul Watters . However, system accounts may use names that describe their purpose (for example, the command WebServer might be associated with the apache user).
Adding Users
Adding a user to a Solaris system is easy, but this operation may only be performed by the root user. There are two options: the first option is to edit the /etc/passwd file directly, incrementing the UID, adding the appropriate GID, adding a home directory (and remembering to physically create it on the file system), inserting a comment, and choosing a login name. In addition, a password for the user must be set using the passwd command. The second is to use the built-in command-line interfaces to create accounts.
| Tip | Does adding a user on the command line sound difficult? If so, you should consider using the automated useradd command, which will do all of the hard work for you as long as you supply the correct information. |
The useradd command has the following format:
# useradd -u uid -g gid -d home_directory m k /etc/skel -s path_to_shell -c comment login_name
Let s add a user to our system, and examine the results:
# useradd -u 1004 -g 10 -d /opt/www m k /etc/skel -s /bin/sh -c "Web User" www
Here, we are adding a Web User called www with the UID 1004, GID 10, with the home directory /opt/www , and the Bourne shell as their login shell. At the end of the useradd script, an appropriate line should appear in the /etc/passwd file:
# grep www /etc/passwd www:x:1004:10:Web User:/opt/www:/bin/sh
However, the useradd command may fail under the following conditions:
-
The UID that you specified has already been taken by another user. UIDs may be recycled as long as precautions are taken to ensure that a previous owner of the UID no longer owns files on the file system.
-
The GID that you specified does not exist. Verify its entry in the groups database ( /etc/group ).
-
The comment contains special characters, like double quotes , exclamation marks ! , or slashes / .
-
The shell that you specified does not exist. Check that the shell actually exists in the path specified, and that the shell has an entry in the shells database ( /etc/shells ).
Modifying User Attributes
Once you have created a user account, it is possible to change any of its characteristics by directly editing the password database ( /etc/passwd ), or by using the usermod command. For example, if we wanted to modify the UID of the www account from 1004 to 1005, we would use this command:
# usermod -u 1005 www
Again, we can verify that the change has been made correctly by examining the entry for www in the password database:
# grep www /etc/passwd www:x:1005:10:Web User:/opt/www:/bin/sh
Remember that if you change a UID or GID, you must manually update existing directory and file ownerships by using the chmod , chgrp , and chown commands where appropriate.
Once a user account has been created, the next step is to set a password, which can be performed by the passwd command
# passwd user
where user is the login name for the account whose password you wish to change. In all cases, you will be required to enter the new password twice ”if you happen to make a typing error, the password will not be changed and you will be warned that the two password strings entered did not match. Here s an example for the user www:
# passwd www New password: Re-enter new password: passwd(SYSTEM): They don't match; try again. New password: Re-enter new password: passwd (SYSTEM): passwd successfully changed for www
After a password has been entered for a user, such as the www user, it should appear as an encrypted string in the shadow password database ( /etc/shadow ):
# grep www /etc/shadow www:C4dMH8As4bGTM:::::::
| Tip | Once a user has been granted an initial password, they may then enter a new password of their own choosing by using the passwd command with no options. |
Exercise 6-1 Create a user account called jbloggs using the useradd command and check that a password entry is created in the shadow password database ( /etc/shadow ).
Deleting Users
Now imagine that one of your prized employees has moved on to greener pastures unexpectedly ”although you will eventually be able to change the ownership on all of her files, you cannot immediately restart some production applications that must be available 24 —7. In this case, it is possible to temporarily disable logins to a specific account by using a command like
# passwd -l natashia
This command would lock Natashia s account until the root user once again used the passwd command on this account to set a new password. A locked account can be identified in the password database by the characters LK:
# grep natashia /etc/shadow natashia:*LK*:::::::
Once all of the user s files have been backed up, and any active processes have been killed by the superuser, the user account may be permanently deleted by using the userdel command. For example, to delete the user account natashia, and remove that user s home directory and all of the files underneath that directory, you would use the command
# userdel -r natashia
Alternatively, you could edit both the password and shadow password databases, and remove the appropriate lines containing the entries for the user natashia. You would also need to manually remove the user s home directory, and all of her files underneath that directory.
| Tip | There are several system accounts that should remain locked at all times to prevent interactive logins, including adm, bin, listen, nobody, lp, sys, and uucp. |
Exercise 6-2 Delete the user account called jbloggs using the userdel command and check that its password entry has been removed from the shadow password database ( /etc/shadow ).
EAN: 2147483647
Pages: 265