RAID
 |
Production systems of this kind invariably experience two kinds of capacity problems. First, even though the E-450 system discussed here may have a total capacity of 360GB, the largest file size that can be supported by the system is the size of an individual hard drive. This means that database servers, for example, would require multiple mount points to be located on a single file system for storing extremely large data files. Having 20 hard disks in this context is only as useful as having one. One solution is to wait until hard disks with higher capacities are manufactured, but relying on future hardware updates is not feasible for systems that have immediate deployment requirements. What is required is some way of splitting physical data storage across several physical disk volumes , while providing a single logical interface for access.
The second problem that arises is that hard disks and other physical media inevitably fail after periods of heavy use. Even if quality hard drives have mean time between failures (MTBFs) of several years, this is an average figure: some drives last ten years , others only last one. Again, superior Sun hardware provides some relief here: it is possible to 'hot swap' hard drives in an E-450, for example, without having to shut down the system and reboot. The faulty drive is simply removed, and the new drive replaced . Once backups have been loaded, the system will be available once again.
However, the length of time it takes to restore disk contents from backups might take several hours: customers often complain of downtime counted in minutes. So, while restoring from backups is an excellent strategy for countering catastrophic failure, it is simply not an option for production systems experiencing single-disk failures. What is required is some level of content redundancy that retains more than one copy of a system's data across different disks.
To solve the capacity and redundancy problem, Solaris provides support for the redundant array of inexpensive disks (RAID) standard. RAID defines a number of different 'levels,' which provide various types of 'striping' and 'mirroring.' In this context, 'striping' means the process of spreading data across different physical disks while presenting a single logical interface for the logical volume. Thus, a striped disk set containing four 18GB drives would have a total logical capacity of 72GB. This configuration is shown in Figure 21-1.
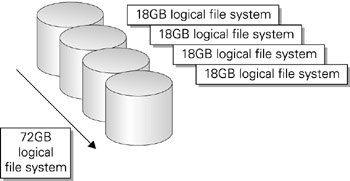
Figure 21-1: Striped disk configuration.
A different approach is offered by mirroring: here, a logical volume's contents are copied in real time to more than one physical device. Thus, four 18GB drives could be mirrored to provide two completely redundant 18GB volumes. This means that if one disk failed, its mirror would automatically be used to continue create, read, update, and delete operations on the file system while the disk was physically replaced (again, with no reboot required). This kind of seamless operation requires no downtime. This configuration is shown in Figure 21-2.
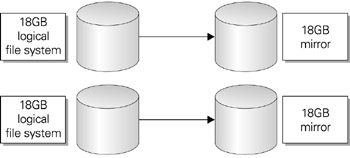
Figure 21-2: Mirrored disk configuration.
Alternatively, the four disks could be configured so that a 36GB striped volume could be created, combining the capacities of two disks, while the remaining two disks could be used to mirror this striped volume. Thus, the system is provided with a logical 36GB volume that also features complete redundancy. This configuration is shown in Figure 21-3.
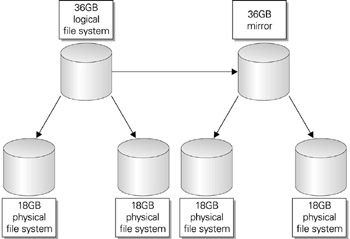
Figure 21-3: Striped and mirrored disk configuration.
There are six major RAID levels supported by DiskSuite, the tool that is used to set up mirrored and striped virtual file systems on Solaris. RAID level 0 is the primary striping level, which allows a virtual file system to be constructed of several physical disks. Their capacities are effectively combined to produce a single disk with a large capacity. In contrast, RAID level 1 is the primary mirroring level: all data that is written to the virtual file system is also copied in real time to a separate physical disk that has the same capacity as the original. This level has the slowest performance because all data must be written twice to two different disks, and costs the most because each drive to be mirrored makes use of a second drive, which cannot be used for any other purpose. However, full redundancy can be achieved using RAID level 1.
The remaining RAID levels are variations on these two themes. RAID level 2 is a secondary mirroring level, which uses Hamming codes for error correction. RAID levels 3 and 4 are secondary striping levels, writing parity information to a single drive but writing all other data to multiple physical disks.
In contrast, RAID level 5 is a striping and mirroring level that allows data to be written to different disks, including parity information. RAID 5 offers the best solution for systems that require both mirroring and striping. These levels are summarized in Table 21-1.
| Level | Description |
|---|---|
|
| Primary striping level, allowing a single virtual file system to be constructed of multiple physical disks. |
| 1 | Primary mirroring level, where all data written to a virtual file system is copied in real time to a separate mirroring disk. |
| 2 | A secondary mirroring level, which uses Hamming codes for error correction. |
| 3 | A secondary striping level, which writes parity information to a single drive, but writes all other data to multiple drives. |
| 4 | A secondary striping level, which writes parity information to a single drive but writes all other data to multiple drives. |
| 5 | A striping and mirroring level which allows data to be written to different disks, including parity information. |
Setting Up RAID
The first step in setting up any kind of RAID system is to ensure that the DiskSuite packages are installed and then prepare the disks for mirroring or striping by formatting them. Primary disks and their mirrors must be set up with exactly the same partition structure to ensure that virtual file systems can be created that are compatible with both primary and mirror.
Once the DiskSuite packages have been installed, it is necessary to prepare disks that will be used with DiskSuite. This preparation includes creating state database replicas for virtual file systems used on the system. Ideally, these state database replicas will be distributed across each controller and/or disk so that maximum redundancy can be achieved. A small partition must be created on each disk that will contain the state database (typically around 5MB). For example, to create a state database replica on the file system /dev/dsk/c1t0d0s7 , we would use the following command:
# metadb -c 3 -a -f /dev/dsk/c1t0d0s7 /dev/dsk/c0t0d0s7
This creates three replicas on each of the two disks specified ( /dev/dsk/c1t0d0s7 and /dev/dsk/c0t0d0s7 ). Note that there are two controllers used rather than one.
If there are no existing state database replicas, the following message will be displayed:
metadb: There are no existing databases
Striping
Next, we need to create configurations for the virtual file systems that we wish to use. These can be permanently recorded in the DiskSuite configuration file ( md.tab ). For example, the striping configuration we mentioned previously, involving four 18GB disks, could have its configuration recorded with the following entry, if the virtual file system ( s5 ) had the path /dev/md/dsk/d5 :
d5 4 1 c1t1d0s5 1 c1t2d0s5 1 c2t1d0s5 1 c2t2d0s5
Here, the four physical disks involved are /dev/dsk/c1t1d0s5 , /dev/dsk/c1t2d0s5 , /dev/dsk/c2t1d0s5 , and /dev/dsk/c2t2d0s5 . To ensure that the virtual file system is mounted at boot time, it could be included in the /etc/vfstab file, just like a normal file system. Indeed, there should only be an entry for /dev/md/dsk/d5 in /etc/vfstab after striping is complete, and the entries for /dev/dsk/c1t1d0s5 , /dev/dsk/c1t2d0s5 , /dev/dsk/c2t1d0s5 , and /dev/dsk/c2t2d0s5 should be commented out.
To initialize the d5 metadevice, we would use the following command:
# metainit d5
If this command succeeds, we simply treat the new metadevice as if it were a new file system and initialize a UFS file system on it:
# newfs /dev/md/rdsk/d5
Next, we need to create an appropriate mount point for the device (such as /staff ) and mount the metadevice:
# mkdir /staff # mount /dev/md/dsk/d5 /staff
The striped volume d5 is now ready for use.
Mirroring
In order to create a mirror between two file systems, we follow a similar procedure of creating an entry in the md.tab file. For example, if we want to create a mirror of /dev/dsk/c1t1d0s5 with /dev/dsk/c0t1d0s5 (note the different controller), we would need to create a virtual file system ( d50 ) that mirrored the primary file system ( d52 ) to its mirror ( d53 ). The following entries would need to be made in md.tab :
d50 -m /dev/md/dsk/d52 /dev/md/dsk/d53 d52 1 1 /dev/dsk/c1t1d0s5 d53 1 1 /dev/dsk/c0t1d0s5
To initialize the d5 metadevice, we would use this command:
# metainit d50 # metainit d52 # metainit d53
If this command succeeds, we simply treat the new metadevice as if it were a new file system and initialize a UFS file system on it:
# newfs /dev/md/rdsk/d50 # newfs /dev/md/rdsk/d52 # newfs /dev/md/rdsk/d53
Next, we need to create an appropriate mount point for the device (such as /work ) and mount the metadevice:
# mkdir /work # mount /dev/md/dsk/d50 /work
The mirrored volume d50 is now ready for use.
EAN: 2147483647
Pages: 265