Preparations for Deploying an XML Web Service
| < Day Day Up > |
| InfoPath is designed to be used not only to connect to relational databases such as Microsoft Access and Microsoft SQL Server, but also to provide access to specified types of XML Web services. There are many potential uses of InfoPath with XML Web services. Using InfoPath 2003 with XML Web services is very straightforward once everything is set up correctly. To maximize the likelihood that you can work through this chapter, I will use the Web services examples included in the InfoPath 2003 Software Development Kit, which can be downloaded from http://www.microsoft.com/downloads/details.aspx?FamilyID=351f0616-93aa-4fe8-9238-d702f1bfbab4&displaylang=en. The version of the SDK I used is dated September 24, 2003. The system requirements for the Web services form templates in the SDK are as follows :
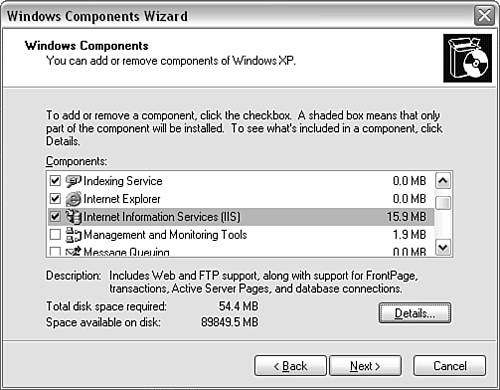
If you plan to use the email attachment functionality, you will also need Microsoft Office Outlook 2003 (or an equivalent email client that supports attachments) and the Microsoft SMTP server running on IIS. Installing Internet Information ServicesTo run the InfoPath SDK XML Web services examples, you must have IIS installed on the local development machine or on an appropriate server. In Windows XP Professional and Windows 2003 Server, IIS is not installed by default. To check whether you have IIS installed, follow these steps:
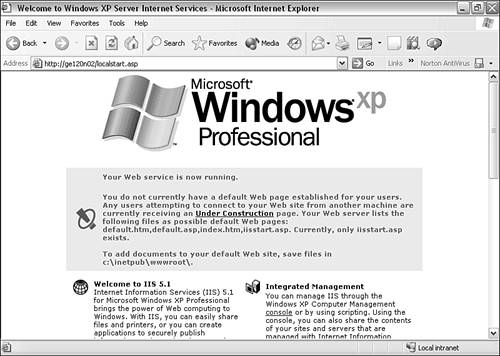
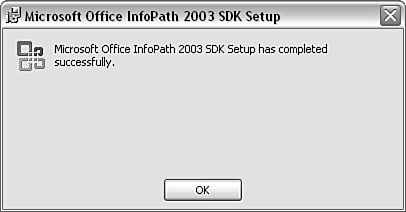
If IIS has been installed correctly and doesn't already have a configured Web site or Web service, typing http:// myServerName / or http://localhost/ in Internet Explorer will cause a default page to be displayed by IIS. Figure 8.3 shows the IIS 5.1 default page. Figure 8.3. The default Web page for IIS 5.1. If IIS was already installed and used for other purposes, the default Web page will likely have been replaced by a Web page, an ASP Web page, an ASP .NET Web page, or a Web service. If you installed IIS after you installed the .NET Framework, you will have to register the ASPNET user account. You do so by running the utility aspnet_regiis.exe from the command line. Open a Command window and navigate to the directory where the utility is stored. On Windows XP, you can expect to find aspnet_regiis.exe in c:\Windows\Microsoft.NET\Framework\v1. versionNumber . If you are unsure of the location of aspnet_regiis.exe on your system, it might be quickest to do a search for the filename and then navigate to the appropriate directory. At the command prompt, after you have navigated to the correct directory in the Command window, type aspnet_regiis.exe -I to register the ASPNET account. Messages will be displayed indicating the progress and completion of the registration. Installing and Configuring the SDKThe InfoPath SDK is downloaded as a single MSI file, InfoPathSDK.msi . Download the file to a suitable location on your hard disk, locate the file, double-click it, accept the Microsoft licensing agreement, and follow the onscreen instructions to install the SDK. If the SDK installs correctly, you will see a message like the one shown in Figure 8.4. In addition, if installation has been successful, the InfoPath SDK will be accessible via the All Programs (in Windows XP) menu. Figure 8.4. Installation of the SDK has completed successfully. The InfoPath SDK includes a configuration utility that carries out several configuration steps necessary to use the InfoPath form templates provided as samples. To access the configuration utility on Windows XP Professional, click the Start button and select All Programs, Microsoft Office 2003 Developer Resources, Microsoft InfoPath 2003 SDK, Setup, Samples Setup. The configuration utility opens (see Figure 8.5). Figure 8.5. The InfoPath SDK configuration utility. The configuration utility carries out four tasks , and its interface is divided into four corresponding sections:
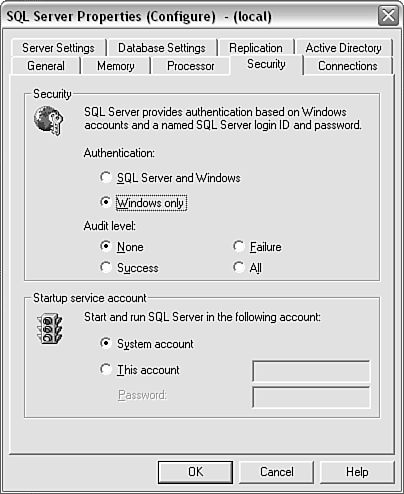
The top section of the configuration utility allows creation of IIS virtual directories using IIS 5.0 (Windows 2000), IIS 5.1 (Windows XP Pro), or IIS 6.0 (Windows 2003 Server). The Server Name text box will typically show the name of your local machine by default, assuming it has IIS installed. If you intend to use IIS on another machine on your network, edit the Server Name text box accordingly . By default, the configuration utility creates a root directory called InfoPathSDK for InfoPath SDK XML Web services. If you want to change the name of the directory, edit the Logical Name text box in the configuration utility. After the contents of the Server Name and Logical Name text boxes are correct, click the Execute button in the top section of the configuration utility. The Status, which is visible to the left of the Execute button, will change from Not Completed to In Progress, and finally to Complete. The second section of the InfoPath SDK configuration utility allows you to test the connection to the Northwind SQL Server sample database. Check whether the Server Name text box contains the desired server name (no change is needed if SQL Server is installed on the local machine as a default instance) and that the authentication to SQL Server is appropriate to the way that you have SQL Server set up. The Connection String text box is likely to contain a correct, automatically generated connection string, so don't fiddle with it unless you are sure it needs to be changed and you understand what you are doing. Click the Test Connection button. If the connection is correctly specified, the Status will change very rapidly from Not Completed, to In Progress, to Complete. If you receive an error message when testing the SQL Server connection, be sure to confirm that the SQL Server is running, particularly if you use it only occasionally for development purposes and haven't set it to run when the operating system starts. If you have changed the Server Name and/or the Logical Name text boxes in the first section of the configuration utility, you will need to modify the sample forms using the third section of the configuration utility. Click the Execute button, and the Status will change from Not Completed to Complete, assuming that all is in order. The remainder of this chapter assumes that the server is the local machine. Configuring SQL ServerFor the Web service sample form templates to work correctly, SQL Server 2000 needs to be configured to allow both Windows authentication and SQL Server authentication. To check the security configuration for the relevant SQL Server instance, follow these steps:
|


| < Day Day Up > |
EAN: 2147483647
Pages: 206
- ERP Systems Impact on Organizations
- The Second Wave ERP Market: An Australian Viewpoint
- The Effects of an Enterprise Resource Planning System (ERP) Implementation on Job Characteristics – A Study using the Hackman and Oldham Job Characteristics Model
- Context Management of ERP Processes in Virtual Communities
- Distributed Data Warehouse for Geo-spatial Services