Using XPath in Expression Boxes

 < Day Day Up > 

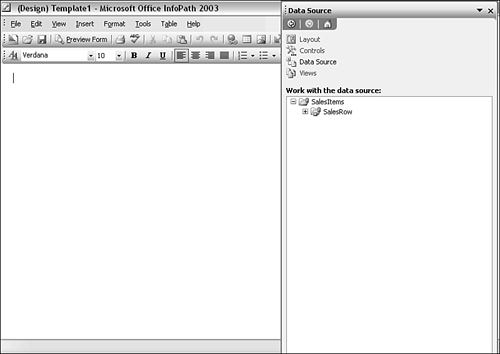
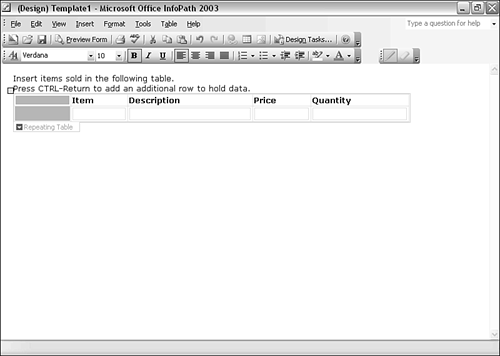
You saw the basics of how XPath can be used with expression boxes in the previous section. In this section, we will put XPath to work in fairly straightforward ways, which can be used in practical production form templates.

Creating a Row Counter in a Repeating Table

In this example, we will create a repeating table to hold data derived from a W3C XML Schema. The W3C XML Schema document is shown in Listing 5.1.

Listing 5.1. A Source W3C XML Schema Document ( SalesItems.xsd )
 <xsd:schema xmlns:xsd="http://www.w3.org/2001/XMLSchema"> <xsd:element name="SalesItems" >  <xsd:complexType>   <xsd:sequence>    <xsd:element name="SalesRow" minOccurs="1" maxOccurs="unbounded" >     <xsd:complexType>      <xsd:sequence>       <xsd:element name="Item" type="xsd:string" />       <xsd:element name="Description" type="xsd:string" />       <xsd:element name="Price" type="xsd:decimal" />       <xsd:element name="Quantity" type="xsd:integer" />     </xsd:sequence>     </xsd:complexType>    </xsd:element>   </xsd:sequence>  </xsd:complexType> </xsd:element> </xsd:schema> 

The schema document indicates that the corresponding XML document will have a structure such as that seen in Listing 5.2.

Listing 5.2. An Instance Document ( SalesItems.xml )
 <SalesItems> <!-- The <SalesRow> element can repeat as often as necessary -->  <SalesRow>   <Item></Item>   <Description></Description>   <Price></Price>   <Quantity></Quantity>  </SalesRow> </SalesItems> 

We can create a form to demonstrate use of the repeating table to display a counter inside each row using the XPath position() function. Follow these steps:

  1. Display the task pane (Ctrl+F1) and select Design a Form from the task pane drop-down menu.

  2. On the Design a Form task pane, select the New from Data Source option. The Data Source Setup Wizard window opens.

  3. Select the radio button labeled XML Schema or XML Data File and click the Next button.

  4. Click the Browse button and locate the W3C XML Schema document c:\IKS\Ch05\SalesItems.xsd .

  5. Click Finish. If the schema is correctly structured and includes structures supported by InfoPath 2003, a blank form area displays, and the Data Source task pane opens (see Figure 5.4).

    Figure 5.4. The newly created data source.

    graphics/05fig04.gif

  6. Add the text Insert items sold in the following table . Press Ctrl+Return to add an additional row to hold data.

  7. In the Work with the Data Source section of the Data Source task pane, right-click on SalesRow and select Repeating Table. A repeating table is inserted in the form area at the existing cursor position. InfoPath usually derives titles for each column fairly intelligently from the field names in the data source (see Figure 5.5). You can edit the column titles if you desire .

    Figure 5.5. A newly created repeating table.

    graphics/05fig05.gif

  8. Right-click in the column header area labeled Item. The menu shown in Figure 5.6 displays.

    Figure 5.6. Menu options for a repeating table.

    graphics/05fig06.gif

  9. Notice the Insert menu option in Figure 5.6. This allows an additional column to be inserted to the left of the Item column. Click on the Columns to the Left option. A new column with a blank header is inserted to the left of the Item column, as shown in Figure 5.7.

    Figure 5.7. A new column is added to the repeating table.

    graphics/05fig07.gif

  10. Click in the cell below the header cell in the newly created column. Click on Controls in the Data Tasks task pane and then click on Expression Box toward the bottom of the Insert Controls section of the Controls task pane.

  11. An Insert Expression Box window opens (refer to Figure 5.1) with an area for you to enter an XPath expression. This expression will be used to arrive at the value to be contained in the expression box control that you are in the process of adding to the form area.

  12. Use the XPath position() function. It takes no arguments, so you can simply type position() in the XPath text box in the Insert Expression Box window. Click OK and the expression box is inserted on the form area at the cursor position.

    ADJUSTING COLUMN WIDTH

    You can adjust the widths of the columns by passing the mouse pointer over the gray vertical lines separating the cells in the header row. When the mouse pointer changes to a vertical black line with a right and left arrow, you can drag the column boundary to the left or right to alter the column width.


  13. The numeral 1 appears in the left-most cell of the second row of the repeating table.

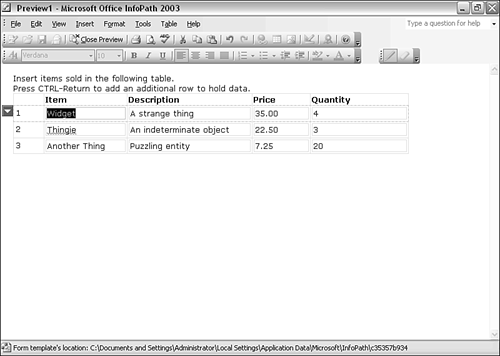
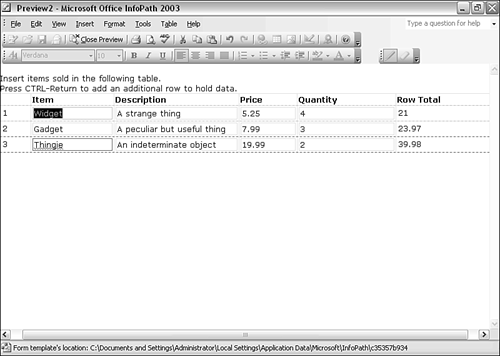
To test the form template ( PositionCounter.xsn in the download includes this, as well as functionality we will discuss in the next section), click on Preview Form. Enter some data and add new lines, either by using Ctrl+Enter or by right-clicking the box at the top-left of the repeating table and electing to insert a new line above or below the current line. If you insert a row above the current row, you should see the value in the expression box in the current row increment by one as the value returned by the position() function changes, because a new row has been added. Figure 5.8 shows a preview of the repeating table in action using PositionCounter.xsn (the appearance will differ slightly if you have followed the instructions given previously).

Figure 5.8. Using the expression box control to provide a row counter.

graphics/05fig08.gif

SEPARATE MENU ITEMS FOR INSERTING ROWS AND COLUMNS

Notice that the menu options for inserting rows and columns are, perhaps surprisingly, not accessible from the Repeating Table Properties window. There are separate menu options available when you right-click in the repeating table outside the text box controls. If you can't find the Insert menu option, check that the final menu option is Repeating Table Properties. If the final menu option when you right-click is, for example, Text Box Properties, you haven't clicked in the appropriate part of the area of the repeating table.

If you have problems clicking in the correct area, click anywhere in the repeating table control. Look for a small gray square at the top-left of the repeating table. Right-click on the small gray square, and the correct menu opens.


Adding a Product

You now have a repeating table with five columns. In this section, you'll add another expression box control and use it to calculate the value of the items sold in that row.

We will start with the form template PositionCounter.xsn (in the file download available for this chapter). Open PositionCounter.xsn in design mode. Then follow these steps:

  1. Right-click on the repeating table in the header cell for the Quantity column. Select the Insert option, and then select Columns to the Right.

  2. A new column with a blank header cell appears to the right of the Quantity column. In the header cell, type Row Total .

  3. Click in the second row of the newly created column. Open the Controls task pane if it's not visible. Double-click on the Expression Box option.

  4. In the Insert Expression Box window, insert the XPath expression Price * Quantity . Click the OK button. The text NaN (meaning not a number ) appears in the Row Total column in the cell below the Row Total header (see Figure 5.9). This is effectively an error message indicating that there isn't a valid numerical value in that cell.

    Figure 5.9. The Row Total column is added and an error is displayed.

    graphics/05fig09.gif

    XPath 1.0 doesn't support complex arithmetic, but it does support simple calculation such as multiplying two values together.

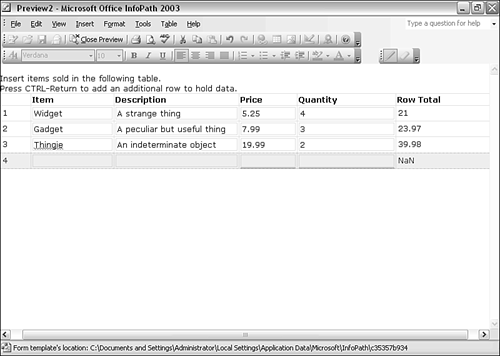
Preview the form template by pressing Alt+P. Add some sample data and create a few rows of data. Enter some values in the Price and Quantity column for a row. The total cost of items in that row is displayed in the Row Total column (see Figure 5.10).

Figure 5.10. Automatically calculated row totals.

graphics/05fig10.gif

DIVISION IN XPATH

In XPath, the forward slash ( / ) normally used for division in many other settings is used as the separator between location steps that make up an XPath location path , such as my:Group/my:field1 . Therefore, the forward slash cannot be used as a division operator.

The div operator is used to divide in XPath where you might otherwise expect to use the forward slash.


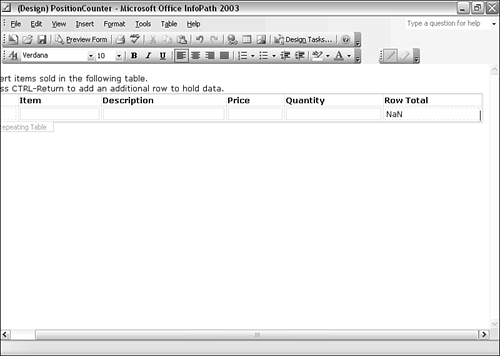
When there are valid numerical values for both Price and Quantity, the corresponding value in the Row Total column is a numeric value. However, each time you create a new row by pressing Ctrl+Enter, because there is no value for Price or Quantity, the value displayed in the Row Total for that new row is NaN (see Figure 5.11). After you enter numbers for Price and Quantity, the calculation takes place.

Figure 5.11. The NaN error indicator is displayed in newly created rows.

graphics/05fig11.gif

Calculating a Grand Total

In this example, we will use the XPath sum() and count() functions to provide summary values for the content of a repeating table. In the previous example, we calculated a product of Price and Quantity but didn't store that value in the data store. This time, we will enter that value in the RowTotal field manually, so we will create a new form template from the W3C XML Schema document, shown in Listing 5.3.

Listing 5.3. A Modified W3C XML Schema Document ( SalesItems2.xsd )
 <xsd:schema xmlns:xsd="http://www.w3.org/2001/XMLSchema"> <xsd:element name="SalesItems" >  <xsd:complexType>   <xsd:sequence>    <xsd:element name="SalesRow" minOccurs="1" maxOccurs="unbounded" >     <xsd:complexType>      <xsd:sequence>       <xsd:element name="Item" type="xsd:string" />       <xsd:element name="Description" type="xsd:string" />       <xsd:element name="Price" type="xsd:decimal" />       <xsd:element name="Quantity" type="xsd:integer" />       <xsd:element name="RowTotal" type="xsd:decimal" />     </xsd:sequence>     </xsd:complexType>    </xsd:element>   </xsd:sequence>  </xsd:complexType> </xsd:element> </xsd:schema> 

Notice that the new element RowTotal has been added, which follows the Quantity element. An instance document would look like Listing 5.4.

Listing 5.4. A Modified Instance Document ( SalesItems2.xml )
 <SalesItems> <!-- The <SalesRow> element can repeat as often as necessary -->  <SalesRow>   <Item></Item>   <Description></Description>   <Price></Price>   <Quantity></Quantity>   <RowTotal></RowTotal>  </SalesRow> </SalesItems> 

We will use the Data Source Wizard to create the data source for the new form template. We could have amended relevant parts of some files in the form template, but because we haven't covered the structure of those files yet, we will create a new form template from scratch.

We also could use scripting code to automatically calculate the value for RowTotal , but we will continue to focus on the use of XPath in this chapter. Scripting techniques are covered in Chapter 17, "Scripting in InfoPath."

SHOP TALK
MODIFYING DATA STRUCTURE ISN'T STRAIGHTFORWARD

We'll start fresh for this example, rather than modifying the previous example. Modifying form templates in InfoPath 2003 can be a real nuisance, particularly for form designers who don't understand how the files inside the form template can be extracted and edited. Because we haven't looked at those topics at all, we'll use the techniques we've already looked at and create a new form template from scratch.

We will look at the structure of some of the files that make up the form template in Chapters 15 ("Understanding the .xsn File") and 16 ("The Manifest"). Issues specific to updating and modifying form templates are discussed in Chapter 11 ("Updating and Modifying InfoPath Forms").

It's often quicker to re-create an InfoPath form from scratch than to fiddle around inside the files extracted from the form template. Depending on the types of changes you need to make, you might need to have competence in understanding ActiveX Data Objects (ADO), XPath, the Microsoft flavor of the XML DOM, and XSLT. InfoPath 2003 wizards allow you to be productive without detailed understanding of those technologies, but the wizards unfortunately don't directly support the modification of a form template.


The following steps should be familiar to you now:

  1. Open the task pane and Select the Design a Form task pane.

  2. Select the New from Data Source option. The Data Source Setup Wizard opens.

  3. Select the XML Schema or XML Data File option. Browse to locate c:\IKS\Ch05\SalesItems2.xsd . If the W3C XML Schema document is correctly structured and it corresponds to the features supported by InfoPath, a blank form area is created and the Data Source task pane opens.

  4. Add some descriptive text to the form area: Enter sales items in this table. You can add a new row by pressing Ctrl+Return.

  5. Right-click on SalesRow in the Data Source task pane (see Figure 5.12) and select Repeating Table.

    Figure 5.12. Selecting a type of form control for repeating data.

    graphics/05fig12.gif

A repeating table control is inserted in the form area at the current cursor position. Notice that there are now five named columns in the repeating table.

AUTOMATIC DUPLICATE BINDING DETECTION

InfoPath can automatically detect when two form controls are bound to the same field in the data source. A blue circle with a lowercase i is inserted into each field that has duplicate binding.

You can see this feature in action by repeating the action of selecting the SalesRow field in the Data Source task pane and selecting Repeating Table. A second repeating table is inserted in the form area, and the blue circles appear in each field (because all fields in the data source have duplicate binding to form controls).

This feature can be very useful in complex form templates because it flags possible inadvertent errors in binding between data source fields and form controls.


Counting the Number of Rows

We will create a row counter using the XPath position() function and an expression box as described in the previous section:

  1. Ensure that the cursor is below and outside the repeating table control and enter the text Number of rows: . Without moving the cursor, double-click on the Expression Box control in the Controls task pane.

  2. In the window that opens, click the square button to the right of the XPath text box. Then select SalesRow in the data source.

  3. We don't want to find the total number of sales rows at any point in filling in the form. So, add count( before SalesRow and ) after it, to give the XPath expression count(SalesRow) .

  4. Click the OK button, and the expression box is added to the form area.

InfoPath doesn't allow you to enter an XPath expression sequentially piece by piece, as you may be used to doing in Excel, for example. You have to do it at least partly by hand. It isn't elegant, but it works.

Create a new line in the form area, insert the text Grand Total: , and add another expression box as described in the previous paragraph. Continue as follows:

  1. In the Insert Expression Box window, click the square button to the right of the XPath text box. Select the RowTotal field, clicking on nodes as necessary to reveal it in the Select a Field or Group window.

  2. Click OK. The expression SalesRow/RowTotal appears in the XPath text box.

  3. To use the XPath sum() function, insert sum( before SalesRow/RowTotal and insert ) after it. The XPath expression should be sum(SalesRow/RowTotal) .

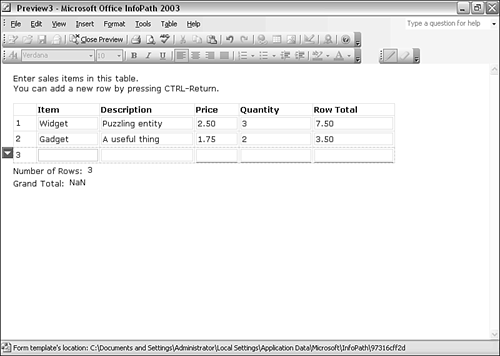
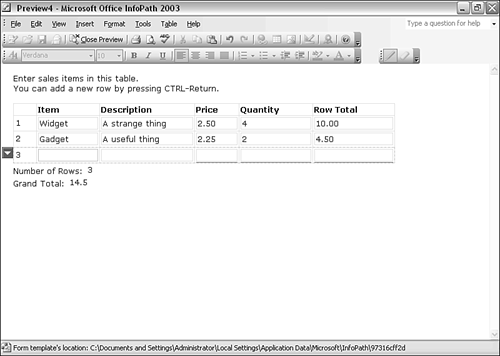
Move to preview mode by pressing Alt+P, and enter some data into the form (see Figure 5.13).

Figure 5.13. The row count and the grand total update automatically.

graphics/05fig13.gif

Most of the time that the form is displayed, you see NaN in the expression box next to the text Grand Total (see Figure 5.14). As soon as you create a new row, you have a blank RowTotal field, which gives the value NaN when added to the numeric values in other rows.

Figure 5.14. Blank row totals cause the NaN error indicator to be displayed.

graphics/05fig14.gif

You can get rid of that problem by editing the XPath expression for the expression box control. You can use an XPath predicate to exclude empty RowTotal values. The XPath expression is edited to read

 sum(SalesRow/RowTotal[.!=""]) 

XPATH PREDICATES

XPath predicates are used to filter a node set selected by a location step. XPath predicates are enclosed in square brackets.

To select, for example, whether a book is represented in XML, Chapter elements can use the simple XPath expression Chapter . To select, using the position() function, Chapter elements after Chapter 3, we can add a predicate such as in Chapter[position() > 3] .


The [.!=""] part of the expression is a predicate:

  • The square brackets indicate that what is contained in them is a predicate.

  • The period is an abbreviation for self::node() .

  • !="" means not equal to the empty string.

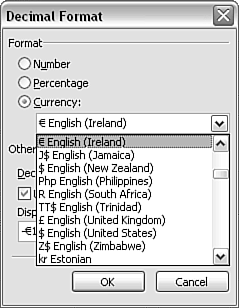
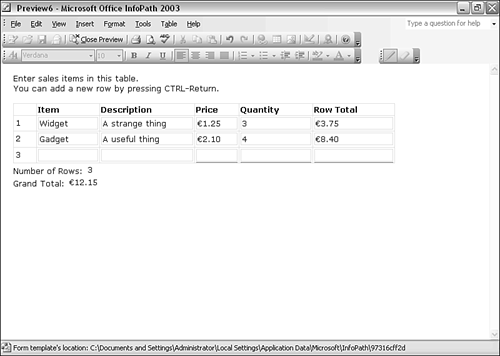
Thus, RowTotal[.!=""] means "Select RowTotal nodes only if their value is not equal to the empty string." With this predicate, new rows that have an empty value for RowTotal don't cause NaN to appear. Figure 5.15 shows the improved appearance just after a new row has been inserted.

Figure 5.15. An edited XPath expression prevents the undesired display of the NaN error indicator.

graphics/05fig15.gif

Formatting Data

So far, the prices in the Price columns have been displayed simply as numbers, but you might want to display them as currency. To do so, right-click on the Price text box, click Text Box Properties, and then click Format on the Data tab of the Text Box Properties window. The Decimal Format window opens (see Figure 5.16).

Figure 5.16. Selecting a currency format for display.

graphics/05fig16.gif

For this example, choose the Euro currency for Ireland. Other Euro currency options are available, depending on language- related preferences for the thousands separator and decimal separator in numeric values. As you can see in Figure 5.16, other important currencies such as the U.S. dollar and the U.K. pound are also available.

After you alter the format of RowTotal and GrandTotal to Euros, the form looks a little more polished (see Figure 5.17).

Figure 5.17. Numeric values displayed as currency.

graphics/05fig17.gif

The final version of the form template is available in the download as PositionCounter2.xsn .

 < Day Day Up > 


Microsoft Office InfoPath 2003 Kick Start
ISBN: 067232623X
EAN: 2147483647
Year: 2004
Pages: 206

flylib.com © 2008-2017.
If you may any questions please contact us: flylib@qtcs.net