Printing
With printing there are many things to worry about, such as the selection of a printer, page settings, and how to print multiple pages. By using classes from the System.Drawing.Printing namespace, you can get a lot of help to solve these problems, and print documents from our own applications with ease.
Before looking at the PrintDialog class that makes it possible to select a printer, you must take a quick look at how .NET handles printing. The foundation of printing is the PrintDocument class, which has a Print() method that starts a chain of calls culminating in a call to OnPrintPage(), which is responsible for passing the output to the printer. However, before going deeper into how to implement printing code, first look a little bit more in detail at the .NET printing classes.
Printing Architecture
Figure 16-18 shows the major parts of the printing architecture to illustrate the relationship between the classes and some of the properties and methods.
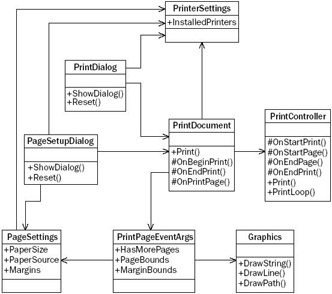
Figure 16-18
Let's look at the functionality of these classes.
-
The PrintDocument class is the most important class. In Figure 16-18, you can see that nearly all other classes are related to this class. To print a document, an instance of PrintDocument is required. The following section looks at the printing sequence initiated by this class.
-
The PrintController class controls the flow of a print job. The print controller has events for the start of the print, for each page, and for the end of the print. The class is abstract because the implementation of normal printing is different from that of print preview. Concrete classes that derive from PrintController are StandardPrintController and PreviewPrintController.
You will not find the methods Print and PrintLoop in the documentation, because these methods are internal to the assembly and can be invoked only by other classes in the same assembly, for example the PrintDocument class. However, these methods help you understand the printing process — that's why they are shown here.
-
The PrinterSettings class can get and set the printer configurations such as duplex printing, landscape or portrait, and number of copies.
-
The PrintDialog class contains options for selecting which printer to print to and how the PrinterSettings should be configured. This class is derived from CommonDialog like the other dialog classes I have already dealt with.
-
The PageSettings class specifies the sizes and boundaries of a page, and if the page is in black and white or color. The configuration of this class can be done with the PageSetupDialog class that again is a CommonDialog.
Printing Sequence
Now, that you know about the roles of the classes in the printing architecture, let's look at the main printing sequence. Figure 16-19 shows the major players — our application, an instance of the PrintDocument class, and a PrintController in a timely sequence.
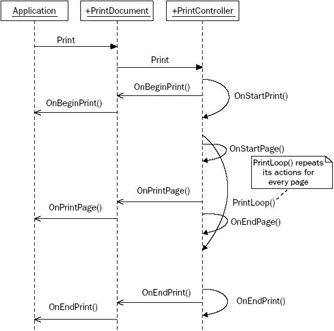
Figure 16-19
The application has to call the Print() method of the PrintDocument. This starts the printing sequence. As the PrintDocument itself is not responsible for the printing flow, the job is given to the PrintController by calling the Print() method of this class. The print controller now takes the action and informs the PrintDocument that the printing has started by calling OnBeginPrint(). If your application should do something at the start of a print job, you have to register an event handler in the PrintDocument so that you are informed in your application class. In the diagram in Figure 16-19, it is assumed that you registered the handler OnBeginPrint(), so this handler is called from the PrintDocument class.
After the beginning phase has ended, the PrintController goes into a PrintLoop() to call the OnPrintPage() method in the PrintDocument class for every page to print. OnPrintPage() invokes all PrintPage event handlers. You have to implement such a handler in every case; otherwise, nothing would be printed. In Figure 16-19 you can see the handler is called OnPrintPage().
After the last page is printed the PrintController calls OnEndPrint() in the PrintDocument class. Optionally, we can implement a handler to be invoked here, too.
To summarize, the most important thing for us to know is that you can implement the printing code in the PrintDocument.PrintPage event handler. This handler will be called for every page that is to be printed. If there's printing code that should be called only once for a print job, you have to implement the BeginPrint and EndPrint event handlers.
PrintPage Event
So, what you know now is that you have to implement an event handler for the PrintPage event. The delegate PrintPageEventHandler defines the arguments of the handler:
public delegate void PrintPageEventHandler(object sender, PrintPageEventArgs e);
As you can see, you receive an object of type PrintPageEventArgs. You can have a look back to the class diagram to see the main properties of this class. This class has associations to the PageSettings and Graphics classes. The first enables you to set the paper size and the margins, and you can get device information from the printer. the Graphics class, on the other hand, makes it possible to access the device context of the printer and send such things as strings, lines, and curves to the printer.
| Note | GDI (graphics device interface) makes it possible to do some graphical output to a device like the screen or a printer. GDI+ is the next generation of GDI that adds features like gradient brushes and alpha blending and is the drawing technology of the .NET Framework. In Chapter 30, you can read more about drawing with GDI+ and the Graphics class. |
If at this point you think that printing is complex, don't be worried! The following example should convince you that adding printing features to an application is quite an easy task.
Before you can add the PrintDialog, you have to add some menu entries for printing. Add two separators and Print, Print Preview, Page Setup, and Exit menu items to the Simple Editor application.
The following table lists the Name and Text properties and handler methods of the new menu items.
| Menu Item Name | Text | Handler |
|---|---|---|
| miFilePrint | &Print... | OnFilePrint |
| miFilePrintPreview | Print Pre&view... | OnFilePrintPreview |
| miFilePageSetup | Page Set&up... | OnFilePageSetup |
| miFileExit | E&xit | OnExit |
The menu should look like Figure 16-20.
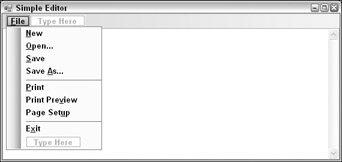
Figure 16-20
In the following Try It Out, you add printing functionality to the sample application by adding a PrintDocument component.
Try It Out – Adding a PrintDocument Component
-
Before you go any further, add the following using directive to the start of your code so that you can make use of the classes for printing:
using System.Drawing.Printing; -
Drag a PrintDocument component from the Toolbox and drop it on the gray area below the form. Change the Name to printDocument, and add an event handler OnPrintPage to the PrintPage event by selecting the Events button in the Properties window. Then add the following code to the implementation of the event handler:
private void OnPrintPage(object sender, PrintPageEventArgs e) { char[] param = { '\n' }; string[] lines = textBoxEdit.Text.Split(param); int i = 0; char[] trimParam = { '\r' foreach (string s in lines) { lines[i++] = s.TrimEnd(trimParam); } int x = 20; int y = 20; foreach (string line in lines) { e.Graphics.DrawString(line, new Font("Arial", 10), Brushes.Black, x, y); y += 15; } } -
Next, add a handler to the Click event of the Print menu to call the Print() method of the PrintDocument class. In case there's no valid printer, an exception of type InvalidPrinterException is thrown that is caught to display an error message.
private void OnFilePrint(object sender, EventArgs e) { try { printDocument.Print(); } catch (InvalidPrinterException ex) { MessageBox.Show(ex.Message, "Simple Editor", MessageBoxButtons.OK, MessageBoxIcon.Error); } } -
Now you can build and start the application and print a document. Of course, you must have a printer installed for the example to work.
How It Works
The printDocument object's Print() method invokes the PrintPage event with the help of the PrintController class.
printDocument.Print(); In the OnPrintPage() handler, you split up the text in the text box line by line using the String.Split() method and the newline character, \n. The resultant strings are written to the string array lines.
char[] param = {'\n'}; string[] lines = textBoxEdit.Text.Split(param); Depending on how the text file was created, the lines are not only separated with the \n (newline) character, but also the \r (return) character. the TrimEnd() method of the String class removes the character \r from every string:
int i = 0; char[] trimParam = {'\r'}; foreach(string s in lines) { lines[i++] = s.TrimEnd(trimParam); } In the second foreach statement in the following code, you can see that you go through all lines and send every line to the printer by a call to e.Graphics.DrawString(). e is a variable of type PrintPageEventArgs where the property Graphics is connected to the printer context. The printer context makes it possible to draw to a printing device. the Graphics class has some methods to draw into this context.
You cannot yet select a printer, so the default printer (whose details are stored in the Windows Registry) is used.
With the DrawString() method, you use the Arial font with a size of 10 points and a black brush for the print output. The position for the output is defined with the x and y variables. The horizontal position is fixed to 20 pixels; the vertical position is incremented with every line.
int x = 20; int y = 20; foreach (string line in lines) { e.Graphics.DrawString(line, new Font("Arial", 10), Brushes.Black, x, y); y += 15; } The printing that was done so far has these problems:
-
Printing multiple pages doesn't work. If the document to print spans multiple pages, only the first page gets printed. It would also be nice if a header (for example, the filename) and footer (for example, the page number) were printed.
-
Page boundaries are fixed to hard-coded values in your program. To let the user set values for other page boundaries, you use the PageSetupDialog class.
-
The print output is sent to the default printer set through the Control Panel by the user. It would be better if the application allows the user to choose a printer. You will use the PrintDialog class for this problem.
-
The font is fixed. To enable the user to choose the font, you can use the FontDialog class, which you look at in more detail later.
So let's continue with the printing process to get these items fixed.
Printing Multiple Pages
The PrintPage event gets called for every page that prints. With the following Try It Out, you inform the PrintController that the current page printed was not the last page by setting the HasMorePages property of the PrintPageEventArgs class to true.
Try It Out – Modifying OnPrintPage() for Multiple Pages
-
First, you must declare a member variable lines of type string[] and a variable linesPrinted of type int in the class SimpleEditorForm:
// Variables for printing private string[] lines; private int linesPrinted;
-
Modify the OnPrintPage() handler. In the previous implementation of OnPrintPage() the text was split into lines. Because the OnPrintPage() method is called with every page, and splitting the text into lines is needed just once at the beginning of the printing operation, remove all the code from OnPrintPage() and replace it with the new implementation.
private void OnPrintPage(object sender, PrintPageEventArgs e) { int x = 20; int y = 20; while (linesPrinted < lines.Length) { e.Graphics.DrawString (lines[linesPrinted++], new Font("Arial", 10), Brushes.Black, x, y); y += 15; if (y >= e.PageBounds.Height - 80) { e.HasMorePages = true; return; } } linesPrinted = 0; e.HasMorePages = false; } -
Add an event handler to the BeginPrint event of the printDocument object called OnBeginPrint. OnBeginPrint is called just once for each print job and here you create your lines array.
private void OnBeginPrint(object sender, PrintEventArgs e) { char[] param = { '\n' lines = textBoxEdit.Text.Split(param); int i = 0; char[] trimParam = { '\r' foreach (string s in lines) { lines[i++] = s.TrimEnd(trimParam); } } -
Add an event handler to the EndPrint event of the printDocument called OnEndPrint. Here, you can release the resources that have been allocated in the OnBeginPrint method. With the sample an array of strings was allocated and referenced in the variable lines. In the OnEndPrint method the reference of the variable lines is set to null, so that the garbage collector can release the string array.
private void OnEndPrint(object sender, PrintEventArgs e) { lines = null; } -
After building the project, you can start a print job for a multipage document.
How It Works
Starting the print job with the Print() method of the PrintDocument in turn calls OnBeginPrint() once and OnPrintPage() for every page.
In OnBeginPrint() you split up the text of the text box into a string array. Every string in the array represents a single line because you split it up at the newline (\n) character and removed the carriage return character (\r), as you've done before.
char[] param = lines = textBoxEdit.Text.Split(param); int i = 0; char[] trimParam = foreach (string s in lines) { lines[i++] = s.TrimEnd(trimParam); } OnPrintPage() is called after OnBeginPrint(). You want to continue printing as long as the number of lines printed is less than the total number of lines you have to print. the lines.Length property returns the number of strings in the array lines. The linesPrinted variable gets incremented with every line you send to the printer.
while (linesPrinted < lines.Length) { e.Graphics.DrawString(lines[linesPrinted++], new Font("Arial", 10), Brushes.Black, x, y); After printing a line, you check if the newly calculated vertical position is outside of the page boundaries. Additionally, you decrement the boundaries by 80 pixels, because you don't really want to print to the very end of the paper, particularly since many printers can't do this anyway. If this position is reached, the HasMorePages property of the PrintPageEventArgs class is set to true in order to inform the controller that the OnPrintPage() method must be called once more, and another page needs to be printed — remember that PrintController has the PrintLoop() method that has a sequence for every page to print, and PrintLoop() will stop if HasMorePages is false. (The default value of the HasMorePages property is false so that only one page is printed.)
y += 15; if (y >= e.PageBounds.Height - 80) { e.HasMorePages = true; return; }
PageSetupDialog
The margins of the page so far are hard-coded in the program. Let's modify the application to allow the user to set the margins on a page. To make this possible another dialog class is available: PageSetupDialog.
This class makes it possible to configure paper sizes and sources, orientation, and paper margins, and because these options depend on a printer, the selection of the printer can be done from this dialog too.
Figure 16-21 gives an overview about the properties that enable or disable specific options of this dialog and what properties can be used to access the values. I will discuss these properties in a moment.
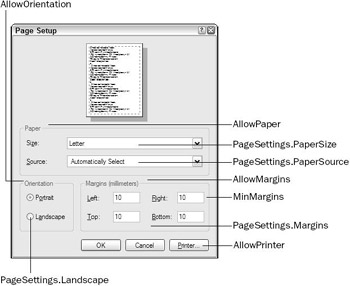
Figure 16-21
Paper
A value of true for the AllowPaper property means that the user can choose the paper size and paper source. the PageSetupDialog.PageSettings.PaperSize property returns a PaperSize instance where you can read the height, width, and name of the paper with the properties Height, Width, and PaperName. PaperName specifies names like Letter, and A4. the Kind property returns an enumeration where you can get a value of the PaperKind enumeration. the PaperKind enumeration consists of many different paper values that define the size of the paper, such as A3, A4, A5, Letter, LetterPlus, and LetterRotated.
The PageSetupDialog.PageSettings.PaperSource property returns a PaperSource instance where you can read the name of the printer paper source and the type of paper that fits in there (as long as the printer is correctly configured with the printer settings).
Margins
Setting the AllowMargins property to true allows the user to set the margin value for the printout. You can define minimum values for the user to enter by specifying the MinMargins property. To read the margins, use the PageSetupDialog.PageSettings.Margins property. The returned Margins object has Bottom, Left, Right, and Top properties.
Orientation
The AllowOrientation property defines whether or not the user can choose between portrait and landscape printing. The selected value can be read by querying the value of PageSetupDialog. PageSettings.Landscape, which is a Boolean value specifying landscape mode with true and portrait mode with false.
Printer
The AllowPrinter property defines whether or not the user can choose a printer. Depending on the value of this property the Printer button is enabled (true) or not (false). The handler to this button in turn opens up the PrintDialog that you will use next.
In the next Try It Out, you add the capability to configure page setup options for printing.
Try It Out – Adding a PageSetupDialog
-
Drag a PageSetupDialog component from the Toolbox and drop it onto the form in the Windows Forms designer. Set its Name to dlgPageSetup and the Document property to printDocument to associate the dialog with the document to print.
-
Now add a Click event handler to the Page Setup menu entry, and add the code below to display the dialog using the ShowDialog() method. It's not necessary to check the return value of ShowDialog() here because the implementation of the handler for the OK Click event already sets the new values in the associated PrintDocument object.
private void OnFilePageSetup(object sender, EventArgs e) { dlgPageSetup.ShowDialog(); } -
Now change the implementation of OnPrintPage() to use the margins that are set by the PageSetupDialog. In your code, the x and y variables are set to the properties MarginBounds. Left and MarginBounds.Top of the PrintPageEventArgs class. Check the boundary of a page with MarginBounds.Bottom.
private void OnPrintPage(object sender, PrintPageEventArgs e) { int x = e.MarginBounds.Left; int y = e.MarginBounds.Top; while (linesPrinted < lines.Length) { e.Graphics.DrawString(lines[linesPrinted++], new Font("Arial", 10), Brushes.Black, x, y); y += 15; if (y >= e.MarginBounds.Bottom) { e.HasMorePages = true; return; } } linesPrinted = 0; e.HasMorePages = false; } -
Now, you can build the project and run the application. Selecting File Page Setup displays the dialog shown in Figure 16-22. You can change the boundaries and print with the configured boundaries.
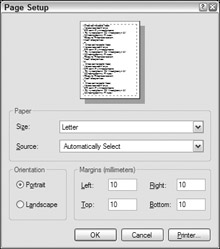
Figure 16-22
PrintDialog
The PrintDialog class allows the user to select a printer from the installed printers and choose a number of copies and some printer settings like the layout and paper sources of the printer. Because the PrintDialog is very easy to use, you will start immediately by adding the PrintDialog to the Editor application with the following Try It Out.
Try It Out – Adding a PrintDialog
-
Add a PrintDialog component from the Toolbox onto the form. Set the Name to dlgPrint and the Document property of this object to printDocument.
Change the implementation of the event handler to the Click event of the Print menu to the following code:
private void OnFilePrint(object sender, EventArgs e) { try { if (dlgPrint.ShowDialog() == DialogResult.OK) { printDocument.Print(); } } catch (InvalidPrinterException ex) { MessageBox.Show(ex.Message, "Simple Editor", MessageboButtons.OK, MessageBoxIcon.Error); } } -
Build and run the application. Selecting File Print opens up the PrintDialog. Now you can select a printer to print the document, as shown in Figure 16-23.
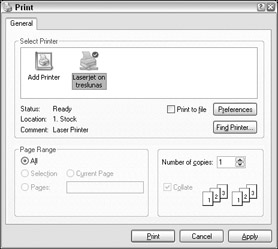
Figure 16-23
Options for the PrintDialog
In the SimpleEditor program you didn't change any of the properties of the PrintDialog. But this dialog has some options, too. In the dialog shown in Figure 16-23 you can see three groups: Printer, Print range, and Copies.
-
In the Printer group not only the printer can be chosen, but there's also a Print to File option. By default this option is enabled, but it is not checked. Selecting this check box enables the user to write the printing output to a file instead of to the printer. You can disable this option by setting the AllowPrintToFile property to false.
-
If the user selects this option, the dialog shown in Figure 16-24 is opened by the printDocument.Print() call to ask for an output filename for the printout.

Figure 16-24 -
In the Print Range section of the dialog, only All can be selected — Pages and Selection are disabled by default. You look at how these options can be implemented in the following section.
-
The Copies group allows the user to select the number of copies to be printed.
Printing Selected Text
Setting the AllowSelection property to true allows the user to print selected text, but you also have to change the printing code so that only the selected text gets printed. You add this functionality in the next Try It Out.
Try It Out – Adding a Print Selection
-
Add the highlighted code to the Click handler of the Print button.
private void OnFilePrint(object sender, EventArgs e) { if (textBoxEdit.SelectedText != "") { dlgPrint.AllowSelection = true; } if (dlgPrint.ShowDialog() == DialogResult.OK) { printDocument.Print(); } } -
In this program all the lines that will be printed are set up in the OnBeginPrint() handler. Change the implementation of this method:
private void OnBeginPrint(object sender, PrintEventArgs e) { char[] param = {'\n'}; if (dlgPrint.PrinterSettings.PrintRange == PrintRange.Selection) { lines = textBoxEdit.SelectedText.Split(param); } else { lines = textBoxEdit.Text.Split(param); } int i = 0; char[] trimParam = {'\r'}; foreach (string s in lines) { lines[i++] = s.TrimEnd(trimParam); } } -
Now you can build and start the program. Open a file, select some text, start the print dialog with the menu File Print, and select the Selection option button from the Print Range group. With this selected, pressing the Print button will print only the selected text.
How It Works
The AllowSelection property is set to true only if some text is selected. Before the PrintDialog is shown, a check must be done to determine if some text is selected. If some text is selected, the SelectedText property of the text box is not null. If there is some text selected, the property AllowSelection is set to true.
if (textBoxEdit.SelectedText != "") { dlgPrint.AllowSelection = true; } OnBeginPrint() is called at the start of every print job. Accessing the printDialog.PrinterSettings.PrintRange property, you discover whether the user has chosen the Selection option. the PrintRange property takes a value from the PrintRange enumeration: AllPages, Selection, or SomePages.
if (printDialog.PrinterSettings.PrintRange == PrintRange.Selection) { If the option is indeed PrintRange.Selection, you get the selected text from the SelectedText property of the TextBox. This string is split up the same way as the complete text:
lines = textBoxEdit.SelectedText.Split(param); }
Printing Page Ranges
Printing a range of pages can be implemented similarly to printing a selection. The option button can be enabled by setting the AllowSomePages property to true. The user can now select the page range to print. However, where are the page boundaries in the Simple Editor? What's the last page? You should set the last page by setting the PrintDialog.PrinterSettings.ToPage property. How does the user know the page numbers he wants to print? With a document processing application like Microsoft Word, where the Print Layout can be selected to view the text on the screen, the user knows the page number. With the simple TextBox that's used with the Simple Editor, the number of pages is not known. That's why you will not implement this feature in your application.
Of course, you could implement page range printing capability as an exercise. What must be done? the AllowSomePages property must be set to true. Before displaying the PrintDialog, you can also set the PrinterSettings.FromPage to 1 and the PrinterSettings.ToPage to the maximum page number.
PrintDialog Properties
Figure 16-25 shows the properties discussed in this section and how they influence the PrintDialog's layout.
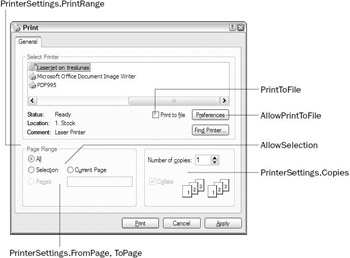
Figure 16-25
EAN: N/A
Pages: 278