File Dialogs
With a file dialog, the user can select a drive and browse through the file system to select a file. From the file dialog, all you want returned is a filename from the user.
The OpenFileDialog enables users to select by name the file they want to open. the SaveFileDialog, in contrast, enables users to specify a name for a file they want to save. These dialog classes are similar because they derive from the same abstract base class, though there are some properties unique to each class. In this section, you look first at the features of the OpenFileDialog, then at where the SaveFileDialog differs, and you develop a sample application that uses both of them.
OpenFileDialog
The OpenFileDialog class enables users to select a file to open. As you saw in the preceding example, a new instance of the OpenFileDialog class is created before the ShowDialog() method is called.
OpenFileDialog dlg = new OpenFileDialog(); dlg.ShowDialog();
Running a Windows application program with these two code lines will result in the dialog shown in Figure 16-2.
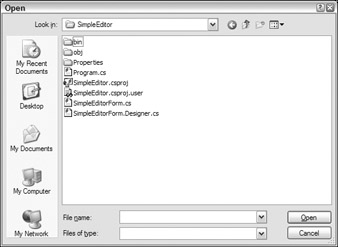
Figure 16-2
As you have already seen, you can set the properties of this class before calling ShowDialog(), which changes the behavior and appearance of this dialog, or limits the files that can be opened. In the next sections you look at possible modifications.
| Note | Note that if you want to use the OpenFileDialog with console applications, the System.Windows. Forms assembly must be referenced and the System.Windows.Forms namespace must be included. |
Dialog Title
The default title for the OpenFileDialog is Open. However, Open is not always the best name. For example, if in your application you want to analyze log files or get file sizes, perform whatever processing is required, and close the files immediately afterward, a title of Analyze Files would be better because the files don't stay open for the user. Fortunately, you can change the title of the dialog by setting the Title property. Visual Studio itself has different titles for the file open dialogs to differentiate the file types that are opened: Open Project, Open File, and Open Web Site.
This code segment shows how a different title can be set:
OpenFileDialog dlg = new OpenFileDialog(); dlg.Title = "Open File"; dlg.ShowDialog();
Specifying Directories
The directory that is opened by default is the directory that was opened by the user the last time the application was run. Setting the InitialDirectory property changes this behavior. The default value of InitialDirectory is an empty string representing the user's My Documents directory, which is shown the first time the dialog is used in the application. The second time that the dialog is opened, the directory shown is the same as for the previously opened file. The Windows common dialog called by the OpenFileDialog uses the Registry to locate the name of the previously opened file.
| Important | You should never use a hard-coded directory string in your application because that directory might not exist on the user's system. |
| Note | To get special system folders you can use the static method GetFolderPath() of the System.Environment class. the GetFolderPath() method accepts an Environment.SpecialFolder enumeration member that defines which system directory you want the path for. |
In the following code example, the common user directory for templates is set as InitialDirectory.
string dir = Environment.GetFolderPath(Environment.SpecialFolder.Templates); dlg.InitialDirectory = dir;
Setting the File Filter
The file filter defines the file types the user can select to open. A simple filter string can look like this:
Text Documents (*.txt)|*.txt|All Files|*.*
The filter is used to display the entries in the Files of type: list box. Microsoft WordPad displays the entries as shown in Figure 16-3.
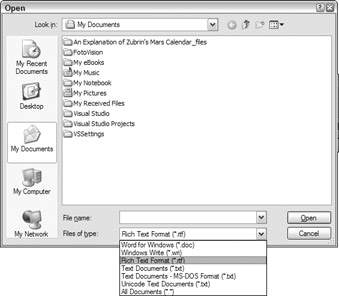
Figure 16-3
A filter has multiple segments separated with the pipe character (|). Two strings are required for each entry, so the number of segments should always be an even number. The first string for each entry defines the text presented in the list box; the second string specifies the extension of the files to be displayed in the dialog. You can set the filter string with the Filter property as in the following code:
dlg.Filter = "Text documents (*.txt)|*.txt|All Files|*.*"; A blank before or after the filter is not allowed.
A wrong Filter value results in a runtime exception — System.ArgumentException — with this error message: The provided filter string is invalid.
The FilterIndex property specifies the number of the default selection in the list box. With WordPad, the default selection is Rich Text Format (*.rtf) (highlighted in Figure 16-3). If you have multiple file types to choose from, you can set the FilterIndex to the default file type. It's worth paying attention to the fact that the FilterIndex is one-based!
Validation
The OpenFileDialog can do some automatic validation of the file before you attempt to open it. When the ValidateNames property is true, the filename entered by the user is checked to see if it is a valid Windows filename. Pressing the OK button of the dialog with an invalid filename displays the dialog shown in Figure 16-4, and the user must correct the filename or click Cancel to leave the OpenFileDialog. Invalid characters for a filename include characters such as \\, /, and :.
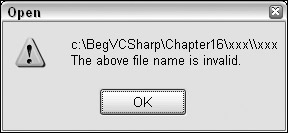
Figure 16-4
With ValidateNames set to true, you can use CheckFileExists and CheckPathExists for additional validation. With CheckPathExists, the path is validated, whereas CheckFileExists validates the file. If the file doesn't exist, the dialog shown in Figure 16-5 is displayed when the OK button is pressed.

Figure 16-5
The default for these three properties is true, so the validation happens automatically.
Help
The OpenFileDialog class supports a Help button that is, by default, invisible. Setting the ShowHelp property to true makes this button visible, and you can add an event handler to the HelpRequest event to display help information to the user.
Results
The ShowDialog() method of the OpenFileDialog class returns a DialogResult enumeration value. the DialogResult enumeration defines the members Abort, Cancel, Ignore, No, None, OK, Retry, and Yes.
None is the default value that is set as long as the user hasn't closed the dialog. When a button is pressed, the corresponding result is returned. With the OpenFileDialog, only DialogResult.OK and DialogResult.Cancel are returned.
If the user presses the OK button, the selected filename can be accessed by using the FileName property. If the user canceled the dialog, the FileName is just an empty string. If the Multiselect property is set to true so that the user can select more than one file, you get all the selected filenames by accessing the FileNames property, which returns a string array.
Note that the FileNames property contains the files in the reverse order to which they were selected — thus the first string in the FileNames array is the last file selected. Also, the FileNames property always contains the filename of the last file that is selected.
This small code extract shows how multiple filenames can be retrieved from an OpenFileDialog:
OpenFileDialog dlg = new OpenFileDialog(); dlg.Multiselect = true; if (dlg.ShowDialog() == DialogResult.OK) { foreach (string s in dlg.FileNames) { // Now display the filenames in a list box. this.listBox1.Items.Add(s); } }
The ShowDialog() method opens the dialog. Because the Multiselect property is set to true, the user can select multiple files. Pressing the OK button of the dialog ends the dialog if all goes well, and DialogResult.OK is returned. With the foreach statement, you go through all strings in the string array returned from the FileNames property to display every selected file.
OpenFileDialog Properties
In summary, Figure 16-6 shows the OpenFileDialog with its properties — you can easily see what properties influence which user interface elements.
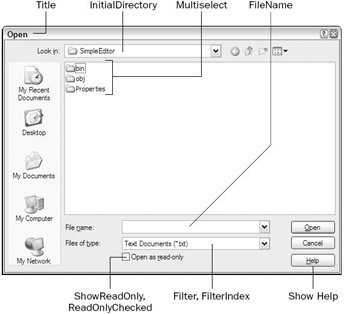
Figure 16-6
To demonstrate the use of the standard dialogs you create a simple text editor Windows application called SimpleEditor that will allow the user to load, save, and edit text files. As you progress further through the chapter, you will also see how to print the text file. In the following Try It Out, you start by seeing how to use the open and save file dialogs.
Try It Out – Creating the Simple Text Editor Windows Application
-
Create a new Windows application called SimpleEditor in the directory C:\BegVCSharp\ Chapter16.
-
Rename the generated file Form1.cs to SimpleEditorForm.cs. Answer Yes to rename all references to the form. This way Visual Studio 2005 also changes the name of the class to SimpleEditorForm.
-
Set the Text property of the form to Simple Editor, and change its Size to 570;270. A multi- line text box will be the area to read and modify the data of the file, so add a TextBox from the Toolbox to the Windows Forms designer. The text box should be multiline and should cover the complete area of the application, so set these properties to the values specified in the following table.
Property
Value
(Name)
textBoxEdit
Text
Multiline
True
Dock
Fill
ScrollBars
Both
AcceptsReturn
True
AcceptsTab
True
-
Next, add a MenuStrip to the application. Set the name of the MenuStrip to mainMenu. The menu should have a File entry with submenus New, Open..., Save, and Save As..., as Figure 16-7 demonstrates.
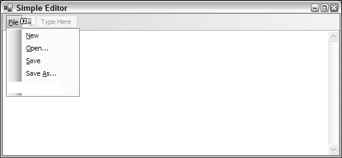
Figure 16-7The ... in the Text property of the Open and Save As menu entries advises the user that they will be asked for some data before the action happens. When choosing the File, New, and Save menus the action happens without additional intervention.
The table that follows lists the names of the menu items, as well as the values for the Text properties. Also define the Click event handler with names as shown in the table. To define the Click event handler you have to select the menu in the dialog, click the Events button in the Properties window, select the Click event, and enter the name of the handler method.
Menu item Name
Text
Handler Method
miFile
&File
miFileNew
&New
OnFileNew
miFileOpen
&Open...
OnFileOpen
miFileSave
&Save
OnFileSave
miFileSaveAs
Save &As...
OnFileSaveAs
-
The handler for the menu entry &New should clear the data of the text box by calling the Clear() method of the TextBox:
private void OnFileNew(object sender, System.EventArgs e) { filename = "Untitled"; textBoxEdit.Clear(); } -
Also, the filename member variable should be set to Untitled. You must declare and initialize this member variable in the SimpleEditorForm class:
public partial class SimpleEditorForm : Form { private string filename = "Untitled";With the SimpleEditor it should be possible to pass a filename as an argument when starting the application. The filename passed should be used to open the file and display it in the text box.
-
Change the implementation of the SimpleEditorForm constructor to use a string where the filename is passed:
public SimpleEditorForm(string filename) { InitializeComponent(); if (filename != null) { this.filename = filename; OpenFile(); } }
-
Now you can change the implementation of the Main() method in the file Program.cs so that an argument can be passed:
static void Main(string[] args) { string filename = null; if (args.Length != 0) filename = args[0]; Application.EnableVisualStyles(); Application.Run(new SimpleEditorForm(filename)); }
-
And you have to implement the OpenFile() method that opens a file and fills the text box with data from the file.
Note Note that the OpenFile() method actually accesses the file in question and uses methods not discussed at length here, but file access is covered fully in Chapter 22.
protected void OpenFile() { try { textBoxEdit.Clear(); textBoxEdit.Text = File.ReadAllText(filename); } catch (IOException ex) { MessageBox.Show(ex.Message, "Simple Editor", MessageBoxButtons.OK, MessageBoxIcon.Exclamation); } }
Here we use the File class to read the file — this class is in the System.IO namespace, so you also need to add the following using directive at the beginning of the file SimpleEditorForm.cs:
using System.IO;The File class and the System.IO namespace will be explored in Chapter 22 along with other file access classes.
-
As you saw in Chapter 7, it's possible to define command-line parameters within Visual Studio for debugging purposes. In Solution Explorer, right-click on the project and select Properties. From the Properties dialog select the Debug tab along the left side. With the dialog shown here, you can enter the command-line arguments. For testing purposes here, enter the following:
C:\BegVCSharp\Chapter16\SimpleEditor\SimpleEditor\SimpleEditorForm.cs
-
Now you can run the application, and the SimpleEditorForm.cs file of your current project will be opened immediately and displayed, as can be seen in Figure 16-8.
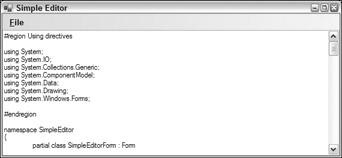
Figure 16-8
How It Works
The first six steps simply set up the form — you should be familiar with this process if you worked through the previous two chapters.
Step 7 is where the meat of the application begins. By adding the string[] to the parameters of the Main() method, you can use any command-line arguments that the user supplies when starting the application.
static void Main(string[] args)
In the Main() method, you check to see if arguments are passed by using the Length property. If at least one argument was passed, the first argument is set to the filename variable, which is then passed to the constructor of the SimpleEditorForm:
{ string filename = null; if (args.Length != 0) filename = args[0]; Application.EnableVisualStyles(); Application.Run(new SimpleEditorForm(filename)); } In the SimpleEditorForm constructor, you check if the filename variable already has a value set. If it has, the member variable filename is set and the method OpenFile() is invoked to open the file. You use a separate OpenFile() method, and don't write the calls to open the file and fill the text box directly in the constructor of the class, because OpenFile() can be used again in other parts of the program.
if (filename != null) { this.filename = filename; OpenFile(); } In the OpenFile() method you read the data from the file. You use the static method ReadAllText() of the File class to get all lines returned in an array of strings. The method ReadAllText() is new with .NET 2.0.
Because file operations can easily generate exceptions, caused, for example, by the user not having the right access permissions to the file, the code is wrapped in a try block. In the case of an IO exception, a message box shows up to inform the user about the problem, but the application keeps running.
protected void OpenFile() { try { textBoxEdit.Clear(); textBoxEdit.Text = File.ReadAllText(filename); } catch (IOException ex) { MessageBox.Show(ex.Message, "Simple Editor", MessageBoxButtons.OK, MessageBoxIcon.Exclamation); } } If you enter a nonexistent filename for the command-line argument when starting the application, the message box shown in Figure 16-9 is displayed.

Figure 16-9
Now, you can read files with the simple editor by passing a filename when starting the application. Of course, using common dialog classes is preferred, and you add those to the sample application in the following Try It Out.
Try It Out – Adding and Using an OpenFileDialog
-
In the Windows Forms category of the Toolbox, you can find the OpenFileDialog component. Drag this component from the Toolbox and drop it to the gray place on the bottom of the Windows Forms designer. Here, you change three properties: the name for the instance to dlgOpenFile, the Filter property to the following string, and the FilterIndex property to 2 to make Wrox Documents the default selection:
Text Documents (*.txt)|*.txt|Wrox Documents (*.wroxtext)|*.wroxtext|All Files|*.*
-
Earlier you've added a click event handler named OnFileOpen to the Open menu entry. Now, you can add the implementation to this event handler. Using the Forms designer, double-click the Open menu entry, so you can add the implementation to the handler method. Here, the implementation the dialog is displayed and the selected file is read with this code:
private void OnFileOpen(object sender, System.EventArgs e) { if (dlgOpenFile.ShowDialog() == DialogResult.OK) { filename = dlgOpenFile.FileName; OpenFile(); } }
How It Works
By adding the OpenFileDialog component to the Windows Forms designer, a new private member is added to the SimpleEditorForm class. You can see the private member in the file SimpleEditorForm.Designer.cs. This file only shows up when you click the button Show All Files in the Solution Explorer.
partial class SimpleEditorForm { private System.Windows.Forms.TextBox textBoxEdit; private System.Windows.Forms.MenuStrip mainMenu; private System.Windows.Forms.ToolStripMenuItem miFile; private System.Windows.Forms.ToolStripMenuItem miFileNew; private System.Windows.Forms.ToolStripMenuItem miFileOpen; private System.Windows.Forms.ToolStripMenuItem miFileSave; private System.Windows.Forms.ToolStripMenuItem miFileSaveAs; private System.Windows.Forms.OpenFileDialog dlgOpenFile; In the region of designer code by the Windows Forms, in InitializeComponent(), a new instance of this OpenFileDialog class is created, and the specified properties are set. Click on the + character of the line Windows Forms Designer generated code and then on the + character of the line private void InitializeComponent() to see the following code:
private void InitializeComponent() { this.textBoxEdit = new System.Windows.Forms.TextBox(); this.mainMenu = new System.Windows.Forms.MenuStrip(); this.miFile = new System.Windows.Forms.ToolStripMenuItem(); this.miFileNew = new System.Windows.Forms.ToolStripMenuItem(); this.miFileOpen = new System.Windows.Forms.ToolStripMenuItem(); this.miFileSave = new System.Windows.Forms.ToolStripMenuItem(); this.miFileSaveAs = new System.Windows.Forms.ToolStripMenuItem(); this.dlgOpenFile = new System.Windows.Forms.OpenFileDialog(); // ... // // dlgOpenFile // this.dlgOpenFile.Filter = "Text Documents (*.txt)|*.txt|Wrox Documents" + (*.wroxtext)|*.wroxtext|All Files|*.*"; this.dlgOpenFile.FilterIndex = 2; Of course, all that has happened here is exactly what you would expect if you dragged any another standard control onto the form, but with the support of the Windows Forms designer you have created a new instance of the OpenFileDialog and set the properties. Now you can display the dialog.
The ShowDialog() method displays the file open dialog and returns the button that the user pressed. Nothing should be done if the user presses anything other than the OK button. That's the reason to check for DialogResult.OK in the if statement. If the user cancels the dialog, just do nothing.
if (dlgOpenFile.ShowDialog() == DialogResult.OK) { Next, you get the selected filename by accessing the FileName property of the OpenFileDialog class and setting the member variable filename to this value. This is the value that's used by the OpenFile() method. It would also be possible to open the file directly with the File class, but because you already have an OpenFile() method that opens and reads a file, you will use this.
filename = dlgOpenFile.FileName; OpenFile();
Now, you can start the simple editor program as shown in Figure 16-10. Only the New and Open... menu entries are functional at the moment. Save and Save As... will be implemented in the next section.
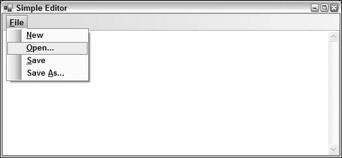
Figure 16-10
If you select the menu entry File Open..., the OpenFileDialog shows up (see Figure 16-11) and you can select a file. I assume you currently don't have files with the file extension .wroxtext. Up to this time you have not been able to save files, so you can choose a different file type in the dialog editor to open a file, or you can copy a text file to a file with the extension .wroxtext.
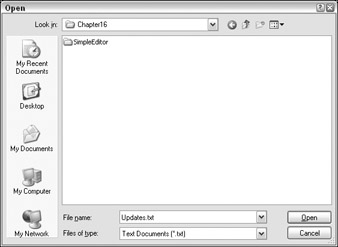
Figure 16-11
Select a text file, press the Open button, and the text shows up in the text box of the dialog. I selected a sample text file, Thinktecture.txt, on my local system, as you can see in Figure 16-12.

Figure 16-12
At this point, you can only read existing files. Now, it would be great to create new files and modify existing ones. You will use the SaveFileDialog to do this.
SaveFileDialog
The SaveFileDialog class is very similar to the OpenFileDialog, and they have a set of common properties — we will not talk about those properties that operate in the same way as those of the OpenFileDialog. Instead, we will focus on the properties specific to the save dialog properties and where the application of the common properties differs.
Dialog Title
With the Title property, you can set the title of the dialog similar to the OpenFileDialog. If nothing is set, the default title is Save As.
File Extensions
File extensions are used to associate files with applications. It is best to add a file extension to a file, otherwise Windows won't know which application should be used to open the file, and it's also likely that you would eventually forget this.
AddExtension is a Boolean property that automatically appends the file extension to the filename the user enters. The default value is true. If the user enters a file extension, no additional extension will be appended. Thus with AddExtension set to true, if the user enters the filename test, the filename test.txt will be stored. If the filename test.txt is entered, the filename will still be test.txt, and not test.txt.txt.
The DefaultExt property sets the file extension that will be used if the user doesn't enter one. If you leave the property blank, the file extension that's defined with the currently selected Filter will be used instead. If you set both a Filter and the DefaultExt, the DefaultExt will be used regardless of the Filter.
Validation
For automatic filename validation there are the properties ValidateNames, CheckFileExists, and CheckPathExists, similar to those for OpenFileDialog. The difference between OpenFileDialog and SaveFileDialog is that with the SaveFileDialog, the default value for CheckFileExists is false, which means that you can supply the name of a brand-new file to save.
Overwriting Existing Files
As you have seen, the validation of filenames is similar to that of the OpenFileDialog. However, for the SaveFileDialog class, there is more checking to do and some more properties to set. If the CreatePrompt property is set to true, the user will be asked if a new file is to be created. If the OverwritePrompt property is set to true, the user is asked if he really wants to overwrite an already existing file. The default setting for OverwritePrompt is true, and CreatePrompt is false. With this setting, the dialog shown in Figure 16-13 is displayed if the user wants to save an already existing file.

Figure 16-13
SaveFileDialog Properties
Figure 16-14 summarizes the properties of the SaveFileDialog.
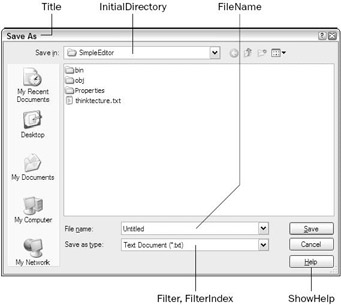
Figure 16-14
In the following Try It Out, you add a Save File dialog to the sample application.
Try It Out – Adding and Using a SaveFileDialog
-
In the same way that you added an OpenFileDialog to the form, you can add a SaveFileDialog: select the SaveFileDialog component from the Toolbox and drop it onto the gray area of the Forms Designer. Change the name to dlgSaveFile, FileName to Untitled, the FilterIndex to 2, and the Filter property to the following string as you did with the OpenFileDialog earlier. (Because you allow only the file extensions .txt and .wroxtext to be saved with this editor, *.* will now be left out.)
Text Document (*.txt)|*.txt|Wrox Documents (*.wroxtext)|*.wroxtext -
Add a handler to the Click event of the Save As menu entry with the name OnFileSaveAs. In this code, you will display the SaveFileDialog with the ShowDialog() method. As with the OpenFileDialog, you are only interested in the results if the user has pressed the OK button. You call the SaveFile() method that stores the file to the disk. This method will have to be implemented in the next step.
private void OnFileSaveAs(object sender, EventArgs e) { if (dlgSaveFile.ShowDialog() == DialogResult.OK) { filename = dlgSaveFile.FileName; SaveFile(); } } -
Add the SaveFile() method to your file:
protected void SaveFile() { try { File.WriteAllText(filename, textBoxEdit.Text); } catch (IOException ex) { MessageBox.Show(ex.Message, "Simple Editor", MessageBoxButtons.OK, MessageBoxIcon.Exclamation); } }
Similar to the OpenFile() method, here the File class is used. With .NET 2.0 this class offers the new static method WriteAll() to write a string to a file. The first parameter defines the name of the file, the second parameter defines the string that should be written to the file.
You can read more about the classes used for file access in Chapter 22.
-
After building the project, you can start the application using the Debug Start menu of Visual Studio. Write some text to the text box and choose the menu File Save As... as shown in Figure 16-15.
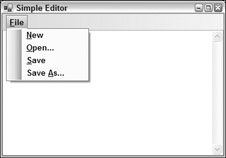
Figure 16-15The SaveFileDialog (shown in Figure 16-16) will pop up. Now, you can save the file and open it again to make some more changes.
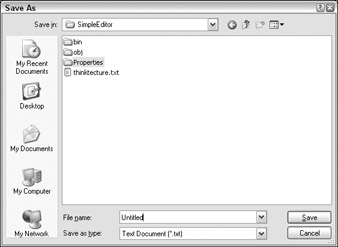
Figure 16-16 -
Now you can do a Save As, but the simple Save isn't available at the moment. Add a handler to the Click event of the Save menu entry and add this code:
private void OnFileSave(object sender, EventArgs e) { if (filename == "Untitled") { OnFileSaveAs(sender, e); } else { SaveFile(); } }
How It Works
With the Save menu, the file should be saved without opening any dialog. There's one exception to this rule. If the user creates a new document but does not supply a filename, then the Save handler should work as the Save As handler does and display the Save File dialog.
With the filename member variable you can easily check if a file is opened or if the filename is still set to the initial value Untitled after creating a new document. If the if statement returns true, the handler OnFileSaveAs() is called that you implemented previously for the Save As menu.
| Note | In the other case when a file was opened and the user now chooses the Save menu, the thread of execution passes into the else block. You can use the same SaveFile() method that you implemented previously. |
With Notepad, Word, and other Windows applications, the name of the file that's currently edited is displayed in the title of the application. With the next Try It Out, you add this feature, too.
Try It Out – Setting the Title of the Form
-
Create a new member function SetFormTitle() and add this implementation:
protected void SetFormTitle() { FileInfo fileinfo = new FileInfo(filename); Text = fileinfo.Name + " - Simple Editor"; }
The FileInfo class is used to get the filename without the preceding path that's stored in the filename variable. the FileInfo class is covered in Chapter 22.
-
Add a call to this method in the OnFileNew(), OnFileOpen, and OnFileSaveAs() handler after setting the member variable filename as can be seen in the following code segments:
private void OnFileNew(object sender, System.EventArgs e) { filename = "Untitled"; SetFormTitle(); textBoxEdit.Clear(); } private void OnFileOpen(object sender, System.EventArgs e) { if (dlgOpenFile.ShowDialog() == DialogResult.OK) { filename = dlgOpenFile.FileName; SetFormTitle(); OpenFile(); } } private void OnFileSaveAs(object sender, System.EventArgs e) { if (dlgSaveFile.ShowDialog() == DialogResult.OK) { filename = dlgSaveFile.FileName; SetFormTitle(); SaveFile(); } }
How It Works
Every time the filename changes, the Text property of the actual form will be changed to the filename appended with the name of the application.
The application now starts with the screen shown in Figure 16-17, where I'm editing the file sample.txt., as you can see from the title of the form.
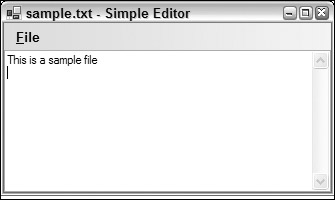
Figure 16-17
Now you have a simple editor — you can open, create, and save files (and edit them too). So, are we finished? Not really! Because the paperless office still doesn't exist, you should add some print functionality!
EAN: N/A
Pages: 278