Working with HTML Forms
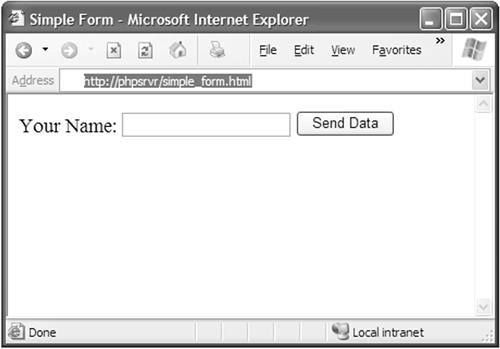
| One of the most common ways through which the client user will interact with the server is via HTML Forms. You will mark a portion of your HTML document as a form (there can be more than one per document) and then place regular markup, content, and form elements (which allow you to enter or manipulate information) inside this form. When the user is done with the form, the data entered in the form is sent to the server, typically through some sort of "Submit" button. While a full treatment of HTML Forms and their capabilities is beyond the scope of this book, we will spend some time reviewing the basics of their use and ways in which they will interact with our PHP scripts. Adding a Form to Your PageAdding a form to your page is as simple as placing a <form> element and the corresponding closing element </form> on a page. Since this would not be terribly useful, we will also add something through which the user can enter data, such as an <input> element. (We will instruct this to behave like a text box.) <html> <head> <title>Simple Form</title> </head> <body> <form> Your Name: <input type="text" name="userName"/> </form> </body> </html> However, this form already has two important problems. There is no way for the user to indicate that he is finished and wishes to submit the data, and we do not have a way to send entered data back to the web server for processing and further action. The first problem is solved by another <input> tag, this time marked as a "Submit" button; this tells the browser this is the element that sends the form data off. <input type="Submit" value="Send Data"/> We will solve the second problem by adding two additional attributes to the <form> element, the first indicating where to send the form data, and the second indicating how. <form name="UserForm" action="add_user.php" method="POST"> The action attribute takes a relative URI and tells the browser where to send the form data (in our case, to a script called add_user.php), while the method attribute indicates our wish to use the POST method. (We will discuss the possible values for the method attribute and their meaning later in this chapter.) Our full form now looks like this: <html> <head> <title>Simple Form</title> </head> <body> <form name="UserForm" action="add_user.php" method="POST"> Your Name: <input type="text" name="userName"/> <input type="submit" value="Send Data"/> </form> </body> </html> This form will look similar to the one shown in Figure 7-3. Figure 7-3. An HTML form with a "Submit" button.
There are a number of elements we can include in our HTML forms, including buttons, text boxes, radio buttons, check boxes, and list boxes. Different web browsers on different platforms will show these to the end user in varying ways, but the overall look of your forms will be the same. One of the key things we will do with each element we place in our form is make sure it has a name attribute associated with it. This will prove critically important when we try to access the user's data in the form from within PHP. <html> <head> <title>Simple Form</title> </head> <body> <form name="newUser" action="04_newuser.php" method="POST"> Full Name: <input type="text" name="fullName"/><br/> User Name: <input type="text" name="userName"/><br/> Password: <input type="password" name="password1"/><br/> Re-Enter Password: <input type="password" name="password2"/><br/> <br/> Address: <input type="text" name="address"/><br/> City: <input type="text" name="city"/><br/> State/Province: <input type="text" name="state"/><br/> Postal/Zip Code: <input type="text" name="postalcode"/><br/> Country: <input type="text" name="country"/><br/> <br/> How You Heard About Us:<br/> <input type="radio" name="howheard" value="Radio"/>Radio<br/> <input type="radio" name="howheard" value="TV"/>TV<br/> <input type="radio" name="howheard" value="Friends"/>Friends<br/> <input type="radio" name="howheard" value="Others"/>Others<br/> <input type="submit" value="Submit"/> </form> </body> </html> The only unusual thing about this section of HTML is that all four of the radio buttons have the same name. This turns out to be quite handy; the client web browser makes sure that only one of the four values is selected at any time. Also, it helps us when the form is submitted since the value for the howheard input elements simply is the value of whichever item was selected when the form was submitted. Most of the elements that can be placed inside of a form are highly configurable and can be customized to suit your application. You are encouraged to consult some of the resources suggested in Appendix C, "Recommended Reading," or your favorite resource on HTML scripting for more information. How Data Is SubmittedAs mentioned before, there are two possible values for the method attribute that control exactly how the data is sent to the server when the form is submittedPOST and GET. Fortunately, these do not change which data is sent to the server. With the HTTP GET method, the full set of data for the form is appended to the URI specified in the action attribute on the form element. The data is appended to the URI after a question mark (?) and is separated by ampersand (&) characters. The names of each field on the form are included with their respective value, which is separated by an equals sign (=). Any characters that would make the URI unworkablesuch as whitespace, further questions marks, equals signs, or other unprintable characterswill be encoded in hexadecimal form. For example, our previous form could be submitted as a GET instead of a POST, which might result in a URI similar to the following if Bobo the Clown filled it in: http://localhost/php/newuser.php?fullName=Bobo%20The%20Clown &userName=BoboTheClown&password1=mypasswd&password2= mypasswd&address=123%20Happy%20Lane&city=Happyville &state=HAP&postalcode=42779&country=HappyLand&howheard= TV Data sent to the server via GET is encoded to convert all characters to 7-bit pure ASCII values. You will notice that the characters %20 appear to be used whenever a space would be used (since spaces cannot appear in URIs)it is the binary ASCII code for a space character in hexadecimal notation. Likewise, the character %2D that is often seen is the ASCII code for the equals (=) sign. The GET submission method is nice since it is easy to debug (you can look at the URI as you are programming and debugging to verify the data), but it does have some drawbacks:
The other method for submitting form data is the POST method. In this, the form data is sent in the body of the HTTP request to the server. (See Chapter 13 for more detail.) The POST method has the advantage of being less visible than the GET method, handling character sets other than ASCII, and not being remembered by your browser's history feature as a complicated or cluttered URI. However, the biggest drawback to the POST method could best be described as "out of sight, out of mind." Because programmers cannot easily see the data as it is sent to the server, many assume that it is safe from prying eyes. All of the traffic between you and the server is plain text, and even POST data is visible to anybody who can see the traffic between the client and server (which is easier than you might think). Therefore, we must assume that it is no more secure than data sent via GET, necessitating further measures to protect the data. Therefore, when faced with the question of which method of form submission to use, we must weigh the considerations of size, usability, character sets, and security. We will suggest a breakdown of the methods roughly along the following lines:
In this train of thought, simple queries or searches would be sent via the GET method, and most other forms that will result in a new account being created or a financial transaction taking place would be sent via POST. Throughout this book, we will follow these suggestions, preferring POST for a vast majority of our forms, and using GET when there is little data to be sent and we are reasonably sure it will not be in an extended character set. Accessing the Form Data Within ScriptNow that we know how to specify where the data should be sent on the server (action) and how it should be sent (method), we can finally start worrying about how to access it from within our code. GET Form DataFor forms submitted using the GET method, there is a way to get the requested URI to permit you to parse it yourself and get the form data. However, $_GET superglobal array is an easier option. As we mentioned in Chapter 3, "Code Organization and Reuse," some variables must be declared as global to use them within functions, whereas superglobals are available everywhere within your script. The members of the $_GET array are simply the form datathe keys are their names from the HTML <form>, and the values are their corresponding data. <?php // // find out what data the user submitted and print it // echo <<<EOT <p align='center'> The user entered the following data </p> <table width='80%' align='center' border='0'> <tr> <td width='25%'> User Name: </td> <td> {$_GET["userName"]} </td> </tr> <tr> <td width='25%'> Full Name: </td> <td> {$_GET["fullName"]} </td> </tr> <tr> <td width='25%'> Address: </td> <td> {$_GET["address"]} </td> </tr> <tr> <td width='25%'> City: </td> <td> {$_GET["city"]} </td> </tr> <tr> <td width='25%'> State/Province: </td> <td> {$_GET["state"]} </td> </tr> <tr> <td width='25%'> Zip/Postal Code </td> <td> {$_GET["postalcode"]} </td> </tr> <tr> <td width='25%'> Country: </td> <td> {$_GET["country"]} </td> </tr> </table> EOT; ?> Were this script the newuser.php from the previous section, it might produce the output seen in Figure 7-4. Figure 7-4. Getting the values from the $_GET super-global array.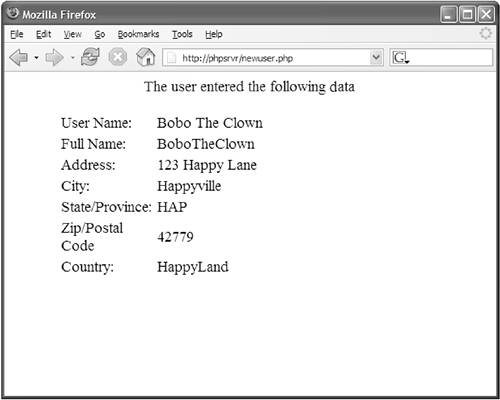 In previous versions of PHP, the preferred way to get the form data from GET was to use an array called $HTTP_GET_VARS. This array was not a superglobal, meaning that you had to declare it with the global keyword to use it within functions. This variable is still available in PHP5, provided that the register_long_arrays setting is turned on in php.ini. (See Appendix A, "Installation/Configuration," for more detail.) Another method available to access these variables is via the register_globals setting in php.ini. In this method, each of the members that would otherwise go in the $_GET array becomes a global variable in PHP, meaning you can refer to our $postalcode example (though global is still required to access it from within functions or classes). There is a high likelihood of name collisions with your code, some of which are intentionalhackers might try to send data to your scripts that overwrites the values of your variables, creating security problems. Because of this and the relative lack of organization of doing things this way, register_globals is turned off by default in all versions of PHP, starting with 4.2.0. Throughout this book, we will work exclusively with the superglobal $_GET since it is the preferred method of doing things and is guaranteed to be supported in future versions of PHP. POST Form DataLike the $_GET super-global for GET form data, there is also a $_POST superglobal array for POST form data. It also has as its member data the values of the form data keyed by the names of the input elements. Our example snippet of code to print out the data submitted would be the same with the exception that all instances of $_GET would be replaced by $_POST. There is also the $HTTP_POST_VARS array (provided register_long_arrays is turned on in php.ini), which is not a superglobal and must be declared with the global keyword to be used within functions. Likewise, if register_globals is turned on in php.ini, the contents of this are also declared as global variables in PHP. However, we will stick with the $_POST array throughout this book. Character Sets and FormsOne of the concepts to which we have devoted a lot of attention (and will continue to) is that of character sets and what format strings are processed and sent between the client and server. As we saw in Chapter 6, "Strings and Characters of the World," although PHP5 basically supports the U.S. English character set internally (ISO-8859-1), we can have it manage UTF-8 strings by using the mbstring extension and paying attention to the functions we use. Another character set issue rears its head when we ask in which character set data is sent from client forms to the server. Now we have to worry about what happens when a user on a computer running a Russian operating system (ISO-8859-5 or koi8-r) tries to submit a form. At first glance, we might be pleased to find in various documentations that the HTML <form> element can include an attribute called accept-charset, which can be used to specify with which character set the form data is to be submitted. <form name="newUserForm" accept-charset="utf-8" method="post" action="accept_new_user.php"> Unfortunately, no web browsers seem to support this functionality, so we will have to temper our excitement and look for other solutions. In the end, most web browsers submit form data in the same format used for the form page. Many PHP programmers find that they can write appropriate character set conversion functions to correctly manage character sets that differ from ISO-8859-1 in their applications. Indeed, programmers browsing the PHP Online Manual will find that there are built-in functions to support some Hebrew strings, and various users have submitted code to help process input from other languages. While these systems correctly process data in the appropriate character sets, they typically break down as soon as you try to start using data or alphabets from further locales. Therefore, we will continue using the broadest character set possible, UTF-8. When we enabled the mbstring extension in Chapter 6, we specifically told it to use UTF-8 internally, which means that we would be creating additional work for ourselves if we tried to get too elaborate in our support for non-Unicode character sets. Furthermore, we do not have to do anything to make this happen. By marking the pages we send as being encoded in UTF-8, all of our form data is going to arrive in the correct format for us back at the server. An overwhelming majority of modern (and semi-modern) client software such as Microsoft Internet Explorer, Mozilla Firefox, and Apple's Safari correctly handle Unicode data, so we will not have to worry about clients not understanding what we send them. |
EAN: 2147483647
Pages: 255