Using the TReeView Control The treeView control is very similar to the Menu control. Like the Menu control, you can use the TReeView control to display hierarchical data. The TReeView control binds to any data source that implements the IHierarchicalDataSource or IHiearchicalEnumerable interface. In this section, you learn how to add items declaratively to the treeView control. You also learn how to bind a treeView control to hierarchical data sources such as the SiteMapDataSource and XmlDataSource controls. You also see how you can use the TReeView control with database data. A treeView is built programmatically from database data. Finally, you learn how you can use AJAX with the TReeView control to display large sets of data efficiently. By taking advantage of AJAX, you can update a treeView without posting a page back to the server. Declaratively Adding Tree Nodes A treeView control is made up of treeNode objects. You can build a treeView control by declaring treeNode objects in the treeView control's Items collection. For example, Listing 17.18 contains a treeView which renders a nested set of links to pages (see Figure 17.15). Listing 17.18. treeViewDeclare.aspx <%@ Page Language="VB" %> <!DOCTYPE html PUBLIC "-//W3C//DTD XHTML 1.1//EN" "http://www.w3.org/TR/xhtml11/DTD/xhtml11.dtd"> <html xmlns="http://www.w3.org/1999/xhtml" > <head runat="server"> <title>TreeView Declare</title> </head> <body> <form runat="server"> <div> <asp:TreeView Runat="server"> <Nodes> <asp:TreeNode Text="Home" NavigateUrl="~/Default.aspx"> <asp:TreeNode Text="Products"> <asp:TreeNode Text="First Product" NavigateUrl="~/Products/FirstProduct.aspx" /> <asp:TreeNode Text="Second Product" NavigateUrl="~/Products/SecondProduct.aspx" /> </asp:TreeNode> <asp:TreeNode Text="Services"> <asp:TreeNode Text="First Service" NavigateUrl="~/Services/FirstService.aspx" /> <asp:TreeNode Text="Second Service" NavigateUrl="~/Services/SecondService.aspx" /> </asp:TreeNode> </asp:TreeNode> </Nodes> </asp:TreeView> </div> </form> </body> </html>
|
Figure 17.15. Displaying a TReeView control. 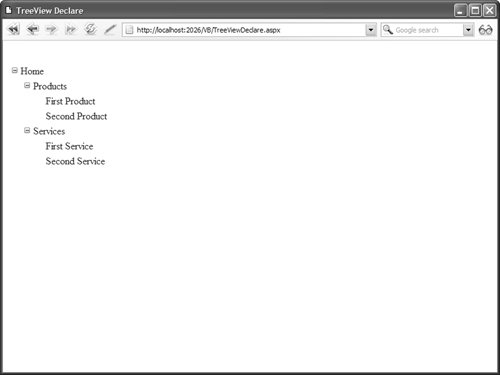
Some of the TReeNodes in Listing 17.18 include a Text property, and some of the TReeNodes include both a Text and NavigateUrl property. You can click the TReeNodes that include a NavigateUrl property to link to a new page. You also can associate a Value property with a treeNode. This is useful when you want to post back to the same page. For example, the page in Listing 17.19 enables you to display the value of the selected treeNode in a Label control (see Figure 17.16). Figure 17.16. Selecting a TReeView node. 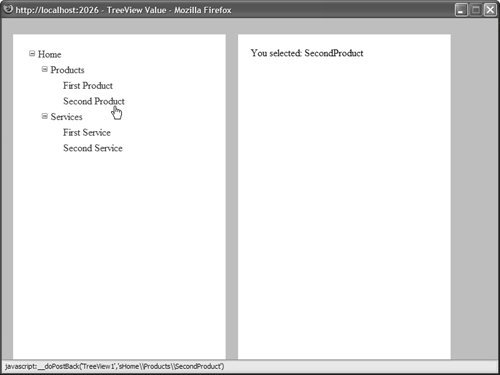
Listing 17.19. treeViewValue.aspx <%@ Page Language="VB" %> <!DOCTYPE html PUBLIC "-//W3C//DTD XHTML 1.1//EN" "http://www.w3.org/TR/xhtml11/DTD/xhtml11.dtd"> <script runat="server"> Protected Sub TreeView1_SelectedNodeChanged(ByVal sender As Object, ByVal e As EventArgs) lblMessage.Text = TreeView1.SelectedValue End Sub </script> <html xmlns="http://www.w3.org/1999/xhtml" > <head runat="server"> <style type="text/css"> html { background-color:silver; } .content { float:left; width:350px; height:500px; padding:20px; margin:10px; background-color:white; } </style> <title>TreeView Value</title> </head> <body> <form runat="server"> <div > <asp:TreeView OnSelectedNodeChanged="TreeView1_SelectedNodeChanged" Runat="server" > <Nodes> <asp:TreeNode Text="Home" Value="Home"> <asp:TreeNode Text="Products"> <asp:TreeNode Text="First Product" Value="FirstProduct" /> <asp:TreeNode Text="Second Product" Value="SecondProduct" /> </asp:TreeNode> <asp:TreeNode Text="Services"> <asp:TreeNode Text="First Service" Value="FirstService" /> <asp:TreeNode Text="Second Service" Value="SecondService" /> </asp:TreeNode> </asp:TreeNode> </Nodes> </asp:TreeView> </div> <div > You selected: <asp:Label EnableViewState="false" Runat="server" /> </div> </form> </body> </html>
|
Notice that the page in Listing 17.19 includes a SelectedNodeChanged event handler. When you select a new node, the SelectedNodeChanged event handler displays the value of the selected treeNode in a Label control. Displaying Check Boxes with the treeView Control You can display check boxes next to each node in a treeView control by assigning a value to the ShowCheckBoxes property. This property accepts the following values: You can use a bitwise combination of these values when specifying the nodes to display with check boxes. The page in Listing 17.20 illustrates the ShowCheckBoxes property (see Figure 17.17). Figure 17.17. Displaying TReeView check boxes. 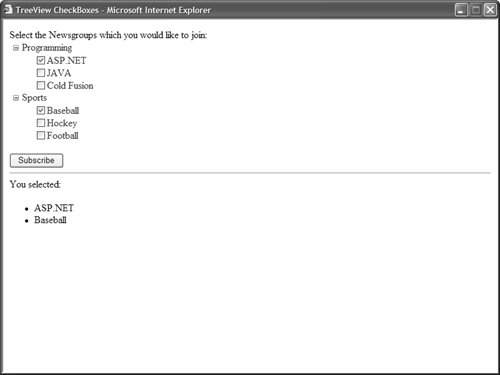
Listing 17.20. treeViewCheckBoxes.aspx <%@ Page Language="VB" %> <!DOCTYPE html PUBLIC "-//W3C//DTD XHTML 1.1//EN" "http://www.w3.org/TR/xhtml11/DTD/xhtml11.dtd"> <script runat="server"> Protected Sub btnSubscribe_Click(ByVal sender As Object, ByVal e As EventArgs) For Each node As TreeNode In TreeView1.CheckedNodes bltSubscribed.Items.Add(node.Text) Next End Sub </script> <html xmlns="http://www.w3.org/1999/xhtml" > <head runat="server"> <title>TreeView CheckBoxes</title> </head> <body> <form runat="server"> <div> Select the Newsgroups which you would like to join: <br /> <asp:TreeView ShowCheckBoxes="Leaf" Runat="server"> <Nodes> <asp:TreeNode Text="Programming"> <asp:TreeNode Text="ASP.NET" /> <asp:TreeNode Text="JAVA" /> <asp:TreeNode Text="Cold Fusion" /> </asp:TreeNode> <asp:TreeNode Text="Sports"> <asp:TreeNode Text="Baseball" /> <asp:TreeNode Text="Hockey" /> <asp:TreeNode Text="Football" /> </asp:TreeNode> </Nodes> </asp:TreeView> <br /> <asp:Button Text="Subscribe" OnClick="btnSubscribe_Click" Runat="server" /> <hr /> You selected: <asp:BulletedList EnableViewState="false" Runat="server" /> </div> </form> </body> </html>
|
The page in Listing 17.20 displays nested newsgroups. You can subscribe to the newsgroups by clicking the Subscribe button. When you click the Subscribe button, the CheckedNodes property is used to return a list of all of the checked treeNodes. This list is displayed in a BulletedList control. Binding to a Site Map You can use a treeView control as a navigation element in your pages by binding the treeView to a Site Map. The page in Listing 17.21 demonstrates how you can bind a treeView to a SiteMapDataSource control (see Figure 17.18). Figure 17.18. Displaying a Site Map with a treeView control. 
Listing 17.21. UsingTreeView/TreeViewSiteMap.aspx <%@ Page Language="VB" %> <!DOCTYPE html PUBLIC "-//W3C//DTD XHTML 1.1//EN" "http://www.w3.org/TR/xhtml11/DTD/xhtml11.dtd"> <html xmlns="http://www.w3.org/1999/xhtml" > <head runat="server"> <title>TreeView Site Map</title> </head> <body> <form runat="server"> <div> <asp:TreeView DataSource Runat="server" /> <asp:SiteMapDataSource Runat="server" /> </div> </form> </body> </html>
|
When you open the page in Listing 17.21, all the nodes from the Site Map are displayed automatically in the treeView control. By default, the SiteMapDataSource uses the XmlSiteMapProvider, which represents a file named Web.sitemap located at the root of an application. Note You can add a TReeView and SiteMapDataSource control to a Master Page to show the treeView in multiple pages. To learn more about Master Pages, see Chapter 5, "Designing Websites with Master Pages."
Binding to an XML File Because an XmlDataSource control returns hierarchical data, you can bind a treeView directly to an XmlDataSource. For example, imagine that you need to display the XML document contained in Listing 17.22. Listing 17.22. Movies.xml <?xml version="1.0" encoding="utf-8" ?> <movies> <action> <StarWars /> <IndependenceDay /> </action> <horror> <Jaws /> <NightmareBeforeChristmas /> </horror> </movies>
|
The page in Listing 17.23 illustrates how you can display the contents of this XML document with a TReeView control. Listing 17.23. treeViewXml.aspx <%@ Page Language="VB" %> <!DOCTYPE html PUBLIC "-//W3C//DTD XHTML 1.1//EN" "http://www.w3.org/TR/xhtml11/DTD/xhtml11.dtd"> <html xmlns="http://www.w3.org/1999/xhtml" > <head runat="server"> <title>TreeView XML</title> </head> <body> <form runat="server"> <div> <asp:TreeView DataSource Runat="server" /> <asp:XmlDataSource DataFile="~/Movies.xml" Runat="server" /> </div> </form> </body> </html>
|
The Movies.xml document in Listing 17.22 is extremely simple. The elements do not include any attributes. You can display more complicated XML documents with the treeView control by declaring one or more treeNodeBinding elements. For example, the nodes in the XML document in Listing 17.24 include id and text attributes. Listing 17.24. MoviesComplex.xml <?xml version="1.0" encoding="utf-8" ?> <movies> <category text="Action"> <movie text="Star Wars" /> <movie text="Independence Day" /> </category> <category text="Horror"> <movie text="Jaws" /> <movie text="Nightmare Before Christmas" /> </category> </movies>
|
The page in Listing 17.25 displays the contents of the XML document in Listing 17.24. Listing 17.25. treeViewXMLComplex.aspx <%@ Page Language="VB" %> <!DOCTYPE html PUBLIC "-//W3C//DTD XHTML 1.1//EN" "http://www.w3.org/TR/xhtml11/DTD/xhtml11.dtd"> <html xmlns="http://www.w3.org/1999/xhtml" > <head runat="server"> <title>TreeView XML Complex</title> </head> <body> <form runat="server"> <div> <asp:TreeView DataSource Runat="server"> <DataBindings> <asp:TreeNodeBinding DataMember="category" TextField="text" ValueField="id" /> <asp:TreeNodeBinding DataMember="movie" TextField="text" ValueField="id" /> </DataBindings> </asp:TreeView> <asp:XmlDataSource DataFile="~/MoviesComplex.xml" Runat="server" /> </div> </form> </body> </html>
|
The treeView in Listing 17.25 includes a DataBindings subtag. This tag includes two TReeNodeBinding elements. The first TReeNodeBinding specifies the relationship between <category> nodes in the XML document and treeView nodes. The second treeNodeBinding specifies the relationship between <movie> nodes and treeView nodes. Binding to Database Data You cannot bind a treeView control directly to a SqlDataSource or ObjectDataSource control because neither of these two controls expose hierarchical data. If you want to display database data with the TReeView control then you have a choice: create a custom SqlHierarchicalDataSource control or programmatically bind the treeView to the database data. The hard option is to build a SQL hierarchical DataSource control. You can do this by deriving a new control from the base HierarchicalDataSourceControl class or by implementing the IHierarchicalDataSource interface. We explore this option in the final section of this chapter. The second option is to build the treeView control programmatically from a set of database records. This is the approach that we will follow in this section. Imagine that you have a database table that looks like this: MessageId | ParentId | Subject |
|---|
1 | null | How do you use the Menu control? | 2 | null | What is the TReeView control? | 3 | 1 | RE:How do you use the Menu control? | 4 | 1 | RE:How do you use the Menu control? | 5 | 2 | RE:What is the TReeView control? | 6 | 5 | RE:RE:What is the TReeView control? |
This database table represents a discussion forum. The relationship between the messages is determined by the ParentId column. The messages that have a null ParentID represent the threads, and the other messages represent replies to the threads. The page in Listing 17.26 uses a treeView control to display the contents of the Discuss database table (see Figure 17.19). Figure 17.19. Displaying database data with a treeView control. 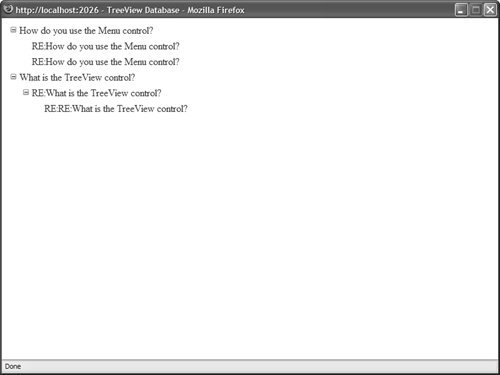
Listing 17.26. treeViewDatabase.aspx The page in Listing 17.26 filters the contents of the Discuss database table by its ParentID column. First, the top-level nodes are added to the treeView. Next, the child nodes are recursively added to the treeView with the help of the AddChildTreeViewNodes() method. Using Populate On Demand and AJAX You can use the treeView control even when working with a large set of data. For example, the Microsoft MSDN website (msdn.Microsoft.com) has links to thousands of articles. This website uses a tree view to display the nested links to the articles. Because thousands of articles are hosted at the MSDN website, not all the tree nodes are downloaded to the browser when you open a page. Instead, additional nodes are downloaded to your browser only when you expand a particular node. You can use a feature named Populate On Demand with the treeView control. When you enable the PopulateOnDemand property for a Tree node, child nodes are not added to the parent node until the parent node is expanded. For example, the page in Listing 17.27 contains an infinitely expanding TReeView. Each time you expand a Tree node, five new child nodes are displayed. Each time you expand a child node, five more child nodes are displayed, and so on (see Figure 17.20). Figure 17.20. An infinitely expanding TReeView control. 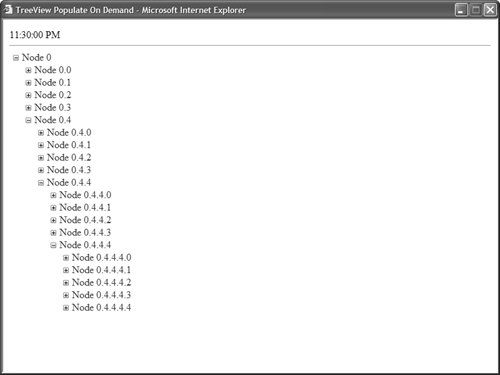
Listing 17.27. treeViewPopulateOnDemand.aspx <%@ Page Language="VB" %> <!DOCTYPE html PUBLIC "-//W3C//DTD XHTML 1.1//EN" "http://www.w3.org/TR/xhtml11/DTD/xhtml11.dtd"> <script runat="server"> Private Sub TreeView1_TreeNodePopulate(ByVal s As Object, ByVal e As TreeNodeEventArgs) For i As Integer = 0 To 4 Dim NewNode As New TreeNode() NewNode.Text = String.Format("{0}.{1}", e.Node.Text, i) NewNode.PopulateOnDemand = True e.Node.ChildNodes.Add(NewNode) Next End Sub </script> <html xmlns="http://www.w3.org/1999/xhtml" > <head runat="server"> <title>TreeView Populate On Demand</title> </head> <body> <form runat="server"> <div> <%=DateTime.Now.ToString("T") %> <hr /> <asp:TreeView ExpandDepth="0" OnTreeNodePopulate="TreeView1_TreeNodePopulate" Runat="server"> <Nodes> <asp:TreeNode PopulateOnDemand="true" Text="Node 0" /> </Nodes> </asp:TreeView> </div> </form> </body> </html>
|
The treeView in Listing 17.27 includes a single statically declared treeNode. Notice that this TReeNode includes a PopulateOnDemand property that is set to the value TRue. Additionally, the treeView control itself includes a treeNodePopulate event handler. When you expand a treeNode that has its PopulateOnDemand property enabled, the TReeNodePopulate event handler executes. In the case of Listing 17.27, the event handler adds five new treeNodes to the treeNode that was expanded. When you use the Populate On Demand feature with a modern browser (Internet Explorer 6, Firefox 1, Opera 8), the page containing the treeView is not posted back to the server when you expand a TReeNode. Instead, the browser uses AJAX (Asynchronous JavaScript and XML) to communicate with the web server. The additional treeNodes are retrieved from the server, without performing a postback. The page in Listing 17.27 displays the current time when you open the page. Notice that the time is not updated when you expand a particular TreeNode. The time is not updated because the only content in the page that is updated when you expand a node is the treeView content. AJAX can have a dramatic impact on performance because it does not require the entire page to be re-rendered each time you expand a treeNode. Note If, for some reason, you don't want to use AJAX with Populate On Demand, you can assign the value False to the treeView control's PopulateNodesFromClient property.
The page in Listing 17.28 contains a more realistic sample of using Populate On Demand and AJAX. This page uses a treeView control to display the contents of the Discuss database table (see Figure 17.21). Figure 17.21. Displaying database data with AJAX. 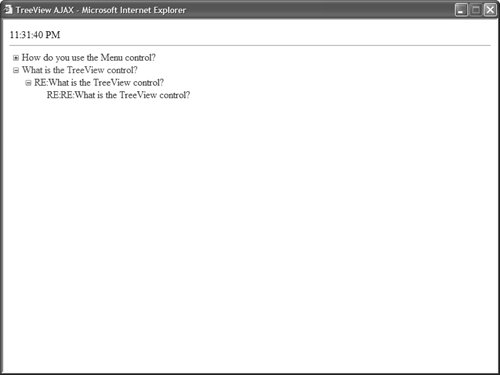
Listing 17.28. TreeViewAJAX.aspx| [View full width] <%@ Page Language="VB" %> <%@ Import Namespace="System.Web.Configuration" %> <%@ Import Namespace="System.Data" %> <%@ Import Namespace="System.Data.SqlClient" %> <!DOCTYPE html PUBLIC "-//W3C//DTD XHTML 1.1//EN" "http://www.w3.org/TR/xhtml11/DTD/xhtml11.dtd"> <script runat="server"> ''' <summary> ''' Only populate the TreeView when the page first loads ''' </summary> Private Sub Page_Load() If Not Page.IsPostBack Then PopulateTopNodes() End If End Sub ''' <summary> ''' Get the top-level nodes (nodes with a null ParentId) ''' </summary> Private Sub PopulateTopNodes() Dim selectCommand As String = "SELECT MessageId,ParentId,Subject FROM Discuss  WHERE ParentId IS NULL" Dim conString As String = WebConfigurationManager.ConnectionStrings("Discuss") .ConnectionString Dim dad As New SqlDataAdapter(selectCommand, conString) Dim dtblMessages As New DataTable() dad.Fill(dtblMessages) For Each row As DataRow In dtblMessages.Rows Dim NewNode As New TreeNode(row("Subject").ToString(), row("MessageId") .ToString()) NewNode.PopulateOnDemand = True TreeView1.Nodes.Add(NewNode) Next End Sub ''' <summary> ''' Get the child nodes of the expanded node ''' </summary> Protected Sub TreeView1_TreeNodePopulate(ByVal sender As Object, ByVal e As TreeNodeEventArgs) Dim selectCommand As String = "SELECT MessageId,ParentId,Subject FROM Discuss WHERE ParentId=@ParentId" Dim conString As String = WebConfigurationManager.ConnectionStrings("Discuss") .ConnectionString Dim dad As New SqlDataAdapter(selectCommand, conString) dad.SelectCommand.Parameters.AddWithValue("@ParentId", e.Node.Value) Dim dtblMessages As New DataTable() dad.Fill(dtblMessages) For Each row As DataRow In dtblMessages.Rows Dim NewNode As New TreeNode(row("Subject").ToString(), row("MessageId") .ToString()) NewNode.PopulateOnDemand = True e.Node.ChildNodes.Add(NewNode) Next End Sub </script> <html xmlns="http://www.w3.org/1999/xhtml" > <head runat="server"> <style type="text/css"> </style> <title>TreeView AJAX</title> </head> <body> <form runat="server"> <div> <%= DateTime.Now.ToString("T") %> <hr /> <asp:TreeView ExpandDepth="0" OnTreeNodePopulate="TreeView1_TreeNodePopulate" Runat="server" /> </div> </form> </body> </html> WHERE ParentId IS NULL" Dim conString As String = WebConfigurationManager.ConnectionStrings("Discuss") .ConnectionString Dim dad As New SqlDataAdapter(selectCommand, conString) Dim dtblMessages As New DataTable() dad.Fill(dtblMessages) For Each row As DataRow In dtblMessages.Rows Dim NewNode As New TreeNode(row("Subject").ToString(), row("MessageId") .ToString()) NewNode.PopulateOnDemand = True TreeView1.Nodes.Add(NewNode) Next End Sub ''' <summary> ''' Get the child nodes of the expanded node ''' </summary> Protected Sub TreeView1_TreeNodePopulate(ByVal sender As Object, ByVal e As TreeNodeEventArgs) Dim selectCommand As String = "SELECT MessageId,ParentId,Subject FROM Discuss WHERE ParentId=@ParentId" Dim conString As String = WebConfigurationManager.ConnectionStrings("Discuss") .ConnectionString Dim dad As New SqlDataAdapter(selectCommand, conString) dad.SelectCommand.Parameters.AddWithValue("@ParentId", e.Node.Value) Dim dtblMessages As New DataTable() dad.Fill(dtblMessages) For Each row As DataRow In dtblMessages.Rows Dim NewNode As New TreeNode(row("Subject").ToString(), row("MessageId") .ToString()) NewNode.PopulateOnDemand = True e.Node.ChildNodes.Add(NewNode) Next End Sub </script> <html xmlns="http://www.w3.org/1999/xhtml" > <head runat="server"> <style type="text/css"> </style> <title>TreeView AJAX</title> </head> <body> <form runat="server"> <div> <%= DateTime.Now.ToString("T") %> <hr /> <asp:TreeView ExpandDepth="0" OnTreeNodePopulate="TreeView1_TreeNodePopulate" Runat="server" /> </div> </form> </body> </html>
|
When the page in Listing 17.28 first opens, only the first-level message subjects are displayed. These messages are retrieved by the PopulateTopNodes() method. When you expand a thread, the matching replies are retrieved for the thread. These replies are retrieved in the TReeView1_TreeNodePopulate() event handler. The treeView in Listing 17.28 performs well even when working with a large set of data. At any time, only the child messages of a message are retrieved from the database. At no time are all the messages retrieved from the database. When the page is used with a modern browser, AJAX is used to retrieve the messages from the web server. The page does not need to be posted back to the web server when you expand a particular message thread. Formatting the treeView Control The TReeView control supports an abundance of properties that have an effect on how the TReeView is formatted. Here are some of the more useful properties of a treeView control, which modify its appearance (this is not a complete list): CollapseImageToolTip Enables you to specify the title attribute for the collapse image. CollapseImageUrl Enables you to specify a URL to an image for the collapse image. ExpandDepth Enables you to specify the number of treeNode levels to display initially. ExpandImageToolTip Enables you to specify the title attribute for the expand image. ExpandImageUrl Enables you to specify the URL to an image for the expand image. ImageSet Enables you to specify a set of images to use with the treeView control. LineImagesFolder Enables you to specify a folder that contains line images. MaxDataBindDepth Enables you to specify the maximum levels of treeView levels to display when binding to a data source. NodeIndent Enables you to specify the number of pixels to indent a child Tree node. NodeWrap Enables you to specify whether or not text is wrapped in a Tree node. NoExpandImageUrl Enables you to specify the URL to an image for the NoExpand image (typically, an invisible spacer image). ShowCheckBoxes Enables you to display check boxes next to each Tree node. Possible values are All, Leaf, None, Parent, and Root. ShowExpandCollapse Enables you to disable the expand and collapse icons that appear next to each expandable node. ShowLines Enables you to show connecting lines between Tree nodes. SkipLinkText Enables you to specify the text used for skipping the contents of the treeView control. (The Skip Link contains hidden text that is accessible only to users of assistive devices.) Target Enables you to specify the name of the window that opens when you navigate to a URL with the treeView control.
The two most interesting properties in this list are the ImageSet and the ShowLines properties. You can set the ImageSet property to any of the following values to modify the images displayed by the treeView control: Arrows BulletedList BulletedList2 BulletedList3 BulletedList4 Contacts Custom Events Faq Inbox Msdn News Simple Simple2 WindowsHelp XPFileExplorer
The ShowLines property causes connecting line images to be rendered between treeView nodes. Displaying lines between Tree nodes can make it easier to visually discern the nested relationships between nodes. If you want to create custom lines, you can specify a value for the LinesImagesFolder property. Visual Web Developer Note Visual Web Developer includes a treeView Line Image Generator that enables you to create custom connecting lines. You can open this tool in Design view by selecting the treeView control and opening the Tasks dialog box and selecting Customize Line Images.
The page in Listing 17.29 illustrates how to use both the ImageSet and ShowLines properties (see Figure 17.22). Figure 17.22. Formatting a treeView with an image set and lines. 
Listing 17.29. treeViewImageSet.aspx <%@ Page Language="VB" %> <!DOCTYPE html PUBLIC "-//W3C//DTD XHTML 1.1//EN" "http://www.w3.org/TR/xhtml11/DTD/xhtml11.dtd"> <html xmlns="http://www.w3.org/1999/xhtml" > <head runat="server"> <title>TreeView ImageSet</title> </head> <body> <form runat="server"> <div> <asp:TreeView ImageSet="XPFileExplorer" ShowLines="true" Runat="server"> <Nodes> <asp:TreeNode Text="Home"> <asp:TreeNode Text="Products"> <asp:TreeNode Text="First Product" /> <asp:TreeNode Text="Second Product" /> </asp:TreeNode> <asp:TreeNode Text="Services"> <asp:TreeNode Text="First Service" /> <asp:TreeNode Text="Second Service" /> </asp:TreeNode> </asp:TreeNode> </Nodes> </asp:TreeView> </div> </form> </body> </html>
|
The TReeNode object itself also supports several properties that have an effect on the appearance of its containing treeView. Here is a list of the most useful properties of the treeNode object: Checked Enables you to check the check box that appears next to the Tree node. Expanded Enables you to initially expand a node. ImageToolTip Enables you to associate alt text with a Tree node image. ImageUrl Enables you to specify an image that appears next to a Tree node. NavigateUrl Enables you to specify the URL to which the current Tree node links. SelectAction Enables you to specify the action that occurs when you click a Tree node. Possible values are Expand, None, Select, or SelectExpand. Selected Enables you to specify whether the current Tree node is selected. ShowCheckBox Enables you to display a check box for the current Tree node. Target Enables you to specify the name of the window that opens when you navigate to a URL. ToolTip Enables you to specify a title attribute for the current Tree node.
You can style the treeView control by attaching Cascading Style Sheet classes to the Style object exposed by the treeView control. The TReeView control supports the following Style objects: HoverNodeStyle Style applied to a Tree node when you hover your mouse over a node. LeafNodeStyle Style applied to leaf Tree nodes (Tree nodes without child nodes). NodeStyle Style applied to Tree nodes by default. ParentNodeStyle Style applied to parent nodes (Tree nodes with child nodes). RootNodeStyle Style applied to root nodes (Tree nodes with no parent nodes). SelectedNodeStyle Style applied to the selected node.
For example, the page in Listing 17.30 uses several of these Style objects to format a treeView control (see Figure 17.23). Figure 17.23. Using Styles with the TReeView control. 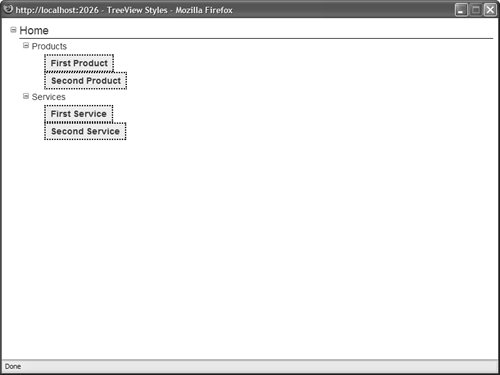
Listing 17.30. treeViewStyles.aspx <%@ Page Language="VB" %> <!DOCTYPE html PUBLIC "-//W3C//DTD XHTML 1.1//EN" "http://www.w3.org/TR/xhtml11/DTD/xhtml11.dtd"> <html xmlns="http://www.w3.org/1999/xhtml" > <head runat="server"> <style type="text/css"> .treeNode { color:blue; font:14px Arial, Sans-Serif; } .rootNode { font-size:18px; width:100%; border-bottom:Solid 1px black; } .leafNode { border:Dotted 2px black; padding:4px; background-color:#eeeeee; font-weight:bold; } </style> <title>TreeView Styles</title> </head> <body> <form runat="server"> <div> <asp:TreeView NodeStyle-Css RootNodeStyle-Css LeafNodeStyle-Css Runat="server"> <Nodes> <asp:TreeNode Text="Home"> <asp:TreeNode Text="Products"> <asp:TreeNode Text="First Product" /> <asp:TreeNode Text="Second Product" /> </asp:TreeNode> <asp:TreeNode Text="Services"> <asp:TreeNode Text="First Service" /> <asp:TreeNode Text="Second Service" /> </asp:TreeNode> </asp:TreeNode> </Nodes> </asp:TreeView> </div> </form> </body> </html>
|
Furthermore, you can apply styles to particular Tree node levels by taking advantage of the treeView control's LevelStyles property. The page in Listing 17.31 uses the LevelStyles property to format first level nodes differently than second level nodes and third level nodes (see Figure 17.24). Figure 17.24. Applying styles to different treeView node levels. 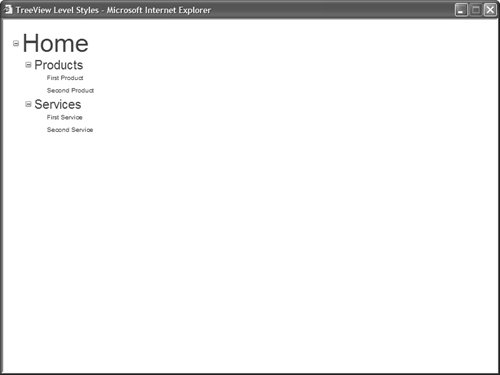
Listing 17.31. TReeViewLevelStyles.aspx <%@ Page Language="VB" %> <!DOCTYPE html PUBLIC "-//W3C//DTD XHTML 1.1//EN" "http://www.w3.org/TR/xhtml11/DTD/xhtml11.dtd"> <html xmlns="http://www.w3.org/1999/xhtml" > <head runat="server"> <style type="text/css"> .nodeLevel1 { font:40px Arial,Sans-Serif; } .nodeLevel2 { font:20px Arial,Sans-Serif; } .nodeLevel3 { font:10px Arial,Sans-Serif; } </style> <title>TreeView Level Styles</title> </head> <body> <form runat="server"> <div> <asp:TreeView Runat="server"> <LevelStyles> <asp:TreeNodeStyle Css /> <asp:TreeNodeStyle Css /> <asp:TreeNodeStyle Css /> </LevelStyles> <Nodes> <asp:TreeNode Text="Home"> <asp:TreeNode Text="Products"> <asp:TreeNode Text="First Product" /> <asp:TreeNode Text="Second Product" /> </asp:TreeNode> <asp:TreeNode Text="Services"> <asp:TreeNode Text="First Service" /> <asp:TreeNode Text="Second Service" /> </asp:TreeNode> </asp:TreeNode> </Nodes> </asp:TreeView> </div> </form> </body> </html>
|
|